Introducción

Sigue esta guía para actualizar el disco duro de tu iMAc con un SSD. Incluye los pasos para instalar el sensor de temperatura para que los ventiladores del Mac operen a la velocidad correcta.

Guía de prerequisito solamente. Actualización del SSD con sensor de temperatura para iMacs de mediados de 2011.

  1. yw5L1XBSIoaFP2lJ
    yw5L1XBSIoaFP2lJ
    IfEYLXa1PVVgeHNR
    EGASiwaQRDU6G5sH
    • Sigue solo los siguientes 9 pasos si estás reemplazando tu disco duro con un kit SSD.

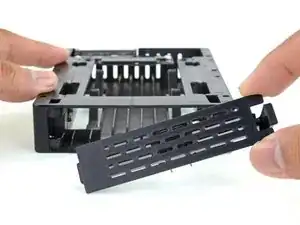
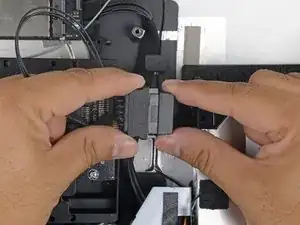
    • Empuja el pestillo de la placa delantera de la carcasa con tu dedo. Mientras sujetas el pestillo pulsado, saca la placa hacia fuera.

    • Quita la placa delantera.

  2. pUBuOR5jObRKcgTb
    pUBuOR5jObRKcgTb
    UOsa4yARWVQWPRf3
    wh1n1HnGSGhYLwfL
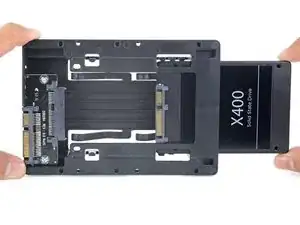
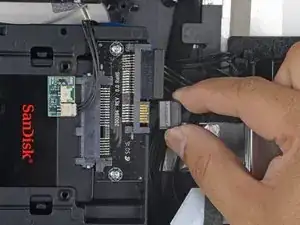
    • Alinea los pequeños conectores SATA para que el lado estrecho del conector en el SSD coincida con el lado estrecho en el conector del receptáculo.

    • Desliza la unidad hacia dentro a través del frontal del receptáculo hasta que el conector SATA quede totalmente dentro.

    • El SSD encaja en el receptáculo solo de una manera. Si los conectores no están alineados, rota el SSD e inténtalo de nuevo.

  3. JZJDQW2yqV5NdNB1
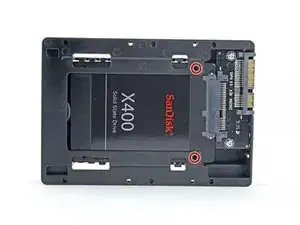
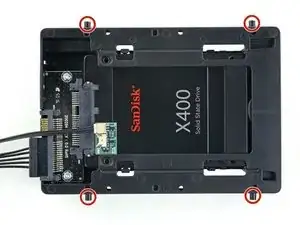
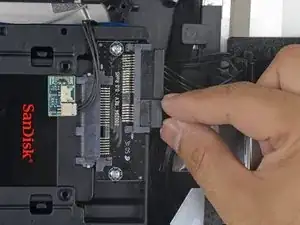
    • Puedes, opcionalmente, instalar dos tornillos Philips #1 que vienen en el kit del receptáculo para fijar el SSD en dicho receptáculo.

  4. SDBAUhNKT3OSAyfF
    SDBAUhNKT3OSAyfF
    3HUjNBmicf1qPBYx
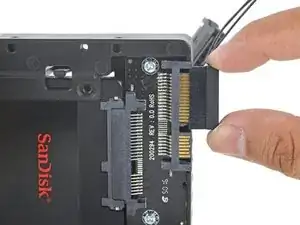
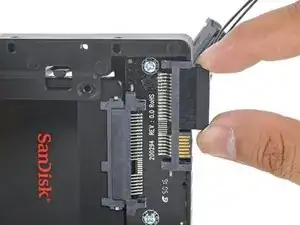
    • Enchufa el cable de energía SATA con sensor en el lado ancho del conector SATA del receptáculo.

    • El cable está diseñado para conectarse solo de una manera posible. Si no puedes conectarlo, rótalo 180º, e inténtalo de nuevo.

  5. Ru3qyqBMjGB6UWVZ
    Ru3qyqBMjGB6UWVZ
    IS51nDDgPwe4d6RK
    SCrDWXZHLJ2ByScQ
    • Despega el reverso del adhesivo de la pequeña placa del sensor de temperatura.

    • Adhiere la placa del sensor de temperatura a un área de metal despejada en la superficie del SSD, tan cerca como sea posible del conector SATA.

    • Dobla el sobrante de los hilos del sensor de temperatura para que no queden en medio cuando instales el receptáculo.

  6. MieR2EENoSvidD3M
    • Instala los pines de montaje desde el disco duro antiguo en los lados del receptáculo.

    • Los agujeros en el receptáculo quizá no tengan roscas, así que atornillarlos puede que requiere un esfuerzo adicional. Tómate tu tiempo y atorníllalos despacio, asegurándote de que entran rectos.

    The technique used when tapping holes with a thread tap can make this much easier:

    After getting about one and a half threads started back the pin or screw out about 1/4 turn, then turn in again 1-1/2 or 2 turns then back 1/4 turn again. Repeat this three steps in -one step back until its all the way in. This technique lets the “chips” clear from in front of the first thread making it much easier to cut the new threads.

    John -

    The photo shows 4 of these, but to original hard drive only had 2…what to do now?

    jinnifer douglass -

    Go ahead and transfer the two posts to the new drive.

    Arthur Shi -

  7. yW2yna6Htkhbyux2
    yW2yna6Htkhbyux2
    fIVXoXRcYu1GZcOV
    • Coloca cualquier soporte de montaje que quitaras del disco antiguo en el receptáculo.

  8. r2tu3rVXPuRJdTUX
    r2tu3rVXPuRJdTUX
    NHlPykOInaa66Zdx
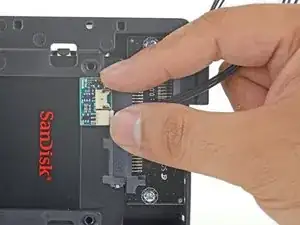
    • Conecta el cable de energía SATA del iMac con el nuevo cable de energía SATA con capacidad de temperatura.

    • Guía los los cables SATA por donde no interieran con ningún otro componente.

  9. rKBoMCVNbvKPlEgt
    rKBoMCVNbvKPlEgt
    tMgaCqaMgUTZVFgY
    • Conecta el cable de datos SATA del iMac con el conector de datos SATA del receptáculo.

    Do you have a photo of how you arranged the wires? The hand in the photo is the way. I’m having trouble making space for the Sata cable

    Silvia Llopis -

    Unfortunately I don’t have additional photos. I understand your issue; the cabling was hard to fit. I ended up bending and carefully folding it so that it didn’t catch anything. Try to find room where it won’t be pinched.

    Arthur Shi -

    i thought everything was good, but i just turned on my imac to install the OS and it’s not seeing my new ssd. i’m trying to install the os using a bootable usb and the dialogue asking me to select a drive pops up, but my new ssd wasn’t on the list! Do you think my SATA cables are pinched? What can it be? i guess i’ll just have to open it and inspect all connections?

    Silvia Llopis -

    lol nevermind i just didn’t realize I had to format the new drive *face palm*

    Silvia Llopis -

    Anyone faced the problem of the “Grey Blinking Question Mark Folder” after this upgrade? I followed all the steps:

    - Tried to reset SMC and NVRAM

    - Formatted the SSD using Disk Utility

    - Tried to reinstall MacOS High Sierra from scratch via recovery mode

    The problem usually comes when the computer goes to sleep, and never comes back alive. When I shut it down and start it up again, the blinking folder came back. Can’t seem to find any other solutions.

    Raynor GAN -

    Mine does not reconize the new SSD - what did I do wrong?

    bennie9922 -

    I was not able to organize the wires in a way to get enclosure to screw into bracket. So basically its just sitting in there, i was able to attach all the wires and everyting, i just didnt screw it back in.

    I was actually able to screw in box to the bracket, but when i tried to put the computer screen back on, it was not able to flatten out so i couldnt put case back on. So i just left it unscrewed and didnt use the bracket…

    Computers still working after a month or so.

    jacob d -

    The internal SATA cable housing is configured with an "L" shaped form used to orient the proper insertion of the cable connector pins. The SATA cable installed in the 2011 iMAC 27" is blocky a pin placed at in the position for the "L". The pin will not allow coupling of a replacement SSD thermal cable adapter unless it is removed.

    Can it be removed without damage, allowing for operation of the drive? Or should it be replaced by a new internal SATA cable?

    JB-Nov 2022

    Jerome Boyd -

Conclusión

Para reensamblar tu dispositivo, sigue estas instrucciones en orden inverso.

Arthur Shi

Miembro Desde 03/01/18

219093 Reputación

0 comentarios