
Introducción
Mientras que a algunas personas les gusta la función tocar para hacer clic del Magic Trackpad, otros usuarios, como yo, prefieren un clic que podamos sentir. Después de meses de uso, a veces el trackpad se atasca y ya no hace clic en un lado o en el otro. Esta guía de reparación hará que tu Magic Trackpad vuelva a hacer clic en menos de 5 minutos.
Herramientas
-
-
Saca tu Magic Trackpad y prepárate para arreglarlo.
-
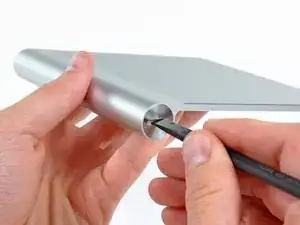
Desenrosca la tapa de la batería girando el tornillo en sentido contrario a las agujas del reloj con un destornillador de punta plana, una moneda, una herramienta de apertura de plástico o una uña.
-
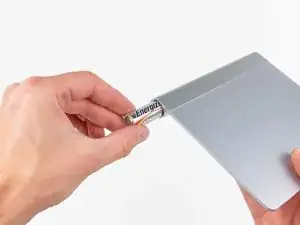
Retira las baterías para evitar cortocircuitos mientras reparas tu Magic Trackpad.
-
-
-
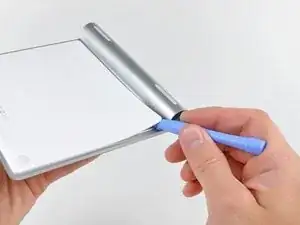
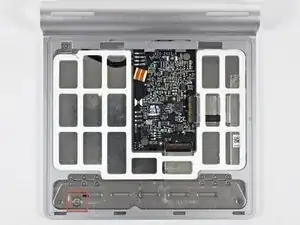
Utiliza una herramienta de apertura de plástico para separar el adhesivo que sujeta los bordes izquierdo, derecho y superior del panel posterior.
-
Después de cortar todo el adhesivo, el panel inferior se levanta de inmediato.
-
-
-
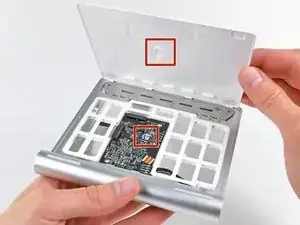
Usa una broca Torx T-6 o T-7 para ajustar el apriete del pequeño tornillo resaltado en rojo en la esquina inferior izquierda del dispositivo (de arriba hacia abajo).
-
Si el clic derecho funciona pero el clic izquierdo no, deberás girar el tornillo en el sentido de las agujas del reloj.
-
Nota: los clics derecho e izquierdo están determinados por la parte superior del panel táctil, no por la vista desde la parte inferior a medida que ajustas el tornillo.
-
Si no funcionan ni el clic derecho ni el clic izquierdo, gíralo en el sentido contrario a las agujas del reloj si no hay ningún movimiento, y en el sentido de las agujas del reloj si hay movimiento pero es demasiado suave para hacer clic.
-
-
-
Invierte los pasos para volver a colocar el plástico en la parte inferior del Magic Trackpad.
-
¡Tu Magic Trackpad debe estar tan bueno y nuevo y listo para usar!
-
Para volver a armar tu dispositivo, sigue estas instrucciones en orden inverso.
77 comentarios
DO NOT DO THIS! My trackpad had the central chip glued STRONGLY to the plastic piece. Pulling off the plastic plate ripped the chip right off. My trackpad is now completely dead. I repeat: DO NOT DO THIS FIX! Your trackpad might not be glued, but I have ruined this thing.
Chris, I just did the same thing to mine and had the same result. I wish I'd read your warning first! Perhaps some heat at the center of the plastic backing would have helped release the adhesive from the chip/backing.
To anyone attempting this fix, if you feel anything in the center of the plastic back cover sticking, do not force it off. It might be possible to get a blade in there to slice through the adhesive, but it really didn't take much force at all for the chip to break free of the circuit board.
David -
I have updated the guide with your warning. I would recommend in the future not pulling anythng apart that could cause ripping. You'll notice the original instructions recommending cutting through the glue, not ripping it apart. Those recommendations were from a breakdown guide and have worked for multiple users. I myself have repaired trackpads 3-4 times following the above instructions.
I have also updated the difficulty to moderate from easy.
Before dismantling, it’s worth checking for sticky crud around the two rubber feet on the front bottom of the trackpad. Those feet are the buttons and they can get gunked up and stick.
Shaun Crampton -