Introducción

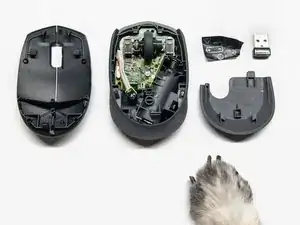
Te presentamos un resumen sobre cómo puedes abrir la carcasa externa sin tornillos del M170. Éste es el primer paso que tendrás que seguir para arreglar cualquier desperfecto de los componentes internos del ratón.

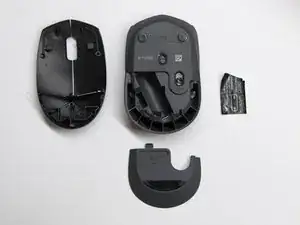
Este ratón no sujeta su carcasa mediante tornillos. En esta guía, verás dónde se encuentran las 3 sujeciones y los 2 enganches que mantienen la parte superior de la carcasa en su sitio.

Herramientas

  1. jcWZWsk3ZPdOIgVg
    • Apaga el ratón y desliza la tapa inferior de la parte trasera del mismo. Aquí es donde están todas las sujeciones a las que necesitas acceder.

  2. Zr5UU2VWQQdLOV5U
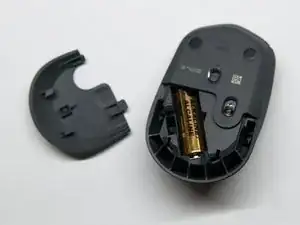
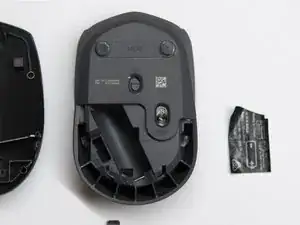
    • Quita la batería y el adhesivo. Hay un total de 3 sujeciones que necesitan soltarse. Dos de ellas están justo en los laterales. La tercera se encuentra debajo del adhesivo en la cavidad de la batería. Logitech suele emplear este método de tapado de puntos de anclaje en otros ratones inalámbricos.

    • Puede que necesites unas pinzas para separar el adhesivo más fácilmente.

    • Liberaremos las sujeciones en el siguiente paso.

  3. kVSUuUXQHWOhIldB
    kVSUuUXQHWOhIldB
    NUqGwrxALSQXKoko
    LboaqfV4hqLIBEYx
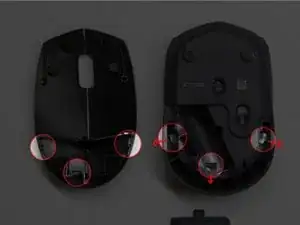
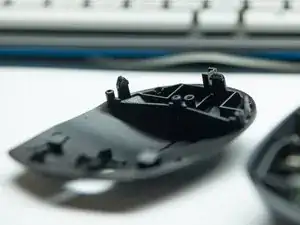
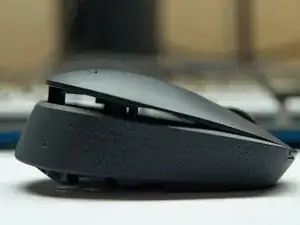
    • Identifica las sujeciones. El plástico que tienen en la parte superior es de un color diferente al del plástico en la base. Por eso, podrás identificar las sujeciones por su color (deberían tener el mismo color que la carcasa externa; En este ejemplo, su color es el negro).

    • Cuando identifiques las sujeciones, tira de ellas hacia afuera (separándose del centro, como muestra la imagen) para soltarlas.

    • Puedes usar cualquier herramienta pequeña para hacerlo, pero el plástico de estas sujeciones puede resultar algo delicado, así que hazlo con cuidado si no quieres que se desgasten.

    I cantt, it wont open

    Mr Johns -

    Mine doesnt have clips.

    brooklyn -

    very tricky , struggling here

    John Fleming -

    With the two side clips, it’s not the T-shaped outer bits that need to be pressed, it’s the thicker part lower down. It takes a bit of force to move the clips, but of course care is required.

    Mike Van Emmerik -

    Thank you. I was struggling with the T shaped parts.

    Efe Muratal -

    best tip: use a screw driver to uncover the bottom clip first. then use your nail to hold it in place(the bottom lid).

    Then use your screw driver (for side clips) to push both the t shaped outer bits with the grey colored bits away from the center.{use the screw driver as a leverage against the outer covering}

    then bada bing bada boom its open

    fawoto7831@fanneat.com -

  4. MBOqb3aShNXCQkXe
    MBOqb3aShNXCQkXe
    Ays3BUwPstSRZLaB
    o3nYgWusiytRGFvP
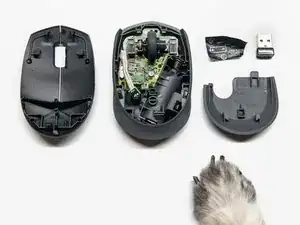
    • Después de soltar las 3 sujeciones, deberías poder separar una parte de la carcasa superior. Puedes hacerlo más fácil si empujas ligeramente sobre una de las sujeciones.

    • Después de que la parte trasera se separe, desliza toda la carcasa superior ligeramente hacia adelante. (Hay dos enganches más en la parte frontal del ratón, donde están los botones, que permiten que éstos no se salgan de su sitio). Al hacerlo, deberías poder separar toda la carcasa.

  5. yAxVNCQqKw6cDPGV
    yAxVNCQqKw6cDPGV
    dUuwcdFFQ6gphcki
    MMbDAKoatNXdAPvA
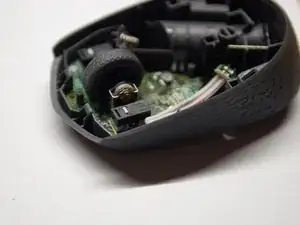
    • A partir de aquí, deberías ser capaz de hacer las reparaciones internas que necesites.

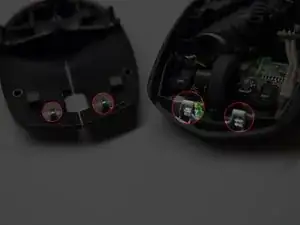
    • Un detalle interesante: Logitech modificó algunos de sus ratones de alta gama para usar interruptores Omron. Este ratón, con un precio de unos 12 dólares, emplea microinterruptores de Himake. La fuerza para pulsar es mayor comparada con los Omron. La durabilidad es otro aspecto de debate. No he usado este ratón lo suficiente como para opinar.

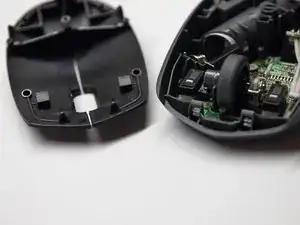
    • Me resulta particularmente interesante que el ratón no tenga tornillos y tampoco tenga adhesivos. Hace que el proceso de montaje resulte muy fácil, con menos cosas que perder o que vigilar.

  6. AIUuCXLNYTDFMELt
    AIUuCXLNYTDFMELt
    ULECYJOYWZSFPUuE
    • Para volver a colocar la carcasa superior, ajusta los enganches frontales primero antes de poner los enganches traseros.

    • Presiona con cuidado, con la palma de la mano, sobre la parte superior para que los enganches traseros se ajusten.

    • Es lógico que también necesitarás volver a colocar la batería y el panel inferior. En mi caso, también reajusté el adhesivo (aunque un poco más alto de su posición original, para dejar espacio para acceder al enganche de la cavidad de la batería). No estaba seguro sobre si necesitaría acceder a él más tarde.

    Front, as in towards the wheel end.

    Mike Van Emmerik -

Conclusión

¡Fantástico! ¡Lo has hecho genial!

John

Miembro Desde 21/08/15

2128 Reputación

27 comentarios

My mouse wheel is loose so I cannot scroll using my mouse is there a way that one can tighten it since I've opened it n the mouse wheel just came out.

Vee -

The same happened to mine, so I used a little bit of super bonder to attached again the wheel to the spinning sensor. Problem solved.

marcosfa -

Thanks man! Your instructions were very useful. Without them, I don't think I would succeeded in fixing my mouse. The optics sensor was just out of place. My mouse is working perfectly now. Thanks again.

samuel.ibrahim -

Same! They probably came out from falling on the floor, but putting the loose light back on to the transparent thingy thing definitely did the trick.

Jacqueline Fernandes -

the clips on the side arent clipping out

wael al hajj -

Same issue for me too

Chuah Chee Song -

can someone tell me where the usb receiver is?

Yunus Lawi -

Thanks for demystifying how to open! There is no power getting to the board but I can 't see any break from the terminal to the board so guess I can"t fix it.

suzan -

Thanks! Releasing the clips wasn’t easy, but it worked in the end. (I have a M171.) Unfortunately, I couldn’t find anything abnormal while ‘enjoying the insides’, so I didn’t manage to fix it. Do you have any suggestion what I should look at, or what broken parts could be fixed? I guess the mouse just fell on the floor too often, and something is irreparably broken.

Els -

Thanks ! After release the clips, I found that an internal component was out of place. Now, the mouse works perfect !

Manuel Espejo -

add close view of shape of clip/snap on so that user knows which side to press for unlocking three latches.

Muhammad Rizwan Sheikh -

I have an M170 mouse, but aside from the underside look, mine has NO “3 clips” anywhere. And the top does not come off. I put the battery in and no sign of light so must be something wrong. There are no visible “clips”.

GARY MATTHEWS -

Hi, Before I try opening my M325(hopefully it has similar clips) I want to ask if the issue I am facing is a hardware issue, My mouse registers a double click when I actually do a single click. It is very frustrating as sometime when I try to close an overlapping window , it closes some other application behind it :( . I have tried changing the double click speed setting in the control panel mouse options but no luck.

Srirang Netake -

for some reason the wheel button stopped working, i opened, cleaned it a bit (it had like 4 years of dust, crumbles and hairs) and magically it started working again (not perfectly, but good enough to avoid spending money on a new one or bother soldering stuff)

Mauro Santopietro -

Man i atach hooks last but its still working perfectly

SRDS 7 -

Thanks! I cleaned the wheel and it’s working now.

Salome Khaindrava -

I was able to open my M170 with instructions from this page. Very helpful. I was trying to see if I could fix the problem with my mouse: When I scroll using the wheel, the page would quickly jump up when I meant to scroll down. I was not able to fix it. Any help? The left-click, right-click and center clicks are fine, but the scroll wheel is something else. When I scroll, the page tends to jump up and down first before following my scroll. Any help is greatly appreciated. Thanks!

Chris Malinao -

is there a way to reset the mouse?

Mohammed Zameil -

Why do you need to reset it?

Daniele Carminati -

just pull off battery. To be sure, with something metallic connect both + and - terminals on the battery compartiment for a 5 secs while mouse switch is in ON position.

—-why do you need it?

adolfo Zameza -

My mouse works fine for 10-15 minutes. then stops working abruptly. It works again a few hours or a day later for 10-15 minutes, and then again stops. I didn’t see anything abnormal on the inside. Any tips?

Anonymous -

Maybe some faulty capacitors?

Daniele Carminati -

John muchas gracias, necesitaba limpiar este mouse para que funcionara de nuevo como nuevo.

Ya estaba enfadado de la falta de precision, una limpieza con cepillo y alcohol isopropilico resolvio todo.

adolfo Zameza -

Thanks man, this was a gem

Rohit Mukherjee -

Hi My M170 works well initially but after some time a message pops up on the screen and says that the USB drive you just inserted is malfunctioned.

Trouble shooting done so far - Driver update in the laptop, firm ware of laptop updated not able to update the firm ware of mouse as the tool does not recognize it.

Please help.

mankuagrawal -