Introducción

Utiliza esta guía para reparar tu mouse si tienes un problema de doble clic en tu Logitech G403.

Hacer doble clic es un problema muy común para G403. Si su garantía finaliza, puedes reparar el mouse tu mismo, en lugar de comprar uno nuevo.

Necesitarás un juego de destornilladores de precisión para arreglarlo. Sin embargo, en caso de que tu destornillador no sirva, puedes consultar estas páginas para obtener ayuda:

  • [guía|13213|Cómo quitar un tornillo pelado]
  • [guía|25630|Prácticas recomendadas para destornilladores]
  • [guía|93991|Elección de la punta de destornillador adecuada]

No olvides desconectar el mouse antes de comenzar.

  1. ANvjhOGh4164kUO3
    • Usa una herramienta de palanca o tu mano para sacar ambos lados de los pies del mouse.

  2. ZMvdNaqOUhHeeqOK
    • Usa un destornillador de precisión para quitar cuatro tornillos del mouse.

  3. IHc1B1MSOOJCH16s
    IHc1B1MSOOJCH16s
    GS4nptosUxbLXWZi
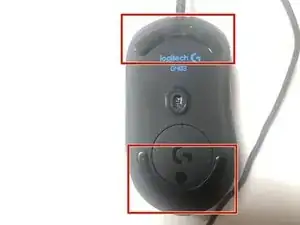
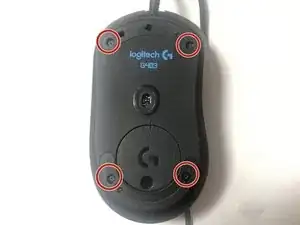
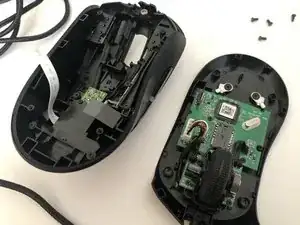
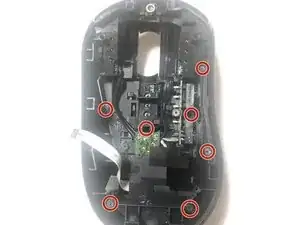
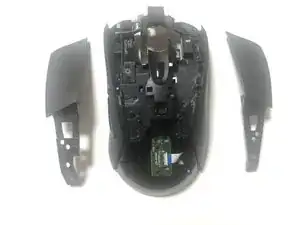
    • Abre lentamente el mouse y ten cuidado de no romper el cable cinta.

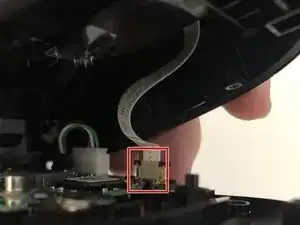
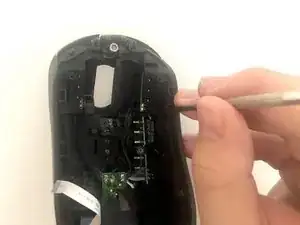
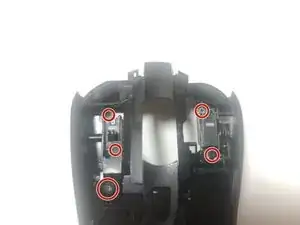
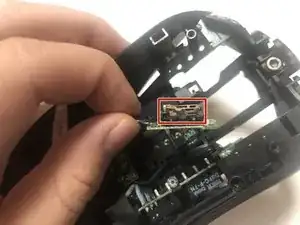
    • Desconecta el conector del cable

  4. dXdSTYmJIpEIsHhU
    dXdSTYmJIpEIsHhU
    u2JlSZ3msZqRwSMb
    • Retira siete tornillos de la cubierta superior.

    The center-left screw is not circled, you have circled the cabling pathway between the tiers. The screw to the right (2:30 from the center circle) was also missed when labeling. I am not sure if this was a mistake or not as I could not continue after removing the seven screws that I could actually see.

    Chammy Lammy -

    The circles are all correct including what you described as "cabling pathway", there's a screw there! You are also right about the 2 screws you mentioned. So there are a total of 9 screws!

    Srdjan Najhart -

  5. GDLtRmTJUXW1UhKI
    GDLtRmTJUXW1UhKI
    JYyobRfkepmOrHYi
    • Retira cuatro tornillos del ratón.

    • Retira la cubierta del clic del mouse.

    Could not find a decent way to remove these and bevel pops couldn’t save me from damaging the connection to the tier beneath this one. Decent tutorial, but perhaps I’m a little too much of an amateur because I could not remove this cover without damage.

    Chammy Lammy -

  6. QdcEIykCMgmKv2DJ
    QdcEIykCMgmKv2DJ
    CWkZe4xGTuvpn6yg
    • Retira los cinco tornillos conectados a los interruptores de clic del mouse.

  7. KBYCZtY6Bf5FKYym
    KBYCZtY6Bf5FKYym
    NipF2yEs1uFLYxLk
    • Abre el interruptor del mouse usando una herramienta de palanca o tus manos.

    • Ten cuidado de no perder la pieza de plástico blanca del interruptor del mouse.

    how do you open these?

    Diogo Valente -

    If the switch is oriented like in the picture, orient the flat portion of precision flathead screwdriver (or knife) horizontally. Go at the switch from the side. Wedge between the base and the "tab" part of the housing that has the gap as seen in the picture. Pry open. That should lift some of the housing off the base, then you can pry open the rest.

    Srdjan Najhart -

  8. nNeHflTJTrWqu2nx
    nNeHflTJTrWqu2nx
    mvb6gaqgIAPh1wcU
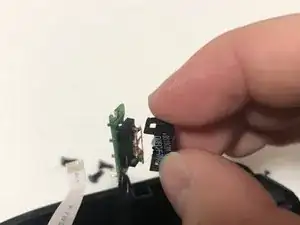
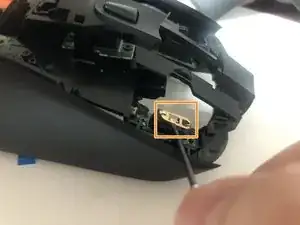
    • Localiza el lugar donde se necesita más tensión.

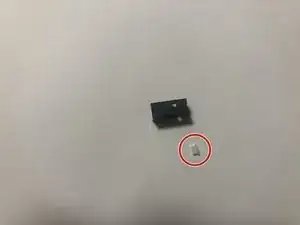
    • Usa una herramienta de palanca o tu mano para dar más tensión a la pieza de cobre, asegurándote de que el cobre esté curvado.

Conclusión

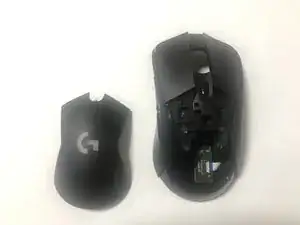
Para volver a armar tu dispositivo, sigue estas instrucciones en orden inverso.

Jisuk Kang

Miembro Desde 06/07/20

319 Reputación

5 comentarios

step 8 made no sense and had to google it

rel -

Worked!!! I had this problem for years, even stoped playing valorant bacause of that. Thanks

VampireKing -

I could not open these screws :( What are the screwdriver size to open these?

Siim -

CR-V (+) 1.5mm

Mohamed el sayed -