Introducción

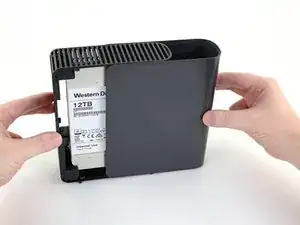
Abrir un disco duro externo implica desmontar la carcasa externa y recoger el disco duro desnudo que hay en su interior. A partir de ahí, puedes utilizar la unidad en tu servidor doméstico, NAS o PC. Este procedimiento muestra cómo extraer el disco duro manteniendo la carcasa intacta.

El uso de discos duros externos es una buena forma de conseguir mucho almacenamiento a un mejor precio. Muchos discos duros externos utilizan discos duros de calidad de servidor que cuestan casi el doble si los compras por separado sin la carcasa externa.

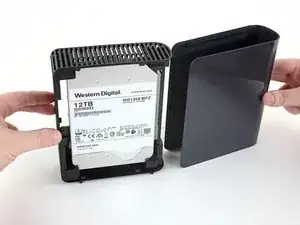
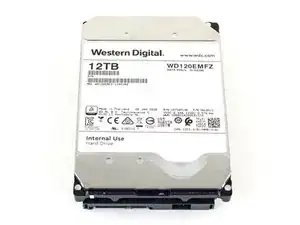
Esta guía demuestra el desmontaje de un disco duro externo WD Elements de 12TB de Western Digital, modelo WDBWLG0120HBK-NESN, pero el procedimiento puede aplicarse a cualquier disco externo WD Elements de 3,5".

Nota:''' Antes de desprender el disco externo, asegúrate de arrancarlo y realizar un escaneo profundo en busca de sectores defectuosos utilizando un programa como HD Tune Pro o Stablebit Scanner. Si se detecta algún error, devuelve la unidad al distribuidor o al fabricante.

  1. YrxXV6hrVY3NbfNY
    YrxXV6hrVY3NbfNY
    2Zk1HKj1PJ3LhvQn
    • Asegúrate de apagar y desenchufar la unidad antes de desmontarla.

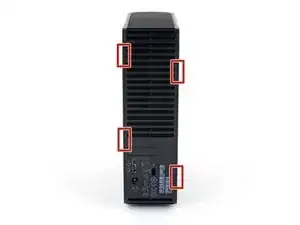
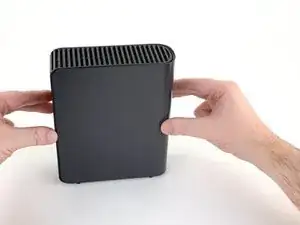
    • La cubierta externa de la carcasa se fija al marco ventilado con cuatro clips de plástico desde el interior. Anota tu ubicación antes de pasar al siguiente paso.

  2. XNKSEYTExp5XnfI4
    XNKSEYTExp5XnfI4
    5Irfmtguvipr2cbl
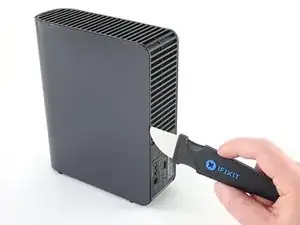
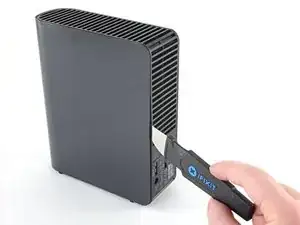
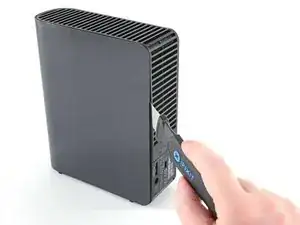
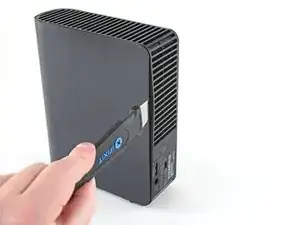
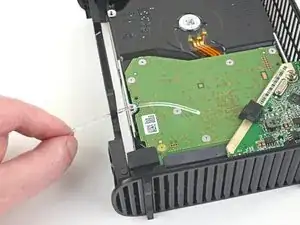
    • Inserta un Jimmy en el reborde entre el marco y la cubierta en un lado de la unidad, aproximadamente a mitad de camino entre la parte superior y la inferior.

    • Es posible que tengas que mover el Jimmy para deslizarlo entre el marco y la cubierta.

  3. QAUcT6YUWybpSxAS
    QAUcT6YUWybpSxAS
    BG2HdhGENnsUuFPY
    BwydJS56cD3NvEkY
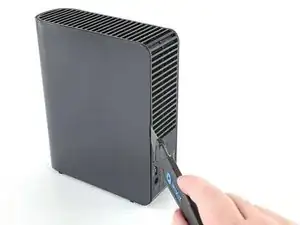
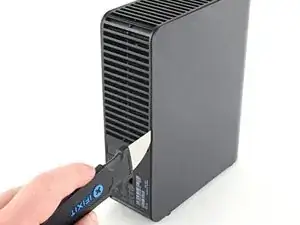
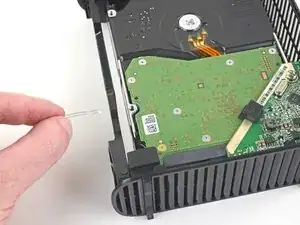
    • Con el Jimmy metido entre el marco y la tapa, haga palanca en el marco hacia fuera para liberar el clip inferior.

    • Ten cuidado de no hacer palanca con demasiada fuerza, ya que podrías romper la carcasa.

    • Si tienes problemas para liberar los clips, desliza el Jimmy más cerca del clip e inténtalo de nuevo.

  4. PJwhe5weXBrDcETd
    PJwhe5weXBrDcETd
    v3FFK2UyKmrSSZCv
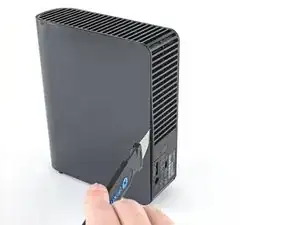
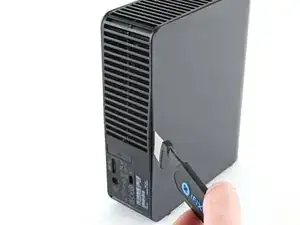
    • Desliza el Jimmy hacia arriba a lo largo del reborde y haz palanca hacia fuera para liberar el clip de plástico superior.

  5. 2TZAYMAoU4QDwbOp
    2TZAYMAoU4QDwbOp
    4ePUfxtTZ4ETkw3f
    • Repite los pasos 2-4 en el otro lado de la carcasa.

    • Ten cuidado de no hacer palanca con demasiada fuerza, ya que podrías romper la carcasa.

    • Si tienes problemas para soltar los clips, acerca el Jimmy al clip y vuelve a intentarlo.

  6. fEw4BujQrPI6oKyN
    fEw4BujQrPI6oKyN
    GC46HPATxHFcI3jU
    pEnxLDsJQWs5jNbg
    • Desliza la tapa hacia fuera del marco para retirarla.

  7. 4XpDcqUbSuP1CYk5
    4XpDcqUbSuP1CYk5
    pgplwFMPjGqWvtwY
    • Desliza la guía de luz LED fuera de la ranura de LED en la placa controladora de la unidad.

  8. xQGjBPWmjLC1iWZH
    xQGjBPWmjLC1iWZH
    lSYuotIADANJx3qa
    jGW5WyP4x4FqNxkF
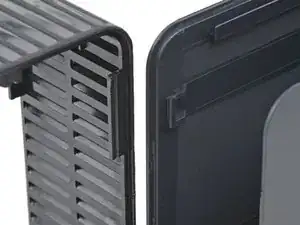
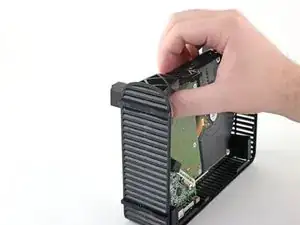
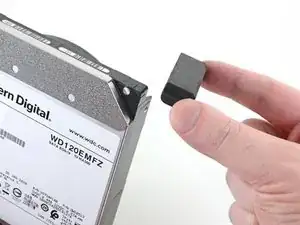
    • Agarra el extremo de la guía de luz LED y deslízala completamente fuera del marco para retirarla.

  9. sVTZcBPHK2UAkbEf
    sVTZcBPHK2UAkbEf
    W2wpLR1gfhgiZsWa
    TQjxEu3ZL6Q3uDpO
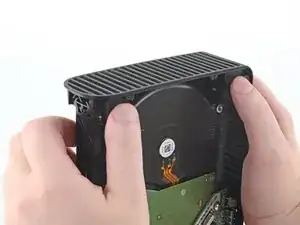
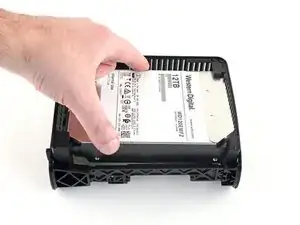
    • Empuja con las manos los cuatro tacos de goma de las esquinas para separar el disco duro del bastidor.

    • Empuja lentamente uno o dos bloques a la vez hasta que el disco duro esté completamente separado del marco.

    Wtf. How? This doesn’t work.

    Feddy Friender -

    Ok, got it, but these directions are terrible. You don’t want to push the blocks out, like the illustration and directions say, because they literally can’t be pushed out. They need to be lifted up while the plastic shell is manipulated until the drive is loosened.

    Feddy Friender -

    Thanks, Feddy!

    Mike Rosenberg -

  10. pxfYbJi6UUSSnuHr
    pxfYbJi6UUSSnuHr
    4kZ6AL4J2MfPcgCa
    • Remueve el disco duro del marco.

  11. brKaRAnfhVHMsQWP
    brKaRAnfhVHMsQWP
    SXYPYFK5xZavWfNd
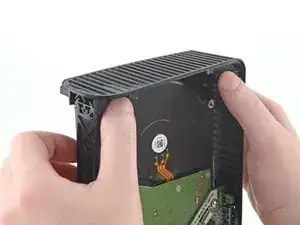
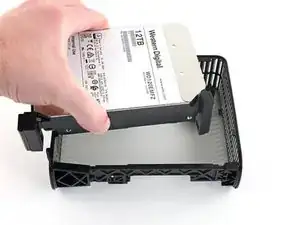
    • Retira los tacos de goma del disco duro si aún están colocados; es posible que algunos de ellos ya se hayan caído al retirar el disco duro.

  12. dckiCGADPZ46o3Wm
    dckiCGADPZ46o3Wm
    iDQ2bprwuu3KyCDV
    keP21ltrHWHqJSSX
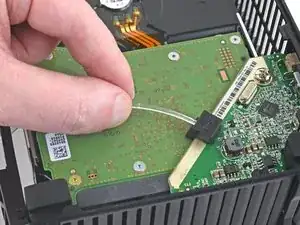
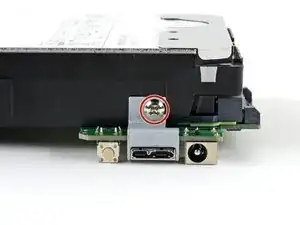
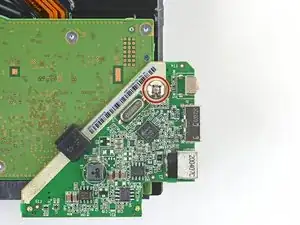
    • Usa un destornillador Phillips para retirar el tornillo de 8.5 mm de longitud que sujeta el soporte metálico de la placa controladora pequeña al disco duro.

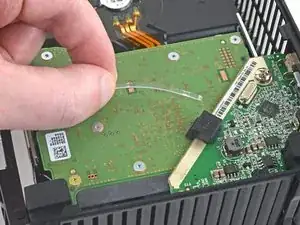
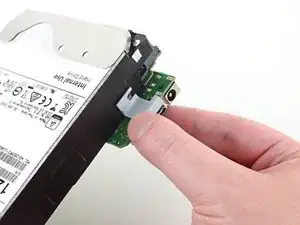
    • Remueve el soporte de metal.

  13. C3dmb2DlDF5KYaKK
    C3dmb2DlDF5KYaKK
    YSjxJDvScqYV4ipD
    Dx5jIFpWWHBnSxAX
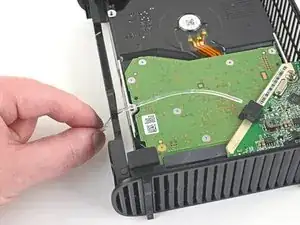
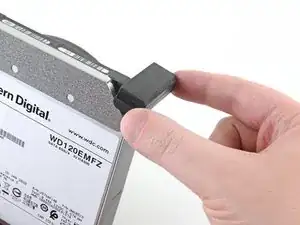
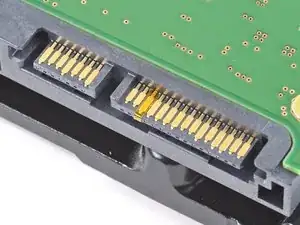
    • Usa un destornillador Phillips para retirar el tornillo de 8.5 mm de largo que fija la placa controladora al disco duro.

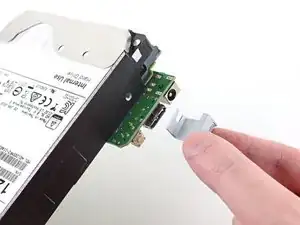
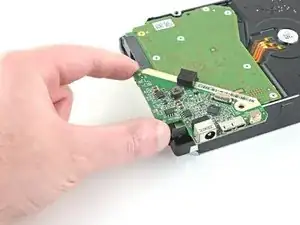
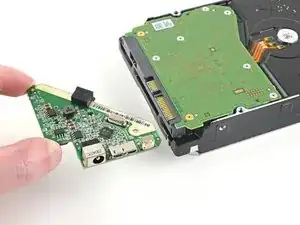
    • Desliza la placa controladora hacia fuera del extremo del disco duro para retirarla.

    • Habrá un poco de resistencia al retirar esta placa, ya que está conectada a los conectores SATA y de alimentación del disco duro.

  14. kGf6bjfZQhHAKvdf
    kGf6bjfZQhHAKvdf
    JjLLn5aZXVxaSTHU
Conclusión

Asegúrate de conservar la carcasa -así como todas las piezas y tornillos que la acompañan- hasta que la garantía haya expirado. Después, llévalos a un centro de reciclaje certificado. También puedes ofrecerlos a la gente de r/DataHoarder para que los reutilicen.

Para volver a montar la unidad y la carcasa, sigue estas instrucciones en orden inverso.

Craig Lloyd

Miembro Desde 10/02/16

30254 Reputación

13 comentarios

Can you recommend a Mac program for running a deep scan to check for bad sectors?

This article only gives two recommendations and they’re both for Windows :(

Martin -

I have a question. Is it possible to take a similar drive but smaller capacity like this about and turn it into a portable drive from it having to have a power supply?

Louis Wilson -

It is not possible. The problem is that a 3.5” disk drive (as used in the Elements drive) needs 12 V as well as 5 V, and they need more power than a USB socket can typically deliver. 2.5” disk drives operate from just a 5 V supply, and, having smaller disks inside, they use less power to start up, so they can be run completely through USB.

Andrew Morton -

Hi Craig! My PC sees it as Local Disc (E:) and wants to format it. Can’t do that! Is there a workaround? This was due to a power surge and I think it was just the adaptor power supply that got damaged. Running W10Home21H1 on Lenovo DESKTOP-699CIMO. Intel(R) Core(TM) i7-4790 CPU @ 3.60GHz 3.60 GHz 16,0GB 64bits Any ideas would be greatly appreciated! Cheers, Marco

Marco66 -

On Step 14, you see there are no screws to take the HDD cover off. How do you take the cover off the HDD to get inside?

Nathan -

lol + other characters to allow comment

Jerry Attric -

I have a WD element 4T and it will not power up. New cable and power adapter. It was stabilized in one spot for over a year, powered up just to store my movies. Plug it up after two weeks of none use and would not power up, no light inside. What can be done? My other storage drives work fine. By the way, you have the best directions on the web.

Tim Newton -

I just wrote you about WD Element, it is a 5.0TB Sata/64MB Cache, WD50EZRZ

WDBlue PC Hard Drive. It will not power up. I wonder if I can get a new USB controller board for it? I am only interested in getting information off of the hard drive. Can an "WEme USB 3.0 to SATA Converter Adapter for 2.5 3.5 Inch Hard Drive Disk SSD HDD" work to power it up to retrieve the Data?

Tim Newton -

Hey Tim, yeah so if you already tried a new power adapter, then it could be a bad controller board. If the drive is already shucked (or you don't mind shucking it), then you can get a SATA to USB adapter to see if the drive will boot up. That will at least rule out the USB controller board.

Craig Lloyd -

Very informative explenation wih clear pictures that show EXACLY in which direction to move the tool to safely detach the casing from the clips without breaking them, much better than most YouTube video's.

Only, I've used two old bank cards. That is i.m.o. much safer than using a metal knife or "Jimmy". With two plastic credit- or bank cards or two guitar picks it's almost impossible to damage the case.

Ruud Wilschut -

Thank you for the guide!

I found that I had a 3 TB Toshiba hdd lying around which I put in one of WD Elements enclosures I was about to recycle. Now I have a fully stacked NAS as well as an external hdd :)

And I'm keeping a controller board + wall wart to be used as simple usb-to-sata device.

Frida Mattias -

Hi.

Is possible on this box, change the HDD. For example. I have WD Elements to 4Tb and have another ( Seagate ) 12Tb and I thinking to change the HDD 4Tb for 12Tb using the same case.

Is possible?

Thanks a lot

Victor Santos -

Did it successfully with fairly limited experience of taking electronics apart (other than joycons a few times), didn't even break any clips. Worked fine for me installing it in a PC without taping over anything.

Jack Bailey -