Introducción
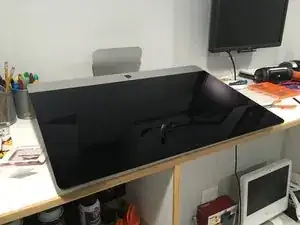
Estaba nervioso al comprar el iMac 27 "de finales de 2015 porque había muy poca información al respecto. Solo pude encontrar algunos videos específicos sobre el desmontaje y muy poca información sobre cómo agregar o actualizar a un SSD. Había toneladas de información sobre el modelo de 2014 y principios de 2015, pero nada de la de finales de 2015. Así que aquí vamos.
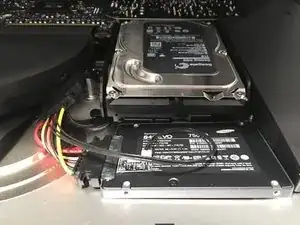
Estoy desconectando el cable de alimentación y SATA del HDD, agregando un SSD de 2.5 "(dejando el HDD en su lugar).
Herramientas
-
-
Abrir la Retina iMac puede ser complicado y necesitas las herramientas adecuadas. Y necesitará algunas cosas para abrir la carcasa e instalar el SSD correctamente.
-
Aquí está el desmantelamiento actual de iFixit que le muestra en qué se está metiendo. iMac Intel 27 "Retina 5K Display Teardown
-
Y de nuestros amigos de OWC, tienen un gran video sobre cómo sacar el HDD completo y reemplazarlo con un SSD, pero esta guía mostrará cómo simplemente dejar el HDD e instalar el SSD. https://vimeo.com/139364064
-
Asegúrese de tomar las herramientas esenciales como: Pro Tech Toolkit y Jimmy para abrir el iMac, aunque utilicé un bisturí médico, descubrí que la "púa de guitarra" era demasiado débil y demasiado gruesa. El "Jimmy" sería un gran sustituto de un bisturí.
-
También necesitará el sensor térmico digital en línea OWC, para que el control de temperatura del iMac permanezca bajo control. De lo contrario, sus ventiladores girarán a toda velocidad. Este kit de OWC también incluye la cinta necesaria para cerrar la copia de seguridad de su iMac. https: //eshop.macsales.com/item/Other%20 ...
-
-
-
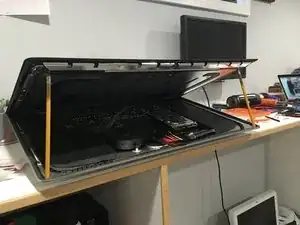
Las guías actuales de iFixit y OWC le permiten desconectar los cables de la pantalla, con esta guía no es necesario. Mantuve mi iMac horizontal y después de abrir la pantalla simplemente usé dos lápices estándar para sostener la pantalla en ambos lados.
-
-
-
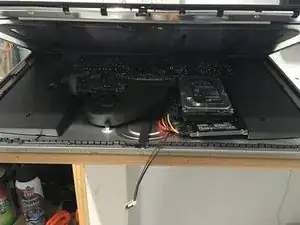
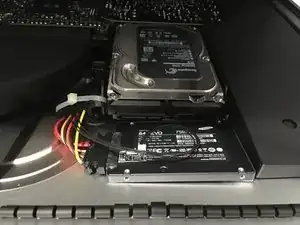
Así que aquí puede ver que desconecté el cable SATA del HDD, conecté el cable del sensor térmico OWC y ya conecté el SSD.
-
El cable OWC es un poco rígido, pero todo lo que tuve que hacer fue retorcerlo un poco para que el SSD quedara plano dentro del iMac. Todo este bolsillo donde muestro el SSD normalmente está vacío y es el lugar perfecto para un pequeño SSD.
-
-
-
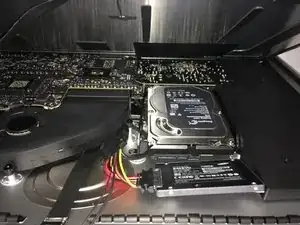
Luego conecté el sensor de temperatura al SSD, mientras mantenía los cables lo más organizados y compactos posible.
-
Aquí también aseguré el SSD al iMac con algunos cuadrados adhesivos de 3M. Como el iMac está curvado aquí mismo, necesitaba algo que lo mantuviera en su lugar, pero también era más grueso que la mayoría de los adhesivos. https://smile.amazon.com/dp/B00O1WFF8U
-
Utilicé cuatro cuadrados en total, pero los dupliqué. Apilar una encima de otra dos veces; una vez en la parte posterior izquierda y otra en la parte delantera derecha.
-
-
-
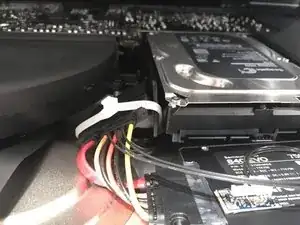
Para el paso final, simplemente até el cable del sensor térmico al soporte del HDD para mantener todo en su lugar.
-
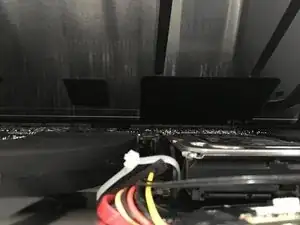
También quería retirar el cable OWC de la pantalla tanto como sea posible. Como puede ver en la segunda imagen, todavía hay mucho espacio ya que el cable OWC y la brida están muy por debajo del HDD y el extractor del ventilador.
-
-
-
¡Eso es! No puedo usar el HDD de 2TB, pero pude instalar un SSD con el mínimo esfuerzo y riesgo sin quitar la pantalla, desconectar los cables de la pantalla o quitar el altavoz o HDD.
-
Como beneficio adicional, las versiones HDD del iMac vienen como "Unidades Fusion", por lo que también tienen un SSD PCIe conectado. El mío tenía un SSD de 128GB instalado, así que ahora tengo acceso a eso como un disco extra. Planeo instalar Windows en la unidad PCIe a través de Boot Camp.
-
Para volver a armar su dispositivo, siga estas instrucciones en orden inverso.

122 comentarios
Hello, in the last part of closing the iMac, what is the adhesive that you use? I bought some on ebay but its not strong enough. thanks.
PCosta -
My link was in the post: https://eshop.macsales.com/item/Other%20...
It includes the thermal sensor and the tape.
If you are installing an SSD to replace the HDD on iMac 2013 and later, you don't even need the thermal sensor cable from OWC because the heat info will be read through S.M.A.R.T. I think that OWC thermal cable for iMac 2013 and later is a scam. The reason why you need the thermal sensor is that Seagate HDD has a proprietary thermal port back in 2010. The thermal info cannot be read by SMART back then. The new iMac from 2013 (probably 2012 included) will no longer need the thermal sensor cable.
Evan -
Well, unless someone has a definitive answer on if it's needed or not I'd still recommend it. Plus it comes with the tape needed to secure the iMac.
Doesn't the newly installed SSD block the fans natural airflow path being placed there?
@chrisray No. The new 5K iMacs have the external fan hole coming out the center of the back of the case. The older iMac's had a thin vent that ran horizontally along the top third of the back case, and that might have been blocked. But on the 5K iMac the plastic fan in the middle pushes air straight out that vent on the back. The SSD does not impede on that at all.
Can you use SSD Fan Control app to keep the fan at the normal speed?
A VIEW -
Why would you want to? Just use the thermal sensor and the fans will stay in check, no need for a piece of software. https://eshop.macsales.com/item/Other%20...
Justin Winchester -
So this guide basically shows you how to install a regular non Apple SSD in a imac that already has a “fusion drive”?
So now you have the hdd that was not moved and the Apple pcie ssd and now the new non Apple ssd right?
gleeglee217 -
Correct. The big take away is that I didn't have to move or remove anything. I was able to add my own SSD, and use Apple's built-in SSD. However I did lose the 2TB Fusion drive, and I'm not the least bit sad about that.
Justin Winchester -
Thanks for the guide, One question though. Did you find or have experience any issues being the fusion drive still in there? Not sure how the two SSD's would behave and work, but i want to make sure there are no conflicts between them. Also, I am assuming you must have seen lot of improvements in terms of performance, read/write, speed etc after the SSD replacement, right? Mind sharing the before and after if you have recorded something?
Mohit S -
The fusion drive is completely disconnected, so it does nothing but take up space.
Modern computer can handle multiple drives, doesn't matter their type. The SSD are two different drives so the iMac just mounts as such. The iMac (or any computer) can really handle as many drives as you could connect to it, internally, or externally. So no there would be no conflicts between SSDs, HDDs or any mix thereof.
Yes, SSDs are insanely faster and better in every way. I did not run any benchmarks because I never even booted this iMac with the Fusion drive. I installed the SSD before I even booted it up for the first time. But you can look up any benchmarks for my SSD vs a standard WD 7200RPM drives
Justin Winchester -
In Justin’s case, the boot time would probably not change all that much since the operating system is effectively on the ssd part of the “fusion drive.” The big performance improvements will start to show up when you put more than 128 GBs of data on your system.
Rick Harman -
Can someone explain why the existing hard drive doesn’t need the OWC thermal sensor? Why can’t you just disconnect the cables from the HDD and reconnect them to the replacement SSD?
Copywriter Ben -
This config just leaves the HDD in place unused, Instead of removing it. All you are doing here is saving a few bucks for the 2.5” to 3.5” adapter frame and fully removing the HDD.
The original Apple HDD has a build in thermal sensor which Apple leverages. When you replace the drive with either a HDD or SSD you need to replace the now missing sensor Apple uses to manage the systems cooling. Thats why you need to add the OWC in-Line sensor.
Dan -
As Dan stated, any drive other than Apples requires the thermal sensor. And yes it only saves you a bit of money ($15 dollars) but it saves you A LOT of time, makes the SSD addition WAY easier, and you are FAR less likely to damage your iMac since you don’t have to remove any components.
Justin Winchester -
Bonjour, question de novice mais peut-on ajouter plutôt un SSD M2 sur l’iMac 27" (fin 2015) ? Avec la même procédure ?
Vincent -
No you cannot.
Justin Winchester -