Introducción

Esta guía pasará por el proceso de clonación de su software, sistema operativo y datos existentes en un nuevo disco duro.

(SuperDuper ahora es compatible con Big Sur y Monterey).

NOTA: Con la introducción del macOS Catalina, ciertos pasos de esta guía están desfasados.

IMPORTANTE: No se recomienda clonar el disco duro si tienes un Mac que usa una partición de recuperación (MacOS 10.7 - presente) o una recuperación de Internet (2011 - presente). En su lugar, para mover sus datos a una nueva unidad, primero crea una copia de seguridad de su unidad existente. Luego, usa la recuperación por Internet o crea una unidad externa de arranque para estar listo para instalar MacOS en la nueva unidad y migrar los datos después.

Si estás satisfecho con la instalación de su sistema operativo actual y simplemente deseas actualizar la capacidad de su disco duro, puedes clonar su disco duro actual a tu nuevo disco.

Para clonar un disco duro, necesitarás un modo de conectar el segundo disco duro a tu Mac. Nuestra caja de disco duro de 2,5" o uno de nuestros kits de actualización de discos duros funcionan muy bien para clonar tu disco.

Para clonar tu disco duro, te recomendamos un programa llamado SuperDuper!, de Shirt Pocket Software.

Las siguientes instrucciones asumen que vas a usar SuperDuper! y la carcasa del disco duro de 2,5" para clonar en una nueva unidad de 2,5". Si estás usando una configuración diferente, el proceso de instalación puede ser algo diferente.

  1. 4JhGoJe32DvBABcV
    • Antes de empezar, mira los puertos de tu disco duro y asegúrate de que tiene los conectores correctos:

    • Puerto de datos estrecho

    • Puerto de alimentación ancho

  2. l5LZ15iFvLKSgKkj
    • Use el destornillador incluido para remover los dos tornillos Phillips.

  3. GlKNvlSsO66fTYOs
    GlKNvlSsO66fTYOs
    uFfdj1OJMECyOWK1
    • Desliza la bandeja de plástico del recinto de aluminio.

    it doesn't slide out

    jbechtel1 -

  4. HEDUVFyoyHCPjZQG
    HEDUVFyoyHCPjZQG
    yG2mwjvGE4BUJmEU
    bHqdPvQVNkFSCtrl
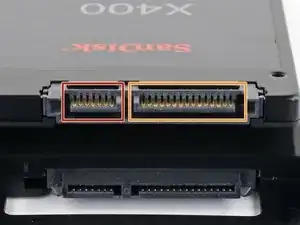
    • Pon la unidad en la bandeja de plástico y alinea los puertos de la unidad con el zócalo de la bandeja.

    • Para evitar que el zócalo del recinto se vea afectado, coloca la unidad tan plana como sea posible contra la bandeja.

    • Empuja cuidadosamente la unidad en el zócalo de la bandeja para asentar los puertos.

    • Presiona el borde levantado de la unidad hacia abajo en la bandeja de plástico.

    • Si el borde de la unidad se engancha en el bloque de espuma, la unidad no está completamente asentada contra el zócalo de la bandeja. Continúa presionando la unidad en el zócalo hasta que se despeje el bloque de espuma.

    It is helpful to use something thin like a credit card as a shoe horn here - while the back edge is still raised, insert a thin card between the edge of the drive and the foam block, then push the drive edge down and slip the card out. This will allow the end of the drive to sit flush against the block without any overlap or mashing of the block. It also eliminates the need to keep pressing or forcing the edge of the drive to fit.

    Charles Bradford -

  5. tZZJY1ygca2RoloP
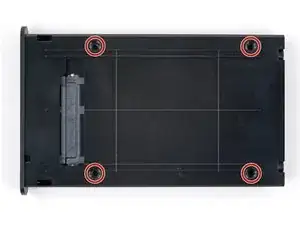
    • Dale la vuelta a la bandeja de la unidad.

    • Usa un destornillador Phillips para instalar los cuatro tornillos de montaje (incluidos en el kit) para asegurar la unidad a la bandeja.

  6. oUPQLXfcPRKeDdLN
    oUPQLXfcPRKeDdLN
    ajPNox2oOMWeTPlM
    v5h44HwBXbMnMlGu
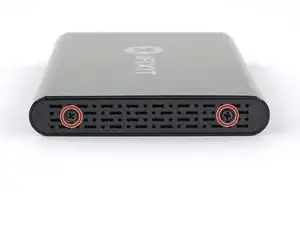
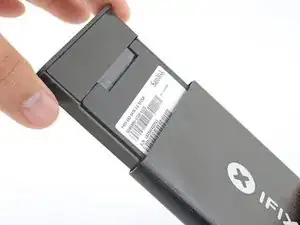
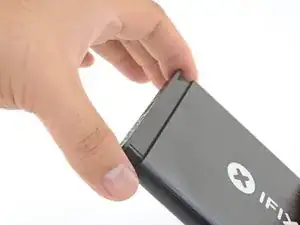
    • Desliza la bandeja de nuevo en la recinto de aluminio.

    • Vuelve a colocar los dos tornillos Phillips para asegurar la bandeja.

  7. ETaIXnVj1XIav6Rj
    ETaIXnVj1XIav6Rj
    3Hd6qNGIMlmPHJor
    • Enciende tu Mac y espera hasta que se cargue completamente.

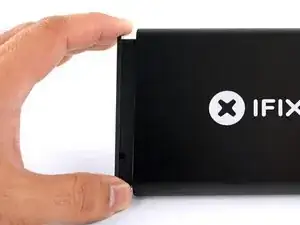
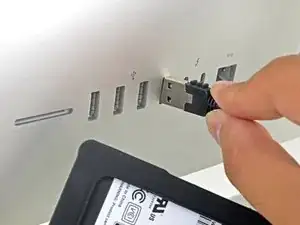
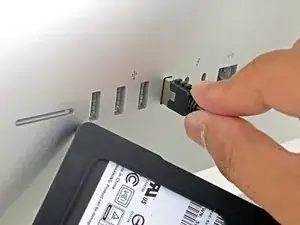
    • Conecta el habitáculo en el puerto USB de tu Mac.

    Bonjour

    Pas d’alimentation pour le SSD !!!?

    cdlt

    legruel -

  8. ZjehMOUv23StrdTT
    ZjehMOUv23StrdTT
    3TNSTJGi2aLFw6QX
    • En el menú desplegable Go, elige Utilidades

    • Abre Utilidad de disco de la ventana Utilidades.

  9. xQdoZda4WOoqk26b
    xQdoZda4WOoqk26b
    FaNEFOFrdxRqjQFw
    cOQMivI1Li3QcAu5
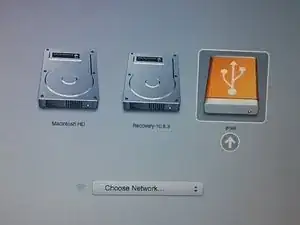
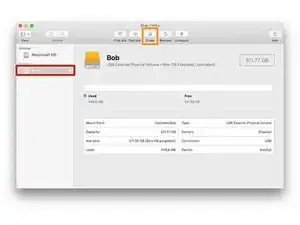
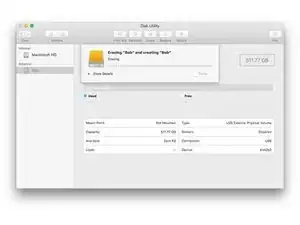
    • Selecciona tu nuevo disco duro de la columna izquierda en la Utilidad de Disco.

    • Si la nueva unidad no aparece, desconecta el habitáculo y verifica si el disco duro está conectado correctamente al habitáculo.

    • Selecciona la opción Borrar cerca de la fila superior de botones.

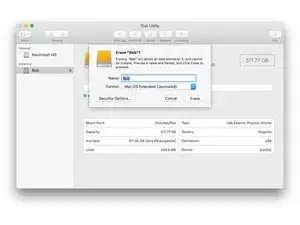
    • Elige un nombre para tu nueva unidad, y en la opción de formato, selecciona "APFS".

    • Advertencia: Al presionar el botón de borrar se borrará todo el contenido de la unidad. ¡Asegúrate de haber seleccionado el nuevo disco duro!

    • Presiona el botón borrar.

    • Este proceso puede durar hasta 10 minutos, así que sé paciente.

    • Sal de la Utilidad de Disco una vez que se haya completado el borrado.

    When I try to partition, I message comes up saying "file system formatter failed". What do I do?

    Cameron Matthews -

    I formatted my Samsung SSD 860 with format “APFS” before I saw this tutorial instructing me to select “Mac OS Extended (Journaled")” for the format.

    craigrhee -

    On latest MacOS (from High Sierra on) you should use APFS. This is mandatory on Catalina, but in this case the system update itself converted the existing drive from MacOS Journaled to APFS.

    Stefano Fratini -

  10. SGh5RRwEmAtDC3bK
    SGh5RRwEmAtDC3bK
    MuUfnPfUqo1gA4Hp
    • Descarga e instala SuperDuper!

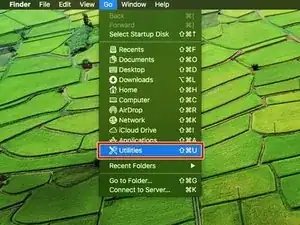
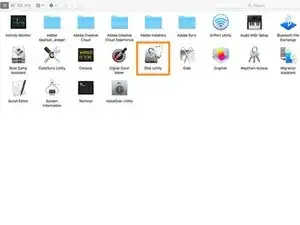
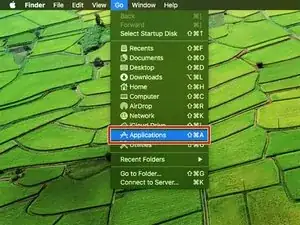
    • En el menú desplegable Go, elige Aplicaciones.
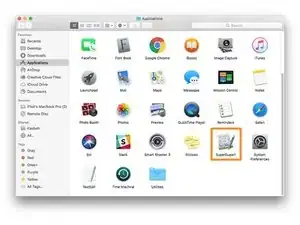
    • ¡Abre SuperDuper!

    With the newer OS-X & MacOS releases its wise not to use 3rd party cloning software.

    A better approach is to use Apple supplied Migration Assistant during the OS install on a fresh drive, or you can do it later its located in the Utility folder.

    Sadly, cloning apps don't create the hidden partition the OS installer does and if you are not careful you can wipe it out with the cloning app.

    An alternative is using Disk Utilities Imaging tool which allows you to create an image file that you can then reuse over and over again if you have to manage multiple systems this offers a very quite way of cloning a standard set of config & apps.

    Dan -

  11. WXfpN3atGlxKACEs
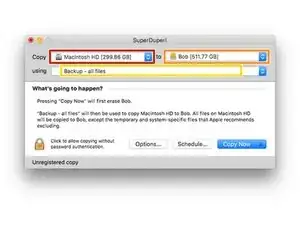
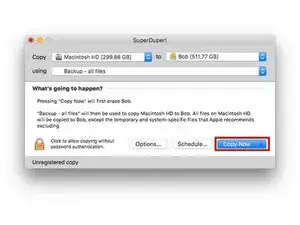
    • En el menú desplegable Copia, elige tu unidad actual.

    • En el menú desplegable de destino, elige la nueva unidad.

    • En el menú desplegable Métodos, elige "Copia de seguridad: todos los archivos".

  12. iF3jZbh4hALxiFlx
    iF3jZbh4hALxiFlx
    RGZ5K41IlmC1hopg
    fRXFr5krMix3aQtG
    • Pulsa el botón "Copiar ahora".

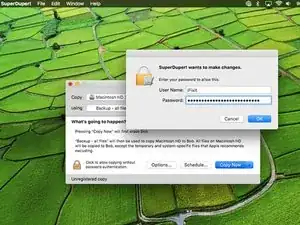
    • Si se te pide, escribe tu contraseña.

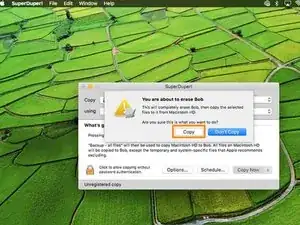
    • Haz clic en "Copiar" cuando se te advierta sobre borrar la unidad.

  13. Xb4XjLsm2UUCGu32
    Xb4XjLsm2UUCGu32
    YIu6oMbXYD54SZPF
    uXyMHarQMojYixMH
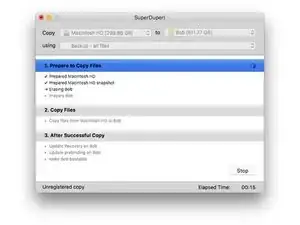
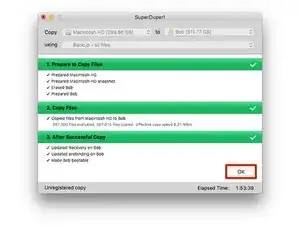
    • Espera a que la unidad se copie (esto podría durar varias horas si tienes mucho en su disco duro).

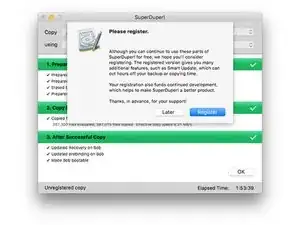
    • Cuando SuperDuper! te solicite el registro, elije "Registrarse" para comprar el software o "Más tarde" para registrarte más tarde.

    • Una vez completada la copia, haz clic en "Aceptar" y sal de SuperDuper!

  14. kEiBAkEof14FxRf4
    • En este punto, tu nuevo disco duro debe ser un clon de tu unidad existente y listo para instalar.

    • Sin embargo, recomendamos probar la unidad clonada antes de cambiar físicamente las unidades. Esto se puede hacer intentando arrancar desde la nueva unidad clonada a través del habitáculo USB.

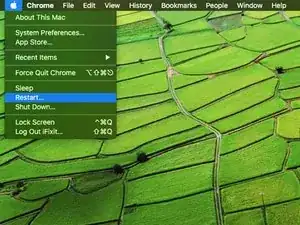
    • Mantén el habitáculo conectado al ordenador y reinícialo. Mantén presionada la tecla "opción" mientras se reinicia hasta que aparezca un menú de opciones de inicio.

    Everything worked up until I was trying to boot from my SSD. I figured it out though if anyone else is having the same problem in 2023. Right after quiting SuperDuper! Click apple > system preferences > start up disk > click lock to make changes > select new SSD > restart.

    Gabriel Yalung -

  15. GcnVnreC3U2HWLyF
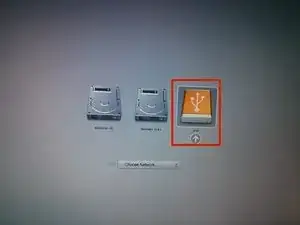
    • Selecciona tu nuevo disco duro en el menú de opciones de arranque.

    • Espera a que el ordenador se inicie para verificar si funciona correctamente.

    • Tu nuevo disco duro ya está listo para instalarse en tu ordenador.

    Can an Apple Time Machine be used to facilitate the cloning of a new hard drive, in LIEU of the $28.00 SUPER DUPER! applications program? My aged MacBook Pro 1297 17” is running OS10.11.6 and I am clueless as to whether or not the original hard drive is even partitioned: After 11 years, it may be time for a new SSD…

    John Birrell -

Conclusión

Retira tu nuevo disco duro de la caja externa e instálalo en tu ordenador. Las instrucciones de instalación están disponibles para una variedad de Macs.

Mike

Miembro Desde 01/11/10

14160 Reputación

24 comentarios

This guide was straightforward and helpful along the way when I replaced my hard drive! My only comment is that this should be a link in the "MacBook Pro 13" Unibody Early 2011 Hard Drive Replacement" article, since the Youtube videos link to each other, but the articles do not. Thanks for all your help with these fantastic guides!

Melissa Smith -

Great except you extol the use of the SATA Wondercable but you don't sell it hen I followed the link to eBay, it listed dozens of various adapters. I did not see this SATA Wondercable.

Disappointed with the answer

jimkidd1 -

Wow! Thank you Mike.

Everything went very well with a big bonus. My older version of Photoshop does not work with the newer Mac operating systems. Now that I installed a new 1TB hard drive, I can upgrade OS if I want. Then I can use the old drive in an internal enclosure replacing the DVD running the old OS X keeping all of my older Adobe apps!

Ifixit rocks!

charlesspowell -

If I have a BootCamp partition, will it clone that as well?

BuckNYC -

Hi BuckNYC,

As far as I know, SuperDuper will not clone the BootCamp partition. You will have to use something like Winclone to do that.

Arthur Shi -

Worked fine. Only issue is that before installing the new drive, you need to set it as the boot disk (System Preferences, Startup Disk) Do this when you’ve got it connected to USB (after Step 12) - when you tested that it’s bootable. (I missed this and had a fraught few hours until Dan helped me out.)

Stephen Babbage -

Great tutorial Mike! Made it a lot easier to swap my old HD for an SSD. Many Thanks!

Olivier Meyers -

Glad to hear it! :)

Mike -

Does this tutorial also work, if I want to switch from FusionDrive to SSD?

daniel.wernitz -

Yes - Make a clone on the new SSD first using an external housing, start up from that disk, then split the internal Fusion Drive in the Mini in its HDD and SSD components using Terminal. Reformat the internal SSD and HDD. Shut down, and replace HDD with the new “external” SSD. The SSD-part of the Fusion drive becomes an extra internal SSD. For fastest performance, put OSX on the faster ex-Fusion SSD and datafiles on the newly installed SSD.

Wannes -

IMPORTANT: Cloning the hard drive is not recommended if you have a Mac that uses a recovery partition (MacOS 10.7 - present)

Why?

Chad R. Larson -

Dunno - Bombich.com Carbon Copy Cloner (my go-to clone app for years) clones them perfectly and has done so for years.

Wannes -

I am looking to upgrade my 2012 hard drive to an ssd. I would prefer the easiest fastest way of migrating or copying my entire installation to the new drive. Is super duper cloning suggested or is there a better way?

abrahamw88 -

So is Super Duper not recommended even though they’ve updated to include Catalina support? If they aren’t, what’s another method as I’ve read that Time Machine backups may not work as well for complete replacement of the drive? I was about to purchase it, but if anyone has bad experiences with it, please let me know before I do?

Info from Super Duper:

v3.3.1 now available!

The latest version of SuperDuper! is faster, better, fully compatible with macOS Catalina (10.15) - in fact, it's compatible with macOS 10.10 and later, has Smart WakeSmart DeleteNotification Center support, additional control capabilities, and improves many aspects of the user experience. Of course, it still includes great features like snapshot supportAPFS recovery volume supportBackup on ConnectEject after CopySparse Bundle support, lets you store a bootable backup alongside Time Machine backups, copy Time Machine backups to other drives, and run scheduled copies on demand. As with every update, we've polished and improved many other aspects as well. (A full list can be found by selecting Help > Revision History.)

mythicalcaesar -

Easy …. Informative and much appreciated…!

Allen Russell -

Anyone else having problem with SuperDuper! on BigSur 11.1 ? Tried twice to run it and after 19 hours nothing.

Also tried to boot in recovery mode and clone from there but got broken seal error which seems to be a BigSur issue.

Constantine -

My understanding is that SuperDuper does not work currently with Big Sur (I experiences similar results as Constantine). I used Carbon Copy Clone successfully (they also have a free trial version) that is able to do the file conversion required for Big Sur.

John Dwyer -

Funktioniert SuperDuper! auch um eine größere 1TB (eingebaute) Festplatte auf die neue 500GB SSD zu klonen?

an walt -

Zumindest gibt es dieses Video, wo jemand erklärt, wie das geht.

Fabian Neidhardt -

Does it also work from 1TB to external 500GB SSD?

an walt -

Isn't Apple's Migration Assistant the alternative to SuperDuper?

tldoumi -

Why should I use SuperDuper over dd?

michael.s.corigliano -

dd will not "quite" work - if the two drives are different size (the second drive needs to be same or larger size of course), then it seems you have difficulty with modifying the new drive partition table with Disk Utility (anyway that's the situation I'm currently in and trying to solve). Also it duplicates the UUID values, and these are supposed to always be unique I think. Maybe there are ways to fix both these issues, and am now trying to find out if it's possible.

-bob

anonymous 97 -

Does not appear that SuperDuper will handle the case where there are multiple partitions on a drive and let you duplicate everything in one step. And not sure if APFS volumes will work or not. Any other suggestions for how to duplicate a drive with multiple partitions (some HFS, some APFS, some data only, some recovery partitions, basically any possible scenario including BOOTCAMP partitions)? Thanks ....

-bob - Nov 9, 2022

anonymous 97 -