Introducción

  1. 3jETuMAJGuYOyrM1
    3jETuMAJGuYOyrM1
    lENxZXOSlnxhjUKM

    Verify your model. The back of the Cellular model just says GPS, so be sure to check the groves where the watch band goes to determine you model. I made the mistake of just reading the back of the device and since I’d been gifted the device didn’t know it was cellular. Cellular has a different type of touch force gasket, different screen, and different battery connections.

    Ryan Holt -

    From what I just read on Apple, the only differences in watch series 3 is 38mm and 42mm.

    mcr4u2 -

    As a consumer all you need to know are 38mm and 42mm

    Michael Adoga -

    The back will say GPS LTE if it’s the cellular version. If it doesn’t say LTE it is only the GPS version. The displays are different whether or not it is LTE(cellular).

    themepark -

    This alternative method only reboots the watch.

    Gregg Stanley -

  2. dAlO5MlADoI4aHmQ
    • Prepara un iOpener (o usa un secador de pelo o una pistola de calor) y calienta la esfera del reloj hasta que esté ligeramente demasiado caliente para tocarla.

    • Deja el iOpener en el reloj durante al menos un minuto para calentar completamente la pantalla y suavizar el adhesivo que lo sujeta a la caja.

    • Es posible que tengas que recalentar el iOpener, o moverlo por la pantalla a medida que las secciones se enfríen, para calentar la pantalla lo suficiente como para levantarla.

    I have heated up the iOpener to 165 degrees and left it on for more than a minute. No way I can lift the screen off with the exact knife. Tried different angles in various places, but no go. I also used a hair dryer un til the watch screen was too hot to touch and even tried a very hard cutting tool blade and also no go. Could n ever get the blade under the face I applied enough force where I could see that the blade left small marks, not very big, but could never get anything to move or lift. What am I doing wrong? I spent 47 years at a global computer company and I am used to taking apart small things and applying force when required. I don’t know what I am doing wrong. Please help me.

    Rafael Blanco -

    Getting the initial gap is not easy. Maybe a playing card could work its way in the tiny gap and cut some adhesive. After that there might be some success with an exacto knife. Or you want to try a piece of aluminum foil (folded for more rigidity) for cutting the adhesive. Be aware of the force touch gasket and that it might get damaged during that procedure.

    Tobias Isakeit -

    I finally used a hot air gun set to 150 deg. C heating up the edges by slowly spinning the watch around before the technique worked. Difficult is the level noted and it’s correct. Finally worked and watch perfectly functioning.

    Chris Giavotto -

    I had to heat the iOpener 2 times and leave it on top of the watch for 10 minutes.

    Axel Trujillo -

  3. TiPIaVjFQZ6OJlTT
    TiPIaVjFQZ6OJlTT
    6hNke1uI3WvUQ3Im
    yys2M1eO4GHOURDx
    • Debido a que el espacio entre la pantalla y el cuerpo del reloj es tan delgado, se necesita una cuchilla afilada para separar ambos. Lea las siguientes advertencias cuidadosamente antes de continuar.

    • Protege tus dedos manteniéndolos completamente alejados del cuchillo. En caso de duda, protege tu mano libre con un guante pesado, como un guante de cuero o un guante de jardinería.

    • Ten cuidado de no aplicar demasiada presión, ya que esto podría causar que el cuchillo se deslice y le corte, o dañar el reloj.

    • Usa protección para los ojos. El cuchillo o el cristal pueden romperse, haciendo que los pedazos salgan volando.

    • No dudes en colocar o quitar la correa del reloj según sea necesario para tener más control al hacer las reparaciones.

    Don’t cut your finger off!

    Mike -

    The Watch 3 stainless Steel has an additional Frame. Where do i have To Open it?

    asteffen@me.com -

    I wore thick gardening gloves just to be safe 😅 and it took a while but the screen did come off.

    Axel Trujillo -

  4. ZkWMSNMJYG6IZhkL
    ZkWMSNMJYG6IZhkL
    NQIDl3ZOwVEC44ZA
    oZFcsBuOlJ6JyOK3
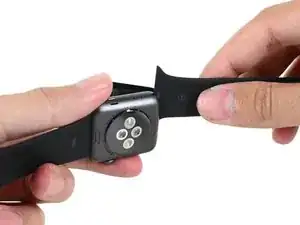
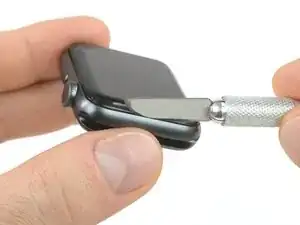
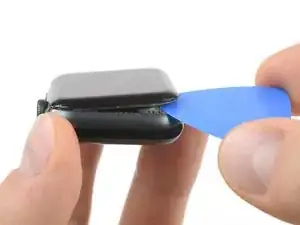
    • Coloca el borde de una hoja curvada en el espacio fino de la pantalla y la carcasa exterior. Comienza en el lado corto de la pantalla, más cercano a la corona digital.

    • Presiona firmemente hacia abajo en el hueco.

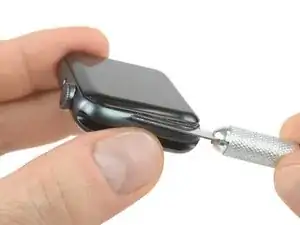
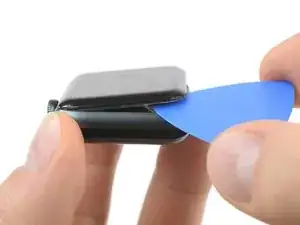
    • Una vez insertada, inclina la cuchilla para abrir ligeramente la pantalla.

    • No insertes la cuchilla más de 1/16 de pulgada (~2mm).

    It’s difficult to grip case in a way that keeps fingers safe from the blade but doesn’t hit the side buttons and turn the device on!

    If it’s a struggle to get the display to release, warm case for a few more minutes.

    Kyle Powderly -

    I have tried so may times to get the display to release but nothing works. Should have bought a new watch LOL. Kept the iOpener on 2 times for 10 minutes and it still won't open. There must be a better way.

    Susan E. White -

    Hi Susan,

    if you're struggling to get the adhesive loose enough a hair dryer, heat gun, or hot plate may also be used, but be careful not to overheat the device. The edge should feel slightly too hot to the touch.

    Dominik Schnabelrauch -

  5. AjRJCyCiMOCZ3rad
    AjRJCyCiMOCZ3rad
    ARGTNpwjNblelqda
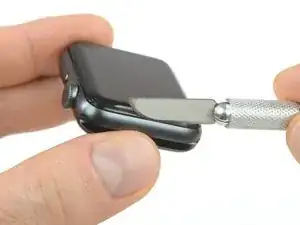
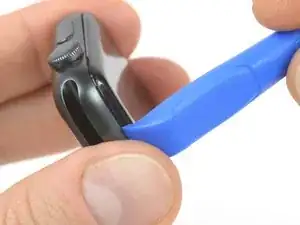
    • Una vez que has abierto un pequeño espacio con la hoja curvada, retira la hoja e inserta el borde mas delgado de una herramienta de apertura en el hueco.

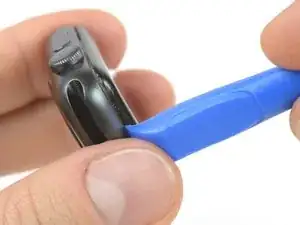
    • Empuja la herramienta de apertura en el hueco. Usando tu pulgar como un pivote para levantar la pantalla abierta un poco más lejos.

    • No intentes abrir o separar la pantalla completamente.

  6. R4FIOpCBksWgGmXY
    R4FIOpCBksWgGmXY
    XUMQGYuCDf4DO6MI
    GWW1SH1I4KqcmfKr
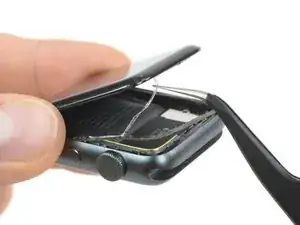
    • Inserta una púa de apertura debajo de la pantalla y separa cuidadosamente la junta de Force Touch de la pantalla.

    • La pantalla iFixit y los kits de reparación de la batería incluyen una junta de reemplazo Force Touch, así que no te preocupes demasiado si la tuya está dañada.

    • De lo contrario, para conservar la junta Force Touch, hurgue con cuidado bajo el borde de la pantalla. Si la junta Force Touch se rompe al levantar la pantalla, o si separa las capas de la junta, también deberá reemplazar la junta Force Touch en sí.

    • Desliza la púa alrededor de la pantalla para separar el adhesivo entre la junta de Force Touch y la pantalla.

    • No insertes la púa de apertura más de 1/16 de una pulgada (~2 mm).

  7. rPZ1tKy2Hq2hQToM
    rPZ1tKy2Hq2hQToM
    vdTqXtcOWsXKFMeh
    x5qVggWBkbWBMNls
    • Para evitar tensionar los cables de pantalla, no la abras completamente todavía.

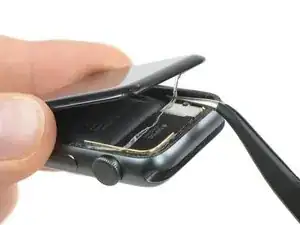
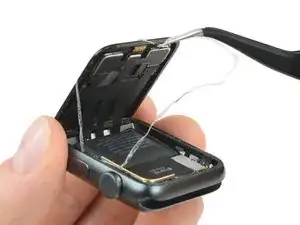
    • Abre la pantalla a un ángulo de 45° y usa pinzas para despegar el adhesivo entre la pantalla y la junta de Force Touch.

    • Enrosca el adhesivo alrededor y detrás de los cables de la pantalla para quitarlo completamente.

  8. y1fV1Nd2PZhidSJy
    y1fV1Nd2PZhidSJy
    iJkqEdVVY2YdLKMo
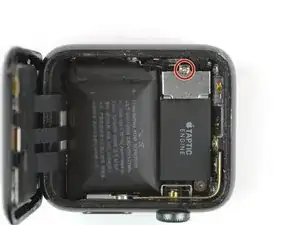
    • Utiliza un destornillador Y000 para quitar el tornillo de tres puntos que sujeta la cubierta metálica del conector de la batería.

    • Remueve la tapa.

  9. rCcSY1GiFOR2oeRP
    rCcSY1GiFOR2oeRP
    USkmJGVUcoYa1Oal
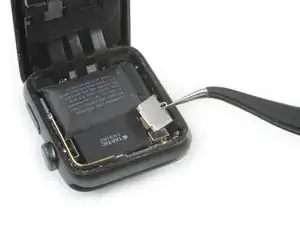
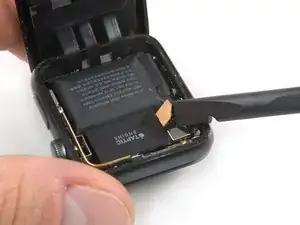
    • Desconecta la batería levantando su conector con el borde de un spudger.

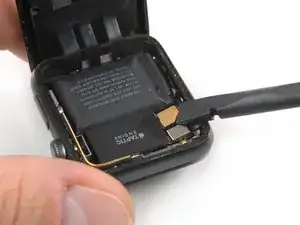
    • Dobla el conector ligeramente hacia arriba para asegurarse de que no haga contacto por accidente.

Conclusión

Para volver a ensamblar tu dispositivo, sigue estas instrucciones en orden inverso.

Tobias Isakeit

Miembro Desde 31/03/14

108306 Reputación

0 comentarios