Introducción

Esta es una guía prerrequisito para desconectar la batería en un Samsung Galaxy Note9. Esta guía es parte de otro procedimiento y no debe ser utilizada sola.

  1. imr3TvrFDDQ2Smgb
    • Apaga tu teléfono antes de comenzar a desmontar.

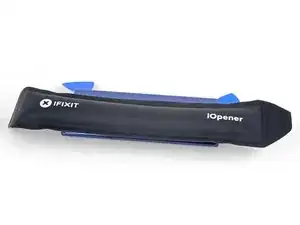
    • Usa un secador de pelo, una pistola de calor o prepara un iOpener y aplícalo en el borde derecho de la parte trasera del teléfono durante un minuto para suavizar el adhesivo que hay debajo.

    If using an iOpener it will need to be fully heated and set on for at least 5 minutes. You’ll know the phone is hot enough when its almost too hot to touch.

    Spencer Barron -

  2. wK5AZqwWYVFHhdpM
    wK5AZqwWYVFHhdpM
    AiS2h1pqRmiTyrnX
    ijSfEkEAirfgkjyB
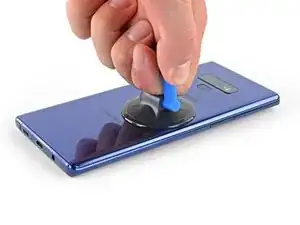
    • Aplica una ventosa en la tapa trasera.

    • Levanta con la ventosa para crear un espacio entre la tapa trasera y el marco del teléfono.

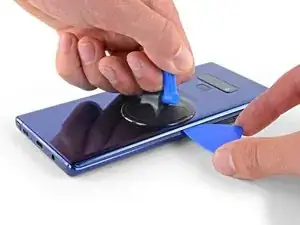
    • Inserta una púa de apertura en el espacio.

    • Si el vidrio está demasiado agrietado, cúbrelo con una cinta de embalaje para crear una superficie para que la ventosa se adhiera.

    • Si el adhesivo no se mueve, aplica más calor, no una fuerza excesiva. Demasiada fuerza podría romper el vidrio.

    It takes so much heat that it is concerning that damage might be caused to the internal parts. It is difficult to heat the glue, pull the case apart and insert the pick at same time. May need some more pointers to handle these situations first, to prevent possible damage. Also what about the glue that is heated and then cooled before opening? Does it run inside and cause greater adhesion after it cools? Another thing, the handling may cause the phone to turn back on while working to separate. Don't know that that is of concern.

    Lou Smith -

    Angle the pick up very slightly so the point goes up into the curve of the glass, not down towards the workings of the phone

    Dean Lee -

  3. phWdatcXskIOnRO3
    • Ten en cuenta que hay más adhesivo a lo largo del borde superior y alrededor del bisel de la cámara que alrededor del resto del teléfono.

    • Corta con cuidado alrededor del borde izquierdo cerca del sensor de huellas digitales o te arriesgas a dañar el cable plano en el interior.

    It's extremely easy to crack the back glass when nearing and rounding the corners. It's probably a good idea to soften the adhesive with heat as you go.

    Aaron Peterson -

    Step 5 is NOT "cut through the adhesive", that's steps 5-10. Step 5 is "Begin the careful process of cutting through the adhesive, starting at the right side where you already softened it. Proceed carefully, slowly, and warmly through the following steps."

    Aaron Peterson -

  4. YpkbXvVWUIR4Afeb
    YpkbXvVWUIR4Afeb
    FaUbUKoZe6HurIby
    5vZLASPFVpEgMyLC
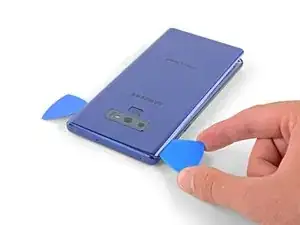
    • Empezando por el centro, corta el adhesivo de arriba a abajo por el lado derecho con una púa de apertura.

    • No insertes la púa más de la mitad en el teléfono al cortar cerca del sensor de huellas digitales o de las cámaras, o te arriesgas a dañar los componentes internos.

  5. OFSZgLGgXARkwaWJ
    OFSZgLGgXARkwaWJ
    E6TEFVlXsPNDGGHi
    FFeOmLNySIi2VTct
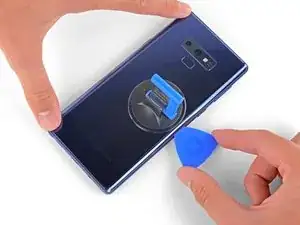
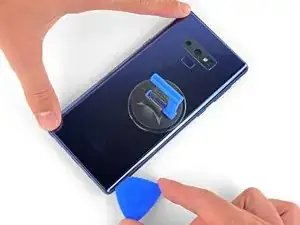
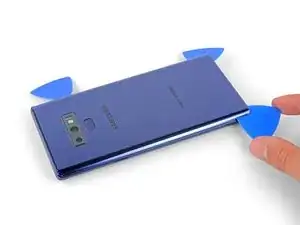
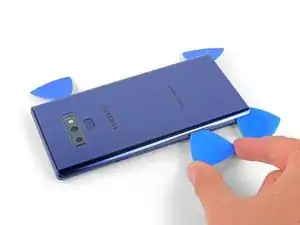
    • Deja una púa de apertura en la esquina superior derecha.

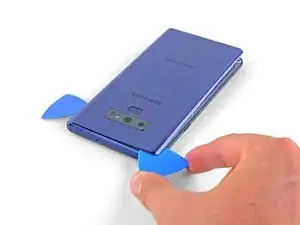
    • Usa otra púa para cortar el adhesivo en la esquina inferior derecha.

    • Deja esa púa de apertura en el teléfono.

    • Usa un iOpener, un secador de pelo o una pistola de calor para aplicar más calor según sea necesario en el lugar donde estás cortando el adhesivo.

    There seems to be a lot of glue at the bottom, I broke the glass as I was cutting past the charging port - not sure if it was already fractured or just not enough heat (I used Sellotape so it didn't break up into pieces!)

    I think LOTS of heat & patience is the key!

    Be very careful around the corners and bottom (probably top too, but I didn't have a problem there). Make sure you've cut in far enough down the side first (go in about 1cm) but less round the corners and work in slowly.

    Dean Lee -

  6. 2jDIRHRfM2FgHNFR
    • Usa una pistola de calor o un secador de pelo o aplica un iOpener caliente en el lado izquierdo del panel trasero durante un minuto para suavizar el adhesivo debajo.

    If using an iOpener it will need to be fully heated and set on for at least 5 minutes. You’ll know the phone is hot enough when its almost too hot to touch.

    Spencer Barron -

  7. 1mtB1lSGkZWyMSrM
    1mtB1lSGkZWyMSrM
    4K246ldIYZVMViQv
    FFMXuXrVm2DpNhZ6
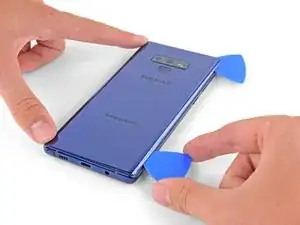
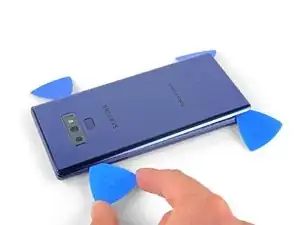
    • Inserta una púa de apertura en la esquina inferior izquierda del panel trasero.

    • Usando otra púa de apertura, corta el adhesivo a lo largo del borde izquierdo del panel trasero.

    • No insertes una púa de apertura a más de la mitad del borde izquierdo cerca del sensor de huellas digitales, ya que podría dañar el cable plano en el interior.

    • No pasa nada si las púas de apertura se caen al separarse la tapa trasera.

  8. nNSpwZdhgreWl3rh
    nNSpwZdhgreWl3rh
    DrwI6NpI44hU5bGQ
    6tniPN2RFyvbFgLv
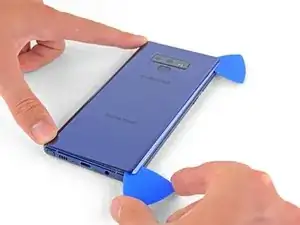
    • Usando la púa de apertura insertada, corta cuidadosamente el adhesivo alrededor de la esquina superior izquierda del panel trasero.

    • Finalmente, corta el último adhesivo a lo largo de la parte superior del teléfono.

    • Utiliza un iOpener, un secador de pelo o una pistola de calor para aplicar más calor según sea necesario en el lugar donde estás cortando el adhesivo.

  9. CFGPd5CUmuDGj14k
    CFGPd5CUmuDGj14k
    XadxJ3X5cMDYZdsS
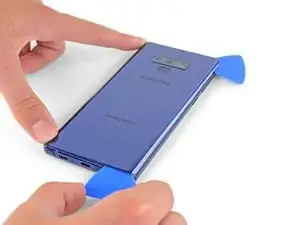
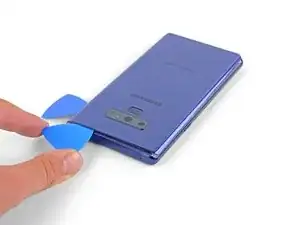
    • Separa primero el lado derecho de la tapa trasera.

    • Inclina la tapa a lo largo del borde izquierdo para exponer el cable plano del sensor de huellas digitales.

    • No saques todavía el cable plano del sensor de huellas digitales.

    Thought I'd done something wrong here as there wasn't a cable attached to the back - the fingerprint reader hadn't come away with the back, but had stayed with the phone.

    Dean Lee -

  10. EOB5BnuPwLiWhRJy
    EOB5BnuPwLiWhRJy
    pvUG6RHyuIevnBsT
    • Usa la punta del spudger para levantar el cable plano del sensor de huellas digitales de su zócalo.

    On my phone the fingerprint sensor did not come off with the back cover but stayed on the phone!

    Dean Lee -

  11. fxtTpIwKVs1XBASZ
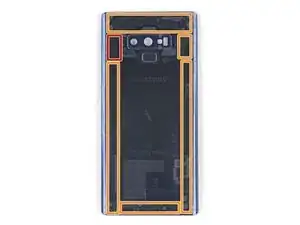
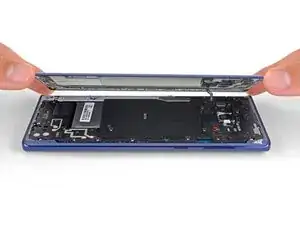
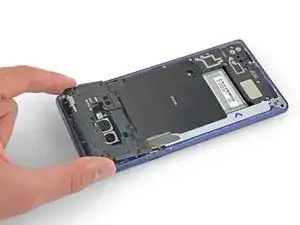
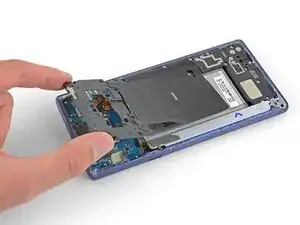
    • Remueve la tapa trasera.

    • Para instalar una tapa trasera:

    • Usa pinzas para quitar cualquier adhesivo que quede en el chasis del teléfono. Luego limpie las áreas de adhesión con alcohol isopropílico de alta concentración (al menos 90%) y un paño sin pelusas para preparar la superficie para el nuevo adhesivo.

    • Aplica con cuidado el nuevo adhesivo a la tapa trasera, luego alinea un borde del vidrio contra el chasis del teléfono y presiona firmemente el vidrio contra el teléfono.

    • Alternativamente, puedes reinstalar la tapa trasera sin reemplazar el adhesivo. Retira los trozos grandes de adhesivo que impiden que la tapa trasera quede al ras. Luego de instalar, calienta la tapa trasera y aplica presión para asegurarla. No será impermeable, pero el pegamento suele ser lo suficientemente fuerte como para aguantar.

    I am installing a new backplate (this is my first repair; I was CERTAIN that I would crack the back glass, and I was NOT wrong) but I’m not sure how tweezers are meant to remove gooey adhesive! I simply used the blue plastic pry tool as a scraper and gently rolled up the goo. Maybe the glue is different because I have a refurbished phone? That may also explain why I had so much trouble with Step 1. Hope that this helps!

    Christopher Yarlott -

  12. NpvMRUlwISOMrGih
    NpvMRUlwISOMrGih
    xEFdupFYZIyOQham
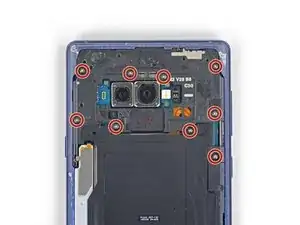
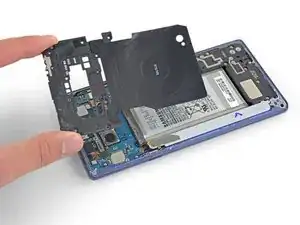
    • Usa un destornillador Phillips para remover los nueve tornillos de 4 mm que sujetan el marco medio superior.

    There are two more screws on the bottom right corner of the little side frame that the Qi plate is glued to. I took those out as it put less stress on it.

    John Stone -

  13. TtRQbpjOgwgKyCeU
    TtRQbpjOgwgKyCeU
    qnfyfoRPVUgOHdxi
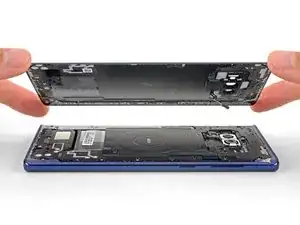
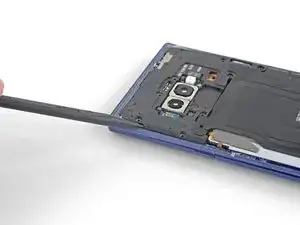
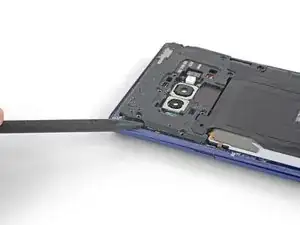
    • Inserta la punta de un spudger en la esquina superior izquierdo del marco medio superior.

    • Levanta el marco medio superior del teléfono.

    • La parte superior del marco medip se encaja y se sale de su lugar.

  14. WPl3OTEYUWaQk4lw
    WPl3OTEYUWaQk4lw
    OtIWY55KKKuAKdUL
    pRScXCbeMtNfmfgF
    • Retira la bobina de carga inalámbrica de la batería empezando por el lado izquierdo.

    • El adhesivo es débil pero puedes usar un pico de apertura para cortarlo si es necesario.

    • Durante el reensamblado, comienza por encajar el marco central en su lugar antes de adherir la bobina de carga inalámbrica.

    Be careful not to tear it as it comes off - especially the side bits that stick out a bit

    Dean Lee -

  15. MDPfHEnbaBBwN5DS
    MDPfHEnbaBBwN5DS
    3SnhFaqu3LXtjZNv
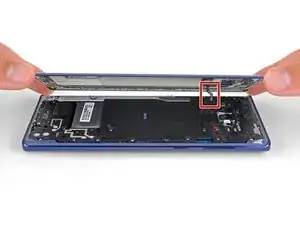
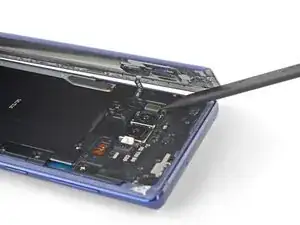
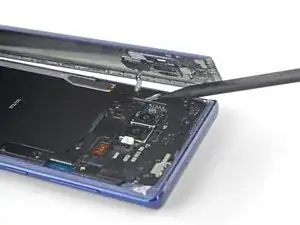
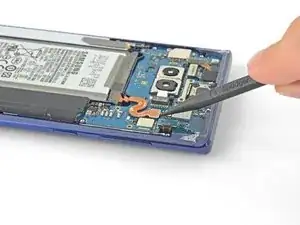
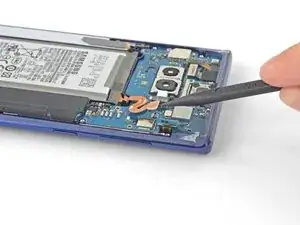
    • Utiliza la punta de un spudger para desconectar el cable plano naranja que conecta la batería a la placa madre.

Conclusión

Para volver a ensamblar tu dispositivo, sigue estas instrucciones en orden inverso.

Sam Omiotek

Miembro Desde 25/02/19

59803 Reputación

0 comentarios