Introducción

Esta guía te mostrará cómo desarmar de manera segura un ratón Logitech G502 Hero como preparación para reemplazar los componentes internos del ratón para una reparación o reacondicionamiento.

  1. g3MdNKvBLZ1rOxm5
    • Para mantenerlo fuera del camino, enrolle el cable USB con la brida de velcro integrada

    • Si la brida de velcro está dañada o falta, una brida de torsión funciona igual de bien.

  2. YDpFtNT43CJ1Xmfb
    YDpFtNT43CJ1Xmfb
    g5bKjZ1eVbdR51vT
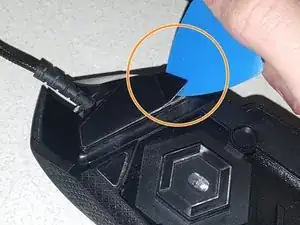
    • Retira la cubierta del peso de la parte inferior del ratón levantándola con el pie del ratón.

    • Puedes quitar los pesos de afinación si lo deseas, pero no es necesario para el desmontaje.

  3. Lt2fFADZQMJ2WvLZ
    Lt2fFADZQMJ2WvLZ
    CoEjJqDh3ASVwBwG
    y5XgvEBRqrlb4Xwy
    • Usando una pistola de calor (ajustada a baja), calienta los tres pies del ratón durante varios segundos cada uno.

    • Desliza una púa de apertura debajo de los pies del ratón y debajo del adhesivo.

    • Si se hace correctamente, debería poder despegar los pies del ratón con el adhesivo aún adherido.

    • Si el adhesivo no sale con los pies, puedes rasparlo con un spudger.

  4. HyIkyNAbZ54e3qdJ
    • Retira los cuatro tornillos Phillips que sujetan las dos mitades del ratón juntas.

    the top screw is actually more to the right and wrongly marked in the picture

    Dennis Schwertel -

  5. L3OAkvn4EMfPafZd
    L3OAkvn4EMfPafZd
    XWKwLKORkWAMwwE3
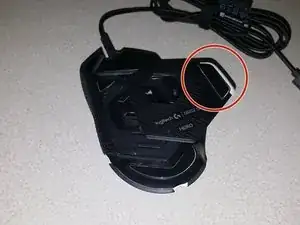
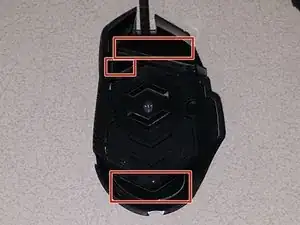
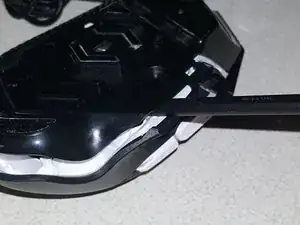
    • Inserta el extremo plano de un spudger de plástico en el área indicada entre las cubiertas superior e inferior.

    • Las dos mitades del ratón se dividirán casi por completo con muy poca fuerza.

    • No intentes separar las dos mitades todavía.

  6. oGPB6pbMyrYCbTrI
    oGPB6pbMyrYCbTrI
    h6N44qdBHZCSZDsD
    GEYYLMdcKmgKXTx2
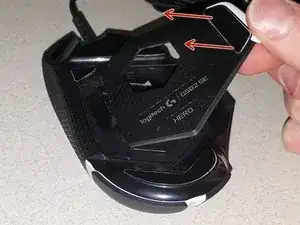
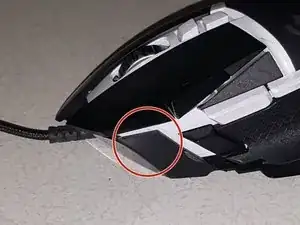
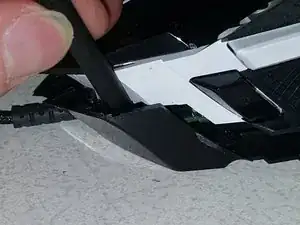
    • Inserta el extremo plano de un spudger de plástico entre las cubiertas superior e inferior en el lado izquierdo del ratón, al lado del clic izquierdo.

    • Las cubiertas superior e inferior se separarán por completo, lo que te permitirá levantar la cubierta superior.

    • Ten cuidado y evita romper los clips de plástico que sujetan las dos mitades juntas.

  7. D4LHZ1mbWYdnPV2b
    D4LHZ1mbWYdnPV2b
    RuEdPpcjTwEUjMm3
    CwVKSiplSvlWJYFb
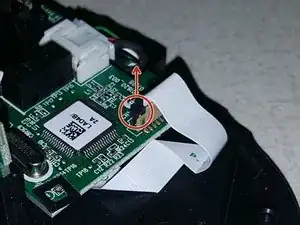
    • Usando el extremo plano de un spudger de plástico, levanta con cuidado ambos lados de la traba que asegura el cable plano.

    • Con el bloqueo liberado, el cable plano debe retirarse fácilmente del conector.

    • No utilices demasiada fuerza para liberar el bloqueo, de lo contrario, el conector podría dañarse.

  8. FmHxBEvGWhXJleGj
    FmHxBEvGWhXJleGj
    eSxfdmnsMGGGF1kx
    EOEGWLbYMXiET6Sr
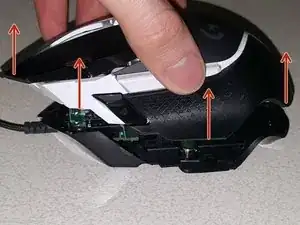
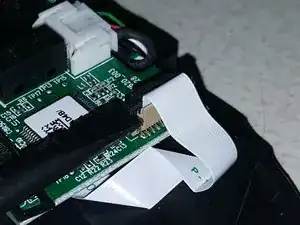
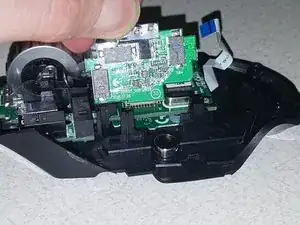
    • Retira la placa lateral tirando de ella hacia afuera para acceder al conector del cable plano.

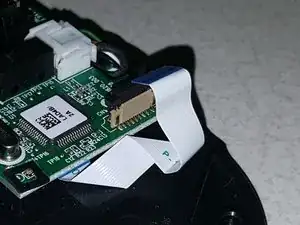
    • Usando la misma técnica que se usó con el conector del cable plano del sensor Hero, desengancha el cierre del cable.

    • Retira el cable plano con la placa lateral.

  9. Y4VCHZuqmFArmdwD
    Y4VCHZuqmFArmdwD
    rPmvLXjSjeANZKW3
    dNKXwZPShA2A1SYY
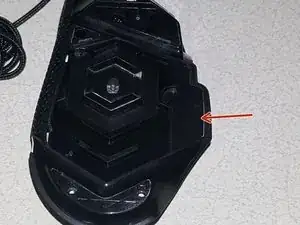
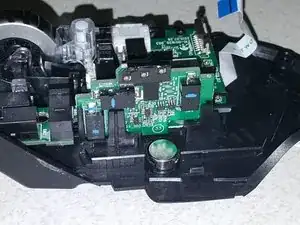
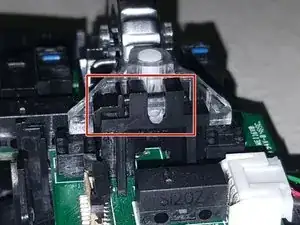
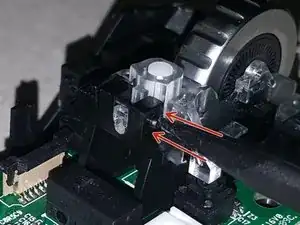
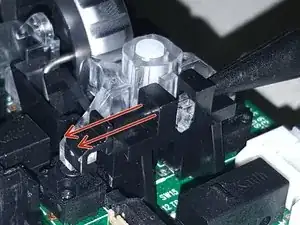
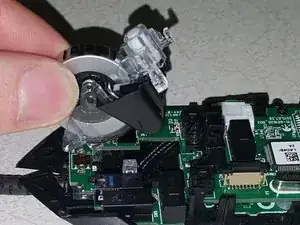
    • El conjunto de la rueda de desplazamiento está sujeto por una barra de retención, que debes quitar

    • Usando el extremo puntiagudo de un spudger de plástico, empuja la barra de retención desde el lado derecho.

    • Una vez que hayas hecho esto, puedes quitar la barra de retención.

  10. FsYniuXPvwlxSmEs
    FsYniuXPvwlxSmEs
    UNFRAA4GCKCMxmVj
    • Saca el bloque de la rueda de desplazamiento del ratón.

    • Hay dos resortes pequeños para las acciones de clic de la rueda de desplazamiento; estos son muy pequeños y se pierden fácilmente.

  11. 6QZkGDcZGwG4RIbn
    6QZkGDcZGwG4RIbn
    6tHtJlDDKZbHQKNs
    4kTQNvcIsmTrGBbo
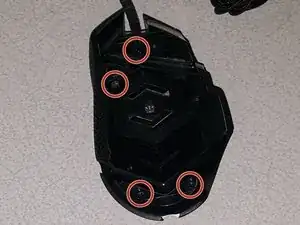
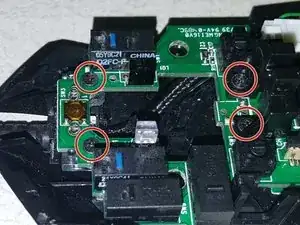
    • Retira los cuatro tornillos Phillips cerca de la parte delantera del ratón.

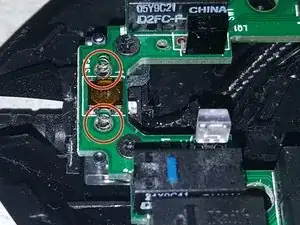
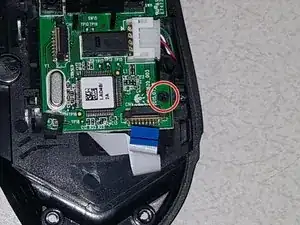
    • Retira el tornillo Phillips cerca del enchufe del cable plano del sensor Hero.

    • Ahora se puede quitar la base para el ensamblaje de la rueda de desplazamiento.

  12. 5E1pmfO5nB3IVcjy
    5E1pmfO5nB3IVcjy
    Y2WUbJNYlI1fprsK
    WmsUVJjuJOyofaPi
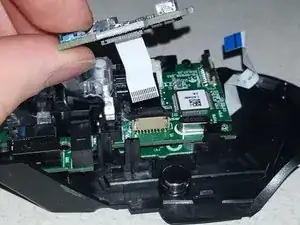
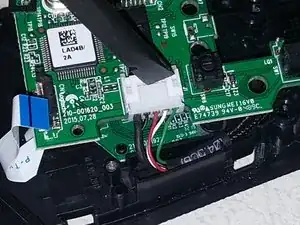
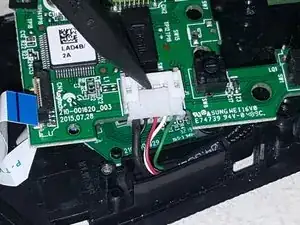
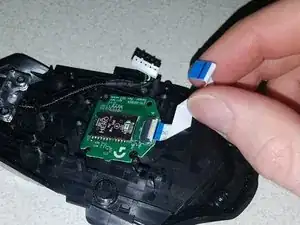
    • Con el extremo plano de un spudger de plástico, desconecta el enchufe del cable USB de la placa principal empujando hacia afuera el extremo macho del enchufe.

    • Una vez que haya suficiente espacio, se puede usar el extremo puntiagudo del spudger para sacar la tapa.

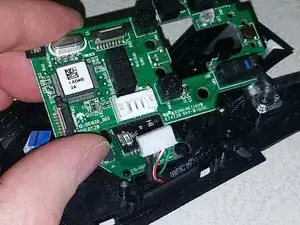
    • Retira la placa principal de la cubierta inferior del ratón.

  13. yvSmgPYYPjp3Suuj
    yvSmgPYYPjp3Suuj
    ZBCWAiTrTbfhMAxe
    BoY1kYXVeeFh2PyW
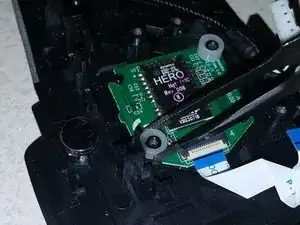
    • Con el tablero principal retirado, aparece la placa del sensor Hero.

    • Retira los dos tornillos Phillips que sujetan la placa Hero.

    • Usando pinzas, retira con cuidado los dos espaciadores de nailon de los postes.

    • Retira la placa del sensor Hero.

  14. EknJ6LJX5RuyUAHY
    EknJ6LJX5RuyUAHY
    rNUshaGv4pD3kEtH
    AYMIpVoGWgED365H
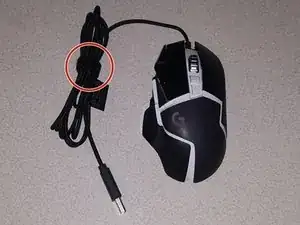
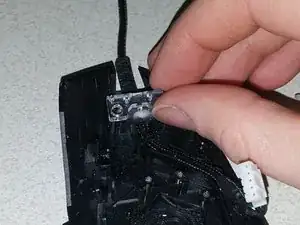
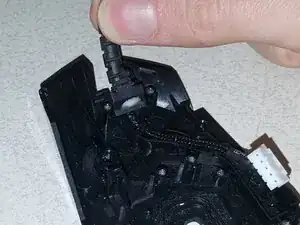
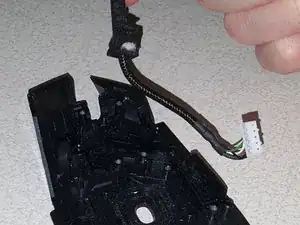
    • Comienza quitando la pieza de plástico transparente en la parte superior del liberador de tensión del cable.

    • Con la pieza de plástico transparente quitada, el cable se puede quitar en el liberador de tensión y la cubierta inferior.

  15. 5iyrmfHpWsbZKxAq
    5iyrmfHpWsbZKxAq
    bBNYqmFM2dhwqDgf
    5UmGWyHeDUctwWTc
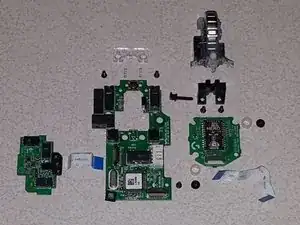
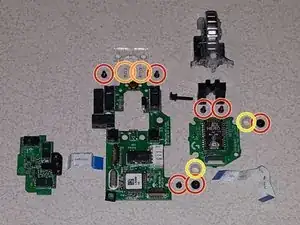
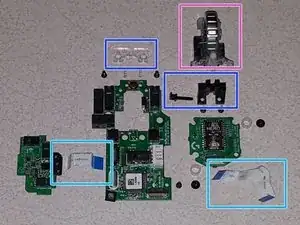
    • Estos son todos los componentes internos, para que te sirva de referencia:

    • Tornillos Phillips

    • Resortes de rueda de desplazamiento

    • Espaciadores de nailon para sensores Hero

    • Cables de cinta para tablero lateral y tablero de sensores Hero

    • Conjunto de rueda de desplazamiento

    • Bases de rueda de desplazamiento y barra de retención

Conclusión

Reemplaza las piezas necesarias y luego sigue estas instrucciones en orden inverso para volver a armar.

spslizer

Miembro Desde 10/03/20

1305 Reputación

20 comentarios

What’s that button near at the spring on top. Is that a middle mouse button? (yellow button thing at the middle at the top)

Nicholin V -

You are correct, that is the middle mouse button

spslizer -

What’s a good replacement switch for the 2 main left/right buttons? They say OMRON 3159C21 D2FC-F-K

Anthony Clark -

That’s a good switch to replace them with

Me personally, I like to pull the switches off of other mice, like those rebranded Logitech ones that are bundled with some computers

The G502 is easy enough to pull apart and put back together that I don't mind replacing the switches on occasion

spslizer -

Oh shoot, you have to do soldering to replace switches? Those black boxes? Yikes, may be something I dont want to mess with if so. If I can just figure out how to clean them I will try that, but if I have to replace them with soldering, I am doomed lol

Living Simple And Fun -

@spslizer sorry I wasn’t clearer before: the switches that are on the primary/secondary buttons are the OMRON D2FC-F-K and the primary switch has failed. I’m replacing them both with Kailh GM 8.0 switches since they seemed to have a good reputation.

I definitely need to study desoldering more though, I am having a lot of trouble removing the bad switches!!

Anthony Clark -

I find that the easiest way to desolder them is to heat up the existing solder, add more new solder, then use a desolder vacuum pump as close as you can to the pin while your iron is still there. If there's still a small residual amount “tacking” it on, heat up the pad around the hole and then wiggle the switch around

It helps to have a helping hands station and a pair of tweezers or hemostats to hold the switch, as the switch and pads will get hot

spslizer -

Hi! I was just wondering if you knew the dimensions of the screw! I lost one when I took it apart and now my right click is a little bit wonky. Thanks!

Sophie T -

Hi Sophie. I unfortunately cannot find the shell and screws of one of these mice.

I would recommend trying one of the shell screws from one of the bottom holes and put it in the hole under the right click or the front hole, depending on which is missing

The microswitch may also be on its way out; a “bounce” click when you click and hold is a good indication of this

spslizer -

Disregard the first part of my comment. I have the measurements from the shell screws

On mine they are M2x10.25mm screws. The head looks to be about 3.25mm wide

spslizer -

Can you plz let me know the dimensions of yellow button (middle click button)? Thanks.

Mujtaba Ali Panjwani -

From my measurements with a non-digital caliper, it is approximately 9.5mm square, with a height of approximately 1mm

If measuring from the outside where the component is indented for the contacts, it is about 8.5mm. The button looks almost like a very stubby “+” symbol. I hope this information helps!

spslizer -

It's 4 x 4 x 0.8mm. I had to replace the middle click button of my Proteus Spectrum (also a G502 model, much earlier than the hero)

Ian Troy Alvaran -

Gracias! pude cambiar los botones de mouse sin problema

Daniel Barros -

Super Anleitung! Habe mit der Anleitung meine Maus schnell zerlegen und die neuen Ersatzteile einbauen können.

Die Ersatzteile habe ich von:

https://ammigoo.de/search?type=product&o...

Malte Fuchs -

My left mouse button stopped functioning properly and I saw a solution for anotheer mouse that said open it up, get to the button sensor (not sure the exact name, and clean off some build up, like is it oxidation? I need to look it up again. But basically, it affects the sensor so that the button wont accept to be held down. You press the button down but it acts like a normal button click.

So now I need to find the sensor and clean it, or replace it. Because the mouse is useless without a good left mouse button.

I see the housing for the sensor (i assume those black boxes under each button. I just need to safely open it up and clean inside.

Living Simple And Fun -

You are correct, the rectagular boxes are the microswitches. It doesn't surprise me that oxidation or even just dust and skin oils could lead to these buttons not working. I've always just replaced the microswitches entirely if they fail or go on the fritz; assuming the the microswitch can be opened up, cleaned, and put it back together, then I don't see why not give it a try

spslizer -

It wont let me reply to you directly for some reason even though I can anybody else, but I am trying to figure out how to open the box up now.
That said, I dont mind changing it out, except I need to know how to safely remove the box. They dont have instructions on that part. Hopefully I can find a video about this online for a mouse with a similar set up.

Living Simple And Fun -

Thank you for the disassembly walk-through. I just replaced the right mouse button with an OMRON D2FC-F-7N and it is a little more firm and makes a little more click. I also had some D2FC-F-K on order but I was impatient.

Trevor Bugera -

Hello, do I need to buy new rubber feet for the mouse or is it possible to reuse the ones I removed? How should i place them back? I don't wanna glue them down because maybe I will need to open it again in the future.

Chilled Gaming -