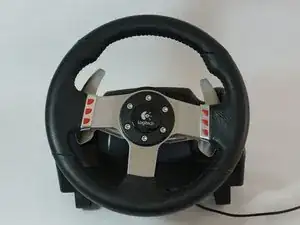
Introducción

La mayoría de los tornillos que quitarás están roscados en plástico; ten cuidado al volver a instalar los tornillos, ya que pueden cruzarse fácilmente o romper el plástico.

  1. JFe3hZpcNcMwfMMY
    • Retira los seis tornillos hexagonales grises de 25 mm con una llave Allen de 4 mm.

    • Ten cuidado cuando levantes la rueda, ya que hay cables frágiles conectados a la parte inferior.

    • Levanta con cuidado la rueda, pero no la desconectes del resto del dispositivo.

  2. wnfiUv2VBuSB31AK
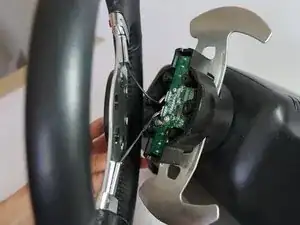
    • Levanta con cuidado la rueda para sacarla del cubo, exponiendo los 2 cables de la palanca de cambios y la placa PCB.

  3. NZhmVBB6Bqh3Wu2P
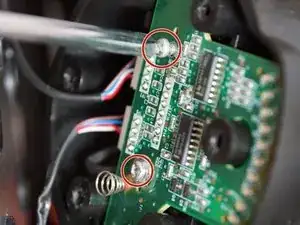
    • Retira los dos tornillos plateados de 7,5 mm que sujetan la placa PCB verde en la rueda con un destornillador Phillips n.º 1.

  4. foUkt5y4AwJkc2ET
    • Retira con cuidado la placa PCB del cubo de la rueda.

  5. Qtmlc6TkePtrVyam
    • Pellizca y desenchufa con cuidado el conector grande de 7 pines debajo de la placa PCB.

    • Ten cuidado al desenchufar este adaptador, trata de no tirar de los cables para evitar dañarlos. En su lugar, mueve el conector de plástico mientras tiras de él para aflojarlo.

    These screws refused to go all the way back in for me, and one of them stripped completely. If this happens to you, you can get replacement screws that are shorter here - https://www.amazon.com/gp/product/B01MFA...

    This works for the G27, not sure about the G25 or any other wheels.

    Obviously the screws being shorter means the wheel isn't as strongly attached to the base in this direction, so if you have to do this remember not to put unnecessary stress on these screws by pulling the wheel straight off the base.

    SouthernPotato -

    bro i need new long cable i think and that connector or just replace the whole thing .. i put new grease, screw it more tight by the encoder so it woulnt go to the left .. wheel works verry nice tho all my buttons and shifter pedals wont work now tho the lights works dont know what to do now.. and now i kinda regreat opening it.. my wheel run so good now just these buttons are off not working at all and it kinda screws up midle of the game..

    Alexander -

    @alexdinpoik I’ve had the same problem when the 7 pin connectors blue and green cables broke off. First, only the blue one was broken which only took the led indicators gradual increase but all buttons were working then when i tried to plug in back, the green one broke off leading to none of the buttons working but the led indicators just working. Now i’ll try to fix it with iron soldering.

    Okan Akgül -

    okan can u pls share a video of you doing it? so i can do the “copy paste” hahah where can i buy cables and stuff i need for that? whats the name of these white connectors ? im new to this but share me a link to buy. i rather just try to fix it then buy a new wheel since its a great wheel compare to g29 that has bad software and the other wheels are to expensive. g27 cant be found in stores anymore neither and if im gonna buy one it has to be new haha hopefully u can share some knowlage thanks!

    Alexander -

    Where i can Buy the 7 pin cable for Main board please

    Ojilve jose -

    Hey guys!

    i broke the 7 pin cable anyone know where can is buy it? Thanks

    Richard Hajdu -

  6. FiRu5bFZLB5YBEuV
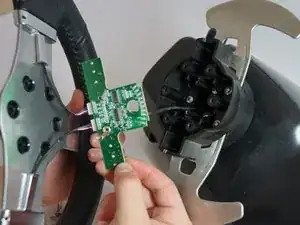
    • Ahora puedes quitar completamente la rueda del cubo. Déjalo a un lado hasta que vuelvas a armar la rueda.

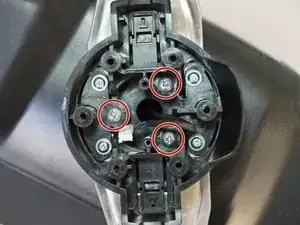
    • Retira los tres tornillos plateados de 37,5 mm más internos con un destornillador Phillips n.º 2.

    • Retira el cubo de la rueda y empuja el conector a través del centro del cubo.

  7. hRAYY1mMrAVKZJFD
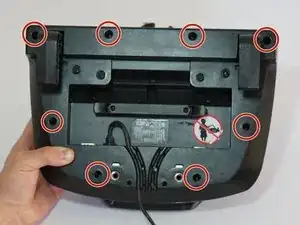
    • El cubo de la rueda ahora se puede dejar a un lado y voltear la carcasa del volante para revelar la parte inferior.

    • Retira los ocho tornillos plateados de 15,9 mm que rodean debajo de la carcasa de la rueda con un destornillador Phillips n.º 1.

  8. UidVkwPtGC2eJLMK
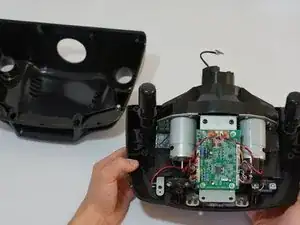
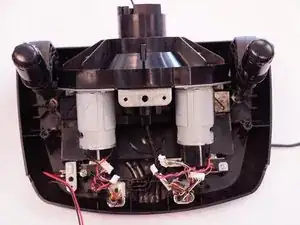
    • Gira la carcasa hacia atrás y retira la mitad superior de la carcasa para dejar al descubierto la mayoría de los componentes de la rueda.

    • La cubierta de la carcasa se puede dejar a un lado hasta que vuelvas a armar la rueda.

    need two new black screes abouve the pcb board.. lost them need to know the size since the screws i replace it with was not exact..

    Alexander -

    Loosen the desk clamps before removing the housing, otherwise you risk breaking something. The housing should come off without having to use any force whatsoever.

    Oula Kuuva -

  9. AmPXsBqhnwifCPIb
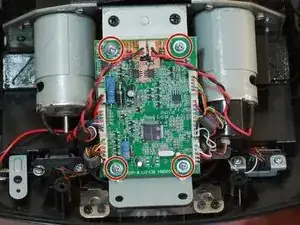
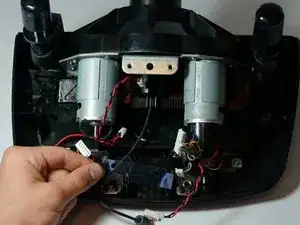
    • Retira los cuatro tornillos plateados de 7,3 mm que sujetan la placa PCB verde a la carcasa del motor con un destornillador Phillips n.º 2.

    I’d do steps 9 and 10 in reverse order, the connectors are much easier to unplug while the board is secured in place.

    Oula Kuuva -

  10. CyrTKTeAZ5fqJSPi
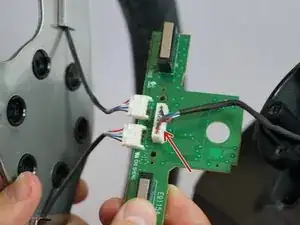
    • Desconecta los tres conectores de plástico en el lado izquierdo de la placa PCB.

    • Desconecta los dos conectores de plástico en la parte superior de la placa PCB.

    • Desconecta los tres conectores de plástico en el lado derecho de la placa PCB.

    • Tirar de los conectores de plástico requiere mucha fuerza, pero ten cuidado y no tires directamente de los cables. Trata de encajar o empujar el lado macho del conector.

    • Si necesitas un poco de palanca adicional al quitar estos conectores, intenta usar una herramienta de apertura de plástico para hacer palanca en los conectores.

    • Retirar estos conectores permite un acceso más fácil a los cuatro tornillos que sujetan el soporte de la placa PCB a la carcasa del motor.

    Some of the connectors have locks on them, I would recommend this as a two person job.

    Reuben Andrews -

    I didn't take them off :)

    Evaristo Rivieccio Vega -

    I messed up and broke the cables of the 5 Pin Connector on the right. Can anyone tell me what it’s called so I can buy replacement? The Rest of the cable is stuck in there so I can’t re-use it sadly.

    Felix Weschke -

  11. a4odqtXHQyqDcUbg
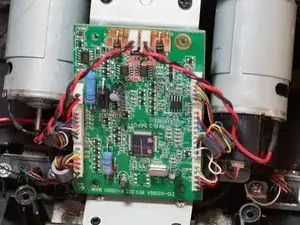
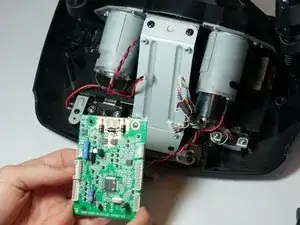
    • Retira la placa PCB después de desconectar todos los conectores de plástico.

    • Ahora puedes dejarla a un lado.

  12. Hvf5BHMD5r3wZDec
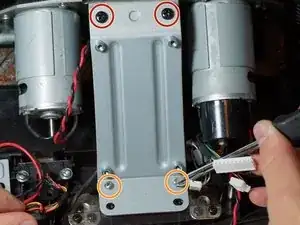
    • Retira los dos tornillos negros superiores de 12,3 mm con un destornillador Phillips n.º 2.

    • Retira los dos tornillos plateados inferiores de 15,5 mm con un destornillador Phillips n.º 1.

  13. q4XLbMAPFVVY2XSU
    q4XLbMAPFVVY2XSU
    EXbOLKj6XwlTA2Zp
    • Retira el soporte de la placa PCB y retira la pieza de plástico transparente que se encuentra debajo.

    • Déjalos a un lado hasta que vuelvas a montar la rueda.

Conclusión

Para volver a armar tu dispositivo, sigue estas instrucciones en orden inverso.

Nicholas Gholdoian

Miembro Desde 21/04/15

1090 Reputación

Un comentario

Hi - help please. I disassembled my G27 and a 2 inch long semicircular metal clip fell out during the process. I don’t know what it is or where it came from.

tony davies -