Introducción

Utilice esta guía para reemplazar la batería CMOS.

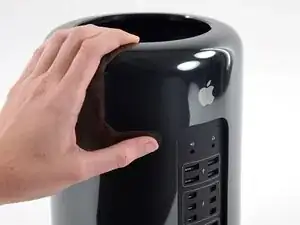
Antes de comenzar cualquier trabajo en tu Mac Pro: Desenchufa la computadora y mantén presionado el botón de encendido durante diez segundos para descargar los capacitores de la fuente de alimentación.

Ten mucho cuidado para no tocar los capacitores o cualquier junta de soldadura expuesta en la parte posterior de la fuente de alimentación. Solo maneja el tablero por los bordes.

  1. UvUDEeuAGOcSyZ6Y
    UvUDEeuAGOcSyZ6Y
    6E4dVROBn2KCRitH
    • Desliza el interruptor de bloqueo hacia la derecha, hasta la posición de desbloqueo.

  2. 1T6FWnrfHWRH2PIX
    1T6FWnrfHWRH2PIX
    LZUjZMT1W2HyocfY
    qEZURvNGfsFRhn15
    • Levanta la caja exterior directamente hacia arriba del Mac Pro.

    • Puede ayudar empujar hacia abajo el centro del ventilador mientras levanta la caja.

  3. thx2PRFESOcKGAcF
    thx2PRFESOcKGAcF
    fowEwJDQUHt5gRvN
    YkicYtjklAO35ERL
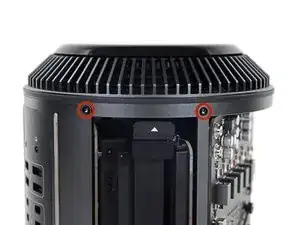
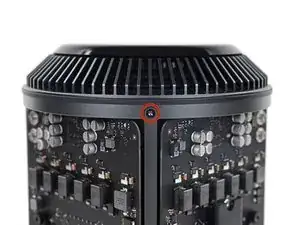
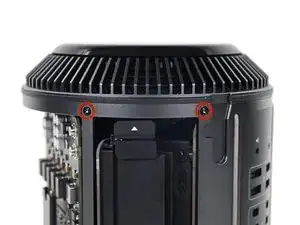
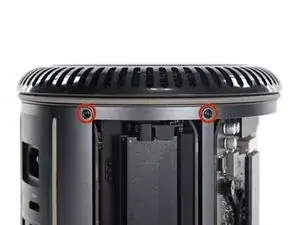
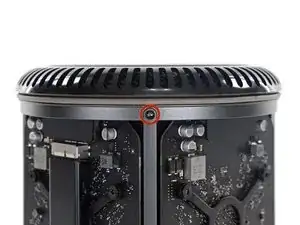
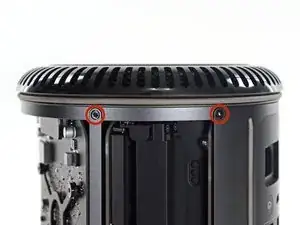
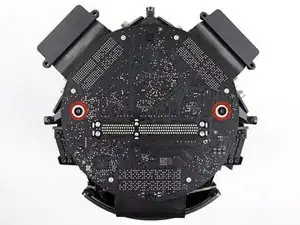
    • Quita los cinco tornillos Torx T10 de 5.1 mm de todo el perímetro exterior del ensamblaje del ventilador.

    You don't have to remove the fan assy to get to the wifi board & card. It can be done with the fan assy still attached.

    Fat Mango -

    Fat Mango is correct. That said. If you do pull the fan assembly note that the screws are all held in with blue Permatex and breaking them free takes a fair amount of effort. Getting a good set of Torx screwdrivers is a must.

    Jim WIlson -

    Hey guys, what would happen if you only replace one card.. I have a D300 but the plan is to upgrade to D500 or D600. So If I can afford and install one instead of the pair would it increase something? or will it cause any conflict? I guess I don’t understand if I the Mac Pro has 2 D300 graphic cards that means each has 1GB? Same as If I would Install 1 D600 that would increase 3GB only? Thanks.

    marcotamayo -

    D300 = 2GB each card. Very few apps uses two cards at the same time.

    Gio Cas -

    The (5) Screws are Apple part number 923-0713

    Steven Gier -

  4. fEANTTnYS4TS3pQD
    fEANTTnYS4TS3pQD
    V2ArmlpPcrPPbGTB
    • El ensamblaje del ventilador está conectado al resto de la computadora mediante dos cables en el lado de la placa de E/S.

    • Incline el ensamblaje hacia arriba alejándolo de la placa de E/S.

    • No intentes extraer el ensamblaje del ventilador todavía, ya que aún está conectado por dos cables.

  5. lceQ6InRYFH5qg2f
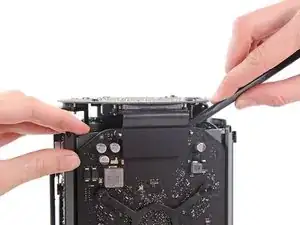
    • Mientras sostienes el ensamblaje del ventilador con una mano, afloja los dos tornillos cautivos T8 en el soporte del cable del ventilador.

    • Estos tornillos están atrapados en la Mac Pro. No intentes quitar estos tornillos de tu Mac Pro.

    On my Mac Pro (assembled mid-2017) these are T8 screws. In fact, there were no T7 screws anywhere in my machine.

    mark33 -

    There was no bracket on top of the cable at all, so I got a bit confused, so I had to skip step 5 and 6.

    Rakesh -

    On my machine, a TR7 worked to remove them due to the weird angle.

    Wilson Gaberino -

  6. Y6MKDVBUdIumVZuf
    • Usa un par de pinzas para tirar del soporte del cable del ventilador y alejarlo del ensamblaje del ventilador.

  7. JUE2RPF2GwjcP2kr
    JUE2RPF2GwjcP2kr
    oW6DugeJyYrgKGD4
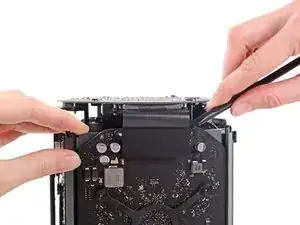
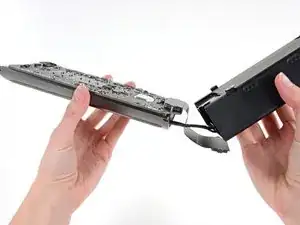
    • Utiliza el extremo plano de un spudger para desconectar el cable plano del ensamblaje del ventilador de la placa de E/S.

  8. wMMmqDsn3NjCMRWu
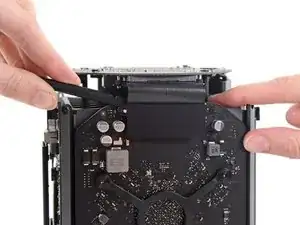
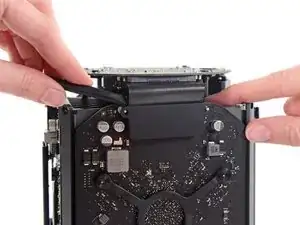
    • Desconecte el cable de la antena del ensamblaje del ventilador de la placa E/S.

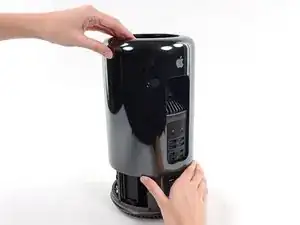
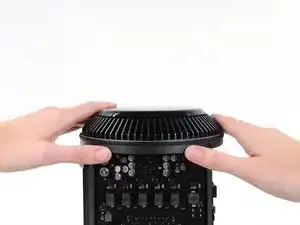
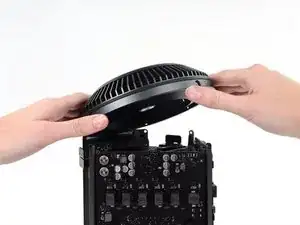
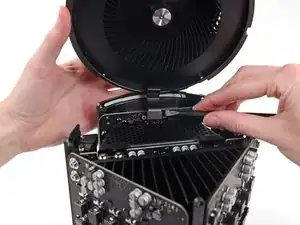
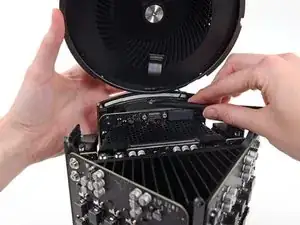
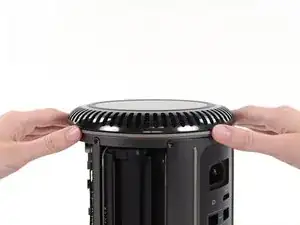
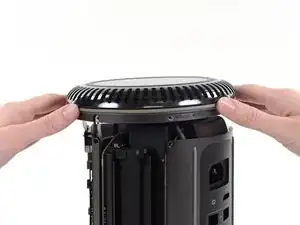
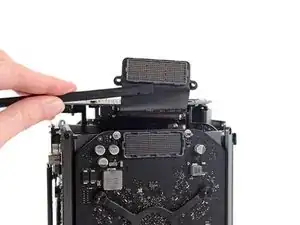
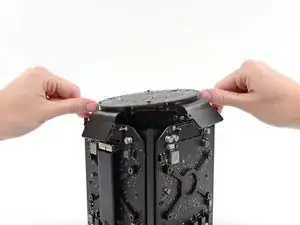
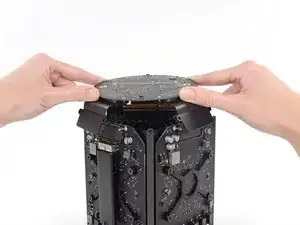
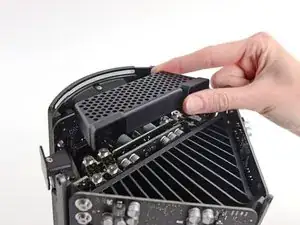
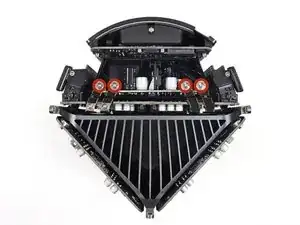
    • Retira el ensamblaje del ventilador del Mac Pro.

    You don't have to remove the fan assy to do the steps below. They can be done with the fan assy still attached.

    Fat Mango -

  9. vKqMwE5sukJabGM4
    vKqMwE5sukJabGM4
    qJXAGFixb3ENKTgb
    GNaKkVSLqlDibNES
    • Coloca la Mac Pro boca abajo, a 180 grados.

    • Retira los cinco tornillos Torx T10 de 5.1 mm del perímetro exterior de la caja inferior.

  10. P5MoWdnj3fbvZkkd
    P5MoWdnj3fbvZkkd
    VQJFPWMcmQVgLTEG
    • Levanta con cuidado la caja inferior y retírala del Mac Pro.

  11. P26PH6LWUoxtfsJ3
    P26PH6LWUoxtfsJ3
    jNkEW6LyVuvBsMZS
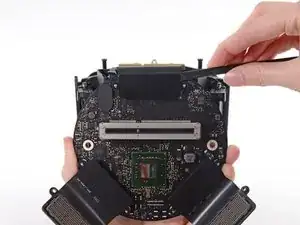
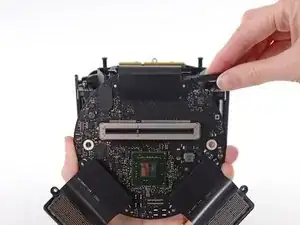
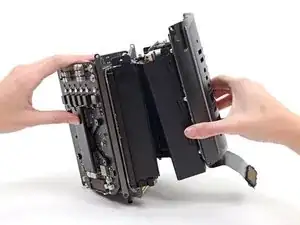
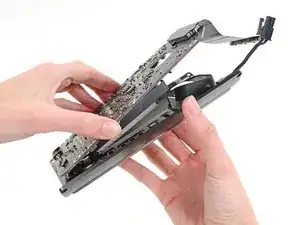
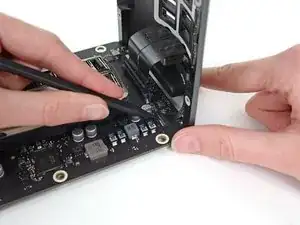
    • Utiliza el extremo plano de un spudger y un movimiento de giro para separar suavemente un lado de la conexión de datos de la tarjeta gráfica.

  12. PJrKJyftNASnUXSA
    PJrKJyftNASnUXSA
    Jw2C4FPaOaAdrj6k
    6GUEKSVQRhxEWYhV
    • Separa suavemente el otro lado también.

    • Levanta el conector hacia arriba y hacia afuera de la tarjeta gráfica.

    • Repite este procedimiento en la otra tarjeta gráfica.

  13. Cu6PK1pT52qF4udy
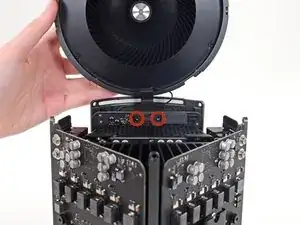
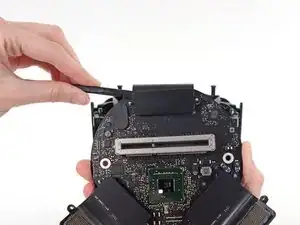
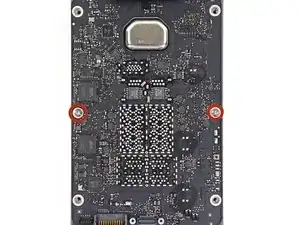
    • Retira los dos tornillos Torx T7 de 6,0 mm que sujetan la placa de interconexión al disipador de calor.

    These are actually 6.0mm T8 Torx Screws. 12/07/2016.

    Todd -

    Ended up being T9 screws for me.

    Nathaniel Wilson -

    On my Mac Pro (assembled mid-2017) these are T8 screws. In fact, there were no T7 screws anywhere in my machine.

    mark33 -

    These are T8 screws in my 2013 Mac Pro.

    Sangers -

    T8 screws for me, i did and edit to this step

    Steve McGinn -

    Ended up being T15 screws on my machine

    Spencer Curtis -

  14. O52qwUGYoQiBDHeZ
    O52qwUGYoQiBDHeZ
    QjgFCxvjHxKjXDot
    LvLEqihWBecwUyeZ
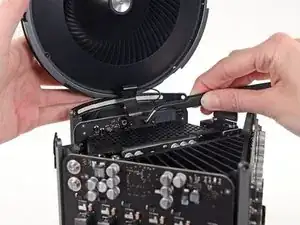
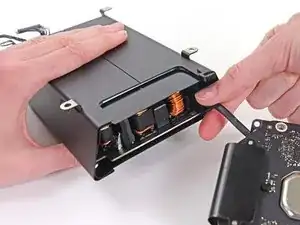
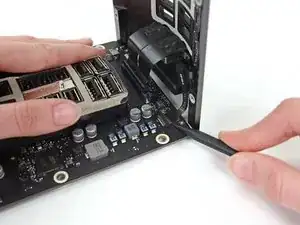
    • Desliza suavemente la placa de interconexión hacia arriba para sacarla de la conexión de la ranura de la placa lógica.

    • Se recomienda levantar un lado y luego el otro.

    • No intentes remover la placa de interconexión del Mac Pro todavía, ya que todavía está conectada a la placa de E / S.

  15. WFugbomjqUuOLuxF
    WFugbomjqUuOLuxF
    ZGheI5XnSQEcetch
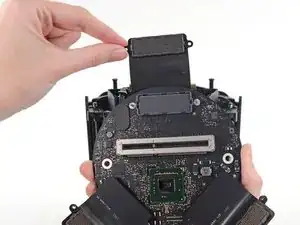
    • Gira la placa de interconexión hacia arriba y otra vez, exponiendo el cable de datos de la placa E/S

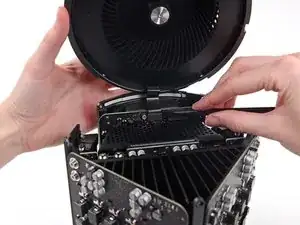
    • Haz el mismo tipo de movimiento de giro y extensión con el extremo plano de un spudger para separar un lado del cable de datos de la placa E/S.

  16. f5Wqjgl2hHjpkrZF
    f5Wqjgl2hHjpkrZF
    XJDSillpOTXBiqqD
    • Usa el extremo plano de un spudger para separar el otro lado del cable de datos de la placa E/S.

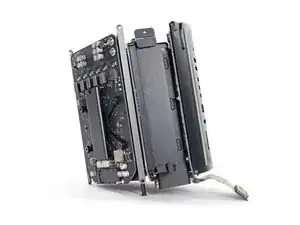
    • Dobla el cable y retira la placa de interconexión de la Mac Pro.

  17. UshNodOHDMceXpFZ
    • Da la vuelta al Mac Pro y colócalo suavemente sobre una superficie plana.

    • Recomendamos colocar el Mac Pro en la esquina del disipador de calor y los dos postes de tornillo de separación que se unen a la placa de interconexión.

  18. DQHQqK22DDBykevM
    DQHQqK22DDBykevM
    OVnch6rGY1LfEWaj
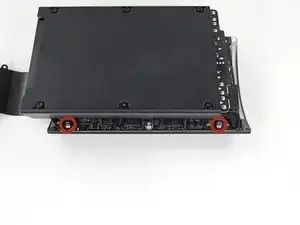
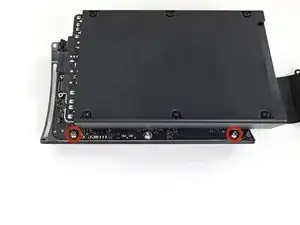
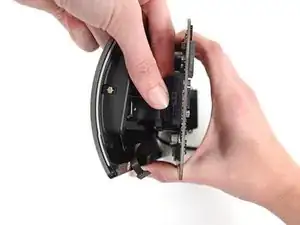
    • Retira los dos tornillos Torx T5 de 3.6 mm de los lados de la caja de la fuente de alimentación (uno en cada lado).

    those are t4 screws in my mac

    Andrzej Kiryluk -

    T4s on mine, as well

    rwcinmsp -

  19. vF6SluHbFoM1FfJJ
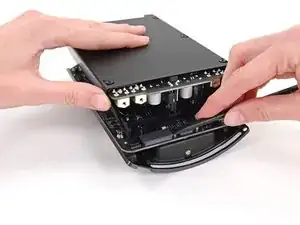
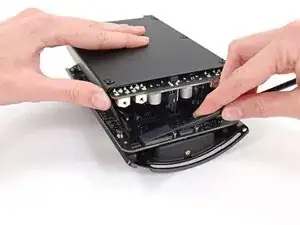
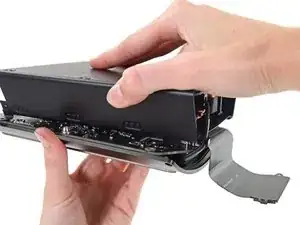
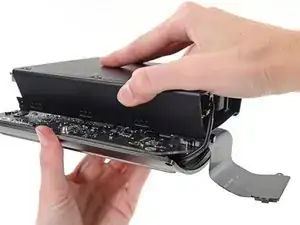
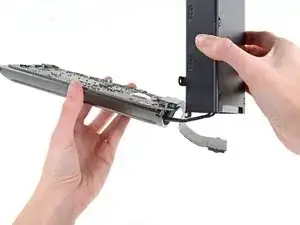
    • Retira la caja de la fuente de alimentación de la parte superior de la fuente de alimentación.

    • Al retirar esta caja, estás exponiendo los componentes internos de la fuente de alimentación. Ten mucho cuidado de no tocar ninguno de los componentes o circuitos de la fuente de alimentación.

    • Ten cuidado de no dejar caer ningún tornillo o herramienta en la fuente de alimentación, ya que esto puede dañar la fuente de alimentación.

  20. LUW6dka1INJTMWM4
    • Retira los cuatro tornillos Torx T8 de 5.5 mm que sujetan el ensamblaje de la fuente de alimentación al Mac Pro.

  21. k435bScZ2IVpLdyI
    • Retira el ensamblaje de la fuente de alimentación del Mac Pro.

  22. rbkr5XRs1AvyySZO
    rbkr5XRs1AvyySZO
    ghps2QbJK5MOfEMP
    F2QrebYhpHwMhkqp
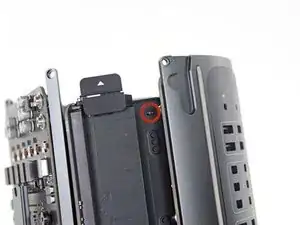
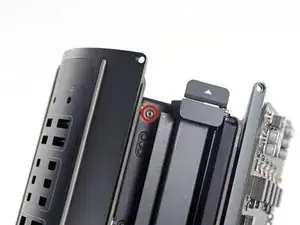
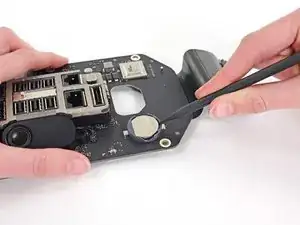
    • Utiliza el extremo plano de un spudger para desconectar el conector de salida de CC de la fuente de alimentación de su zócalo en la placa de E/S.

    • Use la punta de un spudger para desconectar el cable de datos de la fuente de alimentación de su zócalo en la placa de E/S.

    • Para ambos cables, asegúrate de hacer palanca en el conector y no en el zócalo.

    Need to add T9 Torx Screwdriver to list of tools at the beginning of this article.

    htiek nworb -

    When I gently pried up on the power supply data cable, the entire socket came right off the board. Now what?

    rwcinmsp -

    Bought a new I/O board and got it back together. This little socket is held in only by 4 tiny solder joints. Suggest pressing down on the socket with a finger while gently prying up on the plug that snaps into it. (When reassembling, it presses in vertically.)

    rwcinmsp -

  23. vVdueDTOV6iBNiMH
    vVdueDTOV6iBNiMH
    tnp1isTDWK2B3dWO
    • Retira los cuatro tornillos Torx T10 plateados de 9.0 mm de los lados de la fuente de alimentación.

    • La fuente de alimentación sobresale un poco de estos tornillos, por lo que deberás usar un destornillador fijo en un ángulo.

    I managed to untie the screws at an angle using the T9 screwdriver (instead of the T10) works well.

    Rakesh -

    awesome. thank you for the tip!!

    samuel culper -

    A T-10 tip used with a 4mm or 5/32” open-end wrench to loosen helps, too. (These really should be hex bolts…)

    MotorMac -

  24. aJkfrJn6RhNGKBSl
    aJkfrJn6RhNGKBSl
    HUkIw5wgxpj3KVxC
    • Cambia suavemente la fuente de alimentación para liberar el cable de entrada de CA de su clip de plástico.

    • Ten cuidado de no tratar de separar la fuente de alimentación del ensamblaje de la placa de E/S todavía, ya que todavía está conectado por el cable de entrada de CA.

  25. cqXGRFIH4QjiajRy
    cqXGRFIH4QjiajRy
    HV1AqWIvgHDIRmRi
    • Voltea la fuente de alimentación para exponer el cable de entrada de CA.

  26. 14y1Hvlafe2DUOuF
    14y1Hvlafe2DUOuF
    HuYfuDZFknnpDEBk
    • Presiona el conector del cable de entrada de alimentación de CA y sácalo de de su zócalo en la fuente de alimentación.

  27. MXUJmGfOGccUYVdS
    • Retira los 2 tornillos T10 Torx de 9 mm que aseguran la placa del E/S al blindaje E/S.

    On reassembly, before tightening these 2 9.0mm T10s, make sure the other 4 holes line up. Otherwise you might be setting yourself up for cross threading the 4 remaining 9.0 mm T10 that are already in a bad spot for torquing.

    Might not be a bad idea to put the other 4 halfway in to be sure no resistance, then tighten the 2 in this step, then remove the other 4.

    is -

  28. EYlO66aXYWhdLZJB
    EYlO66aXYWhdLZJB
    KyyhWStiJYBUmBpW
    • Levanta la placa E/S desde el extremo con el enchufe CA.

    • No intente de separar por completo la placa del E/S del escudo E/S, ya que todavía hay dos cables que conectan los dos componentes.

  29. 5OR6VaQk5fxxs6j6
    5OR6VaQk5fxxs6j6
    Jje2grKtBY2lnita
    gFm1NkxbydWW5ChL
    • Coloxa el conjunto en una superficie plana para acceder a los conectores de la placa E/S.

    • Utiliza la punta de un spudger para voltear la solapa de retención del conector ZIF del cable de la cinta del escudo E/S.

    • Desconecta el cable plano del escudo E/S.

    This step is unnecessary as you can access the battery already.

    Gary Sheppard -

  30. ldMp2NdQnAyHcegv
    ldMp2NdQnAyHcegv
    ExjcItJjyGDETxFc
    • Aprieta y tira del conector del cable plano del conector de audio de la placa E/S.

    This step is unnecessary as you can access the battery already.

    Gary Sheppard -

  31. eP5eRCqYZ1iRN1qJ
    eP5eRCqYZ1iRN1qJ
    ROHZA6p3DRfIhxWy
    • Utiliza la punta de un spudger para sacar la batería CMOS de la toma de corriente.

Conclusión

Para poder ensamblar tu dispositivo, sigue estas instrucciones en orden inverso.

Andrew Optimus Goldheart

Miembro Desde 17/10/09

494144 Reputación

11 comentarios

A very good guide. I have a few notes from my experience replacing my battery.

In step 13 the torx screws securing the interconnect board to the heat sink were T-8 on my Mac but T-7 worked.

In step 23 a short arm Torx key would be helpful. Getting them out tore up the heads of the screws and getting back in was difficult without cross threading some of them. Bondhus (model no. 31832) sells a set that might help.

In step 29 if you don't reconnect the power supply data cable completely your Mac fan will run full speed and the processors will max out.

Don Hayashi -

Seems like I need to replace the CMOS battery.

Which battery do I need to buy to replace the CMOS battery?

Jan -

Yeah, could somebody please post the specifications for the replacement battery and maybe a source for it?

Doctor Macintosh -

From the tear down, it's a Long-life BR-2032... I got mine at: https://www.amazon.com/PANASONIC-BATTERI.... Good luck! Great machine!

Wagon Fixin -

Yes, the BR2032.

The difference between it and the CR2032 medical battery is the wider heat tolerance range, both extreme heat and cold of the BR. As these are known to get quite hot, get the BR2032.

The batteries in most Macs are easy to replace so substituting the common CR2032 works fine. Electrically, they are identical. The Mac Pro and the late 2009-2010 iMac are a bit time consuming (2009–10 iMacs have the battery on the back of the motherboard) so use the same one that Apple uses.

MikeHalloran -

The best price on the BR2032 is this 3-pack.

<url>https://www.amazon.com/Panasonic-Battery...</url>

MikeHalloran -

Could anyone explain what issues they are seeing with a dead CMOS battery?

I’ve had a problem booting for a while, having to reset pram and smc every time and try multiple reboots, uugh, I changed CMOS battery thinking it was that and tested the old one which was lo and behold dead. I thought this would fix the issue but it hasn’t. Just FYI I have the same problem with or without a battery in there.

ed9905832 -

Hi there. The same for me here, how did you solve this problem ?

Changed for new battery although it is not turning on yet.

Ebd -

Thank You for very good detailed guide but I have problem after reassembly, fan running on maximum speed. I have try SMC reset (1)Shut down Mac, 2) Unplug power cord, 3) Wait 15 sec., 4) Plug in power cord, 5) Wait 5 sec., 6)Turn On Mac) and not worked for me, all is without changes. Mac very lagging and is very slow. I disassembled the mac again, checked all the flex cables and dont’t find any problem with this. Please, is any way how can I fix this? I have searching and testing guides 2 days and now I'm absolutely frustrated, nothing worked. :-( Thank You very much.

David Erben -

Ugh! Evil step #23!

I found the short end of a 5/64" Allen wrench worked quite well.

Thorgrim -

Thank you for an excellent guide to a tricky enough operation. Phew! Good job that coin cell lasts a few years! As someone else has said, I highly recommend chasing down the BR2032 version that Apple install as OEM, rather than using the more common CR2032. There are good reasons for this - the BR2032 has increased temperature stability and holds voltage better over lifetime. UK folk can get a supply at RS Components here: https://uk.rs-online.com/web/p/button-ba...

One other comment - in the reverse of Stage 23 when re-assembling, please take care aligning those 4 x 9mm T10 screws bolting down the PSU to the IO board. They came out fairly easily, but picking up the thread again properly when putting them back I found very tricky, mainly due to the overhang, and there is a risk of stripping if they don’t go in vertically.

David Gordon -