Introducción

Primero aprenderás a retirar la batería y el panel trasero para acceder al joystick con motivo de limpieza/sustitución.
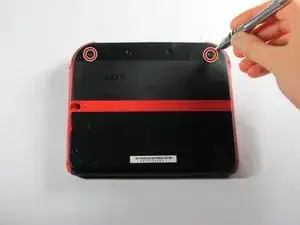
  1. wg4RTxdhgZNOVaab
    • Retire los dos tornillos cautivos Phillips que aseguran el panel superior trasero.

    • Los tornillos cautivos no se separan del panel trasero completamente.

  2. cdb3AdyJTrNhIjrr
    cdb3AdyJTrNhIjrr
    okYxlIGDUBKBdGNP
    • Gire el panel posterior superior hacia arriba y hacia afuera para quitarlo.

  3. YA2mNvc2fLpeZ4NZ
    YA2mNvc2fLpeZ4NZ
    yjKMPFAO1SC1LncE
    HRaiAoWcVXEMByll
    • Retire la batería de su espacio levantándola del lado más cercano al borde exterior.

  4. vkEjnCVvCfkcXpKn
    • Retira los diez tornillos Phillips que sostienen el panel posterior de la consola.

    Can't take off the screw top left next to the battery. What type of screwdriver do I use and where can I find some?

    Little Mac -

    I used a husky with changeable heads, you could probably find one on amazon

    Minecrafter Pig -

  5. ona5d6XElywnV2F6
    • El panel trasero está sujetado a la placa madre por un cable plano, así que ten cuidad de no levantar el panel trasero demasiado lejos del dispositivo.

    • Con cuidado, levanta el panel hacia arriba.

  6. nCtU5fTtc3gYBBVe
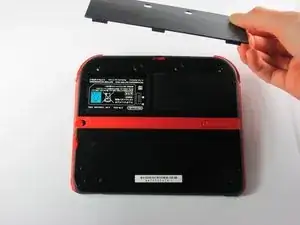
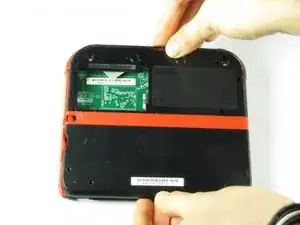
    • Con cuidado, da vuelta el panel trasero para localizar el cable plano.

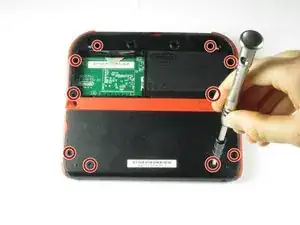
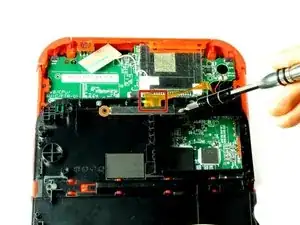
    • Remueve los dos tornillos Phillips que sujetan el cable plano al panel trasero.

    • Remueve los gatillos izquierdo y derecho. Tiene bisagras que podrían romperse y resortes que podrían salirse.

    You can also detach the cable from the motherboard safely by flipping up the connector on the motherboard. Just don't forget to reattach. Some will find this tedious but may save time if you know what you're doing with said connectors.

    Blackbeard -

    I agree, this is what the guide i followed said to do and since I was disconnecting all the other ribbon cables it made perfect sense to do it that way.

    Lin -

    pay attention: my 2ds dropped it's lens covers at this step

    Jos van Reenen -

    Likewise, I used a tiny drop of glue to put the lens back in place. Take care not to dirty the lens.

    Elliot West -

    The picture you have there has the camera lens ribbon installed upside down. The ribbon needs to be pointing down when you re-attach it not up.

    Rick Parrish -

    Agreed, ribbon cable looks upside down in picture

    Elliot West -

  7. OA3KY2vYVXvmDlIj
    OA3KY2vYVXvmDlIj
    xhqkQD6RicMmTXgP
    • Extrae el gatillo derecho de la esquina superior presionando hacia arriba.

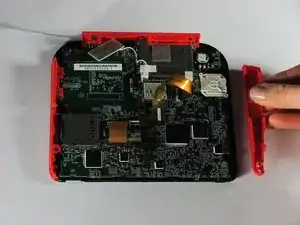
    • Extrae el lateral derecho rojo presionando hacia afuera.

    I recommend not removing the right trigger. I didn’t find it necessary and I hard a hard time getting the spring lined up again.

    Tyler Schommer -

  8. VqvqpHxnUj2YUAOW
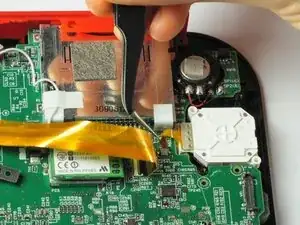
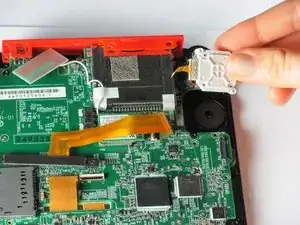
    • Usa unas pinzas para liberar la pestaña gris que sujeta el cable ZIF del joystick al conector. Extráelo hacia arriba de la placa principal.

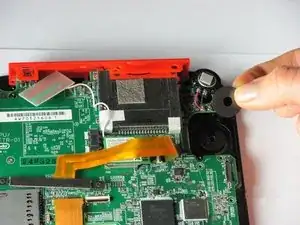
    • Suavemente desliza el cable fuera del conector.

  9. yxAc6pZGAtvbZiMg
    • Extrae los dos tornillos Phillips que sujetan la tapa blanca del joystick.

  10. PAeyOJ6nwJPS2x1P
    PAeyOJ6nwJPS2x1P
    adcYyWtwuAunNC1v
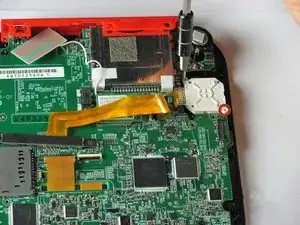
    • Extrae aplicando un poco de fuerza la tapa del joystick.

    • Extrae la arandela situada bajo la tapa del joystick.

    I completed the tutorial but my stick is now drifting by itself and I’m afraid to open it up again and try because the screws, it seems, are damaged from scratching it too much. It’s been like that for at least a year

    ImTHATGuy 500 -

Conclusión

Para montar tu dispositivo. sigue estas instrucciones en orden inverso.

Fina Beauchamp

Miembro Desde 12/01/15

2864 Reputación

12 comentarios

My ribbon cable is broke, Is there a way to fix it?Thanks.

Deez Smith -

When I put the circle pad back in, my 2DS thinks that I am holding up and right on it, when in reality it is in the neutral position. Please help.

CraftedGamer 1170 -

Use the calibrate option in system settings. Also make sure the cable is connected nicely.

Jilvenhong Dickinson -

Recalibrate it in system settings.

Artemy Matveev -

The guide fails to mention that the joystick ribbon cable is locked into the motherboard. You can use a spudger to lift the grey tab, leveraging upwards on the side opposite of the ribbon cable. The tab will pop up and should make getting the ribbon cable out (and back in) easier.

I followed this guide and ripped the ribbon cable while attempting to get it connected back to the system. If I had known the grey tab unlocks, I might not have ripped the cable by trying to force it back under the pins. My iFixit tweezers were also very sharp, and may have cut the ribbon cable. Would anyone be able to recommend something gentler for the ribbon cable?

Ryan G -

@ryango This looks like an oversight on the part of the guide author. I’ve updated the text with (hopefully) better instructions. Sorry it led to tearing your cable. :( That looks like a pretty standard ZIF connector, and once unlocked, it should disconnect and reconnect with minimal force. Personally when working with ribbon cables I prefer blunt-nose tweezers, but it sounds like your tweezers weren’t at fault here. Thanks for the heads-up, and better luck with your next repair.

Jeff Suovanen -

I replaced my analog stick, but it has the same problem, when i turn on the system, the cursor go crazy and then stops, i can move only left and right, no up and down with two different analog sticks…so, it’s not a analog problem, do u have any idea on how to fix it? thank you

Emiliano Tricase -

Try recalibrating it, I guess. After that, let me know how it is? I might find another possible solution.

INFJ Blog -

A bit nervous to try this, do I have to detach the ribbon cables?

INFJ Blog -

So mine doesn't have the gray tab. Any help with that?

jeff why not? -

I've found that a Phillips #000 Screwdriver works better.

Raymond Trinh -

Will iFixit be selling the parts for this repair ever again?

Noboru Garcia -