Introducción

¡Esta es una guía de requisitos previos! Esta guía es parte de otro procedimiento y no está pensada para ser utilizada sola.


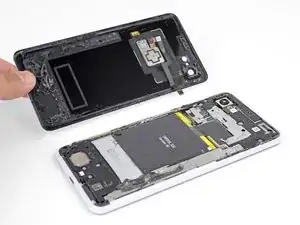
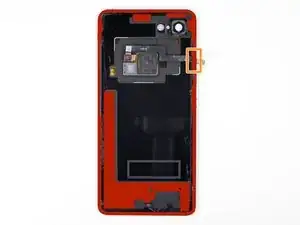
Esta guía muestra cómo quitar y reemplazar el panel trasero de cristal de tu Pixel 3 XL.

  1. wIigbvaXNQ1gCfa2
    wIigbvaXNQ1gCfa2
    4f3uBiUqnYIwtpHk
    5fCoAkkaQhAC1YlB
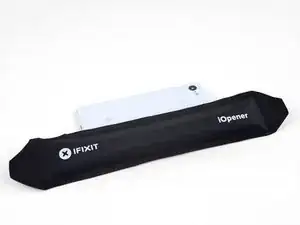
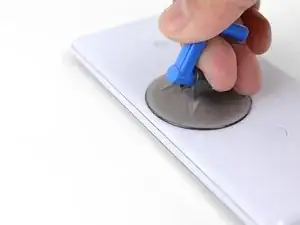
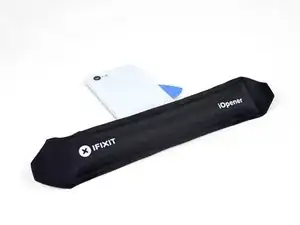
    • Calienta el iOpener y aplícalo al borde derecho del panel trasero durante un minuto.

    • También se puede usar un secador de pelo, una pistola de calor o un hornillo, pero ten cuidado de no sobrecalentar el teléfono, ya que la pantalla y la batería interna son susceptibles de sufrir daños por el calor.

    • Mientras esperas, observa las siguientes áreas en el panel trasero:

    • Adhesivo fuerte: hay grandes parches de adhesivo cerca de la parte inferior del teléfono.

    • Cable del sensor de huellas digitales: ten cuidado de no cortar el cable al hacer palanca.

  2. cZhYNQPJKIpeBdUV
    cZhYNQPJKIpeBdUV
    O3ZtiUsIEYd1LOi5
    PdMr62SQHqkykS2M
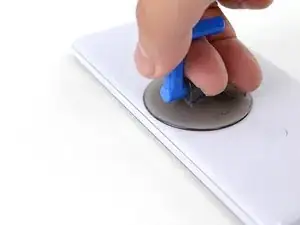
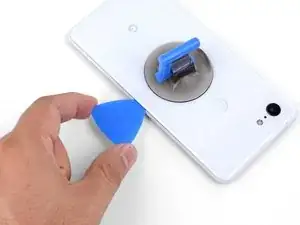
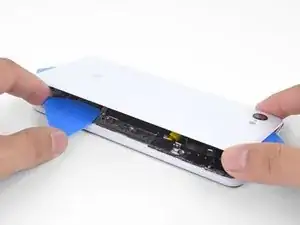
    • Aplica una ventosa en el borde calentado del panel trasero, lo más cerca posible del borde.

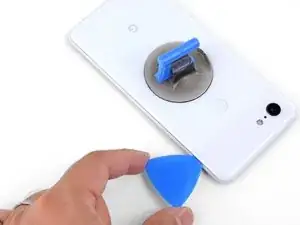
    • Tira hacia arriba de la ventosa con una fuerza fuerte y constante para crear un espacio.

    • Dependiendo de la edad de tu teléfono, esto puede ser difícil. Si tienes problemas, aplica calor en el borde e inténtalo de nuevo.

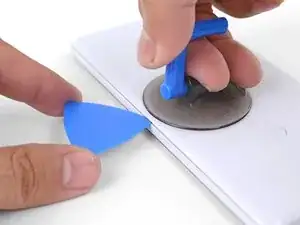
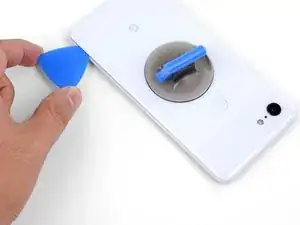
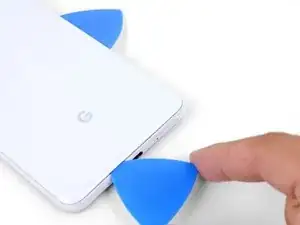
    • Inserta la punta de una púa de apertura en la ranura.

    Suction cup doesn’t work on severely cracked glass.

    Jeffrey Kongthong -

    Step 1 - 2 took me about 50 minutes. Back and forth with heat and trying with suction cup. I could get my finger nail in but not the pick. Took two people, but we finally got a pick in. 2 year old phone.

    Andrew Messier -

    Took about 15 minutes and three total attempts. On the third attempt, I also used a thinner, metal, pick to widen the gap just enough for the plastic pick to fit (Though be careful as you can easily break it with a metal pick). The phone is three years old.

    Hotohori -

    Could not get in with the pick or in from the side. Targeted the bottom of the phone with the iOpener and managed to gently create some space for the pick with the opener tool.

    Daniel R. -

    I also struggled here for a while. I ended up working my way around the entire edge of the phone until I found one spot where I could pry up the back panel. I used a jimmy instead of the opening pics. I also used a hairdryer on lower heat instead of the iopener. 3 year old phone.

    Bryan Wethington -

    Took 30 minutes + to get the back cover off. Used another suction cup to grip from the busted screen and the ifixit suction cup for the back. A thinner Acoustic guitar pick was required opposed to the standard Blues picks provided in the kit (har-har). Would HIGHLY suggest getting a pick into both the back and the front before removing the panels as it will give you more surfaces to pry from. Made that mistake...

    Brian Sommer -

    Over 2 hours of trying, I keep reheating the pouch and let it sit on the edge for sometimes up to 10 minutes since the directed 1 minute wasn't working. Physically cant get enough leverage on the back of the phone; picks are too thick to get under the crack, and the suction cup pops off before I can get enough force to see any gap open. Phone is 5 years old. I really need some help

    Grant Cooper -

    Hey Grant!
    I hear your pain—the adhesives on this phone are very strong. The initial gap is one of the hardest parts of the procedure. Here are some suggestions:
    * If you have a hair dryer, give that a shot. Heat the edge until it is slightly too hot to the touch.

    * These adhesives separate not with extreme force, but with constant steady force and time. Try heating the edge and pull on the suction cup with firm force for about a minute to let the adhesive separate.

    * If you have an opening tool, you can try this procedure to get the initial gap.

    Arthur Shi -

  3. ecDEBpnvfOTcMLZ2
    ecDEBpnvfOTcMLZ2
    2uOnUFqafrCYXyEN
    p51ClEsXXIXPIR4Z
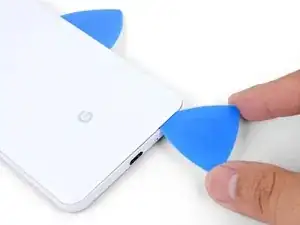
    • Desliza la púa de apertura a lo largo del borde derecho para cortar el adhesivo.

    • El adhesivo se encola y se vuelve difícil de cortar una vez que se enfría. Si eso sucede, vuelve a aplicar calor en el borde para facilitar el corte.

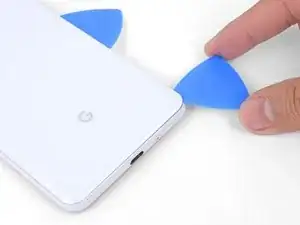
    • Una vez que hayas cortado el borde, deja una púa de apertura en la costura para evitar que el adhesivo se vuelva a sellar.

  4. KQZNiMIXEoEv3sQA
    • Aplica un iOpener caliente en la parte inferior del panel trasera durante un minuto.

  5. gBLNTMRXodCAlNJR
    gBLNTMRXodCAlNJR
    Vbq4vFubRlSHJKRY
    4UK5LbKHwIXueBJp
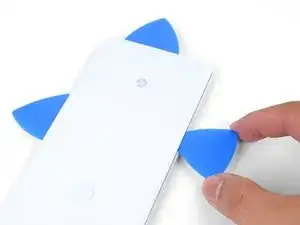
    • Usa una púa de apertura para cortar alrededor de la esquina inferior derecha y continúa a lo largo del borde inferior del teléfono.

    • Trabaja lentamente mientras cortas la esquina para evitar que el panel se agriete. Si el corte se endurece, vuelve a aplicar calor.

    • Deja una púa en el borde para evitar que el adhesivo se vuelva a sellar

  6. K1DNALhsFYem6WuY
    K1DNALhsFYem6WuY
    2FCl2jg2ZVTGSvUm
    IXQXmHMoJGXm3PXr
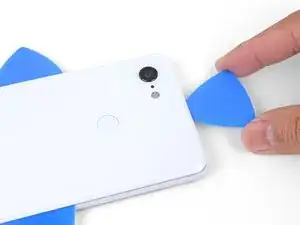
    • Continua calentando y cortando los bordes restantes del teléfono.

    • Ten cuidado al cortar a lo largo del borde izquierdo del teléfono. Si la púa se siente atascada cerca de la parte superior, es posible que hayas enganchado el sensor de huellas digitales. Retira ligeramente la púa del reborde e inténtalo de nuevo.

    • Asegúrate de cortar las porciones gruesas de adhesivo cerca de la parte inferior y el borde derecho del teléfono.

    The back cover is Glass!!!!. DO NOT PRY HARD, IT WILL BREAK!!!!!!!

    You must go slowly and let the heat do the work, if you force the cover off, it will shatter.

    Paul Bernstein -

  7. USkM2UJmmdDVnTmv
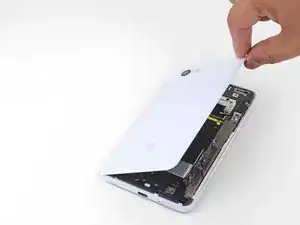
    • Con cuidado levanta el borde derecho del panel trasero.

    • Usa una púa de apertura para cortar cualquier adhesivo restante a lo largo de los bordes.

  8. 1nxmI4hs2Gymfag5
    1nxmI4hs2Gymfag5
    M4kcSI5plQnJtuT1
    MBJ2GPSSE3RnNtLF
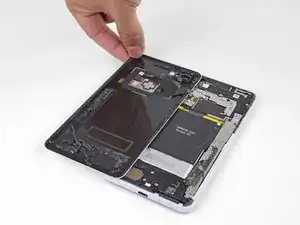
    • Gira el borde derecho del panel posterior hacia arriba y coloca el panel volteado a lo largo del lado izquierdo del teléfono.

    • Asegúrate de que el cable del sensor de huellas digitales esté flojo y evita que se pellizque.

    • Durante el reensamblaje, este es un buen punto para encender su teléfono y probar todas las funciones antes de sellarlo. Asegúrate de apagar el teléfono completamente antes de seguir trabajando.

    • Durante el reensamblaje,sigue esta guía para instalar adhesivos cortados a medida para tu panel trasero.

    Reassembly is way harder. The adhesive guide is generic and not super helpful, so don't be surprised if things went smoothly until you get to this step and then everything starts sticking to things its not supposed to.

    Christopher Trimby -

    This is great but how you address that fact that the phone is tied to a particular fingerprint sensor and after replacing, the new sensor is not recognized by the original phone?

    Dave -

    Hi Dave!

    There's a software calibration tool that you can use to calibrate your new fingerprint sensor. I've updated this step to include a link to the tool.

    Arthur Shi -

    I have a pixel 3 xl and I can't get the tool to work. I finally got the driver's installed after several hours and it says it's for pixel 6 and up basically. So I tried the other option and it's basically saying to do a factory reset? Did I mess something up on the install or what am I doing wrong here? Thanks

    Cody L Paulsell -

    Uhhh

    So, apparently the connector on the motherboard for the fingerprint sensor is just ridiculously fragile, because after plugging and screwing everything in (pretty much reassembled except for the adhesive), I closed up the phone and powered it on to test if everything was working, and when I opened it back up and let the top hang off to the side, it just snapped off. I didn't even have it tensioned that much, it was just hanging off to the side and snapped. So now I've traded a non-functional camera with a non-functional and irreparable (unless I get a new motherboard) fingerprint sensor.

    The guide really ought to emphasize how delicate that connector really is. I have a google drive link here to a photo of the remnants of my poor fingerprint sensor connector :( link

    Mindle -

  9. 66BxIa114CvPBDXF
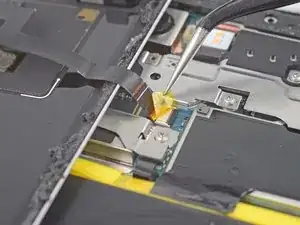
    • Utiliza unas pinzas para despegar y retirar cuidadosamente la cinta amarilla sobre el conector del sensor de huellas digitales.

    This step is utterly unnecessary. It achieves nothing, and the tape is there for a reason (I'm not sure why, maybe to prevent short circuits). I didn't remove this tape while disassembling and it didn't change anything.

    Krzeszny -

    The Kapton tape should adhere to both the cable and the connector. It helps prevent the cable from slipping out of the ZIF connector. You're right in that you don't have to completely remove the tape—I've adjusted the step to reflect this.

    Arthur Shi -

    I just finished this guide, thank you. It would be nice to have a "before ribbon removed" reference picture that's also without the Kapton tape in place if possible. I was no longer certain how far back into the ZIF connector I had to place the ribbon cable as I simply forgot what it looked like before removing it. Basically, it "felt" like it was out too far, but since I had no reference I couldn't compare. Step 10 has good close up pics, but the ribbon cable is already out a bit so a bad reference.

    teknomedic -

  10. sIaa2bIVcTWtgVNZ
    sIaa2bIVcTWtgVNZ
    kljONWUpcx2eLE4p
    syrHkK1ndwxqPAh2
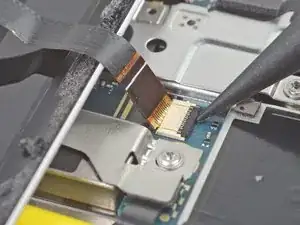
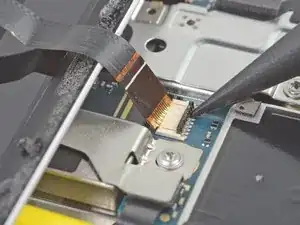
    • Usa la punta de un spudger para voltear cuidadosamente la barra negra de bloqueo en el zócalo ZIF del sensor de huellas digitales.

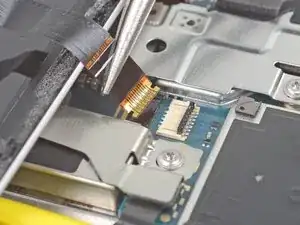
    • Sujeta la lengüeta del cable con los dedos o las pinzas y saca suavemente el cable flexible del zócalo.

    • Para evitar cortocircuitos, evite tocar los contactos metálicos del cable flexible con las pinzas.

  11. KOLMNRDZQHXDXx2H
    • Remueve el panel trasero.

Conclusión

Para volver a ensamblar tu dispositivo, sigue estas instrucciones en orden inverso.

Arthur Shi

Miembro Desde 03/01/18

219109 Reputación

0 comentarios