Introducción

Guía de requisito previo para abrir un iPhone 8, que permite el acceso a los componentes internos para su reparación o reemplazo.

  1. kH33mVcxVN2MyNsd
    • Antes de comenzar, descarga la batería de tu iPhone por debajo del 25%. Una batería de iones de litio cargada puede incendiarse y / o explotar si se perfora accidentalmente.

    • Apaga tu iPhone antes de comenzar el desmontaje.

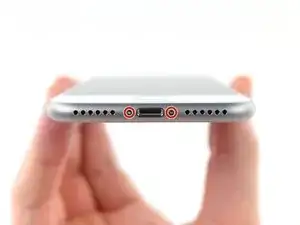
    • Retira los dos tornillos pentalobe de 3,5 mm en el borde inferior del iPhone.

    • La apertura de la pantalla del iPhone comprometerá sus sellos de impermeabilidad. Ten listos los sellos de repuesto antes de seguir adelante con este paso, o ten cuidado de evitar la exposición a líquidos si vuelve a ensamblar su iPhone sin reemplazar los sellos.

    just how long are those screws- i turn and turn and turn and the lift off is soooo slight, seemingly insignificant…

    An. Jahnke -

    I would recommend, from the very beginning, dumping all tools out of the kit (if you got it) and using that white paper tool box as a tray to organize the screws and braces in. It’s nice to work over because it catches screws well and makes it easy to see them if you drop any.

    Johnny Emrica -

    That’s a great idea thank you

    Mohamed Dekkiche -

    Screw to the left of the charging port will not come out. Screw on the right came out no problem. Any ideas?

    Bill Maher -

  2. HWFBtehBMjCQcFAc
    • Calentar el borde inferior del iPhone ayudará a suavizar el adhesivo que asegura la pantalla, facilitando la apertura.

    • Usa un secador de pelo o prepara un iOpener y aplícalo en el borde inferior del teléfono durante aproximadamente 90 segundos para suavizar el adhesivo que se encuentra debajo.

    No hair dryer so GENTLY heated over stove burner

    John Toth -

    Hello,

    What temperature is suitable for removing the front display ? I bought i-Fixit ProTech which is not include the heating "roller" . Thanks for help

    Jiří Sítko -

    Ich habe eine heiße Wärmflasche verwendet. Das hat gut funktioniert :-)

    Moritz Hartges -

    I laid my phone face-down on my 3D printer’s heated bed, and set the temperature to 60 C. After a few minutes, it was ready to loosen.

    Nate B -

    If you don’t have an “iOpener” or heat gun, try using an electric heating pad. I have a small $11 pad I got at CVS for my knee. On medium heat it worked fine for removal and with the “pennies” for setting the new seal.

    Pete P -

    I used a heated tea kettle and a tea towel, it worked!

    Adam Yavner -

    I put on the furnace vent for 10 minutes to get it warm to the touch but not hot.

    terrelldoc -

    I attached it to the after burner of my rocket ship and that worked.

    Matt Brown -

    I'm holding mine just above an erupting volcano but I'm still waiting to see if it has worked. How long does it need?

    Paul Aron -

    I used a water-filled ziploc bag, heated it in microwave. fast, cheap, worked.

    John Barker -

  3. uSKuDUqkPXShJGIe
    uSKuDUqkPXShJGIe
    IeAAHaduoE44JpAR
    t5GbMXdtcHZSd6UW
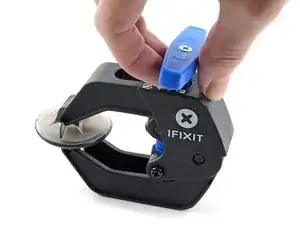
    • Los siguientes dos pasos demuestran el Anti-Clamp, una herramienta que diseñamos para facilitar el procedimiento de apertura. Si no estás utilizando Anti-Clamp, salta dos pasos hacia abajo para obtener un método alternativo.

    • Para obtener instrucciones completas sobre cómo usar Anti-Clamp, consulta esta guía.

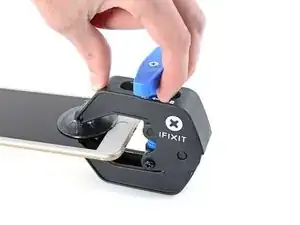
    • Tira de la manija azul hacia la bisagra para desactivar el modo de apertura.

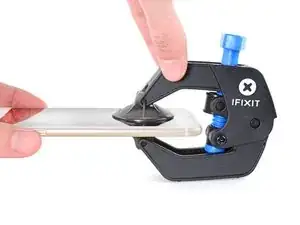
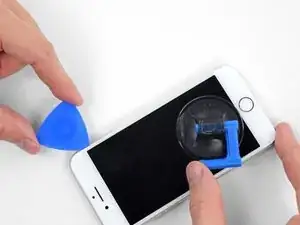
    • Coloca las ventosas cerca del borde inferior del iPhone, justo encima del botón de inicio, una en el frente y otra en la parte posterior.

    • Empuja hacia abajo las copas para aplicar succión en el área deseada.

    • Si encuentras que la superficie de tu dispositivo es demasiado resbaladiza para que el Anti-Clamp la sujete, puedes usar cinta de embalaje para crear una superficie más adherente.

  4. KDAeBh2lnZbXICfQ
    KDAeBh2lnZbXICfQ
    PeluubAbBVTKej6A
    JRgRfsPXUPFQfx1E
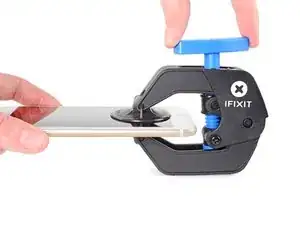
    • Empuja la manija azul lejos de la bisagra para activar el modo de apertura.

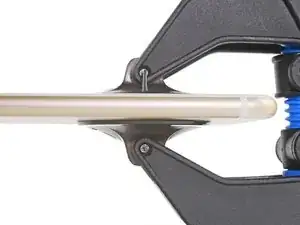
    • Gira el mango en el sentido de las agujas del reloj hasta que veas que las copas comienzan a estirarse.

    • Asegúrate de que las ventosas permanezcan alineadas entre sí. Si comienzan a salirse de la alineación, afloje ligeramente las ventosas y vuelve a alinear los brazos.

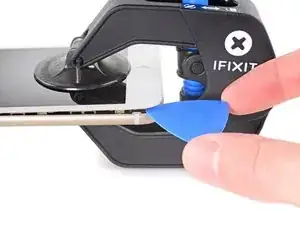
    • Espera un minuto para que el adhesivo se suelte y se abra la parte inferior de la pantalla.

    • Inserta una púa de apertura debajo de la pantalla cuando Anti-Clamp cree un espacio lo suficientemente grande.

    • Si el Anti-Clamp no crea un espacio suficiente, aplica más calor al área y gira la manija en el sentido de las agujas del reloj media vuelta.

    • No des más de media vuelta a la vez y espera un minuto entre vueltas. Deja que el Anti-Clamp y el tiempo hagan el trabajo por ti.

    • Omite los siguientes dos pasos.

  5. VRy3fVrOovwUCabE
    VRy3fVrOovwUCabE
    A5IlSaM3n1xvayKW
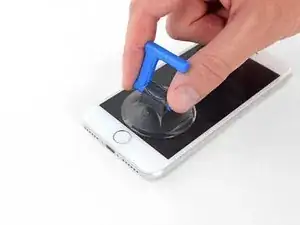
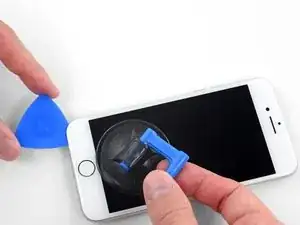
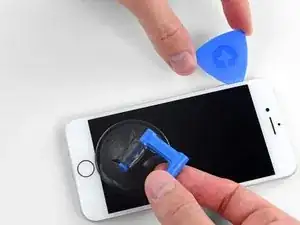
    • Aplica una ventosa en la mitad inferior del panel frontal, justo encima del botón de inicio.

    • Asegúrate de que la ventosa no se superponga con el botón de inicio, ya que esto evitará que se forme un sello entre la ventosa y el cristal frontal.

    • Si tu pantalla está muy agrietada, cubrirla con una capa de cinta adhesiva transparente puede permitir que la ventosa se adhiera. Alternativamente, se puede usar una cinta muy fuerte en lugar de la ventosa. Si todo lo demás falla, puedes pegar la ventosa a la pantalla rota.

    Even with using high heat from a blow dryer, I had to put the suction cup over the home button or the bottom edge wouldn’t lift at all. That waterproof adhesive is incredibly strong.

    Aaron Soderholm -

    As others have said, this part really stinks, but it’ll work if you keep trying. Agree with multiple rounds of hair dryer on high (did about 60-90s each time), and with having to out the suction cup over the home button. You don’t need a big gap to pry it open - it’ll be slight …

    Johnny Emrica -

    Patience is the key here. Expletives and patience. Like previous comments say, putting the suction cup over the home button (I used packing tape to maintain the seal) will allow you to apply force to the proper location to separate the screen. Good luck!

    J Rawlinson -

    Get a suction cup pliers. It’ll make this part fun

    Bradley Steiner -

    iSclack EVO opened the iPhone easily even without heating with no fear of accidentally over-opening it like with a simple suction cup.

    Matti Haveri -

  6. PnYJMHrBqA2Jh22u
    PnYJMHrBqA2Jh22u
    5BxGfRPfmCqCLMOc
    xYlJ5IgLFMxCDZ2B
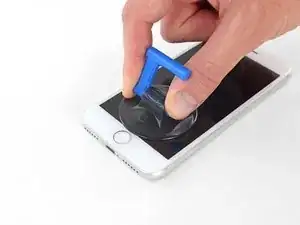
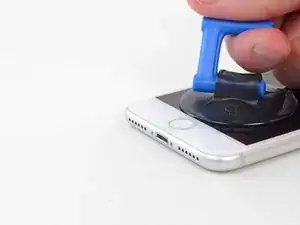
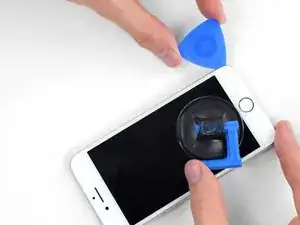
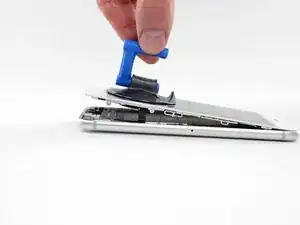
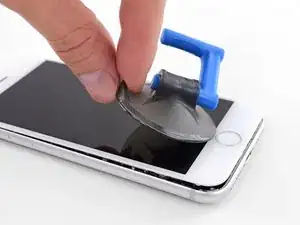
    • Tira hacia arriba de la ventosa con una presión firme y constante para crear un pequeño espacio entre el panel frontal y la caja trasera.

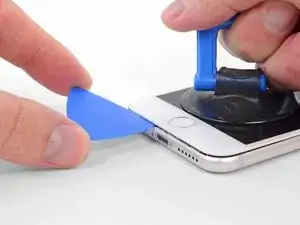
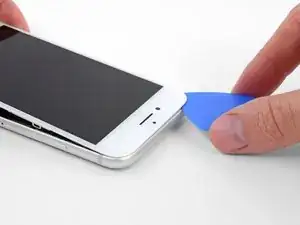
    • Inserta un púa de apertura en el espacio.

    • El adhesivo hermético que sostiene la pantalla en su lugar es muy fuerte; crear esta brecha inicial requiere una gran cantidad de fuerza. Si te resulta difícil abrir un espacio, aplica más calor y balancea suavemente la pantalla hacia arriba y hacia abajo para debilitar el adhesivo hasta que cree suficiente espacio para insertar la herramienta.

    The screen on my phone was so broken, a suction cup did not work, so I softened the adhesive with a blow dryer and used a Jimmy to carefully pry open the phone from the bottom just enough to slip a pick in.

    charguy -

    Just completed a smashed screen replacement, this is probably the most time consuming part. Used packing tape to cover the screen to help create a suction surface (had to replace it a couple times because it pulls away after a purple good pulls ) Used consistent heat for about 5 minutes, then stuck a pick in the tiniest opening… and pry pry pry!

    Brian Gill -

    I failed at this step. No amount of heating, pulling, and rocking opened up enough of a gap to slip in even a knife let alone the blue plastic tool. That's with a phone that has an undamaged screen - just trying to replace the battery. Apple won this round :(

    Michael Sherman -

    Be really careful here. I placed a sucker to the front and rear to help lever off the screen. However, the whole thing came away much easier than I anticipated and I ripped the front part completely away from the rear, tearing all three connector cables. New iPhone required.

    Chris Wood -

    Note that the opening pick they show here does not appear to come with the kit, which is a bummer! The plunger, the mini blue crowbar thing, these are too thick. I ended up using a really thin guitar pick.

    Johnny Emrica -

    Following careful methods can mostly preserve the seal and reusable. Won’t be as water tight but probably still pretty good.

    Bottom edge is pull up with suction + separating tool. Use small precision scissor to cut any tape that gets overly stretched upon initial opening.

    - For the 2 long edges, use an exacto knife to separate the seal from the screen. This keeps the tape on the chassis. Go slow along the long sides. Becareful to avoid scratching the paint on underside of the screen’s edge.

    - Top corners have a thick sealed tape. Best to just use separating tool to twist it open.

    In summary, top and bottom edge use separating tool. Side long edges can use exacto knife to gradually gently separate the seal from underside of the screen’s edge.

    Howard -

    4 picks and an exacto knife, plus 45 minutes later, I finally got it to open! Thanks tor the tip!

    Cat -

    Intact screen, check. Tool kit, check. Hair dryer hot enough to make the phone too hot to touch, check. Following all instructions, check. Screen still in place and refusing to come off, check.

    I heated, reheated, pulled and pulled. I simply could not get it off. Worked at it for an hour and a half, and I’m not a small guy. Yes it is hard to hold, but could get a grip. Just could not get it to budge. Off to the iPhone repair shop tomorrow. Anybody want to buy a repair kit and replacement battery?

    Jim Meyers -

    After struggling for 30m, I looked up some alternate methods and found this helpful:

    https://www.youtube.com/watch?v=25zAK5mG...

    - I used a utility knife and pried up right under the home button

    - the angle matters! I was trying to go too far down before going in. The top surface of the phone is rather thin, so you go in after barely getting under the chassis lip

    - tilt utility knife left to right once you’ve got it under to work it in

    - leave the utility knife in, and now add that pick

    Jared Wilk -

    Pro-tip: don't be an idiot like me. Instead, remove the screen protector you have on the phone before applying the suction cups. Derp.

    hunter.geofizz -

    I struggled with a hair dryer at first and a singular suction cup. However, I tried putting packing tape on the spot where I put the suction job (even though my screen isn't cracked) and I was able to do it first try with ease. Definitely recommend packing tape.

    Alessio Toniolo -

    Suction cup pliers. Dead easy

    Bradley Steiner -

  7. 2QPL6xQ1bKKTHEE2
    2QPL6xQ1bKKTHEE2
    Scr2EQgs2BWhSj3N
    KyO5DVLoiSXnDh2Z
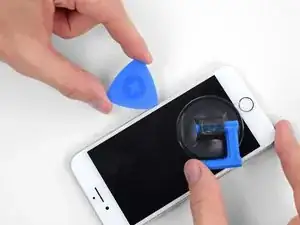
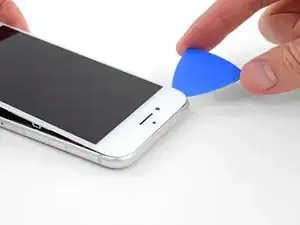
    • Desliza la púa de apertura hacia arriba por el borde izquierdo del teléfono comenzando en el borde inferior y moviéndose hacia los botones de control de volumen y el interruptor de silencio, rompiendo el adhesivo que mantiene la pantalla en su lugar.

    • Detente cerca de la esquina superior izquierda de la pantalla.

    • No intentes sacar el borde superior de la pantalla de la caja posterior, ya que se sujeta con clips de plástico que se pueden romper.

    My Plektrum worked ok, but the edges broke off a bit towards the end

    griffin.weber -

  8. bYHHQWBLX2SbZ4ZM
    bYHHQWBLX2SbZ4ZM
    oWPIhKQUMFLQKwJF
    VbhlSMqUKVaR3i4t
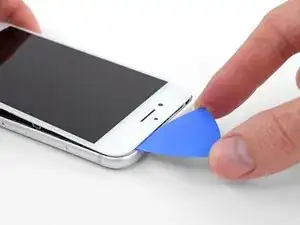
    • Vuelve a insertar tu herramienta en la esquina inferior derecha del iPhone, y deslízala alrededor de la esquina y hacia arriba del lado derecho del teléfono para separar el adhesivo.

    • No insertes la púa muy lejos, o puedes dañar los cables de la pantalla a lo largo de este lado del iPhone. Insértalo solo unos pocos milímetros, o aproximadamente el ancho del bisel de la pantalla.

    No pick in the kit you sent me.

    Ted Cooper -

  9. JsELGeLj2sULj4Rl
    JsELGeLj2sULj4Rl
    1Q5TB6TXChTQrCSO
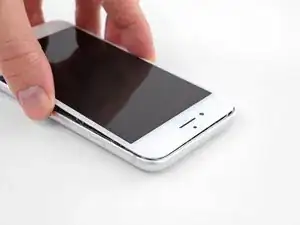
    • Levanta suavemente la ventosa para levantar el borde inferior de la pantalla.

    • No levantes la pantalla más de 15º o corres el riesgo de forzar o romper los cables planos que conectan la pantalla.

    • Tira de la pequeña protuberancia en la ventosa para quitarlo del panel frontal.

  10. 1wx6fuMwGlVmTVwg
    1wx6fuMwGlVmTVwg
    L5DvjVj5xMJAlXg4
    y6nMrARZIGjH4KZO
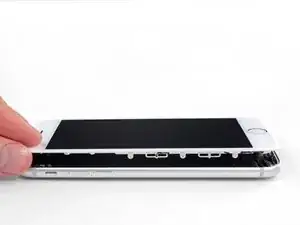
    • Desliza una púa de apertura debajo de la pantalla alrededor de la esquina superior izquierda y a lo largo del borde superior del teléfono para aflojar el último adhesivo.

    I did end up using just a smidge of IFIXIT adhesive remover along the edge before opening and that seemed to really help

    Karen Flowers -

    I have been using the pointed tweezers to pull the adhesive strands apart and out as the display comes off.

    Adam Yavner -

  11. pmOBsioPu6PHdocL
    pmOBsioPu6PHdocL
    wCWsnncFGO1Jy1KT
    • Desliza el ensamblaje de la pantalla ligeramente hacia abajo (lejos del borde superior del teléfono) para desenganchar los clips que lo sujetan a la caja trasera.

  12. XaJPKiESSbHGIDqx
    XaJPKiESSbHGIDqx
    TKsLuMfvlLBnsdMa
    uyGD4MIvBrhLyuiO
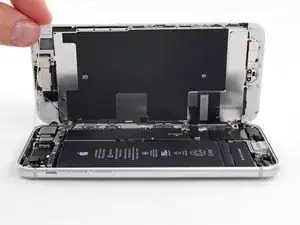
    • Abre el iPhone moviendo la pantalla hacia arriba desde el lado izquierdo, como la contratapa de un libro.

    • No intentes separar por completo la pantalla todavía, ya que varios cables planos frágiles aún la conectan a la placa lógica del iPhone.

    • Apoya la pantalla contra algo para mantenerlo apuntalado mientras está trabajando con el teléfono.

    Nach RECHTS klappen - nicht nach links!

    Manfred Wachtel -

    Als ich das Flachbandkabel auf der rechten Seite sah, hab ich mich auch gefragt, ob die das mit nach Links klappen ernst meinen, und das „Buch“ lieber auf japanische Art nach rechts aufgeklappt. Das sollte dringend in der Anleitung korrigiert werden!

    Sebastian Plickert -

    “Up from the left” means lift up the left side.

    Which is the same as folding to the right.

    “Like the back cover of a book” explains it even more clearly.

    Maybe it gets lost in translation?

    Nick Shtangey -

    Fold to THE RIGHT - not to the left!

    Jim Glenys -

    When I saw the ribbon cable on the right side, I also wondered if they were serious about folding it to the left, and the "book" would rather be opened to the right in the Japanese way.This should be corrected urgently in the manual!

    Jim Glenys -

    Hi Jim, the display opens from the left side, toward the right side. It should look like the back cover of a book. Hope this helps. Good luck with the repair!

    Adam O'Camb -

Conclusión

Para volver a armar tu dispositivo, sigue estas instrucciones en orden inverso.

Adam O'Camb

Miembro Desde 11/04/15

179525 Reputación

0 comentarios