Introducción

Guía de prerrequisito único para abrir el iPad Mini 4.
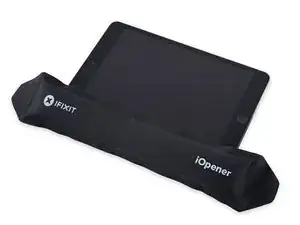
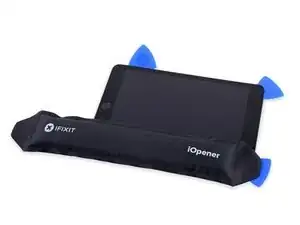
  1. HaIxvTqYrjFRYmFf
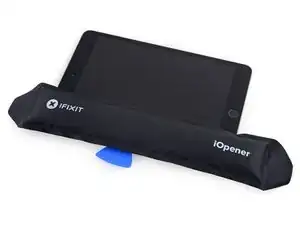
    • Manipulándolo por las pestañas de cada lado, coloque el iOpener calentado en el lateral del iPad a la izquierda del conjunto del botón de inicio.

    • Deje que el iOpener repose durante aproximadamente cinco minutos para ablandar el adhesivo debajo del vidrio.

  2. 13rFSRL3NS4fCQUu
    13rFSRL3NS4fCQUu
    C61ZvErpTPRvm3FK
    1TsMJjmwTMVmHTIa
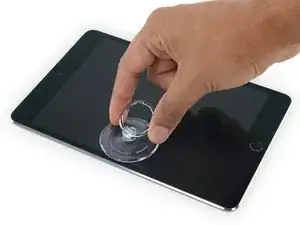
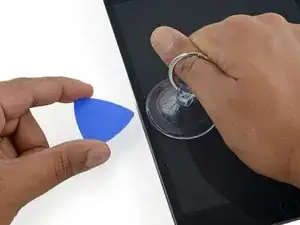
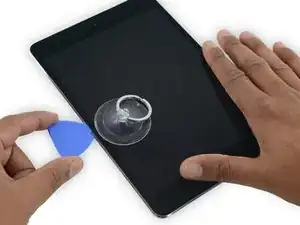
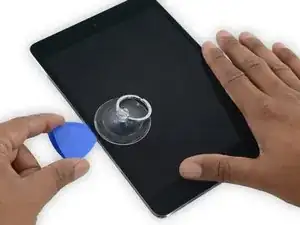
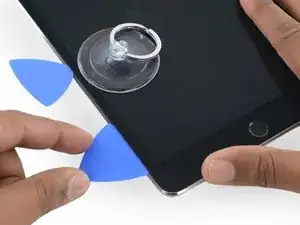
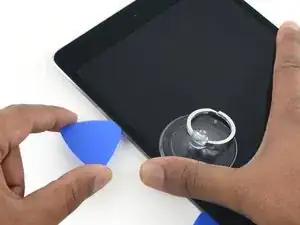
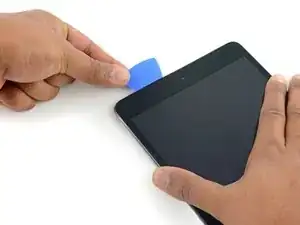
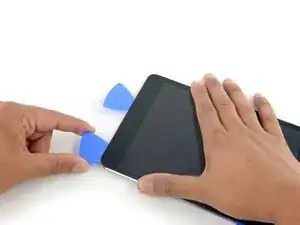
    • Coloque con cuidado una ventosa hasta la mitad del lado calentado.

    • Asegúrese de que la taza esté completamente plana en la pantalla para obtener un sello hermético.

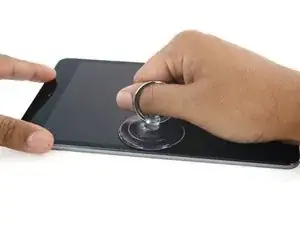
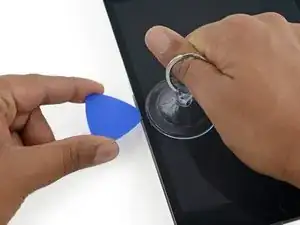
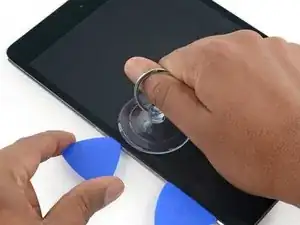
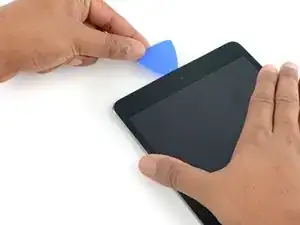
    • Mientras sostiene el iPad hacia abajo con una mano, tire de la ventosa para separar ligeramente el conjunto del panel frontal de la carcasa trasera.

    • Tenga cuidado de solo levantar el vidrio lo suficiente como para insertar una apertura de pico, y corre el riesgo de romper el vidrio.

  3. ohUAS1Ykl4EUbSwG
    ohUAS1Ykl4EUbSwG
    ScjggYUdT4DXsNOK
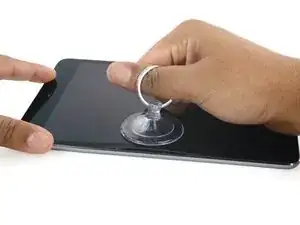
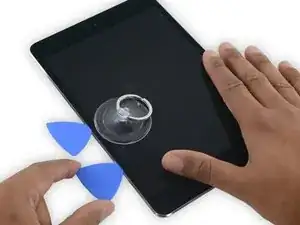
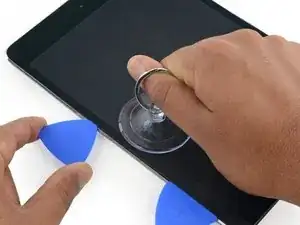
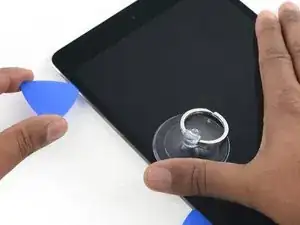
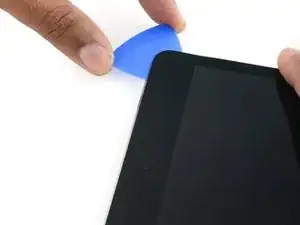
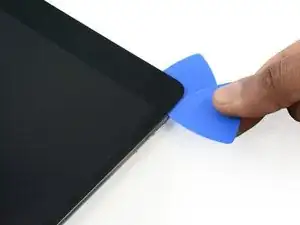
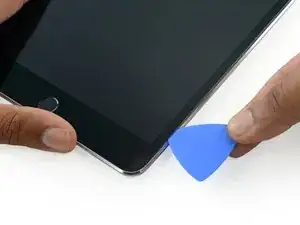
    • Mientras sostiene el vaso con la ventosa, deslice la punta de una púa de apertura en el espacio entre el vidrio y el cuerpo del iPad.

    • No inserte el pico de apertura más profundo que el bisel negro en el costado de la pantalla. Insertar demasiado el pick puede dañar el LCD.

    “Don't insert the opening pick any deeper than the black bezel on the side of the display. Inserting the pick too far may damage the LCD.”

    Unfortunately, you only know you have inserted it too far when you have, and you start seeing little bubble veins form between the glass screen and the LCD.

    The adhesive can be very stiff/hard, and if pushing through it can result in the pick plunging into the LCD when the adhesive finally gives way.

    Take your time, use alot of heat, and if you need to try and push the pick in, try and do so in a slicing motion along the edge, use the wide edge, or hold the pick so that your finger will hit the edge of the screen before the pick tip will pass the bezel.

    lucanos -

    Adhesive strips are only 1mm wide on sides. Up to 5mm wide top and bottom. I used the Isclack. Screen seemed ok bending without breaking. Worth looking for a photo of the replacement adhesive strips so you know what you have to separate. Be extra careful at the lower right corner where the cables are.

    ian cheong -

    This is a failure of a guide as it doesn’t tell you to insert at a downward angle so you don’t potrude into the LCD… Now I have to spend more money to replace the screen as I pushed adhesive between the LCD and the screen even though I went no farther than a millimeter short of the screen...

    Alec -

    can you open the right side if the left is too cracked to use a suction cup on?

    clark overhiser -

    This guide needs amending urgently.

    You MUST NOT put the pick or whatever you are using more than 2mm under the sides of the screen, or you will cut through the adhesive tape securing the backlight assembly to the LCD glass.

    This will push adhesive into the viewable area of the LCD and cause the backlight assembly to no longer be secured against the LCD fully.

    I now need a new screen.

    This line below from the guide is absolutely INCORRECT and will ruin your expensive display:

    ”Don't insert the opening pick any deeper than the black bezel on the side of the display.”

    The black bezel is 5mm to 6mm wide; you MUST NOT insert anything to that depth or you will destroy your display. 2mm maximum!

    jamesqb2001 -

    thanks. will take this into account for my repair

    Adab Abu -

    I too damaged my display because of this absolute nonsense (The German version, which I used, still had this INCORRECT portion in it). I can't believe how long it took iFixit to update this, even though people have been reporting this for years on end. Sadly iFixit still haven't updated a variety of other things that are still at the very least high risk instructions. I just messaged them the other day, but they don't seem to care about or understand the remaining issues that this guide has. At least they updated one of the most severe things, but they just plainly told me 'I'm wrong' about the rest. I liked iFixit it so far, and I've worked on a variety of (difficult) repairs - but this experience was a very huge let down.

    Mac Stevenson -

    A few thoughts after opening a number of Mini 4’s.

    1) if the display is warm enough you can squeeze the digitizer and LCD back together after a minor incursion with the opening pick and it will reseal.

    2) I’ve started going in at the top just to the right of the camera (I use an iFlex to get in then switch to a pick). Then I run down either side with my fingers choked up on the pick so there only a mm or 2 sticking out. Usually after running down one side, I can get the display open enough to get the pick in behind the LCD when I do the other side

    Stow -

  4. TUkUdEMQJclDVNsZ
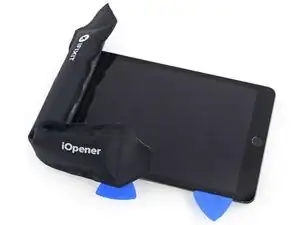
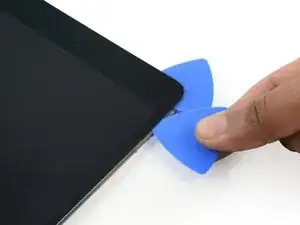
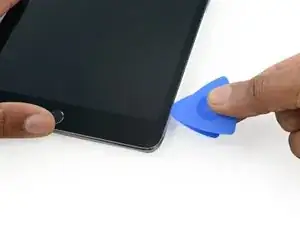
    • Vuelva a calentar y vuelva a aplicar el iOpener.

    • Tenga cuidado de no sobrecalentar el iOpener durante el procedimiento de reparación. Siempre espere al menos diez minutos antes de volver a calentar el iOpener.

    • Déjalo reposar durante unos minutos para recalentar el borde izquierdo del iPad.

    If your iPad is cold, consider leaving the iOpener on for longer than 5 minutes. The aluminum housing is a very large thermally dissipating mass and will quickly cool off the glass and make you have to start over and wait the 10 minutes to reheat. There’s a very slim window in which you’re able to insert the pick into the glass adhesive before it solidifies once again. I’ve been fighting with it for like 20 minutes following these instructions and it’s not working. You really need to leave it for longer than just 5 minutes to get the back housing hot too.

    Crystal S -

    Heat is essential. I used a 3d printer’s heated set at 65 degrees. Chris Storer’s stip above saved me as you really need to let it sit for quite a while to soften the adhesive. Since I was doing a battery change, I heated both sides as the aluminum back is a huge heatsink that really sucks up the heat. Don’t try forcing it; if the suction cup isn’t pulling a gap in the screen, leave it on the heater for additional time.

    garbage911garbage -

    Love the 3d printer idea, I hadn’t thought of that! I have used a heat gun as well but you have to be very careful to not use too much heat. Also watch for inserting the pick too far, it is really easy to delaminate glass from the display!

    russ -

  5. CqMR4hHhWIXsHe31
    CqMR4hHhWIXsHe31
    cxBVHNUwDC4RX1cZ
    Jnv4Ppg4Y5ZUBVkB
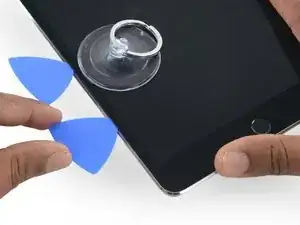
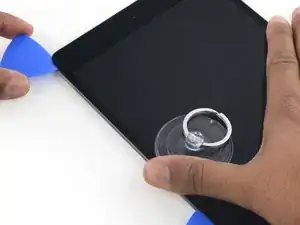
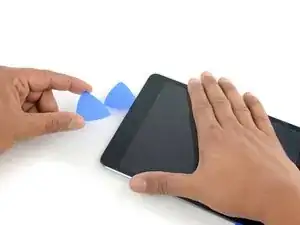
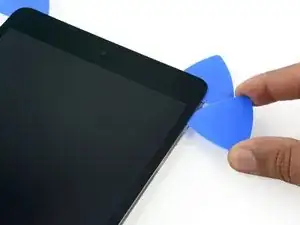
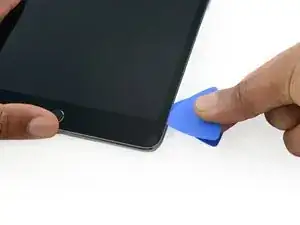
    • Coloque una segunda apertura junto con la primera y deslice la selección hacia abajo a lo largo del borde del iPad, liberando el adhesivo sobre la marcha.

    • Durante el resto del procedimiento, si encuentra una resistencia significativa a las puntas deslizantes debajo del cristal, deténgase y recaliente la sección en la que está trabajando. Aplicar demasiada presión con la púa puede romper el vidrio.

    I have found that wedging a blue pry tool in between the frame and the glass can give you a better edge enough to slide the pick in.

    Crystal S -

  6. WOS4ZM3eJLkCskJC
    WOS4ZM3eJLkCskJC
    Hnga6OLRAMAifQgv
    ypBjyNU4PUckUhxI
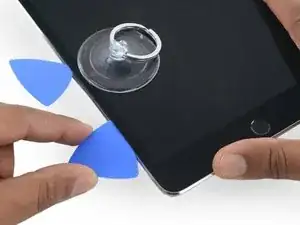
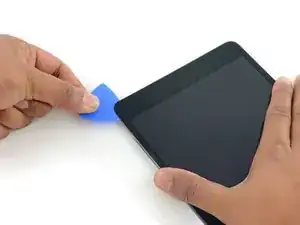
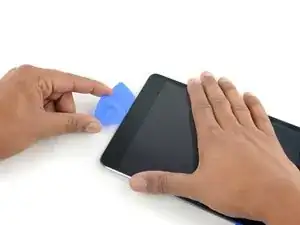
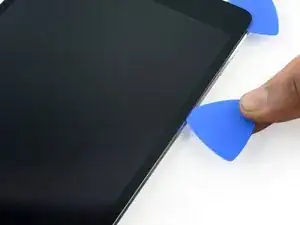
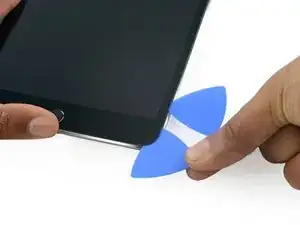
    • Continúe moviendo la palanca de apertura por el lateral de la pantalla para liberar el adhesivo.

    • Si el pico de apertura se atasca en el adhesivo, "enrolle" el pico a lo largo del lateral del iPad, y continúe soltando el adhesivo.

  7. g4K1TQaPG4Pcsian
    g4K1TQaPG4Pcsian
    nTaLoCMLNmMdWXfP
    • Tome la primera selección que inserta y deslícela hacia la esquina superior del iPad.

  8. UbCbTICAd1Qenj1D
    • Vuelva a calentar el iOpener y colóquelo en el borde superior del iPad, sobre la cámara frontal.

    • Tenga cuidado de no sobrecalentar el iOpener durante el procedimiento de reparación. Espere al menos diez minutos antes de volver a calentar el iOpener.

    • Si tiene un iOpener flexible, puede doblarlo para calentar tanto la esquina superior izquierda como el borde superior al mismo tiempo.

  9. ZMS55hkNx4hdDBSU
    ZMS55hkNx4hdDBSU
    Q5nLFBwJGyFQJD6K
    ajQfyycssK2puFRL
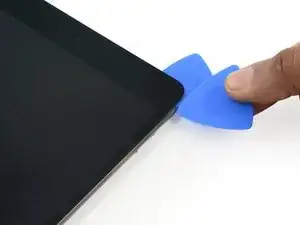
    • Deslice la púa de plástico alrededor de la esquina superior izquierda del iPad para separar el adhesivo.

  10. eoxpXig3yZbNJ5LM
    eoxpXig3yZbNJ5LM
    2UQdxX1TXSBtPnV1
    QJJjM65RQqa2bBUY
    • Desliza la púa de plástico a lo largo del borde superior del iPad, parando justo antes de llegar a la cámara.

    • Según llegas a la zona de la cámara frontal, saca ligeramente la púa de plástico y continúa deslizándola por la parte superior.

    • Evita deslizar la púa de plástico sobre la cámara frontal, dado que puede que manches la lente de la cámara de adhesivo o dañes la cámara. Los pasos siguientes te darán más detalles acerca de la mejor forma de evitar dañar la cámara frontal.

  11. 2biNwid2uuwBB1dI
    2biNwid2uuwBB1dI
    upKYLNsBIufNuJLK
    lXpUpqTV2IROQlUM
    • Deja la púa de plástico en el iPad, después de haber pasado la cámara frontal.

    • Coge una segunda púa e insértala a la izquierda de la cámara frontal, justo donde estaba antes la primera púa. Deslízala hacia la esquina para despegar el resto del adhesivo.

    • Deja la segunda púa ahí, para evitar que el adhesivo de la esquina vuelva a pegarse.

  12. RBiTBQ1bfbLVlBEQ
    RBiTBQ1bfbLVlBEQ
    QoYVVDyCjOGlRV4w
    • Inserta la púa más profundamente en el iPad y deslízala en dirección contraria a la cámara y hacia la esquina.

  13. pIBSCEPokwTEi1cH
    • Deja las tres púas en el las esquinas del iPad para prevenir que el adhesivo vuelva a pegarse.

    • Vuelve a calentar el iOpener y colócalo a lo largo del otro lado del iPad (donde se encuentran los botones del volumen y de bloqueo del iPad)

  14. ICjU4SsE5PcBHfLj
    ICjU4SsE5PcBHfLj
    XHaDLfDSSEKIKO2S
    4MPJUfjxWS21GryD
    • Inserta una nueva púa y deslízala a lo largo del borde derecho del iPad, despegando, según vas pasando, el adhesivo.

  15. EDS62uJdC4StMJC4
    EDS62uJdC4StMJC4
    6FSbjKEpCFQttuXP
    DYTVSLmFJPWPjOo6
    • Continúa deslizando la púa a lo largo del borde del iPad, recalentando el borde con el iOpener, siempre que sea necesario.

    • Ten cuidado de no deslizar la púa muy profundamente dentro del iPad en la esquina inferior derecha, dado que te arriesgas a dañar el cable de la pantalla/display.

  16. WiN5Njbf4TAxgH6j
    • Deja las púas donde están y vuelve a recalentar el iOpener

    • Recuerda no sobrecalentar el iOpener (no lo calientes más de una vez cada 10 minutos)

    • Coloca el iOpener recalentado en el botón de inicio (parte de abajo del iPad) y déjalo en esa posición durante unos minutos para ablandar el adhesivo.

  17. KV3iXayvjLwbPJgy
    KV3iXayvjLwbPJgy
    tut5k1RijNURbajb
    krtEFHCd1XVwjLQp
    • Inserta una nueva púa en la esquina inferior a la izquierda de al pantalla, debajo de la última púa que usaste para abrir el borde derecho.

    • Desliza la nueva púa a lo largo de la esquina inferior derecha del dispositivo.

  18. fPQkoQKAuO4UQw52
    fPQkoQKAuO4UQw52
    njXRBDjMIAIN3kLl
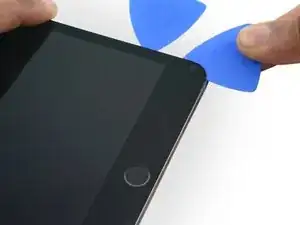
    • Desliza la púa desde la esquina inferior derecha a lo largo del borde inferior del dispositivo. Detente a un poco antes de llegar a 1 cm de distancia del botón de inicio.

  19. TyQ2yT4inXSfLZnt
    TyQ2yT4inXSfLZnt
    GJ3JqPpVjZVTbFjD
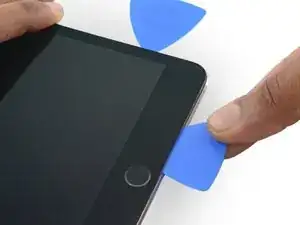
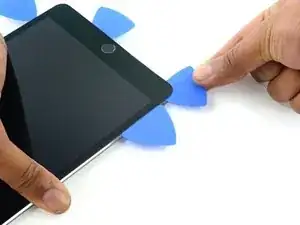
    • Inserta la última púa en la esquina inferior izquierda del iPad, directamente debajo de la otra púa.

  20. 6FCir6UTX1LB11oa
    6FCir6UTX1LB11oa
    I5wxHRns6QLtaanf
    • Desliza la púa a lo largo del borde izquierdo del iPad.

  21. xvXZkOKET1oQ1aeM
    xvXZkOKET1oQ1aeM
    YmcQTJpRREZ6EI6m
    dJISOpWxsTNHryjV
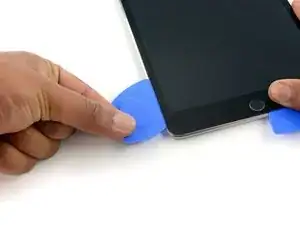
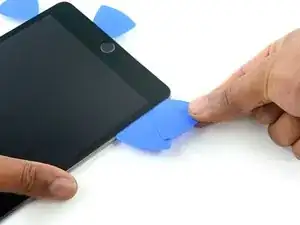
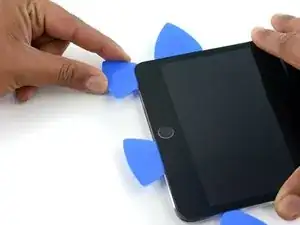
    • Continua deslizando la púa por el borde inferior izquierdo de la pantalla hacia el centro del iPad, hasta que esté a algo menos de 1,5 cm de distancia del botón de inicio.

  22. kKFZvGgiSl6PxHNZ
    kKFZvGgiSl6PxHNZ
    L6v3qnXBSmPS3yQc
    CAtEvbHqdCLRe6Xf
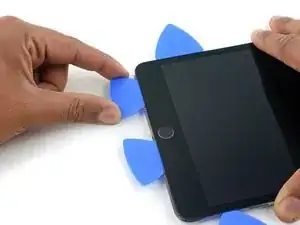
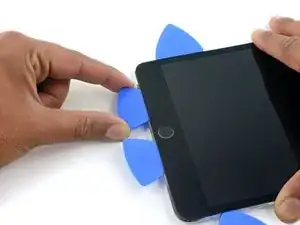
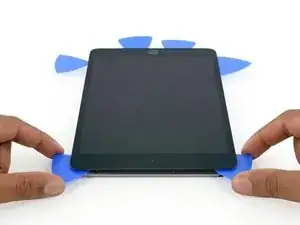
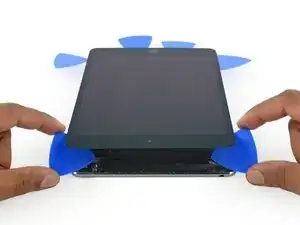
    • Gira las dos púas de las esquinas superiores del iPad para despegar los últimos restos del adhesivo que mantienen la pantalla en su lugar.

    • Levanta la pantalla por el borde superior para abrir el dispositivo.

    "Twist the two picks at the top edge of the iPadTwist the two picks at the top edge of the iPad "

    When I did this twisting motion, and I thought I was being gentle, one of the picks cracked nearly in half. That adhesive is very strong! I probably did not cut into it far enough before applying the twisting to open the screen.

    jharrison -

Conclusión

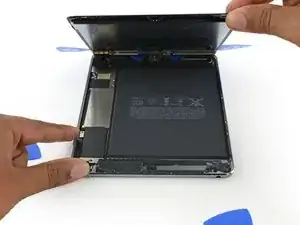
Para volver a armar su dispositivo, siga estas instrucciones en orden inverso.

Evan Noronha

Miembro Desde 06/02/15

219277 Reputación

0 comentarios