Introducción
Desmonta y vuelve a montar el mouse Logitech M525, con instrucciones adicionales para limpiar/reparar la rueda de desplazamiento cuando no funciona, está sucia o la goma se está desintegrando.
Herramientas
-
-
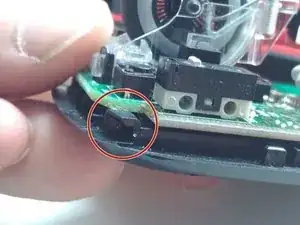
El interruptor para ello, está en la parte inferior. Muy fácil de encontrar, por lo que no hay imagen.
-
-
-
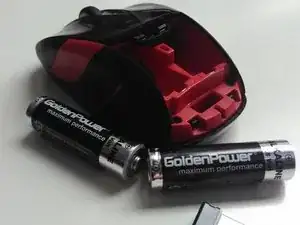
Y el receptor Unificador, si está en el ratón. Esto no es estrictamente necesario, pero probablemente debas hacerlo.
-
-
-
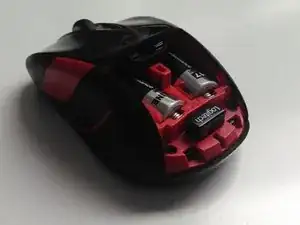
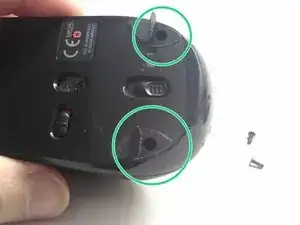
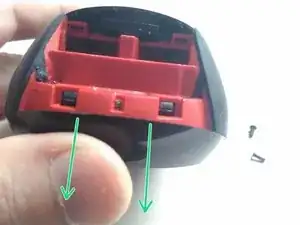
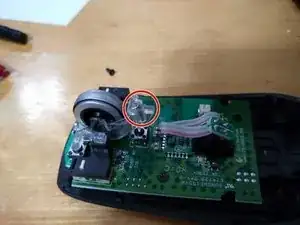
Están ocultos debajo de las dos almohadillas deslizantes a los lados del interruptor de liberación de la tapa de la batería. Solo mete tu destornillador Phillips ahí y extráelos.
-
-
-
Se resistirá un poco, tira suavemente. Cuando tengas un pequeño espacio, muévalo suavemente hacia adelante y hacia atrás un poco, hasta que se suelte.
-
La segunda imagen intenta mostrar las garras que lo sujetan a la tapa superior.
-
-
-
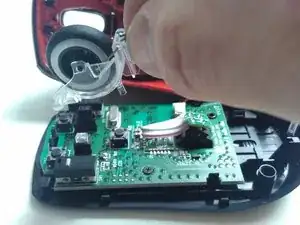
Para quitar la rueda de desplazamiento, tira directamente hacia arriba, teniendo cuidado de que el resorte en la parte inferior permanezca intacto. Hay una guía de plástico en la parte delantera de la carcasa transparente que se encuentra entre los dos postes de plástico en la parte delantera. Asegúrate de que esto suba o baje recto para liberarlo.
-
-
-
En mi mouse, la goma de la rueda de desplazamiento comenzó a desintegrarse. (No hay fotos) pero lo sabes, si al tocar la goma aparce una raya negra en tu dedo. El interior de la carcasa de plástico también era negro.
-
Además de otros desechos, estos provocaron que la rueda de desplazamiento dejara de funcionar por completo, porque la rueda registra el desplazamiento al iluminar la carcasa transparente hasta el otro lado. Notarás que hay "aletas" dentro de la rueda; la interrupción de la luz por estas aletas es cómo el ratón registra el desplazamiento.
-
Al aplicar un poco de tensión hacia afuera en el radio central, podrás quitar la rueda para limpiar la carcasa. Ten cuidado de no perder el brazo y el resorte en la parte trasera de este conjunto.
-
-
-
En mi caso, la goma/pegamento estaba tan desintegrada que la “llanta”/cubierta de la rueda no quedaba centrada y seguía dejando marcas. Así que me la quité. Podría colocar una tira delgada de cinta adhesiva u otra cosa si quisiera una cubierta, pero no hay necesidad real de hacerlo.
-
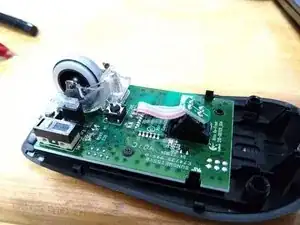
Decidí fotografiar esto después de haberlo reensamblado. Te recomiendo que hagas este ensamblaje antes de volver a colocar la rueda de desplazamiento en la placa lógica.
-
Con el rebaje apuntando hacia el botón izquierdo del mouse, alinea uno de los cubos y empuja el otro lado hasta que ambos cubos centrales encajen en su lugar.
-
Luego, coloca el brazo de retroalimentación háptica en su lugar insertándolo en el hueco y alineando la parte izquierda de los dos clips de bloqueo en la parte posterior de la carcasa de plástico y fijándolo en su lugar. Deja el lado derecho sin sujetar en este punto.
-
Me resultó más fácil insertar el resorte en este punto.
-
Comprime el resorte para que quede completamente debajo del brazo. (Ver fotos #2-3)
-
Tras varios intentos, tuve éxito al comprimirlo con un sujetapapeles, como se muestra en el siguiente paso. Pero cualquier otra cosa haría el trabajo. Lo importante es que sea suficientemente pequeño para permitir que el lado derecho encaje en su lugar mientras se comprime el resorte para que el brazo se asiente completamente sobre el resorte.
-
-
-
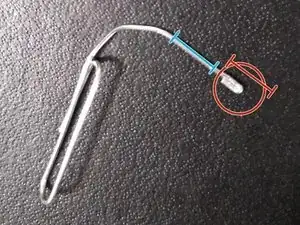
Prepara el compresor de resorte del clip para papel (opcional) doblando el extremo de un clip para papel 90º.
-
Con unos alicates de punta fina, sujeta aproximadamente 1/8" (rojo) del extremo con su mano dominante. Más abajo, usa alicates de bloqueo de canal o de tornillo de banco (con una cara más ancha) para estabilizar (azul).
-
Sosteniendo los alicates de bloqueo de canales (azules) en su lugar, doble el extremo por la mitad (90º) y luego por la mitad otra vez. Luego, usa la parte plana de los alicates de punta fina para comprimir este pliegue en una curva en U apretada.
-
Como en la 2ª foto (antes de volver a poner la carcasa en la placa para evitar daños), comprime el resorte con el lado izquierdo del brazo enganchado en su lugar, pero el lado derecho aún no enganchado. Cuando el resorte esté comprimido el clip es lo suficientemente delgado como para que pueda hacer clic en el otro lado del brazo en su lugar.
-
La pequeña curva en el brazo debe asentarse completamente sobre el resorte.
-


Para volver a armar tu dispositivo, sigue estas instrucciones en orden inverso.
16 comentarios
Very nice! Helped me get mine back together after I accidently removed the wire on the wheel.
ben hall -
Clear and concise, very helpful ! My wheel click didn't work anymore, a quick dusting and cleaning of the insides got it back to normal.
To those who would like to take the logics board from the lower casing : be careful when puting it back together, as the on/off switch under the board must properly align with the small moving plastic piece located in the lower casing. Otherwise, you might have to disasemble the whole thing again just to put it right.
Very helpful! my problem was the Rubber of the wheel, it has “expanded” and it made some friction with the transparent structure. Disassembled, rolled on a flat surface pressing hard and the rubber no longer touches the plastic! Awesome!