
Introducción
Trae el ritmo de nuevo reemplazando un altavoz defectuoso en tu iPhone 5.
-
-
Si el vidrio de tu pantalla está quebrado, contén el vidrio utilizando cinta adhesiva para evitar daños corporales.
-
Superpone tiras de adhesivo transparente sobre la pantalla del iPhone hasta que esta esté completamente cubierta.
-
-
-
Apaga tu iPhone antes de comenzar el desmontaje.
-
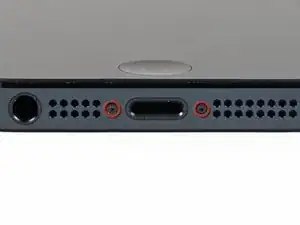
Retira los dos tornillos Pentalobe de 3.6 mm situados junto al conector Lightning.
-
-
-
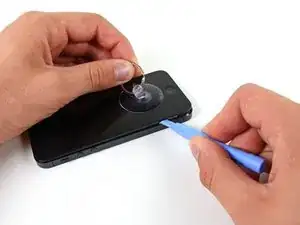
Independientemente de la herramienta que utilices, asegúrate de que levantes toda la pantalla.
-
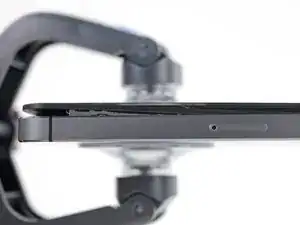
Si el vidrio empieza a separarse del plástico, como mostrado en la primera imagen, utiliza una herramienta de apertura de plástico entre la carcasa de metal del dispositivo y el borde de plástico para separar los clips metálicos de la carcasa.
-
-
-
Cierra el mango del iSclack para abrir las ventosas.
-
Coloca la parte inferior de tu iPhone entre las ventosas y contra el calibre de plástico de la herramienta.
-
La ventosa superior debe estar por encima del botón de inicio.
-
Suelta el mango para cerrar los brazos del iSclack. Centra las ventosas y haz presión sobre ellas para sujetarlas al iPhone.
-
-
-
Sujeta firmemente tu iPhone y cierra el mango del iSclack para separar las ventosas, levantando el panel frontal del interior de la caja trasera.
-
El iSlack esta diseñado para abrir tu iPhone cuidadosamente, lo suficiente para separar las piezas, pero no demasiado como para dañar los cables.
-
Despega las dos ventosas de tu iPhone.
-
Salta los siguientes tres pasos y continua en el Paso 9.
-
-
-
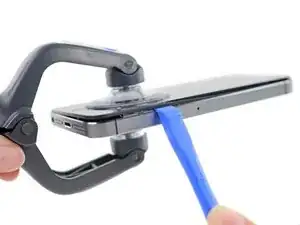
Mientras sostienes el iPhone con una mano, jala la ventosa hacia arriba para separar el ensamblaje del panel frontal un poco de la caja trasera.
-
Utilizando una herramienta de apertura de plastico, empieza a cuidadosamente separar la caja trasera de la pantalla, mientras continuando jalando hacia arriba con la ventosa.
-
-
-
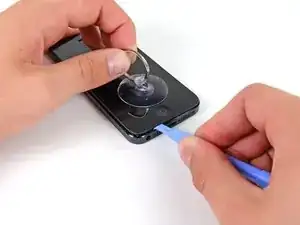
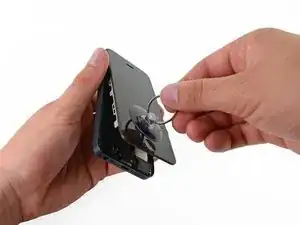
Continúa haciendo palanca alrededor del ensamblaje de pantalla, separando los clips alrededor del lado izquierdo y derecho.
-
-
-
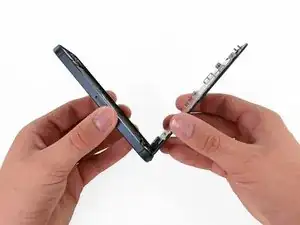
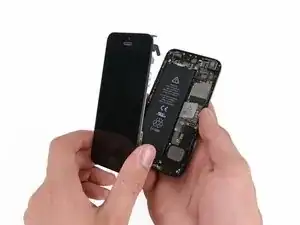
Una vez que los clips han sido liberados en la parte inferior y a los lados del ensamblaje del panel frontal, tira de la parte inferior del ensamblaje hacia afuera de la caja.
-
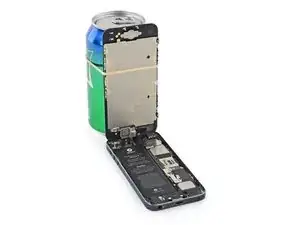
Abre la pantalla hasta formar un ángulo de 90º y apóyala contra algo para mantenerla sostenida mientras trabajas en el teléfono.
-
Agrega una banda elástica para sostener la pantalla firmemente en su lugar mientras trabajas. Esto evitará que ocurra cualquier tipo de esfuerzo en los cables de pantalla.
-
-
-
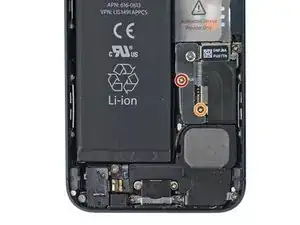
Quita los siguente tornillos asegurando el soporte del conector de batería a la placa lógica:
-
Un tornillo Phillips de 1.8 mm
-
Un tornillo Phillips de 1.6 mm
-
-
-
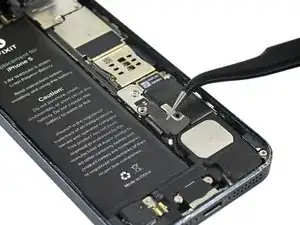
Utiliza una herramienta de apertura para cuidadosamente desconectar el conector de batería de su enchufe en la placa lógica.
-
-
-
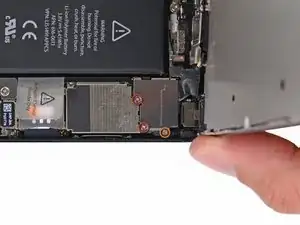
Quita los siguiente tornillos asegurando el soporte de cable del ensamblaje del panel frontal a la placa logica:
-
Dos tornillos Phillips de 1.2 mm
-
Un tornillo Phillips de 1.6 mm
-
-
-
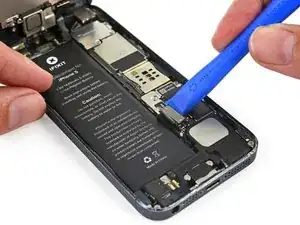
Levanta el soporte de cable de pantalla hacia la batería para desabrocharlo y sacalo del iPhone.
-
-
-
Utiliza una herramienta de apertura de plastico para desconectar las tres cables del ensamblaje del panel frontal:
-
Usa una herramienta de apertura de plástico o una uña para desconectar los tres cables de ensamblaje del panel frontal.
-
Cable del sensor y cámara frontal
-
Cable LCD
-
Cable de digitalizador
-
-
-
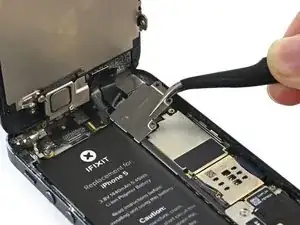
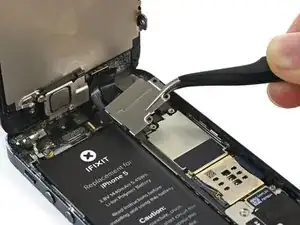
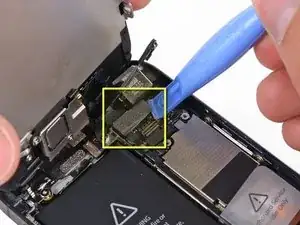
Utiliza la punta de un spudger para levantar y desconectar el cable de antena de la placa lógica.
-
-
-
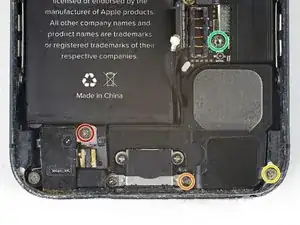
Remueve los siguientes tornillos que sujetan el recinto del altavoz a la caja trasera:
-
Un tornillo Phillips de 2.5 mm
-
Un tornillo Phillips de 1.5 mm
-
Un tornillo Phillips de 2.5 mm
-
Un tornillo separador de 2.7 mm
-
-
-
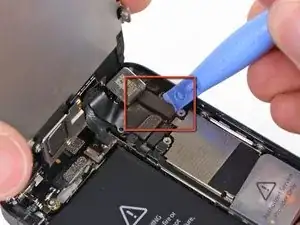
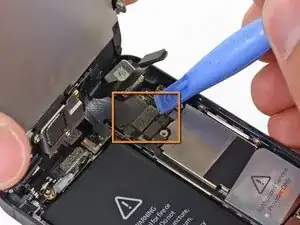
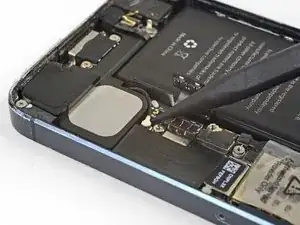
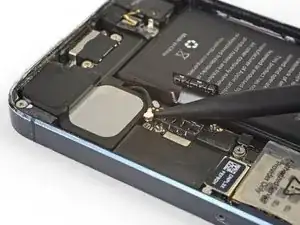
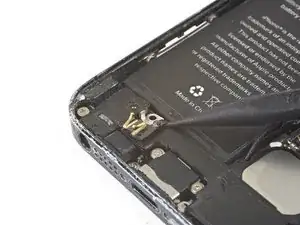
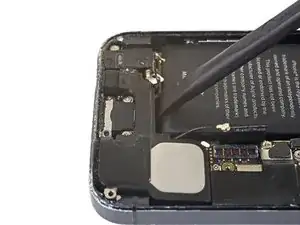
Desliza la punta de un spudger por debajo del cable flexible del muelle de contacto debajo de la batería y afloja con cuidado del recinto del altavoz.
-
-
-
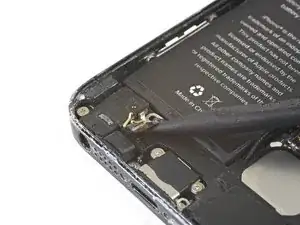
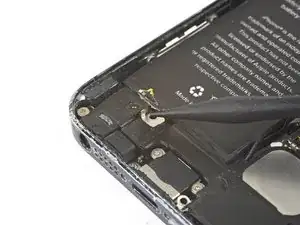
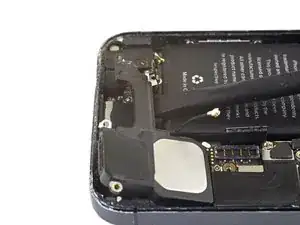
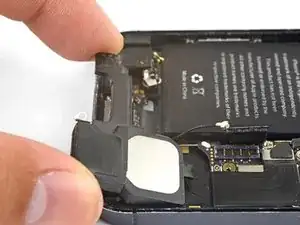
Usa el extremo plano de un spudger para levantar y aflojar el recinto de altavoz de la caja trasera.
-
Saca el recinto de altavoz de su zócalo.
-
-
-
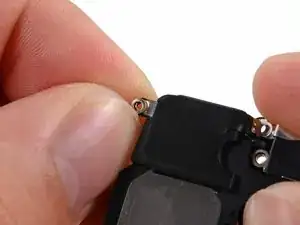
Remueve la arandela pequeña de doble lado en el recinto de altavoz y transfiérala a la parte de reemplazo.
-


Compara tu parte de reemplazo nueva con la parte original. Podrías necesitar transferir componentes restantes o remover respaldos adhesivos de la parte nueva antes de la instalación.
Para volver a ensamblar tu dispositivo, sigue estas instrucciones en orden inverso.
Lleva tus residuos electrónicos a un centro de reciclaje certificado.
¿La reparación no salió como lo planificaste? Fíjate en nuestracomunidad de respuestas del iPhone 5

7 comentarios
Ok guys I replaced a iPhone 5C loud speaker. Turned the phone on. Now its a black screen with numbers on it. It wont boot up or show the apple.
Any ideas why it does this?
Mic -
Step 2 Can I suggest that prior to any dismantling of the main component section that,when the front display has been set aside you take a photo of section containing battery etc.Print the photo you have just taken,then when you remove a screw place it on the corresponding position of the pictured screw.
Have run into a 5 that had it's power/volume flex replaced but now the phone is stuck in headphone mode. Tried a new speaker and a new dock/headphone jack assembly with no luck. Anyone have any ideas?
galihad -
Having completed this repair using the rear camera part from Ifixit I have to comment that the camera is noticeably lower quality. Its not huge - You don't notice it looking at the photos scaled down to fit but viewing one for one there is significant detail lost. My staff member has an Iphone 5 bough at exactly the same time as mine so I was able to take a photo side by side on his and mine after my repair and when you view 1 for 1 pixel in product boxes on mine the text was just a colored blur where on his although you couldn't read the text it was more obviously text. Overall though its still better than having a camera that wouldn't focus at all and being that Apple seem to refuse to supply genuine spare parts (Which there has to be a low against??? - Imagine if a car manufacturer did that) its still good buying one from someone who gives good support. At the end of the day its a phone camera not an SLR and its still better than the older Iphone 4 camera.
matt -
The majority of product manufacturers are not required to provide parts, and apple will fix items under the various warranties it offers. Car manufacturers on the other hand are required to make parts available by law. It is part of the regulation of their industry. They get a lot of protection for their business model, but have some obligations too. It's why the EV1 was pulled, they didn't want to have to make the parts, and why there are so many Delorian parts.
William Leeper -
This is a great guide. However, I'm having a hard time popping the screen back into place. Everything works but I'm afraid of putting too much pressure least I crack it again. Any advice?
amciotola -
To avoid broken screens during reassembling:
Put the hooks of the screen in the right place in the housing, then close it loose, don't press it. Turn your phone upside down with the screen on a very flat surface (e.g. table). Now press the housing on the screen -> no more risk for braking the screen because of inhomogeneous force applied on the glass!
mondbewohner -
I hope folks read this comment before proceeding to attempt a Sleep/Wake button repair on the iPhone 5! Apple has an iPhone 5 Sleep/Wake button replacement program, free, for iPhone 5 devices manufactured through March 2013. See program details at https://www.apple.com/support/iphone5-sl.... Don't do this yourself if you don't need to. It's a difficult repair.
Mark Luscher -
I was willing to add the following important remark on top of this guide but, strangely, it has been refused! Here it is:
---
*Check if your Iphone 5 is eligible to the Apple special program for a free battery replacement (devices sold between September 2012 and January 2013, within a limited serial number range).
* If not, watch the video and use this guide [video|https://www.youtube.com/watch?v=6ogE8USs...]
---
And thus, as my Iphone 5 was eligible, I went to the Apple store of Le Louvre in Paris and the battery has been changed for free instead of 65 euros. Thanks to Mark!
revher -
Hi every one i drop my iphone5s 16gb
I replace 10!new screen but cant back to live i see on the "logic board" where u conect the screen i se damage HOW CANT FIX THAT WHITOUT LOST MA DATA ??? Thaks for anny hellp!!!!!
aliroberto01 -
Steps 12-15 seem to be not necessary for battery replacement. They are not required to remove and replace the battery and they at least DOUBLE the amount of work. Most of the time spent on this process involved working with those tiny screws and maneuvering them in place and screwing them down. Steps 12-15 are three of the five screws that you work with inside.
Also, there should be a note at the beginning of Step 2 that if you bought the iFixit kit that you should go directly to Step 6.
Bob Hatcher -
please wear safety helmet too, integral helmet and cover mouth with an N95 facemask underneath, just in case the battery punctures, explodes, you knock your head back to the wall and slam it back forward hitting the screw in your eye and and inhaling toxic fumes! can never be too careful ;-)
ibisiki -