Introducción

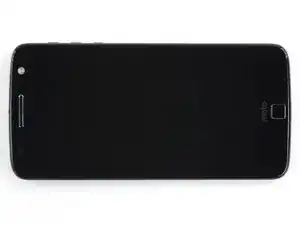
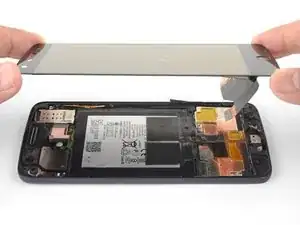
Esta guía muestra cómo reemplazar un ensamblaje de pantalla roto o rasgado en el Moto Z. En el ensamblaje de la pantalla incluye el cristal frontal y la pantalla AMOLED.

El ensamblaje de pantalla es extremadamente frágil y no está reforzada. Trabaja despacio y metódicamente cuando sujetes el ensamblaje de pantalla.

Si el cristal de tu pantalla está rasgado, mantén el cristal contenido para evitar que se rompa aún más y te lastimes durante tu reparación colocando cinta sobre el cristal.

  1. AOhWsAmeA3BjCQYI
    • Calienta un iOpener y aplícalo al borde izquierdo del teléfono durante al menos 90 segundos.

    • Se puede utilizar un secador de pelo, una pistola de calor o un hornillo pero ten cuidado de no calentar demasiado: la pantalla OLED y la batería interna son susceptibles a daño por calor.

    • Mientras esperas que el adhesivo se ablande, sigue adelante y lee el siguiente paso para tener una idea en dónde hacer la palanca.

  2. B3AD1TEtWaQNbuQw
    B3AD1TEtWaQNbuQw
    SESAOm3TZKfiLIxx
    • En los siguientes pasos, cortarás el adhesivo alrededor del borde del ensamblaje de pantalla.

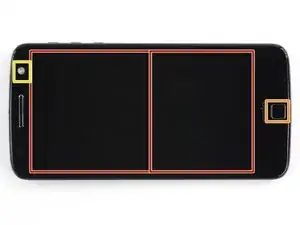
    • Para evitar daño, no cortes en las siguientes áreas:

    • El panel OLED

    • El botón de inicio

    • La unidad flash

  3. ecDSu1IwXefvHyOe
    ecDSu1IwXefvHyOe
    Sl2XHVITPZBMAA1V
    45l3ETvbWoLXAHYt
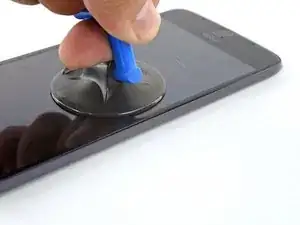
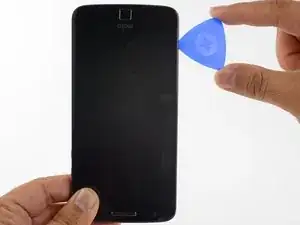
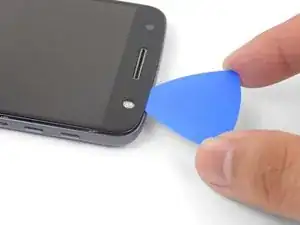
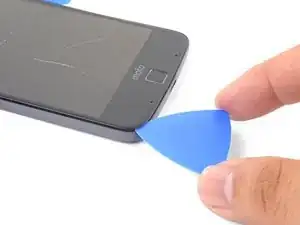
    • Aplica una ventosa lo más cerca posible del borde calentado.

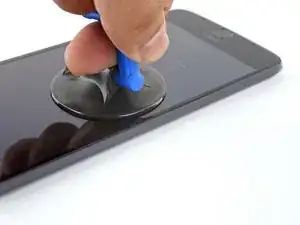
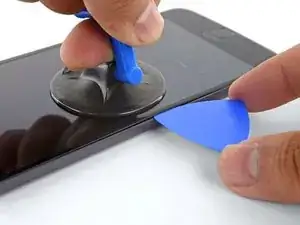
    • Levanta la ventosa e inserta la punta de una púa de apertura en la grieta.

    • No insertes la púa más de 1,5 mm. Insertar la púa demasiado podría dañar el panel OLED.

  4. oIt5C4Ld2ZDNBqFF
    oIt5C4Ld2ZDNBqFF
    vV1rcoBNSTvN5yRd
    rTHWq4cY2OoSYtRm
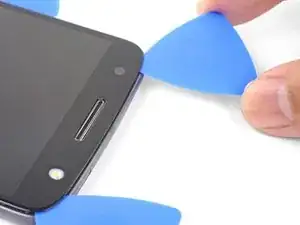
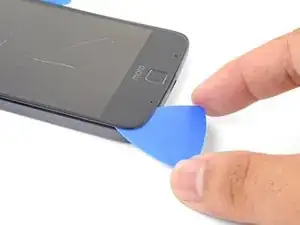
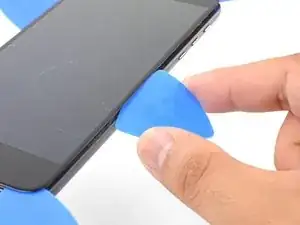
    • Con cuidado desliza la punta de la púa de apertura a lo largo del borde del teléfono, asegúrate de no cortar más de 1.5 mm.

    • Mientras deslizas la púa por el borde, sentirás la punta de la púa presionarse contra el borde del panel OLED. Hasta allí es donde llega la púa sin dañar el panel.

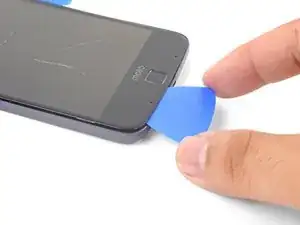
    • Una vez que hayas separado el adhesivo, deja una púa de apertura en el borde para evitar que el adhesivo se vuelva a sellar.

  5. bUsMXMKnGssnwu5A
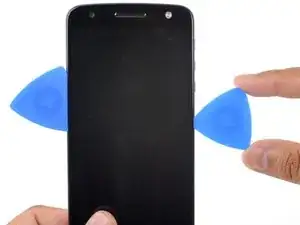
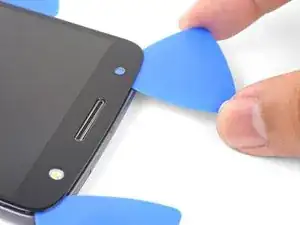
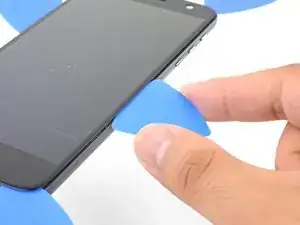
    • Repite el procedimiento de calentar, levantar y cortar para el resto del borde largo del teléfono.

  6. wSBsESUHl1PVsuNR
  7. rYGN2OAKDGmOhlTG
    rYGN2OAKDGmOhlTG
    14kej2hZQVqIk2J2
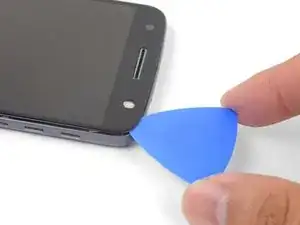
    • Inserta una púa de apertura en la esquina del lado del flash del teléfono y con cuidado corta alrededor de la unidad de flash.

    • No inserta la púa más de 1,5 mm en el borde.

    • Una vez que termines de cortar, deja la púa en la esquina para evitar que el adhesivo se vuelva a sellar.

  8. ICwKD6Xk6t4TxUJb
    ICwKD6Xk6t4TxUJb
    pjHLdexBUTu3FjVI
    odQrxdZ4ckAPau5I
    • Inserta una púa de apertura en la esquina superior restante del teléfono.

    • Con cuidado corta a través del adhesivo en toda la parte superior del teléfono.

    • No insertes la púa más allá de 12,5 mm.

  9. CdtgmSxofc6FivmV
    • Aplica un iOpener caliente al borde inferior en el teléfono durante al menos 90 segundos.

  10. 2cGQEyKevPlyC6mE
    2cGQEyKevPlyC6mE
    pEWg1m4XQYxs2kmH
    tjWsxZdsvq6HgZbv
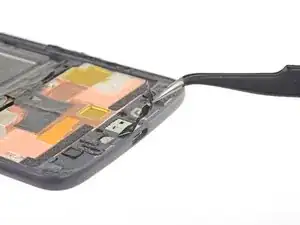
    • Inserta una púa de apertura en la esquina inferior y corta hacia el botón de inicio deteniéndote antes de llegar.

    • Una vez que termines con la esquina, deja una púa en el lugar para evitar que el adhesivo se selle.

    • Repita el proceso para la otra esquina inferior.

  11. brUPNyqVDPZVCP21
    brUPNyqVDPZVCP21
    p4HKLBK3hFxuYY1A
    • Con cuidado tuerce la primera púa de apertura ligeramente para ayudar a liberar el adhesivo del borde.

    • Repite el mismo proceso para cada púa restantes moviéndolas cuando sea necesario y torciéndolas ligeramente para liberar el adhesivo.

  12. PSbMswxRT54lC3jW
    PSbMswxRT54lC3jW
    yUnYjJkaQWgN1oUY
    XROmdJOEYlNDElxe
    • Levanta el extremo del auricular de la pantalla para proporcionar acceso a los cables de pantalla.

    • No abras la pantalla más allá de 90 grados y siempre brinda soporte al panel de pantalla.

    It says lift home button end of display but the photo shows lifting the earpiece end.

    Lynne Ayers -

    Good catch! I have fixed the step.

    Arthur Shi -

    When I finally got mine opened, all I see is a white piece of metal. Nothing like you photo…UhOH…

    Diana Myera -

    Oh no! It sounds like a different model! Motorola phones are notorious for their similar sounding naming conventions.

    Arthur Shi -

  13. AliGuJ5ZLd1KkOub
    AliGuJ5ZLd1KkOub
    1TNRwfivjGnX2WXk
    N5HiOnp4LXA5YLcu
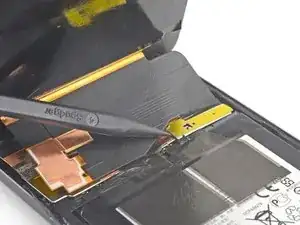
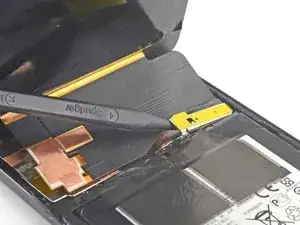
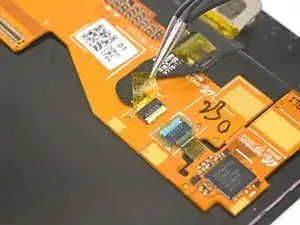
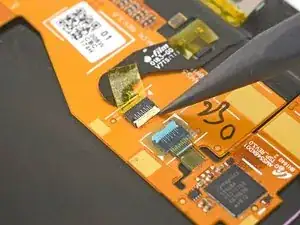
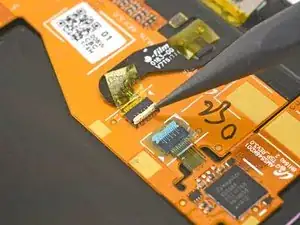
    • Usa la punta de un spudger para levantar el escudo del cable de la pantalla.

    • Remueva el escudo de cable de la pantalla.

  14. AmvnVWuA4bcqApdC
    AmvnVWuA4bcqApdC
    SYEPgOWWepwwPHaW
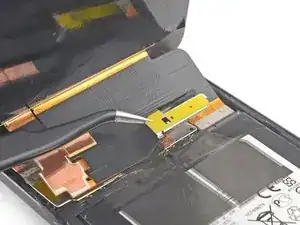
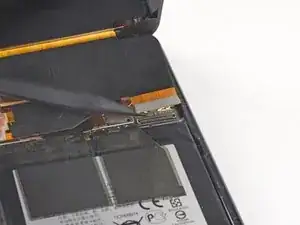
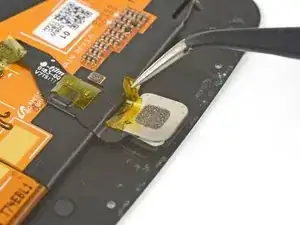
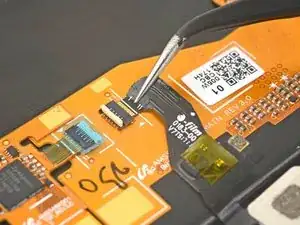
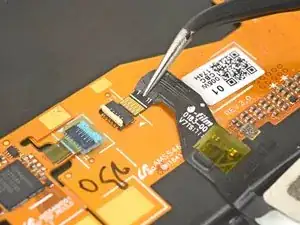
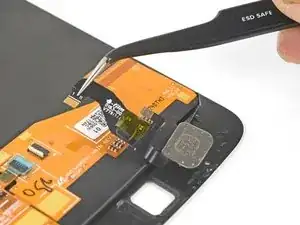
    • Usa la punta del spudger para levantar y desconectar el conector del cable de pantalla de su zócalo.

  15. MffriIMQwph2MZhw
    MffriIMQwph2MZhw
    kepJQHIFFmTjkKUv
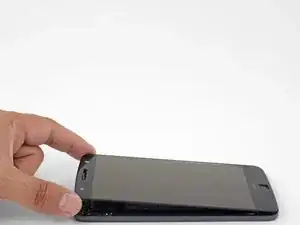
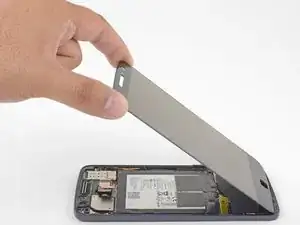
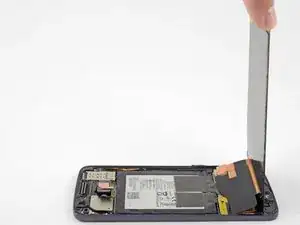
    • Remueve el ensamblaje de la pantalla.

    • Antes de volver a instalar el ensamblaje de la pantalla, remueve completamente cualquier adhesivo y vidrio restante del marco.

    • Luego de remover todos los rastros de pegamento y cristal del marco, limpia las áreas de adhesión con alcohol isopropílico 90% (o más) y un paño libre de pelusa o filtro de café.

    • Asegúrate de encender tu teléfono y prueba tu reparación antes de instalar el adhesivo nuevo y volver a sellar el teléfono.

    • Usa el adhesivo de pantalla para Motorola Moto Z para volver a sellar tu teléfono.

    By removing the traces of glue from the frame, you will also remove the protective covers of the microphone and whatnot at the home button side,, as well as the speaker cover at the other side, because the glue does its duty…

    dr_baeschtlr -

  16. BHLxGqUZ2nVLSUh4
    BHLxGqUZ2nVLSUh4
    FW2XPybMSReFAoVH
    • Usa las pinzas para despegar cualquier cinta en el conector del botón de inicio.

  17. A4iEeFiX2Rend56y
    A4iEeFiX2Rend56y
    sUYQeqxOcmp5Q1cH
    • Usa la punta de un spudger para dar vuelta el seguro del conector del botón de inicio.

  18. SYxxIVCawlGfDYee
    SYxxIVCawlGfDYee
    3kxcWOvEOhkHhd4h
    • Usa pinzas para sacar con cuidado el cable del botón de inicio directamente del zócalo.

  19. 4wktrDPUJVhSwmkE
    • Remueve el botón de inicio.

Conclusión

Compara tu parte nueva de reemplazo con la parte original. Podrías necesitar transferir los componentes restantes o remover los respaldos adhesivos de la parte nueva antes de la instalación.

Para volver a ensamblar tu dispositivo, sigue estas instrucciones en orden inverso.

Lleva tus residuos electrónicos a un centro de reciclaje autorizado.

¿La reparación no resultó como lo planificaste? Consulta nuestra comunidad de respuestas de Motorola Moto Z para ayuda en la resolución de problemas.

Arthur Shi

Miembro Desde 03/01/18

219093 Reputación

14 comentarios

Do you ship to India?

gsriram72 -

Watch the youtube video it’s a lot better also instead of sending a sticker that connects the phone and the screen they should’ve added adhesive to the new screen.

Jonathan Davila -

Hi Jonathan,

Unlike aftermarket screens that may have adhesive pre-attached, we are an authorized Motorola reseller and sell OEM Motorola parts. In this case, the OEM screen comes without adhesive pre-attached.

Arthur Shi -

For the most part this was a helpful guide, but what about the flash? When following the directions the flash comes off with the screen/digitizer, and it appears to have happened to the author as well. There is no mention or help in reattaching this component or needing to purchase a new flash component prior to beginning the repair. It will be too late for me, but any insight might help others.

Joe Wiltjer -

Hey Joe,

You’re right—depending on the part you order, you may need to transfer the flash lens from your original back cover to the replacement part. This involves prying the original off and sticking it back onto the replacement cover. I’ll add a note to one of the steps.

Arthur Shi -

You have to reattach the flash lens wires directly to the underside of the OLED screen, not the ‘back cover.’ It sticks directly to the OLED screen. That’s where it was on the old screen. Was this wrong?

Daniyal Kazi -

Hi, do you know if it would be possible to use the screen from a Z Play (much cheaper)?

Jean-Yves -

Hello,

Somehow in the middle of the process to replace my Moto Z screen and battery, I lost the display cable shield. I assemble the display without it, but the touch won’t work. AIs this because I lost the part, or the replacement part is faulty?

Also, the adhesive tapes on the battery are also gone. Is it going to a problem?

Thank you

Farshad Khoshnoud -

Hi Farshad,

It is possible, though unlikely that the missing display cable shield is the culprit for the touch. I would double-check the wide display connector to make sure it is fully seated. Connect the display, place a non-conducting sheet between the display and the rest of the phone, and power it up to see if the digitizer works. If it does, there’s a grounding issue. The black tape on the battery mainly helps dissipate heat, but may also help electrically insulate certain parts.

Arthur Shi -

Hello

I have tried to use a piece of folded aluminium foil as the shield, but it won’t work. I used it because I failed to find this small part online, on the other hand, I find in comments after my story that the shield may not be of touch function value, so, I am wondering what else could be the issue. I also ordered two more display assemblies because I thought they may be faulty, but nothing changed. Any idea?

Farshad Khoshnoud -

Everything went great but I forgot to replace the Display Cable Shield, found it when I was cleaning up. Hope it’s OK without it?!

Randall Patkowsky -

Hi Randall,

If you already sealed the phone and it works, that’s fine!

Arthur Shi -

Hi Randall

Is the phone fully functional? I have lost the display cable shield and when I assemble the device, there’s no touch.

Farshad Khoshnoud -

The screen is super sensitive and I messed up the volume and power buttons.

Randall Patkowsky -