Introducción

Dispara reemplazando los gatillos en tu Xbox 360 Wireless Controller.

  1. 2n5cabIuJELBKtCp
    2n5cabIuJELBKtCp
    BUPm4PuhYuAFY2QW
    • Presiona el botón de liberación en la parte trasera superior del control.

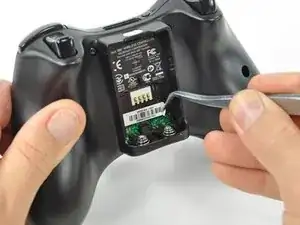
    • Extrae el portapilas del control.

    • La opción estándar para los paquetes de baterías de los controles inalámbricos de la Xbox 360 son las baterías AA. También hay disponible una batería recargable, pero ambas opciones de batería se extraen del controlador de la misma forma.

  2. pimpfi2dSiLdSctG
    • Usa un par de pinzas para despegar la etiqueta del código de barras del compartimento de la batería.

  3. 2oj6VAsZhlhMMnCo
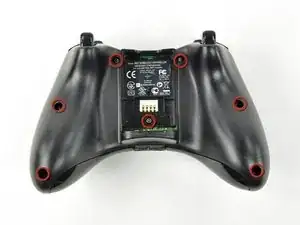
    • Retira los siete tornillos Torx de seguridad T8 de 9,3 mm que sujetan la carcasa trasera a la carcasa delantera.

    Any recommendation on which set of Security Torx tools to use? I've already purchased 2 kits, one of those being sold as "Xbox controller tools" but the diameter of the head does not fit the hole on the controller and that's critical for the 2 screws on the bottom. The tools must obviously be thinner in diameter and long enough to get there.

    Arnie -

    How to open an XBOX 360 controller without a special screwdriver. http://www.instructables.com/id/How-to-o... Works perfectly.

    Louis -

    A lot of thanks for your comment. It's very usefull

    Echedey -

    I picked up a handy torx key set from Auto Zone. Was about $10, no lose driver bits. has both sizes you need to repair the controller and the console. Here's the link:

    http://www.autozone.com/autozone/accesso...

    FierDancr -

    It doesn't really matter which set of bits you by or what brand makes them, Torx bits (and the security versions of them) are generic & come in standardized sizes. You do not need a special "xbox" tool kit, you just need a size 8 torx security bit, no matter what brand makes the bit/kit. Those types of "specialty kits" are usually just collections of generic bits that you can buy at a hardware store in a regular bit set. The difference is that a general bit set will have bits for screws that a specific item doesn't have in it, whereas a specialty kit will only include bits for the types & sizes of fasteners used in the specified item.

    BTW, with the smaller sizes of torx security bits you can try breaking off the little post in the middle with needlenose pliers or something else that can fit in the there. Even if the post doesn't break off cleanly, it's usually short enough to fit a regular (non security) torx bit in the slot.

    Nerfbomb -

  4. 5xJkNxt3DoRVp311
    5xJkNxt3DoRVp311
    fvxUv5tSWmCC3oiH
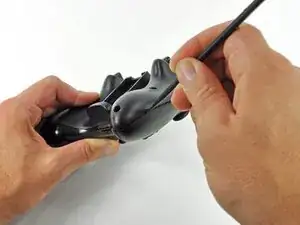
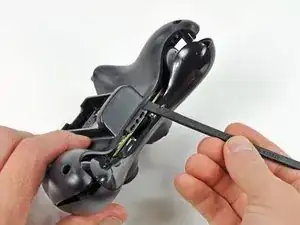
    • Introduce un spudger entre las carcasas delantera y trasera, a lo largo del borde izquierdo del controlador.

    • Gira el spudger hacia el frente del controlador, separando las dos carcasas.

  5. Hjf1LBWjF1OCx4jr
    Hjf1LBWjF1OCx4jr
    IUQrUiO6ZuHAHYjg
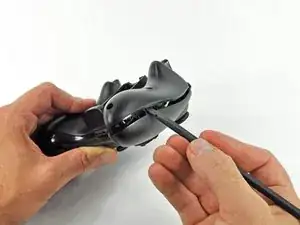
    • Introduce un spudger entre las carcasas delantera y trasera, cerca del conector para los auriculares.

    • Gira el spudger hacia el frente del controlador para separar ambas carcasas.

  6. Oxa5mcnVgNQhStdu
    Oxa5mcnVgNQhStdu
    tB2epfsiXDTCQR4Q
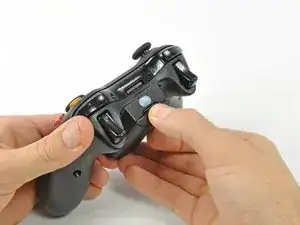
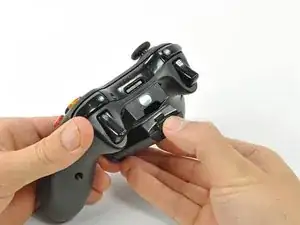
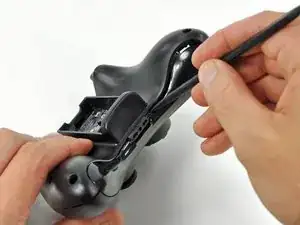
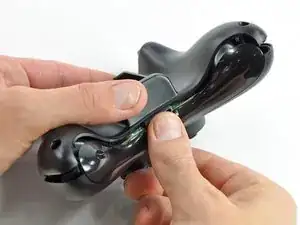
    • Sujeta el controlador por el compartimento de la batería y el conector para auriculares.

    • Levanta el compartimento de la batería para separarlo del conector de los auriculares, separando la carcasa trasera de la carcasa frontal y la placa lógica.

    • Los resortes de contacto de la batería se mantienen en su lugar mediante ranuras en el alojamiento de la batería en la carcasa trasera. Asegúrate de realinearlos correctamente durante el montaje.

    The RB / LB bar will fall away easily as you handle the upper case and logic board; just be prepared for it.

    knoxco -

  7. M2UEQAZJeM5rOiCR
    M2UEQAZJeM5rOiCR
    qaiKdyJ3vSKCYkTc
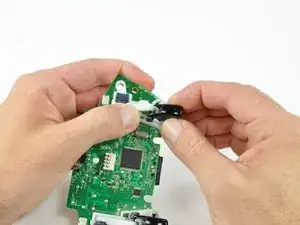
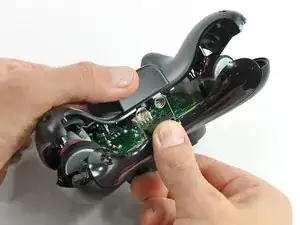
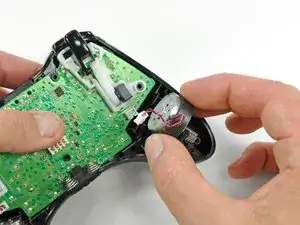
    • Usa el extremo plano de un spudger para quitar el cable del motor de vibración, moviéndolo hacia arriba desde su zócalo en la placa lógica.

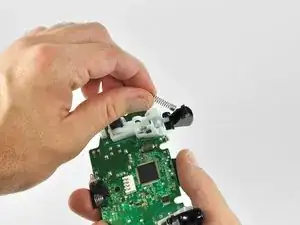
    • Saca el motor de vibración de la carcasa delantera.

  8. DwvbBJCujyqTVqaw
    DwvbBJCujyqTVqaw
    xyJQNWVVyfPRslva
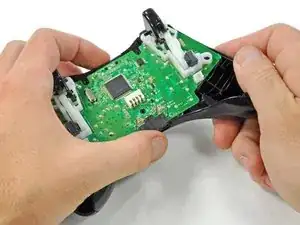
    • Retira el motor de vibración del otro lado del controlador utilizando el mismo método descrito anteriormente.

    • El motor izquierdo tiene significativamente más contrapeso que el motor derecho.

    The opposite was true for the controller I just opened. It was the left motor counterweight (as you hold the controller normally) which had more weight. Perhaps it doesn't matter which goes where?

    Bob S -

    For anyone reading this in the future, it does matter. The way you had them originally is the correct way.

    Yado Nada -

  9. VBiVykaL6Mge6Qlf
    VBiVykaL6Mge6Qlf
    cmQQUXvmDOTRL1wK
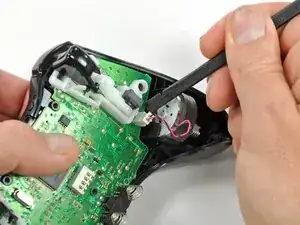
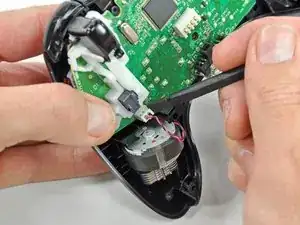
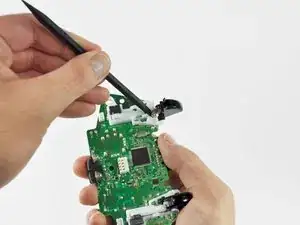
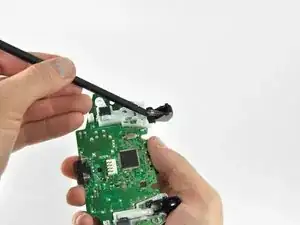
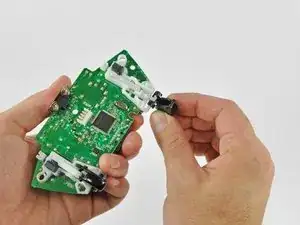
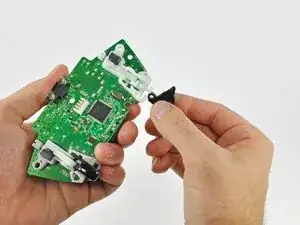
    • Levantando el conector de los auriculares y el enchufe de alimentación, extrae la placa lógica de la carcasa frontal.

    What if you're having difficulty taking the logic board out?

    Xander Uchida -

    In my experience with my controller, the logic board lifts out very easily, there are no tabs or fasteners holding it in.

    So, if you're having difficulty taking the logic board out, call a friend with average hand dexterity & motor skills to do it for you.

    Nerfbomb -

    If the controller is a bit old, the center plastic screw holder might have swollen and will need a little stenght to release the logic board.

    RoFixedIt -

  10. LSXN2TCBmIJMBWc4
    LSXN2TCBmIJMBWc4
    1kpisUyfYcsGHTsZ
    IBYXQ1t6MYsQLPwe
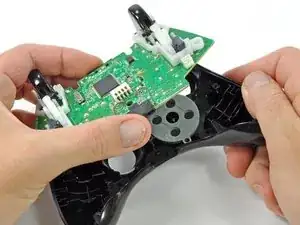
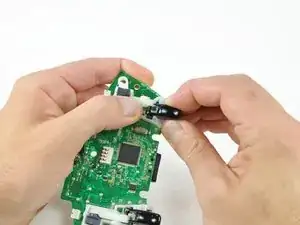
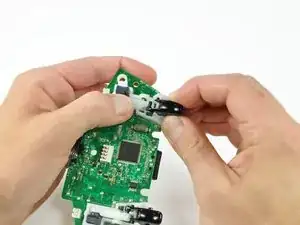
    • Con el pulgar y el índice, empuja el gatillo izquierdo hacia el lado derecho del controlador. Empuja simultáneamente el brazo de control del gatillo en la dirección opuesta.

    • El gatillo tiene una clavija que encaja en una ranura en el brazo del gatillo. Asegúrate de empujar lo suficiente para que la clavija salga de la ranura.

    • Empuja el brazo del gatillo hacia abajo.

  11. LS41yP5KPTDIv5wL
    LS41yP5KPTDIv5wL
    QZ1ioSWoQqIiGWi1
    UmQNVQLLC3xNdeAT
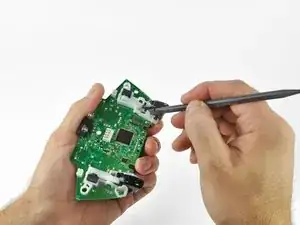
    • Inserta el borde de un spudger entre el gatillo y el conjunto del gatillo cerca del borde izquierdo. Haz palanca en la carcasa lejos del pestillo del gatillo.

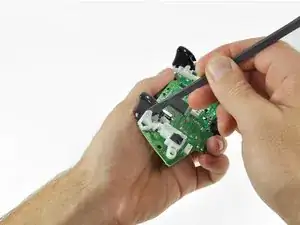
    • Utilizando la técnica descrita anteriormente, haz palanca en la carcasa del borde derecho para alejarla del gatillo.

    • Gira el gatillo lejos de la placa lógica, más allá de su alojamiento.

  12. 5PVIwMvWMIcEESBI
    5PVIwMvWMIcEESBI
    6uiF3NWB6rDClnlL
    bFumbpPijF5nCVoL
    • Con un spudger, saca el resorte del gatillo de su clavija en la carcasa del gatillo.

    • Saca el resorte del gatillo del gatillo.

  13. 4O1NH31bxPOMsUxu
    4O1NH31bxPOMsUxu
    Zja6UDbWSN6xvXVb
    UxSQ5JbUfSkQliNm
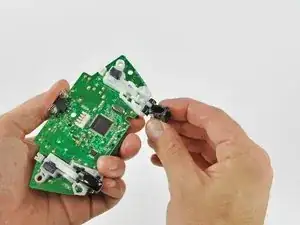
    • Desliza el gatillo hacia el lado derecho de la placa lógica y gíralo en el sentido de las agujas del reloj.

    • Retira el gatillo derecho de la placa lógica.

    • Para quitar el gatillo izquierdo de la placa lógica, sigue el procedimiento descrito anteriormente para el gatillo derecho.

    This is a removal guide not a replacement guide. I need steps to putting the trigger back in now.

    Paul de Boer -

    My trigger works by moving in and out but it is constantly either working or constantly not, when i press the home screen it switches between the two……help please

    Daunte Mooney -

Conclusión

Para volver a armar tu dispositivo, sigue estas instrucciones en orden inverso.

Brett Hartt

Miembro Desde 13/04/10

125887 Reputación

4 comentarios

use a small tag of double sided tape to hold the counterweights in when you rebuild or its nearly impossible to tip up the two halfs of the controller to fit them together. With the counterweight just slightly stuck into place with a tiny tag of double sided tape you can tip that half of the controller upside down to fit on top of the other half. Still awkward but do-able. Almost impossible otherwise.

iorigrif -

If i leave out the vibrations things will it cause the problems tonthe board ??

Michael Francis -

These instructions were given in proper order and understanding

Arthur Murray Doan -

IMO this could have benefited from some instructions on how to get the triggers back on, cause it was quite a challenge.

The way I managed to do it, is you've got to reverse both step 11 and step 10 in one go, otherwise it would be impossible to get the trigger peg into the white arm (at least I couldn't figure out a way to do it): before reversing step 11, hold the white arm up and to same side you pushed it in the step 10, and then once you click it back into place, the peg would also go into the slot in the arm. For me it was easier to do for LT than RT - the latter too a few tries, so I would recommend doing LT first and then RT.

Rathori -