
Introducción
Usa esta guía para reemplazar una batería desgastada.
Nota: Si hay una película de plástico delgada en tu batería de reemplazo, no intentes retirarla. Está pegada y protege la batería dentro de la MacBook.
-
-
Retira los siguientes 10 tornillos:
-
Dos tornillos Pentalobe de 5 Puntos de 8 mm
-
Ocho tornillos Pentalobe de 5 Puntos de 2.5 mm
-
-
-
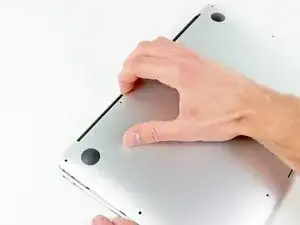
Utiliza tus dedos para hacer palanca entre la pantalla y la cubierta posterior y jala hacia arriba para destrabar y retirar la cubierta posterior de la MacBook Air.
-
-
-
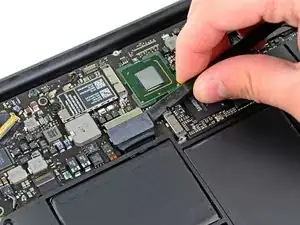
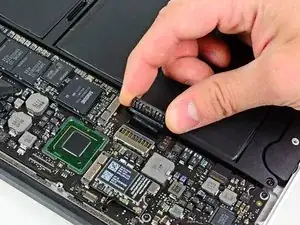
Utiliza la parte plana de un spudger con un movimiento de palanca hacia arriba para retirar ambos lados del conector de la batería del socket de la tarjeta madre.
-
Dobla ligeramente el conector de la batería hacia arriba para evitar que accidentalmente haga contacto con el socket.
-
-
-
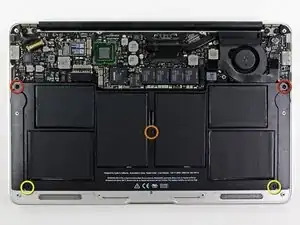
Retira los siguientes 5 tornillos que aseguran la batería a la cubierta superior
-
Dos tornillos Torx T5 de 5.2 mm
-
Un tornillo Torx T5 de 6mm
-
Dos tornillos Torx T5 de 2.6 mm
-
-
-
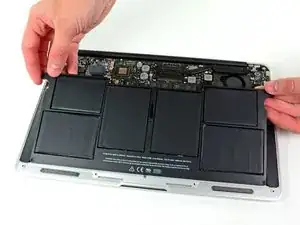
Levanta la batería de la orilla más cercana a la tarjeta madre y retírala de la computadora.
-
Cárgala al 100%, y mantenla cargando por, al menos, 2 horas más. Después, desconéctala y úsala normalmente para agotar la batería. Cuándo veas la notificación de batería baja, guarda tu trabajo, y mantén tu laptop encendida hasta que se le acabe la batería. Espera por lo menos 5 horas, y vuelve a cargar tu laptop sin interrupciones a 100%
-
Si notas un comportamiento inusual o problemas después de instalar tu nueva batería, tal vez debas restablecer el SMC de tu MacBook.
-

Para volver a ensamblar tu dispositivo, sigue estas instrucciones pero en reversa.

57 comentarios
Arrived with 52% charge, capacity 4593 mAh of 4680 mAh. 98% health, manufacture date of the iFixit replacement battery is Feb 4 2012 (2.9 years), with 0 charge cycles. My order arrived extremely fast, and replacing the battery itself was easier than expected. Overall speed of my MBA seems to have improved somewhat as well. Despite my MBA mid-11 being almost 3.5 years old, the internals, fan included, were all fairly free from dust. So far, so good.
I removed a battery pack from a mid-2011 MBA. Two of the lithium polymer cells had expanded so much that the upper case was bulging out about 0.5cm. The bulge un-bulged itself as soon as I loosened the screws on the lower case. There doesn't seem to be any significant damage to the hardware. Pretty wild. Also, despite this repair being listed as "Difficulty: Moderate", it's about the easiest thing you can do that involves opening the bottom cover.
Joey -
THIS IS FANTASTIC!! I ordered it on a Thursday & received it on a Saturday! Came very protected in the box. It took me only 40 min to replace the battery & these instructions were excellent to follow! I highly recommend!
When you say:
Remove the following ten screws:
Two 8 mm 5-point Pentalobe screws
Eight 2.5 mm 5-point Pentalobe screws
Do the 8mm & 2.5mm dimensions refer to the LENGTH of those screws, or the size of the pentalobe? That is, are there other sizes of pentalobe drivers like there are for hex, phillips and torx? When only one dimension is provided, it is usually the socket/driver size, not the screw length, maybe since the length cannot be seen when the screw is installed.
Can I suggest that you clarify your instructions so folks are confident they are only in need of _one_ pentalobe driver?
Nerdily yours,
Larry (whose iPhone 4S can now get through a day without 6 recharges thanks to ifixit.com ;-)
larryleveen -
The 8mm and 2.5mm are the length of the screws. One pentalobe P5 screwdriver suffices for all the screws (P5 is implicitly the size of the pentalobe screw heads).
Michael Welham -
I sourced all the parts from ifixit, plus a magnetic project mat which I found to be very useful for organising the teardown and reassembly.
Allen -
The magnetic mat is
GERARD SZAREK -
Keep the 2.5mm tiny screws away from the MagSafe connector as they will be attracted and sucked in to the magnet.
Frank O'Carroll -
A tip an old bench tech taught me that has saved me many times: I put clear “Scotch” tape over the case screws as they became “free”. The tape kept them in place while I lifted the lid off, cleaned it etc.
Michael Mee -
Thank you for a really smart tip! I will be using that countless more times!
Lilljedahl -
I’m confused about internet recovery and installing MacOS. Is all of this done before placing in the new ssd card or after. I don’t have any files that I would like to safe/transfer, is all of this necessary, if I don’t do it before placing new ssd, will I still be able to instal/upgrade macOS afterwards.
It’s an old Mac and now it won’t start or charge, I know I will have to replace battery and put new battery first and turn on Mac before doing the ssd stuff. Since it won’t effing start.
I’m really clueless about backing up old ssd, since I don’t need any files, besides MacOS(software) ,and is that related to the ssd?
AMG -
The answer to your question: You need to insert your SSD into the computer before internet recovery. If you start the recovery before inserting SSD, it won’t affect the setup, you won’t damage anything. But your SSD will not be detected (as there isn’t one inserted.)
Also, a little tip: If you bought a used SSD, go into Disk Utility and format the drive with the highest security level to permanently remove all of the previous files.
Also a FYI: Internet Recovery will load up Mac OS X 10.9.5 Mavericks, so I would recommend making a recovery drive from a Big Sur (or desired version) through another Mac, and a USB. You can visit this support doc: https://support.apple.com/en-us/HT201372
Hope this helps! -Dan
danielwen -
I got a macbook air with a damaged and swollen battery. I could remove all screws, except one 2,5 mm screw. I’m afraid it got damaged while attempting to remove it, I have no grip with the P5 pentalobe screwdriver. How can I proceed?
Robert Hermans -
Hi Robert!
Try some techniques found in this stripped screw removal guide. Good luck!
Arthur Shi -
Hello I have a macbook air they are say they do not have parts for my laptop macbook air 11 inches 2013 mid need to replace battery which one to buy
vensilver -
Hello! This is the part you want—maybe we’re not able to ship it to you if you’re out of the United States. The battery in your MacBook Air should be the same for all 11” between mid-2011 to early-2015.
Arthur Shi -
The smaller screws went in more easily when I put back all the screws along the hinge edge first.
Rachel Slatkin -