Introducción

Usa esta guía para reemplazar el cable de datos de placa E/S

  1. XxSVygoKg3BQZUeK
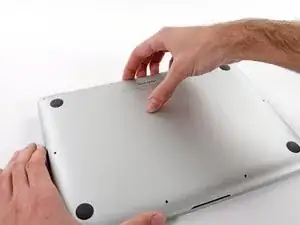
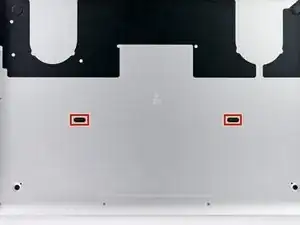
    • Quitar los siguientes diez tornillos que unen la tapa inferior con el cuerpo:

    • Dos tornillos Pentalobe P5 de 2.3mm

    • Ocho tornillos Pentalobe P5 de 3.0mm

    • A lo largo de esta reparación, mantén un seguimiento de cada tornillo y asegúrate de que vuelve exactamente al lugar de donde salió para evitar dañar tu dispositivo.

    If don’t have one of those neat project mats, then you can use small pieces of flattened blu-tack to hold the screws. If you arrange them in the shape of your mac book cover, and put the screws down methodically, you can get a one-to-one mapping of the screws to the correct screw holes.

    Toby Thurston -

    Or you can use an ice tray where you put the screws and the parts in separate bays in the same order as they come in the instructions.

    timofej.se -

    This is great! I used a small magnetic white board, and wrote on it to identify the parts as I went. This whole process, from the fast shipment to the great instructions to the complete, high quality, tool kit has been great. I’m typing this comment on my resurrected laptop. Thank you! Sue

    Susan Greer -

  2. TZjAGsfhlId3q36t
    • Introduce los dedos entre el cuerpo y la tapa inferior.

    • Tire suavemente de la tapa inferior.

    • Retire la tapa inferior y déjela a un lado.

  3. SLwb4KCgFZKfLR2B
    SLwb4KCgFZKfLR2B
    3eGiEP35uex15jKd
    muPIBpQokGnUUXJP
    • Durante el montaje, empuja suavemente hacia abajo el centro de la carcasa inferior para volver a colocar los dos clips de plástico.

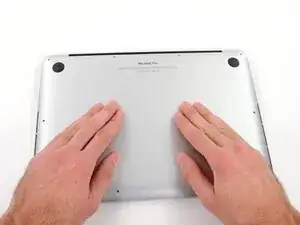
    • La carcasa inferior está conectada a la carcasa superior en el centro, con dos clips de plástico.

  4. oh6QmDClHy3Es55f
    • Remueve la cubierta de plástico adherida a la placa de contacto de la batería.

  5. AvPUsRLbmXLZWSlb
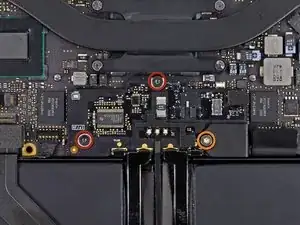
    • Remueve los siguientes tornillos que sujetan la placa del conector de batería a la placa lógica:

    • Dos tornillos T6 Torx de 2.8 mm

    • Un tornillo Torx T6 con reborde de 7.0 mm

  6. eYeaxKQXRIv43WNX
    eYeaxKQXRIv43WNX
    INge1d6OYG2XdrMr
    • Utiliza una pincita para remover la pequeña tapa de plástico ubicada cerca de la parte inferior derecha de la placa de conector de batería.

    Is adhered to screw beneath, so lift firmly and slowly.

    Andrew -

    when doing this with metal tweezers as instructed in the video, it was difficult to get off and apparently while i was trying to do it, the tweezers went too far under and i believe made contact with the screw underneath? there was a zzz noise, an orange flicker and a little stream of smoke that came out. i freaked out and put everything back together to see if the laptop even still worked, it turned on and everything but died right away (i drained it before doing the repair anyway, so i was surprised it turned on at all).

    i finished the battery repair and did several other things while in there. i have charged it all the way as recommended and will use it later on to see how everything is, im hoping that it’s a okay, but could someone explain to me what happened and the possible consequences?

    Kait D -

  7. 3h3p5bF5gSsxU3H1
    • Remueve el tornillo T6 Torx de cabeza ancha de 6.4 mm que sujeta el conector de batería al ensamblaje de la placa lógica.

  8. KnflDJ6YcW61sb3S
    KnflDJ6YcW61sb3S
    Y3LPyukbnPaH2Qua
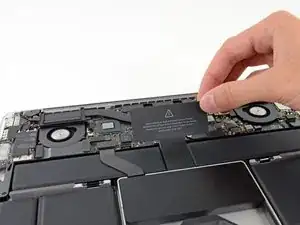
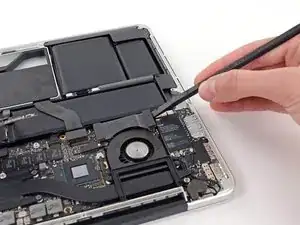
    • Con cuidado, levanta la placa de conector de la batería de la placa lógica.

    • Se recomienda doblar los cables de batería ligeramente, para mantener la placa suspendida por encima de la placa lógica y fuera del camino.

    • No pliegues la placa completamente o dobles los cables ya que esto podría dañar la batería.

  9. wBB3HYE4h4RPE1gv
    wBB3HYE4h4RPE1gv
    oUwSuUJp4RWM4RSK
    • Toma el intercalador con pincita

    • Un intercalador es el nombre de una interfaz que enlaza una conexión eléctrica con otra. En esta reparación, es la placa que conecta la batería a la placa lógica.

    • Levanta el intercalador de la placa lógica y remuévelo.

    • Al remover esta placa, te asegurarás que la batería permanezca desconectada durante tu reparación, previniendo que tu computadora se encienda accidentalmente. También es una buena idea sacarla así no cae de manera inesperada.

    How can I remove interposer I m not able to remove it

    Raunak -

    you must lift it absolutely vertically, or it fouls against the locator pin in the corner- you can easily get the impression that it won’t come over the end of this pin- almost like it’s rivetted in. it isn’t. get a good grip on it with the tweezers in the centre hole & one of the sides, & lift it STRAIGHT up.

    duncan rmi -

    I would recommend to use plastic tweezers in order to reduce risk of damage.

    Martin Sippel -

    wat is the model this SSD

    thierry.wilow -

  10. OZelarOBjAVaVFfX
    OZelarOBjAVaVFfX
    AqIx1EApvUJZuqXt
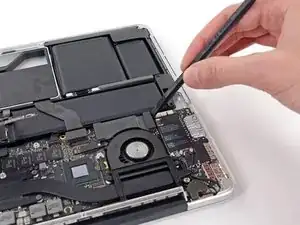
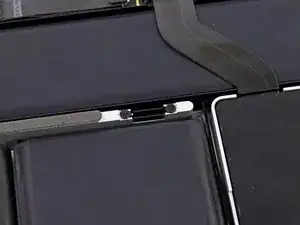
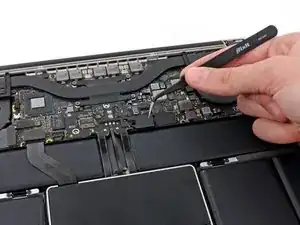
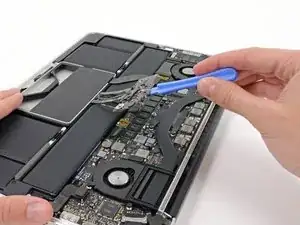
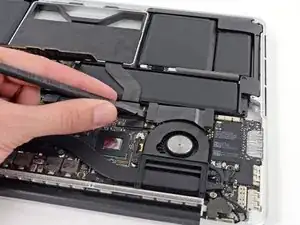
    • Utiliza el extremo plano de un spudger para levantar el lado derecho del conector de cable de datos de la placa E/S de su enchufe en la placa E/S .

    • Al levantar el conector de cables de datos de la placa E/S de su hueco, asegúrate de levantar el conector y no el hueco Si levantas el enchufe podrías causar daño irreversible a la placa E/S .

    I keep my fingernails fairly long, very handy for many computer repair jobs. This gives me 10 spudgers over which I have very fine muscular control. It is far easier to pop some of these tiny delicate MacBook parts loose with my nails.

    Ben Myers -

    Skip this step. For an easier, lower-risk repair, go straight to step 15 and just fold the speaker out of the way.

    .A. -

  11. QKxcNUeAhrixRuPH
    QKxcNUeAhrixRuPH
    fCYXnPX1iQDHNIaE
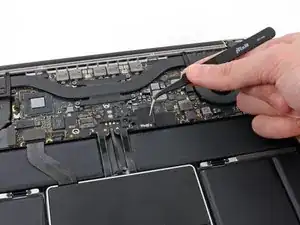
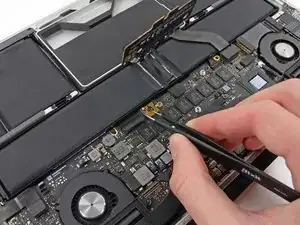
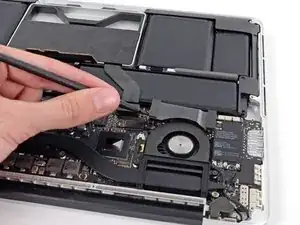
    • Calzar el extremo plano de un spudger por debajo del lado izquierdo del conector de cable de datos de placa E/S .

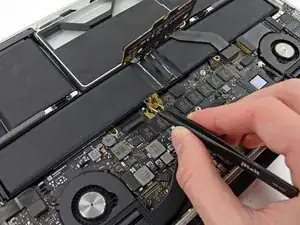
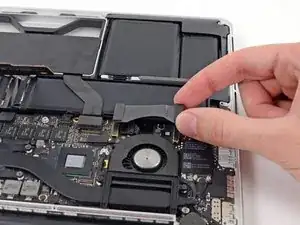
    • Suavemente tuerce el spudger para desconectar el conector del cable de datos de E/S de su enchufe en la placa lógica.

    I also skipped this step as this data cable is not compromising the exchange of battery and less interaction with connectors is less risk of damage..

    Diesen Schritt habe ich ebenfalls weggelassen, da das Datenkabel den Austausch der Batterie nicht behindert und weniger Manipulationen an Steckverbindern bedeutet ein geringeres Risiko für Beschädigungen

    Martin Sippel -

  12. dWiQlHIlEeHEg2fO
    • Levanta y remueve el cable de datos de la placa E/S de su MacBook Pro.

    This step is useless. Could be skipped

    Pierre S. -

Conclusión

Para volver a ensamblar tu dispositivo, sigue las instrucciones en orden inverso.

Walter Galan

685928 Reputación

0 comentarios