
Introducción
Utiliza esta guía para reemplazar el conector de auriculares de su iPod Touch.
Herramientas
Partes
-
-
Con la pistola de calor configurada en "baja", comienza a calentar la parte inferior del Touch cerca del botón de inicio.
-
-
-
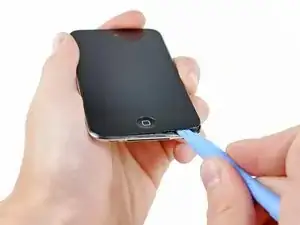
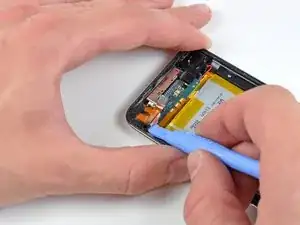
Inserta el borde de una herramienta de apertura de iPod entre el panel de vidrio frontal y el marco de plástico cerca del botón de inicio.
-
Haz palanca en el borde inferior del panel frontal hacia arriba, teniendo cuidado de no doblar el vidrio en exceso.
-
-
-
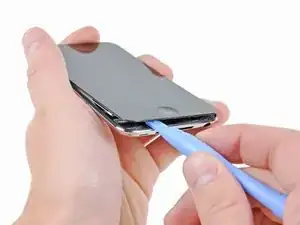
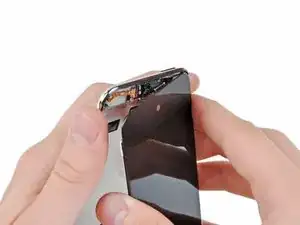
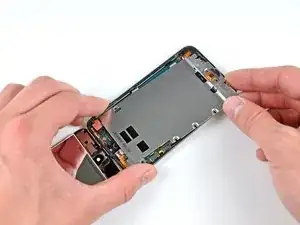
Cuando haya suficiente espacio para agarrar el borde inferior del panel frontal, levántalo del cuerpo del Touch para despegar el adhesivo a lo largo de los bordes izquierdo y derecho.
-
-
-
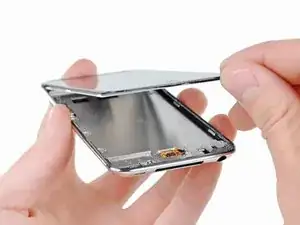
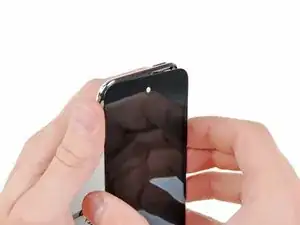
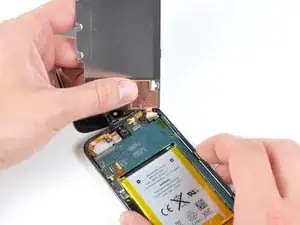
Retira con cuidado la parte superior del conjunto del panel frontal del adhesivo que lo sujeta al Touch, teniendo cuidado con el cable digitalizador corto que conecta los dos componentes.
-
-
-
Retira los siguientes ocho tornillos Phillips #00:
-
Un tornillo Phillips de 3,5 mm
-
Dos tornillos Phillips de 3,0 mm
-
Un tornillo Phillips de 2,3 mm
-
Un tornillo Phillips de 2,4 mm
-
Tres tornillos Phillips de 2,0 mm
-
-
-
Usa el borde de una herramienta de apertura de iPod para levantar la delgada cubierta de acero de la cámara trasera.
-
Retira la cubierta de acero del iPod.
-
-
-
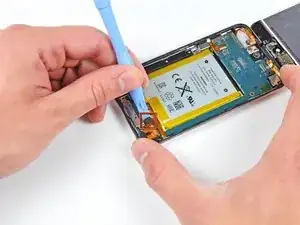
Inserta el borde de una herramienta de apertura debajo de la placa intermedia de acero cerca de la esquina inferior izquierda del Touch.
-
Haz palanca lentamente hacia arriba para separar la placa del adhesivo que la sujeta a la carcasa interior de plástico.
-
Si la placa aún está unida a la placa lógica, vuelve a calentar el área para aflojar el adhesivo y, luego, separa lentamente la placa de la placa lógica con la herramienta de apertura.
-
Hay un cable plano delgado y frágil debajo de la placa. Al levantar la placa, ten mucho cuidado de no rasgar el cable.
-
-
-
Inclina ligeramente el plano medio de acero para sacarlo de la caja trasera.
-
Levanta el plano medio de acero de la carcasa trasera y retira el trozo de cinta de cobre pegado a la cámara trasera.
-
-
-
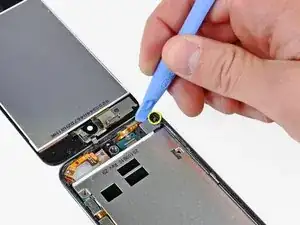
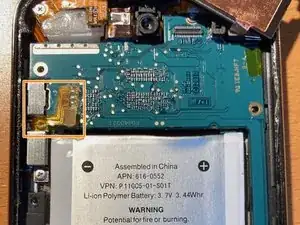
Utiliza una herramienta para abrir iPod para hacer palanca y levantar el conector de auriculares fuera de su zócalo de la tarjeta lógica.
-
-
-
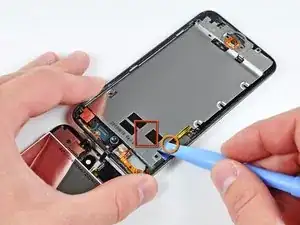
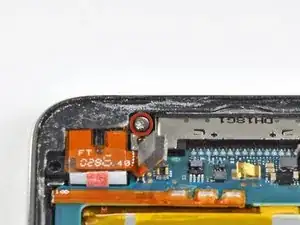
Remueve el único tornillo Phillips de 2.6 mm que asegura el jack de audífonos conectado a la carcasa trasera.
-
-
-
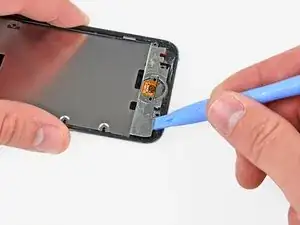
Utiliza una herramienta para abrir iPod para levantar cuidadosamente el borde del conector cercano a la batería fuera de su alojamiento.
-
Retira el conector de auriculares de su base dentro de la carcasa trasera.
-


Para reensamblar tu dispositivo, sigue estas instrucciones en orden inverso.

3 comentarios
BEFORE TO OPERATE, make sure that your headphone jack problem is not a clump of pocket dust stuck into it. It is hard to see so use a needle from which you curve the end a little bit. Make sure to empty it properly. Mine is like new.
You made my day
This Project was not hard if you are patient and sober. The guide is not so clear on reassembly. I RECOMMEND GETTING SOME SORT OF ADHESIVE FOR THE SCREEN when you replace anything on this Ipod. Most likely the previous adhesive will not be strong enough to hold it together, so rip it out and start over.
Max -
do I have to use a heat gun
Fabiola Winfield -
yes it is crucial
ben folks -
but u can use a hair dryer on warm
ben folks -
I didn't use a heat gun but this was due to the glass being rather shattered and not just cracked in the corner. The rule of thumb might be to not use excessive force, if you see that you need to use the heat gun or a blow dryer as someone suggested. I also wanted to point out the the adhesive strip just around the edges was exposed and it is rather strong so I was able to pull it around part of the edge which actually helped the glass disengage.
nirv -
Hi, thanks to this tutorial achieves replace my iPod battery to 100%, it was difficult, so thanks iFixit!
The only problem I had was with the iFixit screwdriver disappointed me greatly, as it can not remove the screws with the screwdriver.
A tip for those who first make repairs before starting the disarmament carefully read through the tutorial to not make a mistake that could damage your iPod and do not forget to place pieces in a safe place so they are not lost.
Greetings from Guatemala
Alfonso.
Alfonso Espinoza -
well then u suck
ben folks -
Be careful with the heat gun!! Don`t use it too much. You can melt something inside, specially when you`re closing the iPod.
Luiz R -
No man you can use a blow dryer!
Colton B -
Would a heat bead bag be safer option to weaken the adhesive?
Angus McLauchlan -
I had success with as low as 80°C using a hair dryer to melt the adhesive, I kept track of it with a meat thermometer. The battery says it's rated only up to 60°C...
micahvanderhill -
I got through all the parts to take the wifi antenna out!! But, I'm having a hard time putting the stuff back!!
~Palm head~ But thank you ifixit for the great and awesome directions, I understand clearly!! Thank you very much
Kaiden -
A hairdryer perfectly does the job. I’d recommend heating the bottom for 20 seconds, then attempt at inserting a plastic pick between the glass and the chassis. If it doesn’t work, reapply some heat in 10 seconds intervals until the glue gives in. You shouldn’t have to exert lots of force to release the adhesive, heat should do the job.
Then apply some heat to the top of the screen to release the remaining adhesive. Opening is straightforward. Just beware of the ultra little slack of the short yet fragile flexible digitizer cable.
Olivier Biot -
Thanks for the tip!
Lua Tech -