Introducción

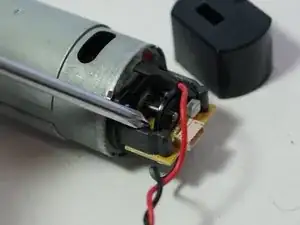
Si tu Logitech G27 no responde propiamente, incluso después de calibrarlo, puede que necesites reemplazar su encoder óptico. El encoder óptico es un pequeño dispositivo electrónico que convierte la rotación del volante en una señal electrónica para que la computadora la entienda. No es difícil el reemplazarlo, solo necesitas mucha paciencia porque estarás quitando muchos tornillos.! Asegúrate de que tu volante este completamente desconectado antes de empezar este reemplazo.

  1. JFe3hZpcNcMwfMMY
    • Retira los seis tornillos hexagonales grises de 25 mm con una llave Allen de 4 mm.

    • Ten cuidado cuando levantes la rueda, ya que hay cables frágiles conectados a la parte inferior.

    • Levanta con cuidado la rueda, pero no la desconectes del resto del dispositivo.

  2. wnfiUv2VBuSB31AK
    • Levanta con cuidado la rueda para sacarla del cubo, exponiendo los 2 cables de la palanca de cambios y la placa PCB.

  3. NZhmVBB6Bqh3Wu2P
    • Retira los dos tornillos plateados de 7,5 mm que sujetan la placa PCB verde en la rueda con un destornillador Phillips n.º 1.

  4. foUkt5y4AwJkc2ET
    • Retira con cuidado la placa PCB del cubo de la rueda.

  5. Qtmlc6TkePtrVyam
    • Pellizca y desenchufa con cuidado el conector grande de 7 pines debajo de la placa PCB.

    • Ten cuidado al desenchufar este adaptador, trata de no tirar de los cables para evitar dañarlos. En su lugar, mueve el conector de plástico mientras tiras de él para aflojarlo.

    These screws refused to go all the way back in for me, and one of them stripped completely. If this happens to you, you can get replacement screws that are shorter here - https://www.amazon.com/gp/product/B01MFA...

    This works for the G27, not sure about the G25 or any other wheels.

    Obviously the screws being shorter means the wheel isn't as strongly attached to the base in this direction, so if you have to do this remember not to put unnecessary stress on these screws by pulling the wheel straight off the base.

    SouthernPotato -

    bro i need new long cable i think and that connector or just replace the whole thing .. i put new grease, screw it more tight by the encoder so it woulnt go to the left .. wheel works verry nice tho all my buttons and shifter pedals wont work now tho the lights works dont know what to do now.. and now i kinda regreat opening it.. my wheel run so good now just these buttons are off not working at all and it kinda screws up midle of the game..

    Alexander -

    @alexdinpoik I’ve had the same problem when the 7 pin connectors blue and green cables broke off. First, only the blue one was broken which only took the led indicators gradual increase but all buttons were working then when i tried to plug in back, the green one broke off leading to none of the buttons working but the led indicators just working. Now i’ll try to fix it with iron soldering.

    Okan Akgül -

    okan can u pls share a video of you doing it? so i can do the “copy paste” hahah where can i buy cables and stuff i need for that? whats the name of these white connectors ? im new to this but share me a link to buy. i rather just try to fix it then buy a new wheel since its a great wheel compare to g29 that has bad software and the other wheels are to expensive. g27 cant be found in stores anymore neither and if im gonna buy one it has to be new haha hopefully u can share some knowlage thanks!

    Alexander -

    Where i can Buy the 7 pin cable for Main board please

    Ojilve jose -

    Hey guys!

    i broke the 7 pin cable anyone know where can is buy it? Thanks

    Richard Hajdu -

  6. FiRu5bFZLB5YBEuV
    • Ahora puedes quitar completamente la rueda del cubo. Déjalo a un lado hasta que vuelvas a armar la rueda.

    • Retira los tres tornillos plateados de 37,5 mm más internos con un destornillador Phillips n.º 2.

    • Retira el cubo de la rueda y empuja el conector a través del centro del cubo.

  7. hRAYY1mMrAVKZJFD
    • El cubo de la rueda ahora se puede dejar a un lado y voltear la carcasa del volante para revelar la parte inferior.

    • Retira los ocho tornillos plateados de 15,9 mm que rodean debajo de la carcasa de la rueda con un destornillador Phillips n.º 1.

  8. UidVkwPtGC2eJLMK
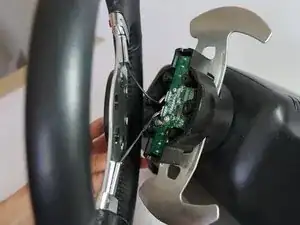
    • Gira la carcasa hacia atrás y retira la mitad superior de la carcasa para dejar al descubierto la mayoría de los componentes de la rueda.

    • La cubierta de la carcasa se puede dejar a un lado hasta que vuelvas a armar la rueda.

    need two new black screes abouve the pcb board.. lost them need to know the size since the screws i replace it with was not exact..

    Alexander -

    Loosen the desk clamps before removing the housing, otherwise you risk breaking something. The housing should come off without having to use any force whatsoever.

    Oula Kuuva -

  9. AmPXsBqhnwifCPIb
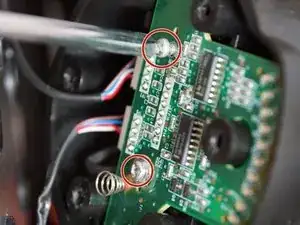
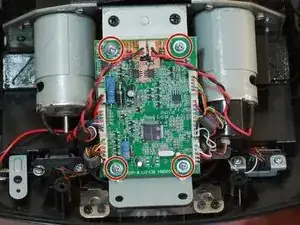
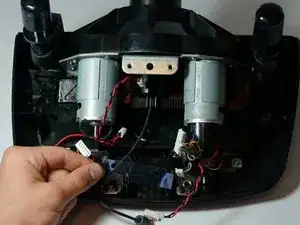
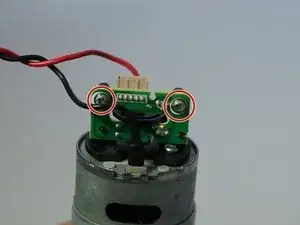
    • Retira los cuatro tornillos plateados de 7,3 mm que sujetan la placa PCB verde a la carcasa del motor con un destornillador Phillips n.º 2.

    I’d do steps 9 and 10 in reverse order, the connectors are much easier to unplug while the board is secured in place.

    Oula Kuuva -

  10. CyrTKTeAZ5fqJSPi
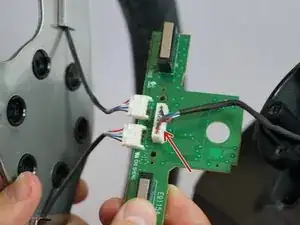
    • Desconecta los tres conectores de plástico en el lado izquierdo de la placa PCB.

    • Desconecta los dos conectores de plástico en la parte superior de la placa PCB.

    • Desconecta los tres conectores de plástico en el lado derecho de la placa PCB.

    • Tirar de los conectores de plástico requiere mucha fuerza, pero ten cuidado y no tires directamente de los cables. Trata de encajar o empujar el lado macho del conector.

    • Si necesitas un poco de palanca adicional al quitar estos conectores, intenta usar una herramienta de apertura de plástico para hacer palanca en los conectores.

    • Retirar estos conectores permite un acceso más fácil a los cuatro tornillos que sujetan el soporte de la placa PCB a la carcasa del motor.

    Some of the connectors have locks on them, I would recommend this as a two person job.

    Reuben Andrews -

    I didn't take them off :)

    Evaristo Rivieccio Vega -

    I messed up and broke the cables of the 5 Pin Connector on the right. Can anyone tell me what it’s called so I can buy replacement? The Rest of the cable is stuck in there so I can’t re-use it sadly.

    Felix Weschke -

  11. a4odqtXHQyqDcUbg
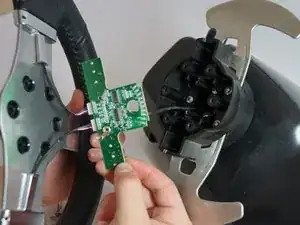
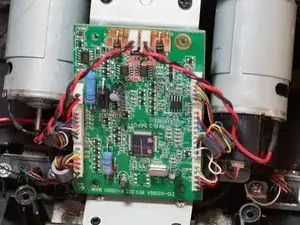
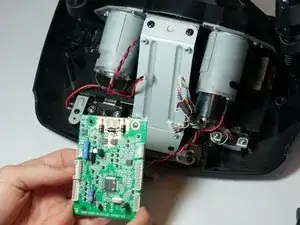
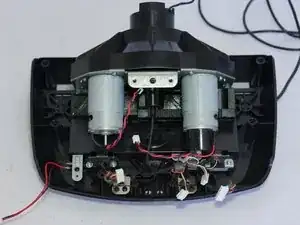
    • Retira la placa PCB después de desconectar todos los conectores de plástico.

    • Ahora puedes dejarla a un lado.

  12. Hvf5BHMD5r3wZDec
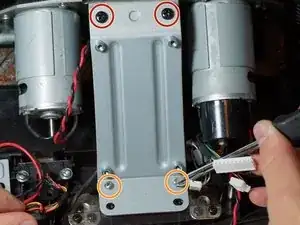
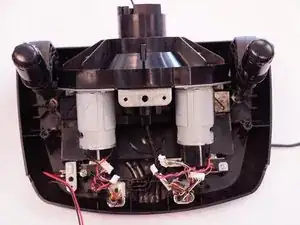
    • Retira los dos tornillos negros superiores de 12,3 mm con un destornillador Phillips n.º 2.

    • Retira los dos tornillos plateados inferiores de 15,5 mm con un destornillador Phillips n.º 1.

  13. q4XLbMAPFVVY2XSU
    q4XLbMAPFVVY2XSU
    EXbOLKj6XwlTA2Zp
    • Retira el soporte de la placa PCB y retira la pieza de plástico transparente que se encuentra debajo.

    • Déjalos a un lado hasta que vuelvas a montar la rueda.

  14. 2Z4ierAmxCqHyrnR
    2Z4ierAmxCqHyrnR
    I2tjrwJisDMVXVe2
    • Después de seguir la guía de prerrequisito, voltea tu dispositivo.

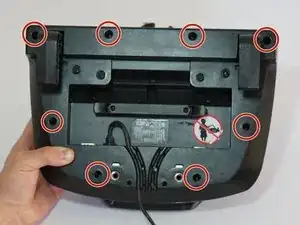
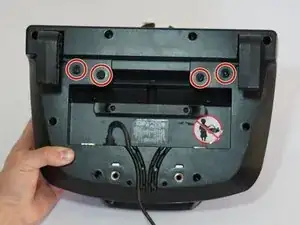
    • Remueve los 4 tornillos del centro de la parte inferior del dispositivo con un desarmador Phillips #1.

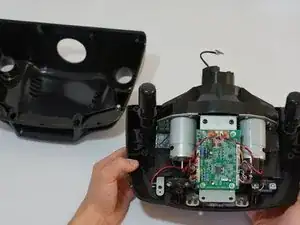
    • invierte tu dispositivo a su posición original, y remueve completamente la carcasa del motor del resto del dispositivo.

  15. ta5DsYr1cnKZe14M
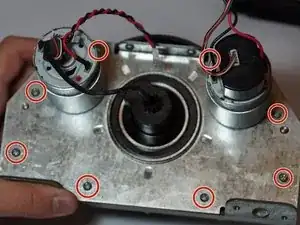
    • Remueve los 8 tornillos que adjuntan la carcasa del motor a el plástico con un desarmador Phillips #1.

    • Remueve completamente la carcasa del motor del plástico.

    • En esta foto, el encoder óptico esta adjuntado más a la derecha del motor. Tiene una cubierta negra de plástico alrededor para su protección.

  16. Pt3EqUQDIXNcFMWg
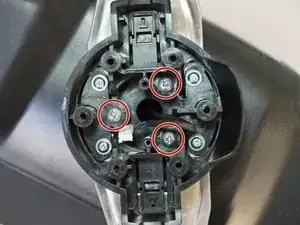
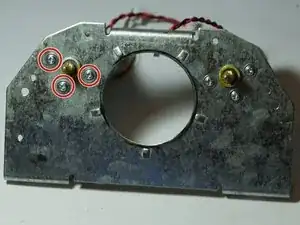
    • Voltee el dispositivo, y remueva los tres tornillos adjuntos a la parte izquierda del motor del soporte de metal usando un desarmador Phillips #1.

    • Remueva el motor completamente de su soporte metálico. Esto va a hacer más fácil para moverlo y reemplazar el encoder óptico.

  17. mnTynYtePPYsRSnB
    mnTynYtePPYsRSnB
    YhREFmurM3RPhZ1n
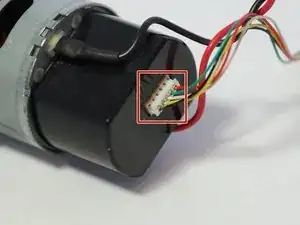
    • Remueve el adaptador blanco de 5 pines en la parte final del encoder óptico.

    • Usa la misma cantidad de precaución con este adaptador que con los otros: no jale directamente los cables y menéelos con cuidado.

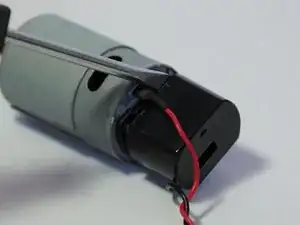
    • Remueva la carcasa de plástico haciendo palanca con un desarmador o con una herramienta de apertura plástica.

    bonsoir ou acheter les conecteur blanc avec les 5 fils pour volant g27

    philippegontier30@free.fr -

    ou acheter les connecteur blanc avec les 5 fils de couleur du volant g27

    philippegontier30@free.fr -

  18. CTBhP1eigOuhUrkB
    • Remueve los dos desarmadores plateados del lado inferior del encoder óptico con un desarmador Phillips #0, y el circuito estará liberado del motor y listo para reemplazar.

    • Ten cuidado de no doblar el cable del recibidor negro que sobresale de la tarjeta. Si no se alinean, tu volante no será capaz de calibrarse completamente y tendrás tiempos complicados tratando de alinearlos de vuelta.

    my wheel wont calibrate and sometimes it spits out a “power surge on usb” error and my optical encoder is good, what do i do?

    Jackson Beers -

    I like this replacement. https://es.aliexpress.com/item/329959435...

    At first I didn't calibrate myself. I realised that it has to be fully inserted and satin with the end of the motorbike cylinder, as you can see in the seller's pictures. Then it did calibrate.

    Evaristo Rivieccio Vega -

  19. IVItp52pCnaFjsVT
    IVItp52pCnaFjsVT
    ybh1WMhfCDkDE6rA
    nIaREUgYBXt6Y5ex
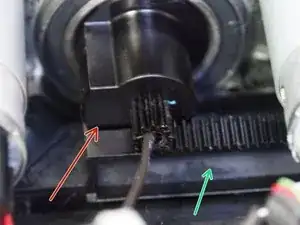
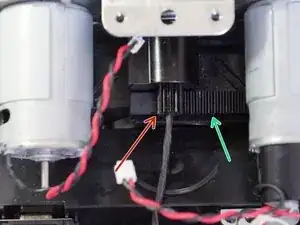
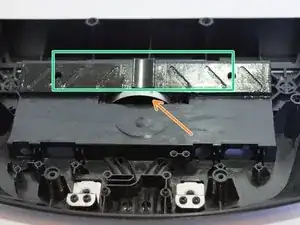
    • During reinstallation make sure when doing this step to align the stop on the wheel gear with the track as shown in the second and third pictures.

    • Also make sure that the metal half-circle clip is placed properly inside the slot.

    • After placing the metal clip in the slot, place the plastic cog on top of the clip and on the rail.

    Thank you ! ! ! !

    Patrick Ebensberger -

Conclusión

Para reensamblar tu dispositivo, sigue estas instrucciones en orden inverso.

Grant Blake

Miembro Desde 21/04/15

1554 Reputación

29 comentarios

Where can you get the encoder to replace it?

invertig0 -

Hello and thanks for the guide. I understand this might be off topic, but would you happen to know the pinout of the7-pin connector in step 5? There is no label on the pins. Thanks in advance for your time.

Georgios Arkouzis -

Very much appreciate your assistance & time putting this together. I Chose the expoxy route. My wheel IS BACK!

Dave -

Are you sure about Step 19 alignment. Some other guy with G25 says it has to be dead centre alligned otherwise you get blinking lights.And that's exactly what happens to me.

robertleskovsek -

hi! i reassembled mine positioning it all the way to the right, and i have blinking power light and my wheel do not calibrate. what do you mean by dead centre aligned? i have to assemble it back together in center position, is that it?

felipezerobala -

Hey, really big thanks for this guide! I opened my wheel and found the optical encoder broken as foreseen. Just bought the brass version, but for the first instance I fixed the encoder by wrapping some thin tape around the edges and cut off the rest. worked well, but is not meant for a long time use.

As I managed to make this fault, please add a hint that when rearranging the wheel (reverse step 1+2 the thin wheel button wires love to slip close to the bottom left and right screwholes with the risk to be squezzed between wheel and wheel hub. Now I have repaired the wheel function and wrecked the upper left button function :-)

fulgorth -

Gracias a esta guía he podido reparar el volante G27. Muchas gracias.

urrielu -

You can buy a printed version here: https://www.shapeways.com/product/4FDSWS...

It worked great for me, it shipped within a week and I'm using it now for over 2 years without any problems.

2 versions are sold: 30 and 60 slot encoder.

60 slot is for G25 and early G27 later G27 wheels use the 30 slot version.

RacingVictim -

The three hub screws in step 6 refused to go all the way back in, and one of them stripped completely. If this happens to you, you can get shorter screws here to replace those very long screws - https://www.amazon.com/gp/product/B01MFA...

Obviously the screws being shorter means the wheel isn't as strongly attached to the base in this direction, so if you have to do this remember not to put unnecessary stress on these screws by pulling the wheel straight off the base.

Also the best replacement in terms of longevity for the encoder disk is the brass ones that you can order here, but shipping takes quite a while - http://cmlaserservice.com/index.html

I tried to 3D print one myself but it didn't work.

SouthernPotato -

Hello, i repaired the old optical encoder. Now when i connect my wheel to PC the calibration works. But then PC doesn't "read" when im stearing. The other buttons are ok. Please help me what to do. Thanks

Tom Bubok -

can you please share me the motor specifications?

Gokulraj S -

Is this questin for me?

Tom Bubok -

yeah ! I need this motor specifications :)

Gokulraj S -

Repaired with this guide, thanks.

For the repair of the optical encoder I used a washer.

smigolxp -

not encoder?? Washer??

Il Vloggatore -

is it work sameway??

Il Vloggatore -

I user a washer to repair the broken optical encoder.

smigolxp -

Excellent guide and thanks for the publication and your help !!!

Luca Ragno -

!!!!Took me a white 2FIX it but!!! LISTEN! !!If Your wheel aiant straight in center with good or new encoder TRY first in windows controllers menu .Wherę IT shows controler. Devices while pointing at your g25,7dfgt Device :Press Ctr+shift and right Mouse to engage wheel calibration. Thank you and You Welcome ;)

laikros -

Hi everyone. You can buy a replacement from there. Optical encoders available with 30 or 60 Slot. For 30 Slot check out this https://www.ebay.com/itm/264059488231 and for 60 Slot check out this https://www.ebay.com/itm/264059495927

Mister -

Also I have managed to change the encoder without disassembling the mainboard and bearing housing. Just remove the motor encoder cover and change the encoder. The same way worked on Driving Force GT

Mister -

Where can I order the optical IR sensor? I’m not getting my drive on without one …

DieCalmerThanASuicideBomber -

If someone tries do do this: Do not do step 9 to 16. It’s completely unnecessary and will just make it harder to assemble again. You can remove the cable and casing as described in step 17 just fine with some fiddling.

If you disassemble it completely as shown in this guide you will have to align the stop gear to the track again (step 19), which just doesn’t work well by visual estimate alone.

Viking Dinosaurs -

Hello

I changed my optical wheel, but after that my g27 doesn’t calibrate : power led is blinking, but the wheel doesn’t make its calibration process as the wheel is not moving… After three attempts, power led is blinking fast and that’s all.

I made a video of this problem : https://youtu.be/hihREK_QC1Q

I thought my optical wheel was too low (or too high) on the engin axis, so I tried to change its position but no effect.

If you have any idea…

Sylvain Jn -

I had the same issue. If you have a 3d-printed optical wheel replacement make sure to completely cover it with black marker. It has to be all the way black otherwise light can shine through the spokes and the encoder sends an error which results in the issue you’re having.

So even if it looks black.. just try again with the black marker..

Don H -

how many slot encoder do i need?

Nico Rosella -

Step 15 and 16 can be skipped! You can keep the motors attached to the frame to open up and replace the encoder wheel. (I just did it like that and that works fine)

Don H -

Good day sir

I have lost the 5 pin adapter

Please help me i am unable to find 5-pin adapter for encoder part online

I want to purchase it

DeadShoT World -

Hey,

I switched the encoder on my g27 with a brass one yet I'm facing another issue. With the old broken encoder, it only calibrated to the right. With the new one, It calibrates all the way from right to left but it doesn't come back to the center. Then it repeats the process 3 times but nothing happens. What could be the issue?

I've read people saying that I need to readjust the black plastic to the center on step 19.. any ideas?

Hannod -