Introducción

La mayoría de errores de lectura (DREs) se pueden solucionar cambiando la lente láser de la Unidad Óptica DVD de la Wii.

  1. nAy3OhXSoOfu4ijL
    nAy3OhXSoOfu4ijL
    c15NIW3ZpSXgdFZe
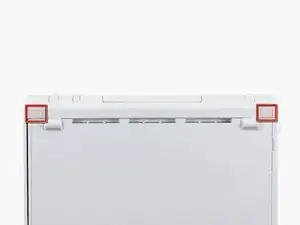
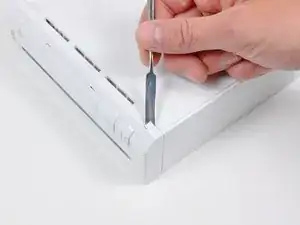
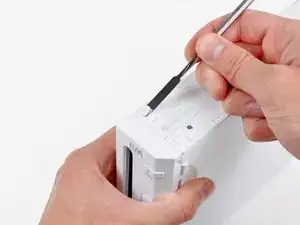
    • Usa un spudger de metal para quitar las tapas de plástico blancas de los tornillos pegadas a la caja inferior cerca del frontal de la Wii.

    Die Abdeckungen sind geklebt, stecken also nicht.

    Ludger -

    Don’t mistakenly remove the rubber case feet

    Bob Trout -

    I just did. That picture could be better.

    B G -

    Thanks I almost removed the rubber feet

    Lushane -

    If you’re wondering what to use for this, the main blade of a pocket knife from the corner of the plastic works well.

    Cameron Holman -

    As you remove the hardware in each step, place them together on a sheet of paper and circle them with the step number.

    Tom J -

  2. QLLTmVQpby6q1oKX
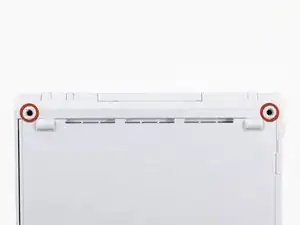
    • Quita los dos tornillos Tri-Wing de 8.3 mm ocultos debajo de las cubiertas que acabas de quitar.

    Before you start, get a small plastic tray with at least 15 small bins in it, and put the screws you take out in each step in the bins in order. It makes reassembly a LOT easier.

    larry -

    NOTE: You need a Y1 screwdriver. Be careful when buying the little red screwdrivers on Amazon that claim to fit the Wii - they don’t!! From personal experience.

    Robotai -

    Just to add to Robotai’s comment, if you do get the little red/orange screwdrivers on Amazon, file off the tip. It if’s mostly blunt, it fits the tri-wing screws much better.

    jeff -

    1/16 x 1 craftsman Phillips mini screwdriver works for this if you don’t have the tri-wing driver

    grace nicosin -

    How do you make one ? If you don’t have the screwdriver

    Ethan -

    I am using a 18ct empty egg carton to hold the screws/parts removed in the steps.

    karenmparamore -

    Larry’s idea about the bins was great and helpful.

    Robots is right- you NEED a Y1. Just buy the thing with the drive. I didn’t, tried many other options, none worked. Had to order the thing separately with shipping. Mistake….

    David Ryan -

  3. wjvAQVg1yyeAi1pU
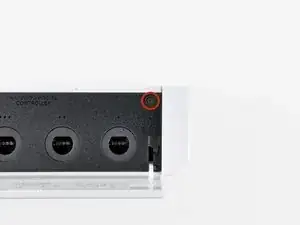
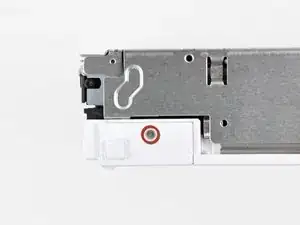
    • Quita el único tornillo Phillips de 5.9 mm de debajo de la puerta del puerto del controlador más cercano a la placa frontal.

  4. ghUThgil3vmDoPcV
    • Usa un spudger de metal para quitar el pata de goma pegada al costado de la Wii cerca de la abertura de la unidad de DVD.

    All of the rubber feet on my very old Wii had literally melted into a gooey mess and just needed to be scraper off and cleaned with alcohol.

    Bob Robins -

  5. mhVTpcmCaFExhNaO
    • Quita el único tornillo Phillips de 5.9 mm escondido debajo de la pata que acabas de quitar.

    please help! my lil sis got a disc stuck in my wii while it was off!!! please help fast!!!

    Leah Vegan -

    does it turn on?

    Giovanni Munoz -

  6. i1WPurAjixkuIcDK
    i1WPurAjixkuIcDK
    xygEtkVuunWqi4dd
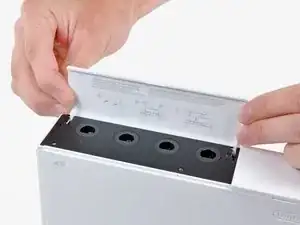
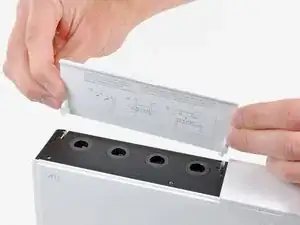
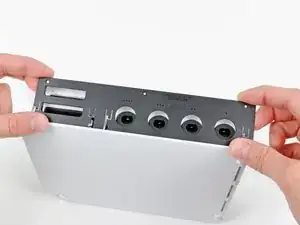
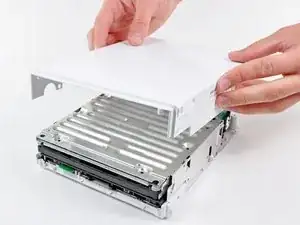
    • Quita con cuidado la placa frontal del frontal de la Wii.

    • Usa un par de pinzas para desconectar el conector de plástico del cable LED de la placa base.

    • Quita la placa frontal.

    surprisingly, this was the trickiest step for me. I almost completely mangled the wires when my tweezers slipped as I was attempting to remove the connector.

    rbelknap -

    I removed it with a spudger, gently lift from each side until it pops out.

    For those reassembling

    line up the pins push it in with your spudger gently until it's in. Then line up the front plate, push gently, confirm everything is where it should be and push firmly, I found it needed a strong push to sit flush with the other body panels.

    James middleton -

    I ended up using needle nose pliars on this step.

    Awesome detailed guide made this very easy, thank you author!

    Glenn Woodard -

    Can someone direct me to what I need to do? My tweezers slipped and I cut one of the wires on the connector. Where can I find a new Y plug for the wii?

    jaredslaweski -

    I also broke my wire trying to use tweezers. I should have known better. I use (normally do) a spudger on one side and my fingernail on the other to gently pry these types of connectors out. I ended up buying a replacement faceplate on ebay.

    Tyler -

    This was the hardest part for me. I tried using my fingernails, two different tweezers, and needle nose pliers, but I ended up cutting both the wires. Anyway, I put some electric tape over the exposed wires and just reassembled the system. Funny thing is that the LED still works and I have not noticed any difference. I'm not sure what those wires did, but they seem to not be important.

    Nick -

    For people still wondering after all these years, :), The connector is for the blue leds around the dvd when loading and unloading a disk.

    Niels -

    I also broke off the flimsy wires at the connector. To NOT break the wires, alternate pressing on the right and left sides of the connector with a small flathead screwdriver. Be patient, it will eventually work itself free. There isn't enough to grab onto with the tweezers and you'll only succeed in having them slip off, grab the wires, and yank the wires out.

    Good news is that if you do rip out the wires, no worries... I didn't reconnect them and the unit works just fine. I have no idea what those wires are even for. Power LED continues to work no problem.

    jasendorf -

    I used two small flat head screw drivers, one on each side to pry out the connector. This created less pressure from me and reduced my chance of cutting the wires.

    mulkey -

    This guide is really marvellous - works a treat. But I would definitely recommend needle nose pliers for this step rather than tweezers. It's really easy if you use pliers and potentially damaging if not, and you get it wrong. I had one sniff at it with tweezers then immediate nipped out to the garage for my pliers!

    thepitcanary -

    Definitely a tricky step with that connector. I also cut broke the wire accidentally and was going to just give up trying to fix the Wii. However, as others stated the Wii works just fine, including the lights. I do wonder what those wire are for.

    darcaesar -

    I also had a lot of trouble trying to get the connector off with tweezers. Ended up leaving it attached. It does not really get in the way of remaining steps.

    Ron Even -

    Needlenose pliers did the trick for us!

    Ron Cormier -

    Needlenose pliers did it for us!

    Ron Cormier -

    You can save yourself some trouble at this point and skip the rest of the disassembly: See that green tab to the left of the sd card slot? THAT’S the wifi board (and that green tab, in hindsight, seems designed to make it accessible without taking apart the whole device, don’t you think?) A little careful spudging, and you’ve got it out, ready to replace! (There’s a guy who shows the process on youtube, if you want to review first)

    Will -

    I got the connector out ok thanks to the suggestions here, but I couldn’t figure out how to reattach it. In the end, I just kind of threw it in and it worked fine.

    Christine Wittmer -

    Very clear instructions - thanks! Faceplate needed replacing after one of my son’s friends accidentally kicked it across the room. $10 bucks to fix, thanks to ebay and these instructions. I’d never heard of a “tri-wing” screw before.

    LInda Rawlins -

    I just left the connector alone and kept it connected while working on it. There is enough wire to allow you to do what you need if you are just careful not to snag it on anything.

    Michael Payne -

    This was the trickiest part, I almost broke the wires using tweezers and pliers, so instead use a flat end screwdriver to pry it out, when putting it back in use needlenose pliers to start it then use your fingernail to go the rest of the way.

    grace nicosin -

    After I got the connector out I noticed the little locking flap on the top side of the connector. I think prying this first is the key to easier removal.

    Will B -

    Anyone know of a method to replace the connector if you end up breaking the wires? Bits of wire are stuck in the white plastic connector, so I'm wondering if I can buy a connector online somewhere without replacing the whole face plate. Thanks :)

    Bronze Owl -

    I severed both wires. If you want to avoid removing the connector, you can lengthen the two wires by unserpentining them from the wire holder that's in the cover.

    Griff Derryberry -

    Make sure there is no SD card in your unit before pulling this off, otherwise it'll get stuck and you could snap your sd card in half!

    carlosahiciano -

  7. GZYIO2iirMcnTBQL
    GZYIO2iirMcnTBQL
    PbD4A5VBcsLJ1tYW
    GAwGa1hgtnKuiPFs
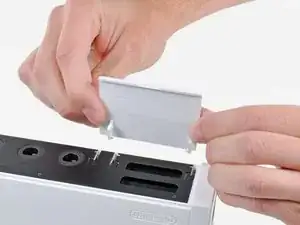
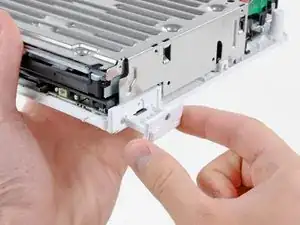
    • Abre la cubierta del puerto de los mandos hasta que esté en perpendicular con el engaste del puerto de mandos negro.

    • Tira de la cubierta del puerto de los mandos hacia arriba para soltarlo de la carcasa exterior.

    • Repite este proceso para la cubierta del puerto de la tarjeta de memoria.

  8. 5gH2SPFFYhQLXoZ2
    5gH2SPFFYhQLXoZ2
    UGivIc4L2ejQD3mv
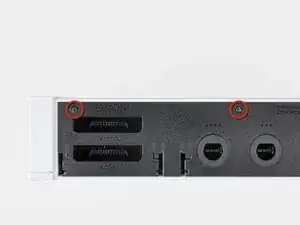
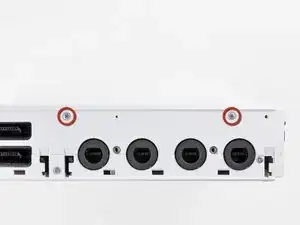
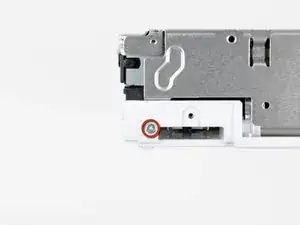
    • Quita los dos tornillos restantes de 4.1mm Phillips que están en el borde superior del engaste del puerto de plástico negro.

    • Levanta el engaste por el lado alargado más alejado de los puertos de los mandos y sácalo de la Wii.

    The 3rd hole is in step 3.

    James middleton -

  9. gVM15IknBqyYY5sO
    • Quita los dos tornillos de 5mm Phillips que hay encima de los puertos de los mandos.

  10. BCYHR1CYxUkGSIAM
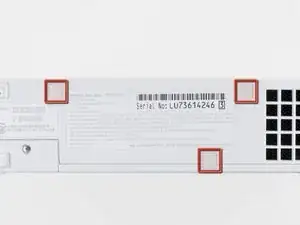
    • Usa un spudger de metal para quitar las tres cubiertas de tornillos resaltadas que están en un lado de la Wii.

  11. vrshxvpywjLhpKLT
    • Quita los siguientes tornillos:

    • Dos tornillos de 5mm Phillips

    • Un tornillo Tri-Wing de 8.2mm

  12. jSyMwWqvjWCBPTxE
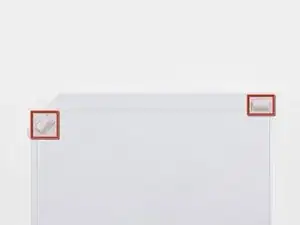
    • Usa un spudger de metal para quitar las dos patas de goma pegadas a la cara inferior de la Wii cerca de los puertos traseros.

  13. UVFQ6pJvVMHKKHje
    • Quita los dos tornillos Tri-Wing de 8.2 mm escondidos debajo de las patas que acabas de quitar.

    had a little trouble with theses screws. they were just barely too deep for my 54pies bit driver kit to reach. I ended up inserting a small wad of paper into the shaft of my driver so the tri-wing bit stuck out far enough to engage the screw. (I used the tweezers to remove the paper when I was done) :)

    rbelknap -

    I can confirm, this works fantasticly!

    Thank you

    James middleton -

    When putting the screws back in hold the tip still with the screw and carefully drop it in.

    James middleton -

    Thank you rbelknap, this is excellent advice for those using the ifixit branded driver.

    George Squires -

    You could also use the 4mm nut driver in the iFixit kit to turn the tri-wing driver. This will give you a little more reach.

    Edward Tucker -

    How is no one talking about the included 4mm nut driver trick at Edward Tucker mentioned?! That is genius! Thanks mate!

    Zabuza -

    That's the idea that I needed. Agree with Zabuza.

    cwdick -

    Bingo. All of the other comments were unnecessary.

    Tony Shannon -

    This paper wad trick totally worked for me too!

    anonymous 779 -

    Standard Tri-Wing bits will NOT fit into the holes. Make sure that you get one of the tool kits from iFixit (I just ordered the Mako Driver/Bit kit with 64 bits ) - the Tri-Wing bits in this kit have a narrow shaft that allows it to reach deep into narrow holes like these on the Wii . (Disclaimer - I have no association with iFixit).

    dave whale -

    I just sawed off a bit of the shank holder from the iFixit tool, in order for the bit to go deep enough into the case.

    The tool still works fine.

    Alan Walker -

    Thanks for the paper wad trick advice! Worked perfectly with my Wii

    Finder352 -

    The 4mm driver was the exact fix for this problem, no mods necessary

    Tony Shannon -

  14. mymDLxDWlRsB4vHW
    • Saca la carcasa exterior del cuerpo de la Wii.

    This step could use at least another picture from the backside so it's clearer what comes up and what stays down.

    Jose Vazquez -

    I used a spudger around the edges of the outer case to gently ease it upward since I could not lift it out with my fingers. Then it came right out.

    Marko -

    hey marko that really helped me thanks\. als if you need help figuring which side is up, its the one with the nintendo engraving on it

    Aryan Garg -

    A fan filter fell out at this step how do you put it back?

    Edit: I figured it out it was from the side intake vent. Just line up the two notches with the pegs in the case to hold it in place

    Darren Jones -

  15. SqZI2B154SVW1ZJc
    SqZI2B154SVW1ZJc
    BW5UKvFUfK4ZVExC
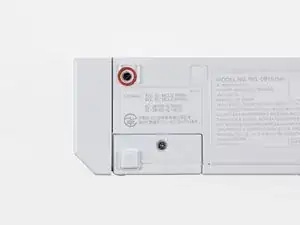
    • Quita el pequeño tornillo Phillips que sujeta la puerta de la batería al panel inferior.

    • Este tornillo es cautivo a la puerta de la batería.

    • Saca la puerta de la batería de la Wii.

    • Este es un buen momento para cambiar tu batería CR2032 si no la has cambiado recientemente.

    The screw on the battery door of my Wii required a Phillips #000 screwdriver, which is not listed in the required tools.

    Ben -

    The screw is a PH0000 (quadruple zero) requiring an exceptionally small Phillips screwdriver to remove. If this is your first time in here in a while, this may also be a great time to change the CR2032 battery.

    Steve Bonds -

    I was able to use the ph0 no problem.

    Darren Jones -

    I used a 00 with no problem.

    julie -

    What does this battery do? I never knew there was a battery inside of the WIi.

    Stephen Thornhill -

    thje battery is used to maintain timwe and date etc

    Electronik -

    Where can we get a new battery from?

    Chriul Rg -

  16. gObGvUh6TpHn2gXb
    • Quita el tornillo Tri-Wing de 8.2 mm que está escondido debajo de la puerta de la batería

    Note - this screw is a machine screw (e.g. not self-tapping). It screws into a hex nut, and that nut is captive in a slot in the case. When reassembling, ensure that this hex nut is still captive, and has not migrated out to other areas within the Wii.

    dyanetti -

    The other drive cage hole is screwed in step 11, continue to reassemble.

    James middleton -

  17. iIKijEXEWbyxr4mJ
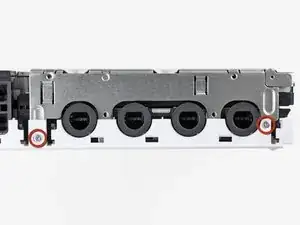
    • Quita los dos tornillos Tri-Wing de 8.2 mm que sujetan el protector de la unidad de DVD cerca de los puertos del mando.

  18. XlIvLipMQrrNcTnm
    • Levanta el protector de la unidad de DVD hacia arriba y quítalo de la Wii.

    Be careful not to cut your fingers on the sharp edges of this metal shield. My daughter actually scraped enough skin to cause blood to drip off her finger. Then we noticed her skin stuck to the metal edge. Yuk.

    J Smith -

    True story I did it to myself lol

    James middleton -

    Does the dvd shield need to be there? I want to remove it but im not sure if i should

    Kadamo -

  19. ZS6nMai5uZUNE6mZ
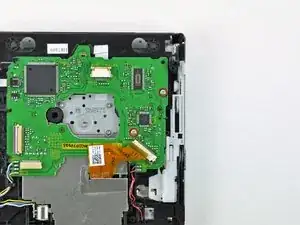
    • Quita los cuatro tornillos Phillips #1 de 9 mm que sujetan la unida de DVD al panel inferior.

    The two left hand screws were very difficult to relocate during reassembly. I was coaching my 8 year old through this, and this was probably the only step that he couldn't do. We dropped these screws several times, and used magnets to retrieve. Miniature needle-nose pliers gripping the 'washer' surface of the screw were too wide. We managed to purchase the 'button head' of these screws with the needle-nose and drop the screws into their hole, and push with the phillips until secure. I would like to hear how others install these screws, please.

    dyanetti -

    I had the same problem as you and eventually found an easy way round it. I wrote this to be added to the instructions but it was rejected: "Once the DVD drive has been removed, remove the 4 rubber washers from the screws removed earlier and insert them into your new DVD drive. Because two of the screws are difficult to reach, it is best to insert these two screws into the washers and then slide them into place ready for securing to the base plate".

    The rubber washer holds the two screws roughly in position, you can then reach them with your screwdriver through the two holes (about an inch away) and finish tightening them up.

    Gary -

    For the two screws at the front of the chassis, use a three-pronged parts retriever to lift them out after you unscrew them.

    Walter -

    Helpful tip: Use a magnetized screwdriver for the 2 screws nearest the DVD face because they are set in deep sockets

    Blake Minghelli -

    During reassembly, it can be tricky to position the recessed screws. To temporarily magnetize your screwdriver, rub the tip against a magnet for 5-10 seconds. (A refrigerator magnet will do.) You should then be able to put the screw on the tip and gently lower it into position.

    Matt D -

    Thanks - the refrigerator magnet trick worked for me,

    Jim Allen -

    Another method for getting the front screws back in is to insert a small pair of tweezers through the DVD slot to guide the screw in. I just dropped the screw in between the tweezers which held the screw just above the hole. Then I was able to use the phillips screwdriver to guide the screw into the hole and screw it in. Done in just a few seconds.

    Another option would be to stick a dab of hot glue on the screw to your screwdriver and then when the screw has been driven home either the glue stays on the driver and is easily removed or it stays on the screw and you just pull it off with tweezers or needle nose pliers.

    accts4mjs -

    The screwdriver provided in the kit by ifixit is a magnetized screwdriver and works perfectly!

    mulkey -

    If you are disassembling your Wii because, say, a two-year-old has shovelled pennies into it (yes, that was me) you will also need to partially disassemble the drive itself, which is not covered in this guide. Luckily it's really easy. Unscrew the 4-5 larger Philips/cross head screws on the top of the frame (NOT any of the smaller darker ones) around the edges, and the frame on top of the drive will lift right off. Be careful as there is cabling running to it, so don't yank it or pull it too far off. You will now be able to get any coins or other foreign objects out.

    thepitcanary -

    I didn't have a magnetic screwdriver, so I applied a tiny amount of fabric glue to the head of each screw, waited a minute for it to start to harden, inserted my non-mag screwdriver into the screw head, and the screw stuck to the screwdriver long enough to insert it into the hole.

    Lee Crooks -

    Be advised that the posts that these screws go into are very fragile and may even break. Make sure to get the little plastic pieces out if you over tighten them or they are just brittle and broken to begin with. The screws seem to be long enough to work if you do break the posts off completely.

    Michael Payne -

    I needed a size 1 Phillips screwdriver for this step.

    julie -

    Thanks, I will include it in the guide

    Angel -

    Be careful with these screws - they seem to be quite malleable and easy to strip.

    Electronik -

  20. qfTvdHXbpHGqSfQ2
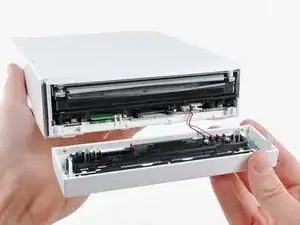
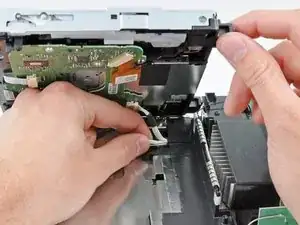
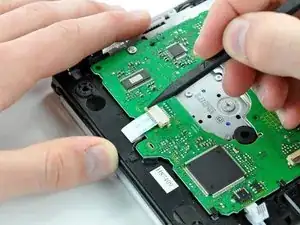
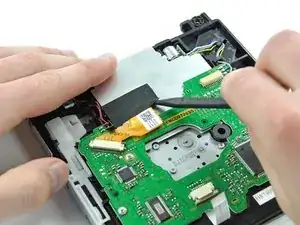
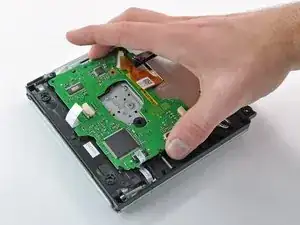
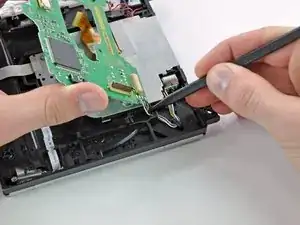
    • Levanta el lado de la unida de DVD opuesta a los puertos de los mandos lo suficiente para acceder a los cables de su cara inferior.

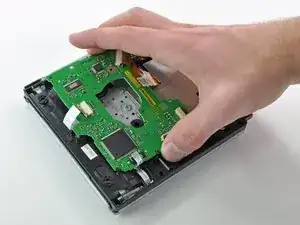
    • Con cuidado saca el cable de alimentación de la unida de DVD de debajo de la cubierta de plástico cerca del disipador de calor.

    When reversing these steps to reassemble the Wii, at this point it is possible to do a quick test before screwing the drive to the case. This will save you a lot of time if something is wrong.

    Don't touch anything you don't have to while the case is off.

    Carefully plug the power cable into the back of the Wii, then use a screwdriver to gently press the white button next to the glowing yellow LED on the front. You should hear the DVD drive power up and whir. Then press the white button again, wait for the yellow light to come back, and unplug the Wii.

    If you didn't hear the drive start up, most likely one of the two ribbons isn't connected to the drive correctly. Doublecheck the previous 3 steps.

    Matt D -

  21. mGYaCvwpJARMNUGH
    • Saca el cable de alimentación de la unidad de DVd de su zócalo en la unidad de DVD.

    When reversing this step, be careful re-inserting the connector. The pins are very delicate and if you aren't at the proper angle, you can bend them and ruin the drive.

    jisakoff42 -

    The exact thing happened to me just now; I reinserted it at a (very slight) angle, and bent one of the pins at the end of the socket. Luckily, I was able to straighten it back up with a sewing needle. I made sure the spacing was consistent with the rest of the pins, and that I reinserted the connector as straight as I could, so it doesn’t happen again.

    Jose Olarte III -

  22. bg3hTQoBKJTJst1c
    bg3hTQoBKJTJst1c
    wW2XLfVLGFKgkSyT
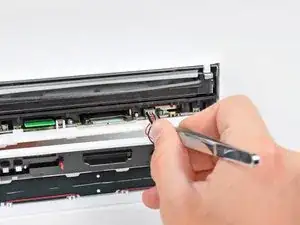
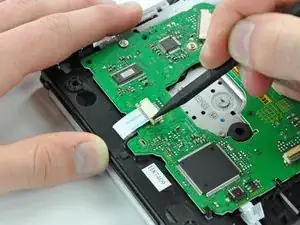
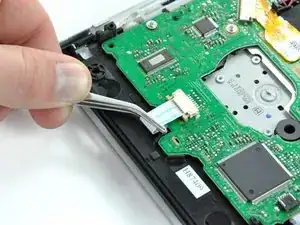
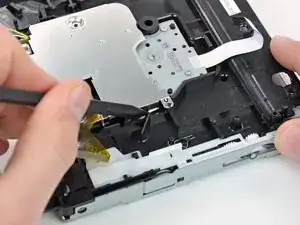
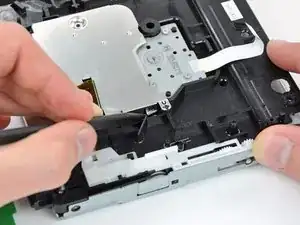
    • Usa tu uña para levantar la solapa de retención en el zócalo del cable plano de la unidad de DVD.

    • Asegúrate de que haces palanca en la solapa de retención, no en el zócalo.

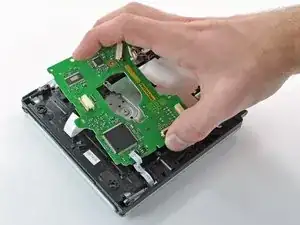
    • Saca el cable plano de la unidad de DVD fuera de su zócalo.

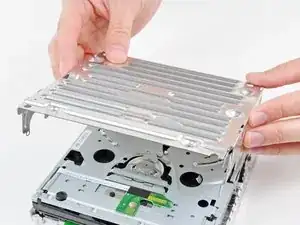
    • Quita la unidad de DVD de la Wii.

    When reversing this step, make sure the ribbon is all the way in. For some reason I found positioning it with my replacement drive was much harder than with my old drive. The gentlest tug after lowering the brown clip would show that the ribbon was not actually being held tightly. I thought for a while that the clip itself was broken, but eventually I got it to hold the ribbon correctly.

    Matt D -

    Be careful with this step. I too had difficulty re-inserting the ribbon. I even popped off the brown clip and thought I broke it. Thankfully it snapped back into place.

    Dana Kennard -

    It is difficult to tell, but be aware that the brown piece is the retaining flap, not the light piece , which is the actual socket.

    Dan Neunaber -

    I had to use Kapton tape. I couldn’t get the clip back on.

    Jim Allen -

    This was the trickiest step for me. Take note of how the ribbon is configured before you loosen the clip to help you replace it with confidence in the right way.

    Ping Wu -

    Careful! When reinstalling, I think I bent and broke the ribbon. The Wii doesn't respond upon power up - I think because it doesn't see the drive.

    Steve Bennett -

  23. 5fi2DFVMuw5MRCRn
    • Extrae el cable flexible del sensor de discos del conector usando unas pinzas.

    If you’re doing a drive swap this step in not necessary.

    netdude21 -

  24. ZatFC1FxdUVYmZ6v
    ZatFC1FxdUVYmZ6v
    U3Es4uBxyTMONR6J
    HqrsvOqlImI5RORD
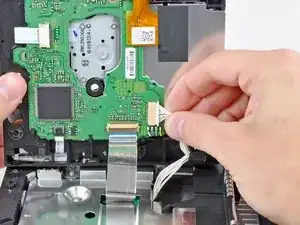
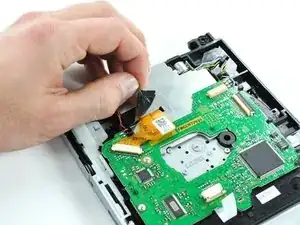
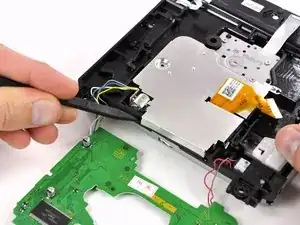
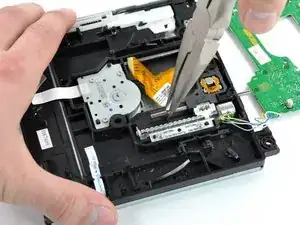
    • Usa la punta de un spudger para empujar los lados del sujetador del conector ZIF que asegura el cable plano del motor del eje directamente lejos del conector.

    • Desconecta el cable plano del motor del husillo tirando de él hacia afuera de su conector con un par de pinzas.

  25. BFBoVnNB2PEWfluO
    BFBoVnNB2PEWfluO
    PULHdufFPnaHOW2O
    • Retira el trozo de cinta de tela negra que cubre una parte del cable plano de la lente.

  26. gGTmOXDGFas1vsdN
    gGTmOXDGFas1vsdN
    6YhvuHbPRtNyDOkS
    sSTtxfN1Vwl2kPUo
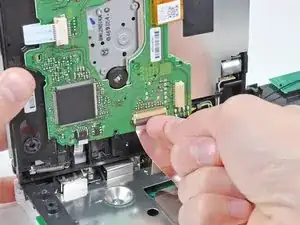
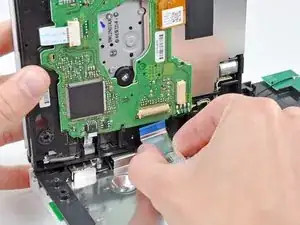
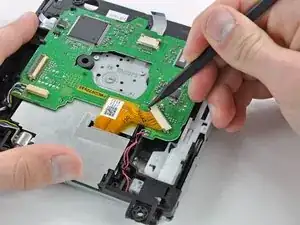
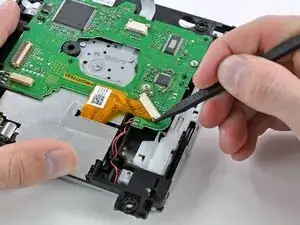
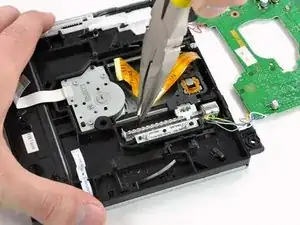
    • Desconecta el cable plano de la lente empujando primero las dos lengüetas de bloqueo del conector ZIF hacia el cable plano con la punta de un spudger.

    • Usa un par de pinzas para sacar el cable plano de la lente de su conector.

    Re-assembly comment: After re-connecting the lens ribbon cable is a great time to remove the solder blob from the replacement lens.

    Tom -

  27. Q4DFIf1F4IOxytZM
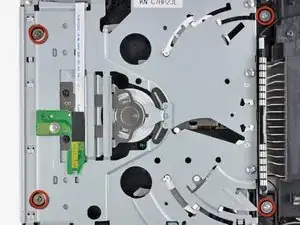
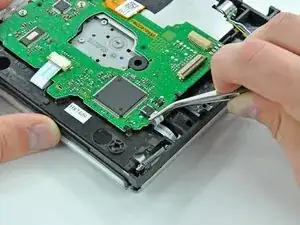
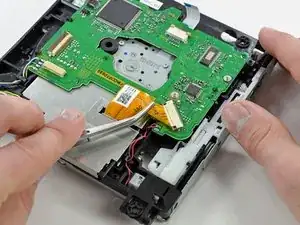
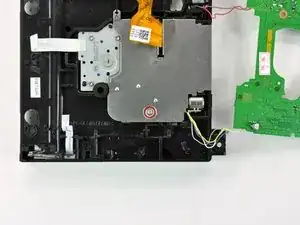
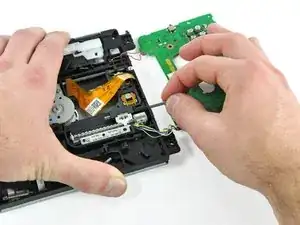
    • Retira los dos tornillos Phillips de 5,0 mm que sujetan la placa de la unidad de DVD a la carcasa de la unidad.

  28. cJXoy3vtWSelDScK
    cJXoy3vtWSelDScK
    En1RBsVIoNP6qlrM
    UNPbi5siKhnbGPt3
    • Levanta la placa de la unidad de DVD de la carcasa de la unidad levantando primero el lado con el conector del cable plano de la lente.

    • Tira del lado opuesto de la placa de la unidad de DVD hacia afuera mientras levantas toda la placa para liberarla de las pequeñas pestañas negras de plástico que la sujetan en su lugar.

  29. gdhVVefsSsc3LDrs
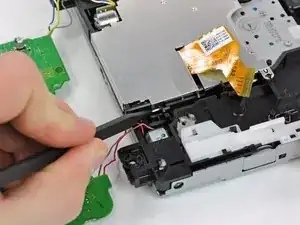
    • Desconecta los cables que están soldados a la placa de la unidad de DVD desde debajo de sus lengüetas de plástico negro con la punta de un spudger.

    I found it was easiest to unwind red and brown first and then white, blue, gray, yellow.

    Carol -

    I found this was easiest one wire at a time

    Tom -

  30. JlFJO2wE3ariTYw4
    • Coloca la placa de la unidad de DVD junto a la unidad de DVD de tal manera que los cables soldados a la placa de la unidad de DVD no estorben (como se muestra en la imagen).

    • Retira el único tornillo Phillips de 5,0 mm del protector EMI de la lente del DVD.

  31. IKAwFXEjgTRQdVfo
    IKAwFXEjgTRQdVfo
    DBVe3WmLxGFgMaDR
    jmIkVbbuisfnqJ2A
    • El lado del escudo EMI con la ranura para el cable plano de la lente del DVD tiene dos pequeños clips de metal que se sujetan a las lengüetas de plástico negro en la carcasa de la unidad de DVD.

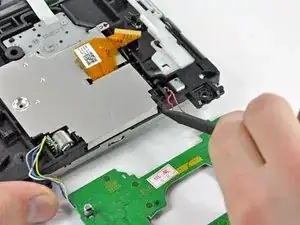
    • Usa la punta de un spudger para doblar los dos clips de metal lo suficiente como para que ya no estén sujetos a sus respectivas lengüetas de plástico.

    • El escudo EMI está hecho de un metal suave y maleable. Se puede doblar fácilmente y volver a darle forma, pero la fatiga excesiva puede hacer que los clips se rompan.

    • Asegúrate de que ambos clips vuelvan a colocarse en sus posiciones originales al volver a ensamblarlos.

  32. KKSQPra3DFXMDsm3
    KKSQPra3DFXMDsm3
    64r3D5MnVh1rRPhS
    • Pequeñas lengüetas en el escudo EMI se asientan en dos orificios en el borde exterior de la carcasa de la unidad de DVD.

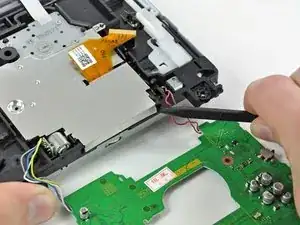
    • Inserta la punta de un spudger en el orificio que está más cerca de los cables rojo y rosa que se conectan a la placa de la unidad de DVD.

    • Gira el spudger para sacar la primera pestaña de su orificio en la carcasa de la unidad de DVD.

    Regarding Step 32 and 33 - I did this a little differently, and didn't need to bend (plastic deformation) the tin. Complete Step 31, but instead of 'bending' the clips, you release them and pop the tin up over the plastic 'barb' to release the EMI shield. Then, then repeat Step 31 (popping the tin clips off of the barb) for the two tabs on the opposite side (screw side) of the EMI shield. The EMI shield can then be withdrawn, e.g. released to the bottom of the picture in steps 32 and 33, without bending the tin as advised in step 32 and 33. The only mildly tricky part was releasing the clip from the barb near the (blue/yellow/grey/white) wires connecting the laser stepping motor - I used a fine flat screwdriver.

    dyanetti -

    Agree with dyanetti; the two end tabs in step 32-33 are not intended to be bent. Should release all four of the clips on the sides of the plate first, then it will rotate up and the end pins will just slide out (and in when reversing the process for reassembly).

    If you take the top off the dvd drive, these tabs are easy to unlatch from the other side.

    ChrisV -

  33. prWSkqhNBERYnBt3
    prWSkqhNBERYnBt3
    H5P2rDX2wwywebmp
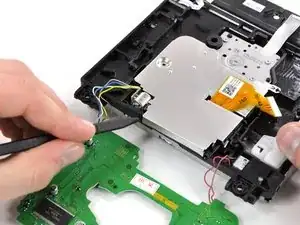
    • Repite la acción del paso anterior para sacar la segunda lengüeta del protector EMI de su orificio en la carcasa de la unidad de DVD.

    • Puede ser necesario sujetar el borde opuesto del protector EMI para evitar que los clips o pestañas se vuelvan a colocar.

  34. dOVSnSCDZJxuwapR
    dOVSnSCDZJxuwapR
    ONSxPLagd2jjmvHs
    • Sujeta el escudo EMI por los dos bordes que están libres y gira la pieza entera ligeramente hacia el borde que todavía está presionado hasta que los dos últimos clips restantes estén libres.

    • Levanta el escudo EMI directamente de la unidad de DVD.

  35. ZPTN6HMYRYTZeiDi
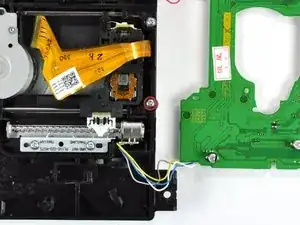
    • Retira el tornillo Phillips de 5,0 mm que está más cerca de los cables amarillo, azul, blanco y gris.

  36. lNMMbZFGiTe2MuJD
    lNMMbZFGiTe2MuJD
    BZfmij2wXKWpSHul
    1sQmTpTFijQhAe3r
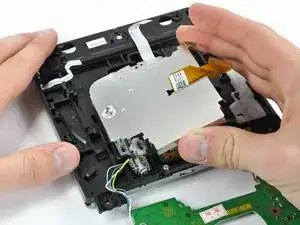
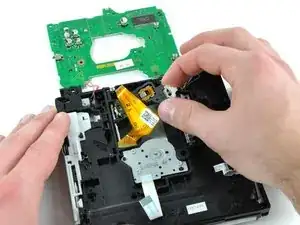
    • Mientras sostienes la unidad de DVD con una mano, sujeta el pasador de retención de la lente de la unidad de DVD (más cercano al tornillo que acaba de quitar) con un par de alicates de punta fina.

    • Desliza el pasador de retención hacia el borde de la carcasa de la unidad de DVD.

    • Liberar el pasador requerirá algo de fuerza y luego será muy fácil.

    • Una vez que el pasador se mueva con facilidad, agárralo con los dedos y sácalo completamente de la carcasa de la unidad de DVD.

    There is a small piece of black plastic next to the last screw which was removed. Lifting this up a millimeter or two will release the retaining pin so that it can be moved out easily.

    FRAC -

    What to do when these Clips Break?

    Marco Bienert (RodneyMcKay) -

    It's important not to scratch this rod with the pliers. I would use fingertips or plastic tweezers for this step, or wrap the needlenose pliers with tape first.

    ChrisV -

    Careful! It’s so easy to break that black plastic piece. Notice that it’s only connected at one end and hinges very easily causing a stress fracture. Whether you lift it from the side or go in through the end hole, minimize the number of times you hinge it.

    I found that vinyl tape-wrapped bent-nose pliers worked well to grip the rod.

    Brian -

  37. QYwQryKMu5AtfWZC
    QYwQryKMu5AtfWZC
    XHKMcSYQZEcREwG2
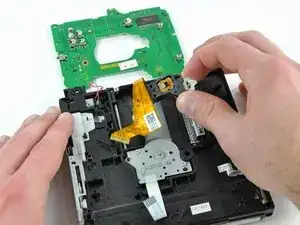
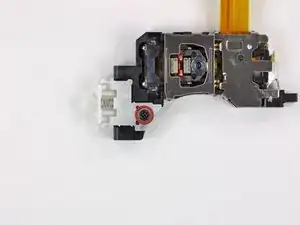
    • Toma el ensamblaje de la lente de la unidad de DVD por el lado del que acaba de quitar el pasador de retención.

    • Retira el conjunto de la lente de la carcasa de la unidad de DVD.

  38. TypuAiPy2u66PIaN
    TypuAiPy2u66PIaN
    pacLxrP63ZtMuXiN
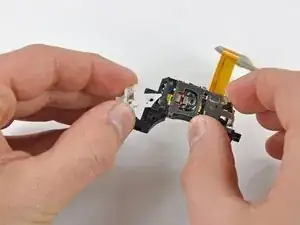
    • Retira el tornillo Phillips de 4,2 mm que fija el soporte de plástico blanco al conjunto de la lente.

    • Levanta el soporte del conjunto de la lente.

    • Si vas a instalar una lente nueva, asegúrate de transferir el soporte de plástico blanco y atornillarlo a la lente láser nueva antes de la instalación.

    May need an additional step when replacing with a new laser sled assembly: The new one will have a solder blob across two signals for esd protection; this must be removed after the new laser is installed, otherwise it will be completely unable to read the disk.

    ChrisV -

    agree with Chris V you have to de-solder the solder dot on ribbon just make a straight vertical line compare it to the replacement laser this should be step 39 because if you don't do this the laser lens will not be able to read properly

    keytechllc -

    Had the same issue. I wasted a couple hours troubleshooting the new laser before figuring out that I needed to de-solder the solder blob shorting the 2 signal lines.

    Christopher Daun -

    Any tips on removing the screw from the white plastic bracket that needs to connect to the new part? It is not loosening on the old one at all. New mini-philips on order to see if they will fit better and hold but I don't think this is going to come free. Does anyone know where a new white plastic bracket can be ordered?

    eljuline -

    Correctly sized philips was all it took. Came off right away. So all set to put it back together tonight.

    eljuline -

    Does the author cares about comments or not? The guide is missing one fundamental step that has been already pointed out by the comments from 4 years ago!!

    Marco Bo -

    I too wasted time with this repair until I saw these comments. Completely reassembled, tested, then repeated the whole process again to check all the connections. When I finally found these comments I attempted to remove the solder but ended up with a flakey - partially working wii. I assume I damaged the ribbon cable in the process.

    Ultimately I spent another $20 and bought a new DVD unit ($5 more than the replacement lens) and has my wii working in 15 minutes. I wish I had seen these notes first - I wouldn’t have wasted my time trying to replace the lens. Please, please, please update this guide and save the community a lot of trouble!

    David Begleiter -

    Does anyone know where too by white plastic bracket thing

    Hassan Farooqi -

Conclusión

Para montar tu dispositivo, sigue estas instrucciones en orden inverso.

David Hodson

Miembro Desde 14/04/10

148383 Reputación

25 comentarios

Many thanks for the excellent guide - my wii is working again!

Niel Viljoen -

WOW! I have seen a lot of repair manuals and guides, and this has to be one of the best!

Appreciate the care and craftsmanship it took to put this together.

One suggestion: Please add pics of the screws with specs to compare the sizes.

Terry -

very informative...if the laser is dirty or the lens is broken....will the tray from the drive come out and go inside...as normal ....please assist...

Techy -

All went well. The main problem I had was tweezers of low quality. Also, during assembly, some screws was to tricky, so I needed to magnetize screwdriver and for that purpose I used - a speaker :)

Great tutorial, in deed. David just saved Christmas for me and my family.

Dragan -

This is one of the best set of instructions I have ever used. Easy to follow steps with accurate illustrations. Very well done, I don't know how you could make it any better! A++,

camoore4800 -

Me too. After solder blob removed, my Wii was able to read GameCube disks and most of my Wii disks.

debrota -

Me too. After solder blob removed, my Wii was able to read my GameCube disks and most of my Wii disks.

debrota -

Me too. After solder blob removed, my Wii was able to read my GameCube and most of my Wii disks.

debrota -

Very useful and detailed.

John Rosenberger -

Dare I try this on my own?

Simon Clark -

Hola el lente de mi wii no intenta leer, al introducir un dvd el lente da un golpe y luego tres golpes mas, no suena como si intentara leer el disco, de echo tampoco se oye girar al disco, Quisiera saber si este problema es por el laser dañado o si se daño el motor que hace girar el dvd. Mi correo es david19_4@hotmail.com si pudiera ayudarme le agradeceria, puede responderme en ingles yo puedo traducirlo. Gracias

david19_4 -

i tried this ix but as i was doing it i flipped the drive over and a small metal clip fell out and cant find where it has to go back in???

can anyone help please?

thanks in advance

dany -

★☆★ Top Marks ★☆★ for a well thought out and fantastically illustrated procedure.

My 7 year old son and I worked as a team and it worked like a dream.

The only thing is, that we didn’t originally desolder the bridge on the new lens cable, so we had to work back through to step 22. However, this only took us 20 minutes extra :)

Many, many thanks to Mark and your 7 contributors. ★☆★ Nice Work ★☆★

Ted George -

This is one of the most detail oriented tutorial I’ve ever seen. On Step 11, the screws were also color coded to avoid confusion. Great work!

I was able to follow this tutorial and replace the lens module with ease. The Wii system is now able to read the DVDs. Now, however, I have an issue. The Wii console is making a huge din after the replacement. Does anyone this issue? What do I need to do to fix the issue?

Thanks again for a great tutorial!

affansayed -

How can I tell if my lens is broken and if it’s in a bad (reversible) condition?

Hunson Abadeer -

My two year old stuck playing cards into the disc slot causing no disc to be read. I purchased the Apollo Precision Tool Kit for Phone and Computer Repair, it contained everything I needed to get the job done. I only had to complete through step 19 to push the cards out. Took about 2 hours to complete the project.

Noone Particular -

This was a really good guide, I got my Wii working again and I am happy.

Sara Zielinski -

Thank you so much!

John -

Best disassembly instructions ever!!!

terry.huberts -

Thanks for the great instructions, we had no problems getting our Wii working again!

Peter Krystad -

nach einbau des neuen laser geht es immer nocht,immer noch die selbe fehlermeldung disk kann nicht gelesen werden

Marco Ott -

This is an excellent guide. Thanks for putting it together!

Scott Carter -

This was great, thanks! But I did have to look up elsewhere how to desolder the static point on the new laser assembly which I learned about in several videos I watched to get an idea of what I was getting into before I started.

Holly S -

this is a lifesaver for my wii!

Cameron Smith -

will try this when I get the materials that I need. But so far, this looks pretty promising.

Andrew Burley -