
Introducción
Usa esta guía para reemplazar un pantalla rota, rasgada o defectuosa en tu Apple Watch Series 2.
Asegúrate de actualizar tu Apple Watch a watchOS 5 o posterior (y el iPhone vinculado a iOS 12 o posterior) para evitar problemas de emparejamiento después de reemplazar la pantalla.
Reemplazar la pantalla puede causar problemas con Apple Pay. Si es posible, para reducir la probabilidad de problemas, elimina toda la información de tu cuenta ApplePay antes del reemplazo y vuelve a ingresarla con la nueva pantalla instalada.
Herramientas
-
-
Prepara un iOpener (o usa un secador de pelo o una pistola de calor) y calienta la esfera del reloj hasta que esté ligeramente demasiado caliente para tocarla.
-
Deja el iOpener en el reloj durante al menos un minuto para calentar completamente la pantalla y suavizar el adhesivo que lo sujeta a la caja.
-
-
-
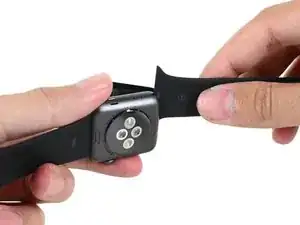
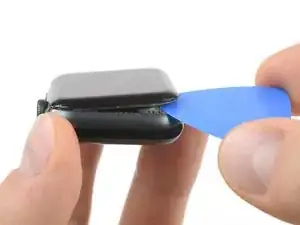
Coloca el borde de una hoja curvada en el espacio fino de la pantalla y la carcasa exterior. Comienza en el lado corto de la pantalla, más cercano a la corona digital.
-
Presiona firmemente hacia abajo en el hueco.
-
Una vez insertada, inclina la cuchilla para abrir ligeramente la pantalla.
-
-
-
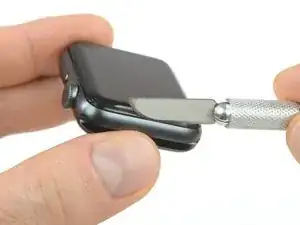
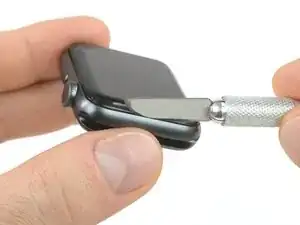
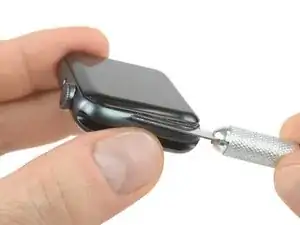
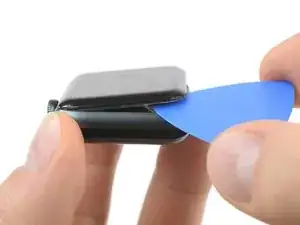
Una vez que has abierto un pequeño espacio con la hoja curvada, retira la hoja e inserta el borde mas delgado de una herramienta de apertura en el hueco.
-
Empuja la herramienta de apertura en el hueco. Usando tu pulgar como un pivote para levantar la pantalla abierta un poco más lejos.
-
-
-
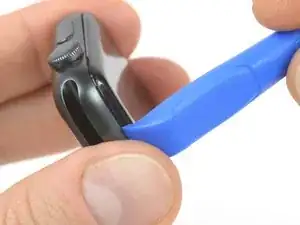
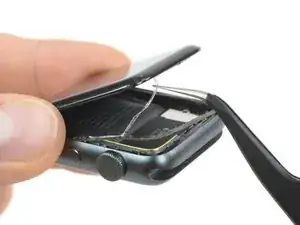
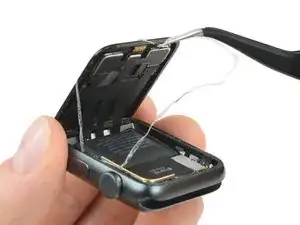
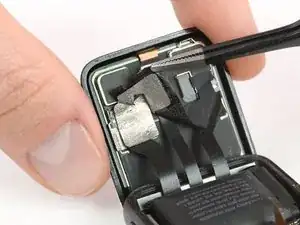
Inserta una púa de apertura debajo de la pantalla y separa cuidadosamente la junta de Force Touch de la pantalla.
-
Desliza la púa alrededor de la pantalla para separar el adhesivo entre la junta de Force Touch y la pantalla.
-
-
-
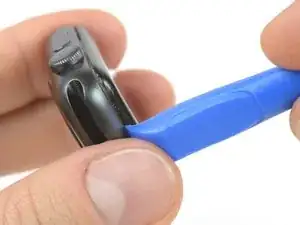
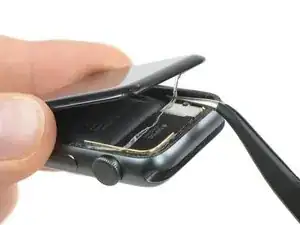
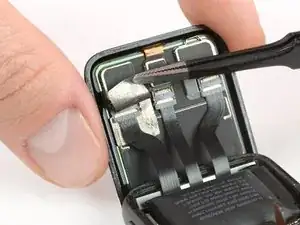
Abre la pantalla a un ángulo de 45° y usa pinzas para despegar el adhesivo entre la pantalla y la junta de Force Touch.
-
-
-
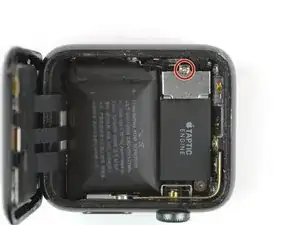
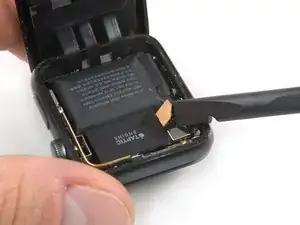
Utiliza un destornillador Y000 para quitar el tornillo de tres puntos que sujeta la cubierta metálica del conector de la batería.
-
Remueve la tapa.
-
-
-
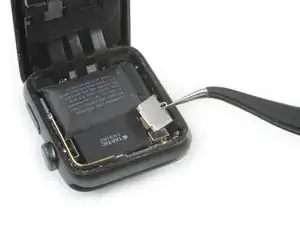
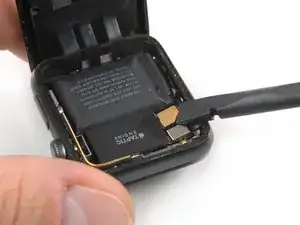
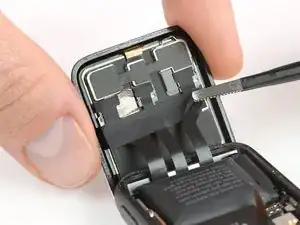
Desconecta la batería levantando su conector con el borde de un spudger.
-
Dobla el conector ligeramente hacia arriba para asegurarse de que no haga contacto por accidente.
-
-
-
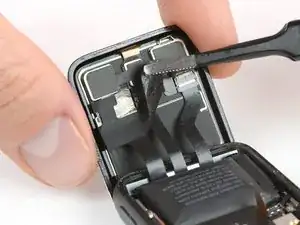
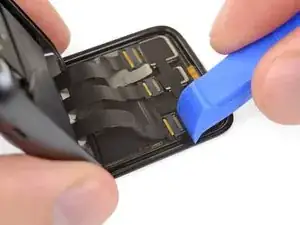
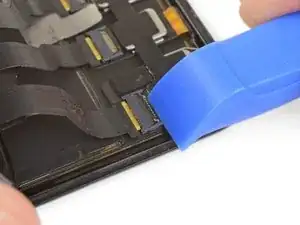
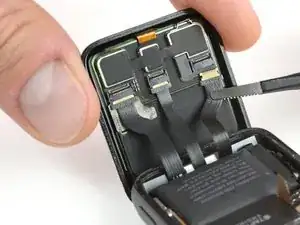
Usa un par de pinzas para despegar la cinta que cubre los conectores del cable de la pantalla.
-
Comienza desde la parte inferior derecha de la cinta y trabaja con cuidado hacia el conector en el medio.
-
-
-
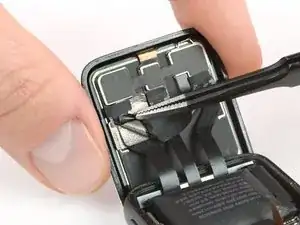
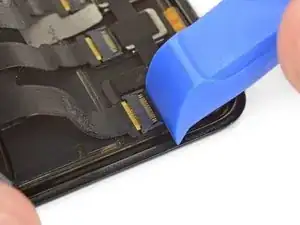
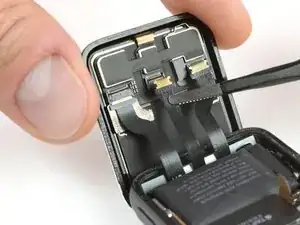
Si se rasga, tómala desde la parte inferior izquierda para eliminarla por completo. De esta manera, la lámina que coincide debajo (en la pantalla) permanecerá ilesa.
-
-
-
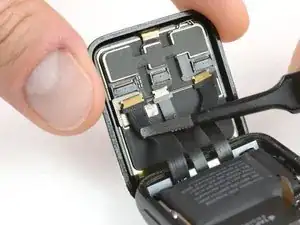
Usa un par de pinzas para desconectar los cables flexibles de la pantalla tirando de ellos suavemente.
-


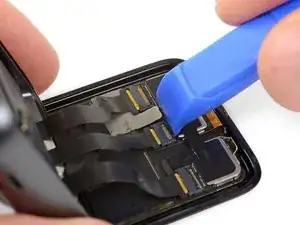
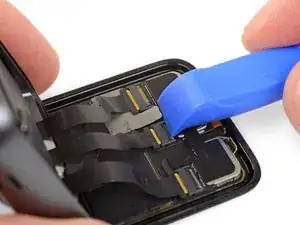
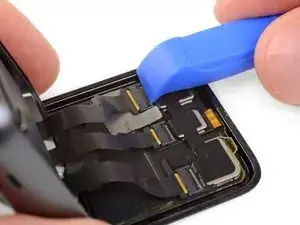
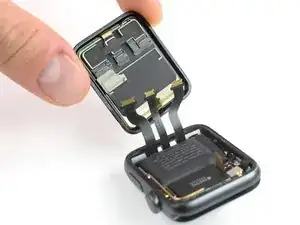
Continúa desde el punto 10 de nuestra guía de sensor Force Touch Sensor para volver a sellar su reloj y completar la reparación. Para conseguir unos mejores resultados NO conectar la nueva pantalla antes de pasar el paso 17

18 comentarios
Job done….With a smashed screen remember to apply clear scotch tape to hold the screen together. Continue to heat the remaining stuck shards when the main bulk of the glass comes out. Pick them out carefully, and not to raise the gasket. Use a strong magnifying glass. the ifixit heat gel pack and tweezers helped me. Ensure that all tiny bits of glass have been removed form the body. Just turn it upside down, give a couple of gentle taps with something plastic. Pick out if necessary, taking care around the components. For a smashed screen, needs a good hour or more.
pep073 -
Congratulations on the successful repair. And thanks for your comment and additional hints.
This one was tough…and I’ve been doing various repair for years. Thank you iFixIt for top notch tutorials and instructions (and the progressive photos). I had a broken display and an iCloud locked watch for parts. Getting the display off the broken iWatch was easy…getting the replacement/good display off the other iWatch was very difficult. I keep at it and eventually it released, but I think I chipped the display edges slightly. If I have to do this one again, I may think twice. I’d say use plenty of heat. I used the iRemover, which helped a lot, it gets plenty hot and holds the heat for job. Once you’re inside, you’ll need that every so special 000 tri-lobe bit for the battery (for this I bought the iFixIt Pro toolkit…worth it to have a solidly made set of disassembly tools). I don’t think it’s worth breaking down the iWatch for repairs much further than the display or battery. The water resistant seal is compromised enough as it is with the display removal.
Just wondering are the ion x glass and sapphire crystal screens interchangeable because I have a broken series 2 aluminum case and it comes with the ion x glass but I want to get the sapphire crystal glass instead to make it stronger
Displays of the same Series, model and size should be compatible.
Just noticed that my reply might come across a little vague.
Same Series hopefully makes sense (some swapped Series 3 onto Series 2 and vice versa which lead to the displays getting warmen than usually).
Same model means LTE or GPS which is probably irrelevant since the Series 2 does not have LTE.
And same size is hopefully a no-brainer ;)
So to summarize, yes, Sapphire display of the same watch should work instead of an ion-x.
Please let me know if it won’t work.
Verify your model. The back of the Cellular model just says GPS, so be sure to check the groves where the watch band goes to determine you model. I made the mistake of just reading the back of the device and since I’d been gifted the device didn’t know it was cellular. Cellular has a different type of touch force gasket, different screen, and different battery connections.
Ryan Holt -
From what I just read on Apple, the only differences in watch series 3 is 38mm and 42mm.
mcr4u2 -
As a consumer all you need to know are 38mm and 42mm
Michael Adoga -
The back will say GPS LTE if it’s the cellular version. If it doesn’t say LTE it is only the GPS version. The displays are different whether or not it is LTE(cellular).
themepark -
This alternative method only reboots the watch.
Gregg Stanley -