Introducción

Esta guía detalla cómo remover la tarjeta lógica en una iMac 4K 2019 para poder remover y reemplazar la RAM.

En algunas imágenes en esta guía se utiliza una iMac antigua, la cual tiene algunas diferencias visuales mínimas. Estas diferencias no afectan el proceso de reparación.

""Esta guía requiere que manejes una fuente de poder que contiene capacitores grandes. Desconecta la iMac y presiona y mantén presionado el botón de encendido por al menos 10 segundos para ayudar a descargar los capacitores. Maneja la fuente de poder por los bordes y no toques los componentes de la superficie.""

  1. xew1BWp2BZwFMbWh
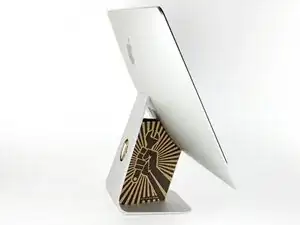
    • Con la bisagra libre para moverse, la iMac estará desequilibrada y será difícil trabajar en ella. Coloca una cuña de servicio en el soporte para estabilizar la iMac.

    • Si estás utilizando una cuña de cartón de servicio de iFixit, sigue estas direcciones de ensamblaje para armarla.

    • Antes de empezar a trabajar en el iMac: Desenchufa la computadora y mantén presionado el botón de encendido durante diez segundos para descargar los condensadores de la fuente de alimentación.

    • Ten mucho cuidado de no tocar los cables de los condensadores ni las soldaduras expuestas en la parte posterior de la fuente de alimentación. Sólo manipule la placa por los bordes.

    Maybe your directions should suggest fixers to buy RAM cards in pairs. I wanted 32 Gig of RAM, and I bought and installed one 32 G RAM and while it seems fine, one source told me it would be 5-10% faster if I had put in two 16 RAM cards. Is that accurate?

    BRUCE CLARKE -

    it would at least be that much faster, in theory some applications should run twice as fast

    blakebest -

  2. M42hmSlBUbk6PbHC
    M42hmSlBUbk6PbHC
    YmEFhp4dqiXysxIN
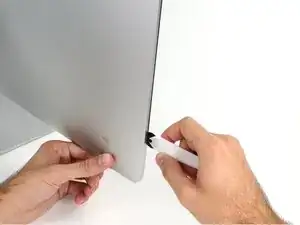
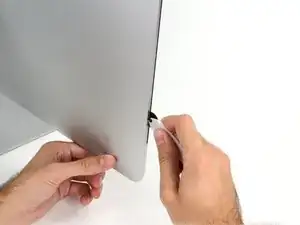
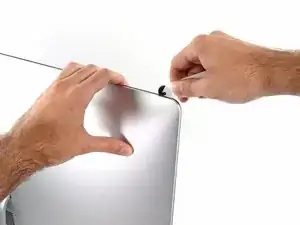
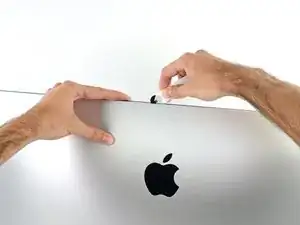
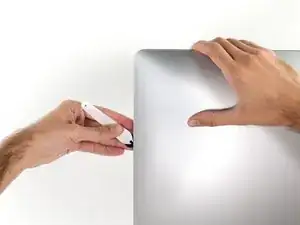
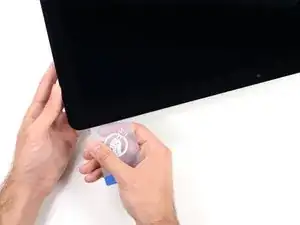
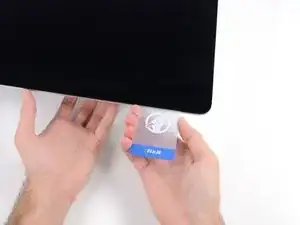
    • Comenzando por el lado izquierdo de la pantalla, cerca del botón de encendido, inserta la herramienta de apertura de la iMac en el hueco entre el panel de vidrio y la carcasa posterior.

    • El eje de la herramienta de apertura de la iMac evitará que empujes la rueda demasiado lejos. Si utilizas otra herramienta, no insertas más de 3/8" en la pantalla. De lo contrario, corres el riesgo de cortar los cables de la antena y causar daños graves.

  3. cOVEfbnXgUttrW2b
    cOVEfbnXgUttrW2b
    FlMUC3pRXZOFhcoB
    tKQWoCGakrogQTPD
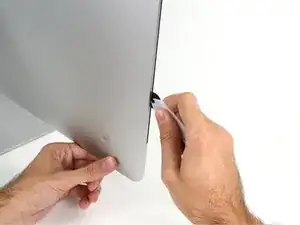
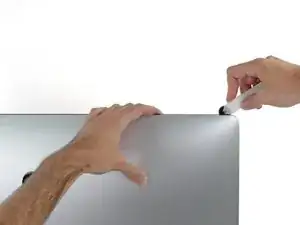
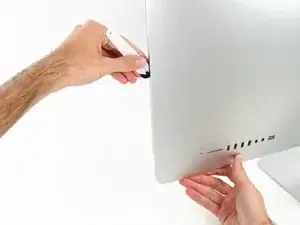
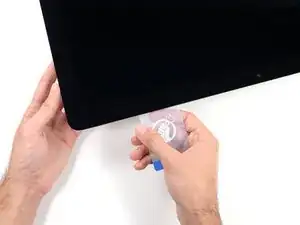
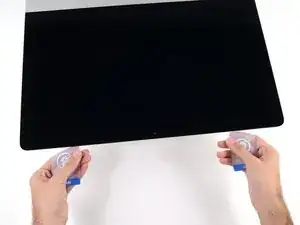
    • Usa la herramienta como un cortador de pizza, enróllala a lo largo del hueco, cortando el adhesivo de espuma entre el marco y la pantalla.

    • Asegúrate de empujar siempre con la rueda de corte hacia adelante. Si tiras, la rueda podría salirse del mango.

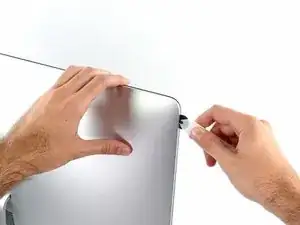
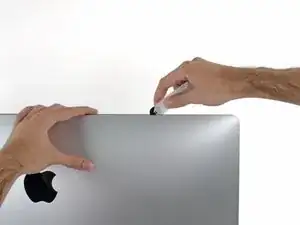
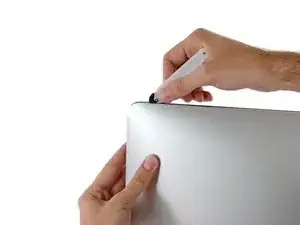
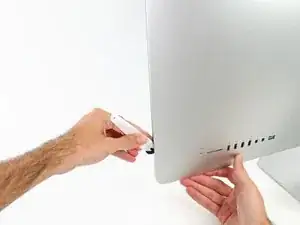
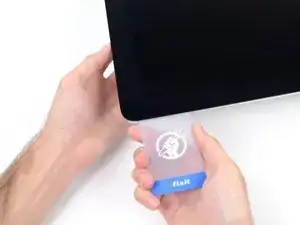
    • Pasa la herramienta por el lado izquierdo de la pantalla.

  4. tSAS3Jn3qghgZJDe
    tSAS3Jn3qghgZJDe
    KCyqluPop5fjDYAE
    IqxfhhMDuT5ibx1P
    • Continúa deslizando la herramienta alrededor de la esquina izquierda superior.

  5. Gr5frklRP5SSCfcs
    Gr5frklRP5SSCfcs
    ja4mM4JMGPU2UVrV
    • Corta el adhesivo a lo largo del borde superior de la pantalla.

  6. NZSSQT4P2YuyMtAf
    NZSSQT4P2YuyMtAf
    BudRMK2UCrSCEYOO
    • Continúa a lo largo de la parte superior de la pantalla.

    • Puede que quieras pasar la herramienta de un lado a otro unas cuantas veces para asegurarte de que cortaste completamente el adhesivo.

  7. AFpWIRNam5smLYMl
    AFpWIRNam5smLYMl
    RXhs3VgToDNZiJpM
    gxF3JYbbkAp4VTJN
    • Empuja la herramienta por la esquina superior derecha de la pantalla.

  8. RZ6ybv2fcA12MLAL
    RZ6ybv2fcA12MLAL
    yfJAyWOQtfxUkTCE
    • Empuja la herramienta a lo largo del dorde derecho de la pantalla.

  9. MbfslBJoWVDXS5kR
    MbfslBJoWVDXS5kR
    NoNsLWkB1JuDpsvo
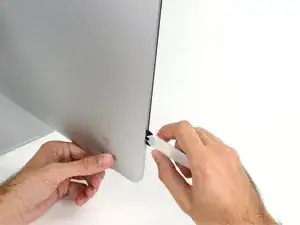
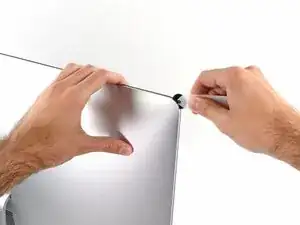
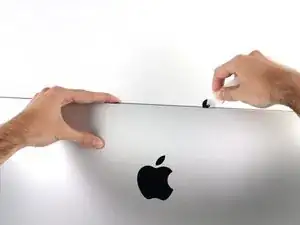
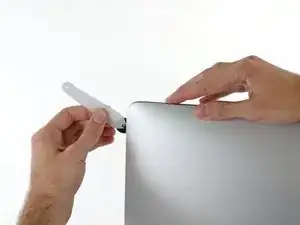
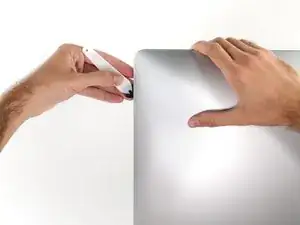
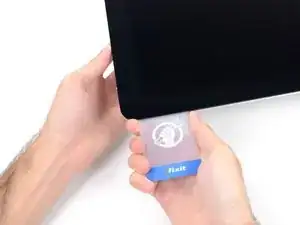
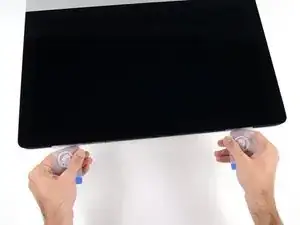
    • Termina de empujar la herramienta de apertura a la parte inferior del lado derecho de la pantalla.

    • En este punto, querrás volver a pasar la herramienta por toda la pantalla, para asegurarte de que cortas la mayor cantidad de adhesivo posible.

  10. 1OOl3uQ3SUHBD5XD
    1OOl3uQ3SUHBD5XD
    65vvKRUNKxVKGOwY
    lPpjVUkv1sMMaSav
    • Si bien la herramienta de apertura corta la mayor parte del adhesivo, la pantalla seguirá estando ligeramente adherida a la caja. Será necesaria una tarjeta de plástico para liberar lo que queda de este adhesivo.

    • Coloca la iMac boca arriba sobre una mesa.

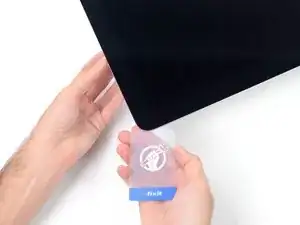
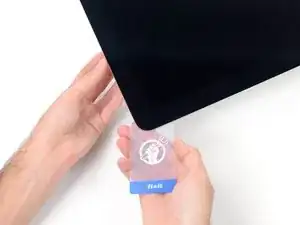
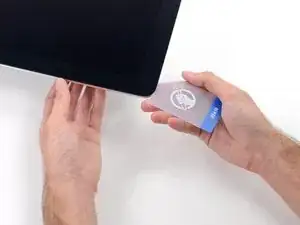
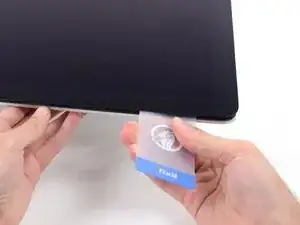
    • Empezando por la esquina superior derecha de la iMac, acuña una tarjeta de plástico entre la pantalla y el marco.

    • Ten cuidado de no insertar la tarjeta de plástico más de 3/8", o podrías dañar los componentes internos.

    9.5mm in the rest of the world

    Tal Glazer -

  11. TwUkxBqp3WUU5SQM
    TwUkxBqp3WUU5SQM
    nMscaGHNZwiXWGTU
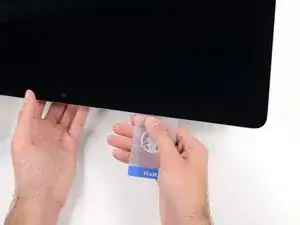
    • Gira suavemente la tarjeta de plástico hacia los lados para crear un hueco entre la pantalla y el marco.

    • Muévete lentamente y ten cuidado de no estresar demasiado el vidrio de la pantalla, sólo necesitas hacer un hueco de aproximadamente 1/4".

    Which is around 6.5mm

    Tal Glazer -

  12. 5H2mrXvL1GqHCbMH
    5H2mrXvL1GqHCbMH
    JAkiWZj5Ho4yNTYo
    EskKkKR4VOrJcuhl
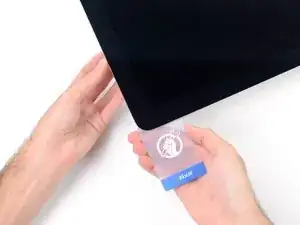
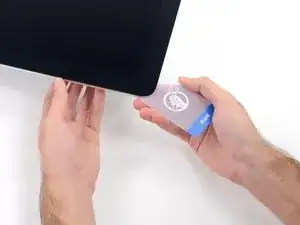
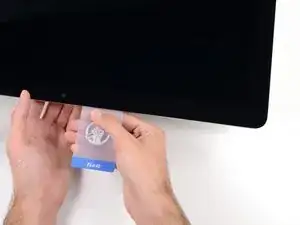
    • Desliza la tarjeta hacia el centro de la pantalla para cortar el adhesivo que quede en la esquina superior derecha de la iMac.

    • Asegúrate de detenerte antes de la cámara iSight, o podrías dañarla.

  13. QVKUQYp4K6pmbyjX
    QVKUQYp4K6pmbyjX
    OgKJPO6IXFXkEDtt
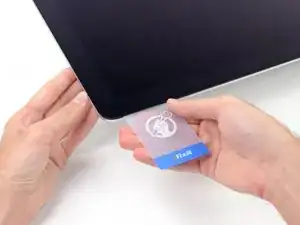
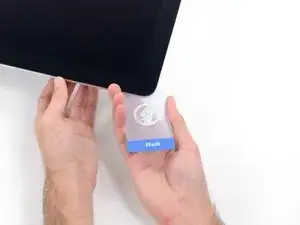
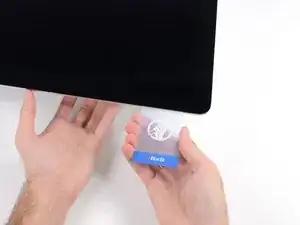
    • Pon la tarjeta plástica en la esquina superior derecha una vez más, y déjala ahí para evitar que el adhesivo se vuelva a pegar.

  14. YLlxXZGUiVKXEPX1
    YLlxXZGUiVKXEPX1
    d2mHEVkqOtcoxt62
    aybCLgwrfPOFlWjR
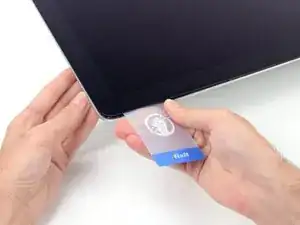
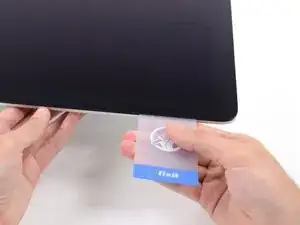
    • Inserta una segunda tarjeta de plástico en el hueco entre la pantalla y el marco, cerca de la esquina superior izquierda de la iMac.

  15. WfyVK51oSKrP4Zmm
    WfyVK51oSKrP4Zmm
    Hcaw4qZgJJXva4Ls
    • Gira suavemente la tarjeta hacia arriba, aumentando ligeramente el espacio entre la pantalla y el marco.

    • Al igual que con el otro lado, gira lentamente para permitir que el adhesivo se separe, y ten cuidado de no sobrecargar el cristal de la pantalla.

  16. yXDZaJkjPkEAcVep
    yXDZaJkjPkEAcVep
    iGsPuW6mkoqZTeWO
    YFQAcDZXTypgc4kn
    • Desliza la tarjeta de plástico hacia el centro.

    • Deja de deslizar justo antes de la cámara iSight para evitar dañar la cámara.

  17. 6eIbW1PCSMq6Bers
    6eIbW1PCSMq6Bers
    pd3AFHwUgYpc4dtt
    • Pon la tarjeta de plástico en la esquina superior izquierda.

  18. GOUrhY1NeK1fcLaC
    GOUrhY1NeK1fcLaC
    QRPTMuatYNuyUKMD
    NfjmyRMmXDIgiVec
    • Con ambas tarjetas de plástico insertadas como se muestra en las esquinas, gire suavemente las tarjetas hacia los lados para aumentar el espacio entre la pantalla y la caja.

    • Si hay alguna sección que parece pegarse y no se separa, deja de retorcer y usa una de las tarjetas para cortar el adhesivo restante.

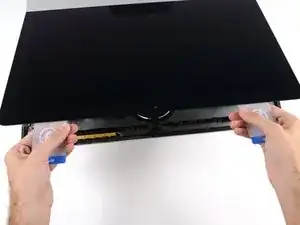
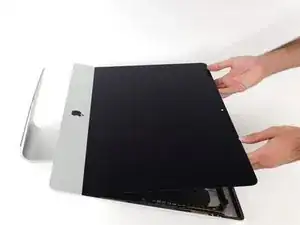
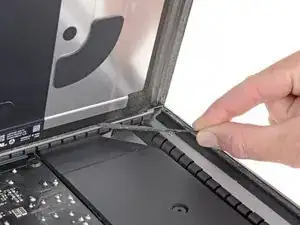
    • Comienza a levantar la parte superior de la pantalla del marco.

    • Sólo levanta la pantalla unos pocos centímetros: los cables de datos y de alimentación de la pantalla siguen conectados a la placa lógica.

  19. 2CYaRvZMKD1MHJWF
    2CYaRvZMKD1MHJWF
    fHCLPYQIpP4EVOLZ
    • Levanta la pantalla lo suficiente para tener un acceso fácil al conector, pero no demasiado, ya que estirarías los cables y forzarías sus conexiones (levántalo menos de 20 cm.)

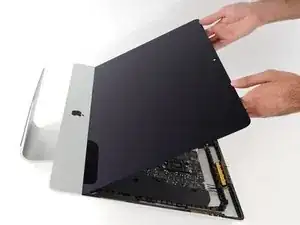
    • Sostén la pantalla con una mano, mientras usas la otra para desconectar el cable de energía de la pantalla.

    It was difficult to remove this connection. I ended up having to gently pull-up vertically a little on the wire side to unsnap it about 1mm and then horizontally wiggle it out.

    delacrj2 -

    I had a difficult time removing this connection. I had to lift the wire-side about 1mm before it unsnapped and then carefully wiggle it out horizontally.

    delacrj2 -

    Can this cable be replaced? I am worried mine is damaged. I have no display after the screen fell and stressed the display flex cables following an SSD upgrade.

    Jeremy Brainard -

    This step should be done with extreme caution and care, as this step 19 is not described in great detail (sorry, author).

    The first (most outward) cable will slide out by gently pulling it by its tabs. The second (inner) cable is more tricky, as the locking lever must be moved backward first, before gently pulling backward on the cable connector. The angled tweezers are useful here, to help lift that locking lever, because fingers are too big for this.

    Ernst -

    be VERY careful and SLOW...take your time. These displays crack VERY easily when removing and they'll spider web on you. I've done probably 20 or so of these and cracked 3 being super careful.....ugh.

    Faslane -

    I found the best way to unplug this display power cable was to use my right hand, and the fingernails of my index finger and thumb to grab the ends of the tabs on either side of the connector, squeeze, and pull the connector out gently.

    Phil McInnis -

  20. Zh56FQPLtH1qJkBF
    Zh56FQPLtH1qJkBF
    RuoSZ5iXxQqvKfcF
    MuEuntgC4FjFNuDJ
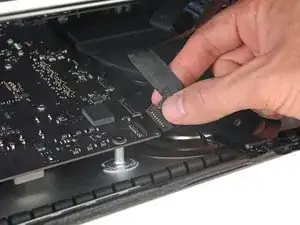
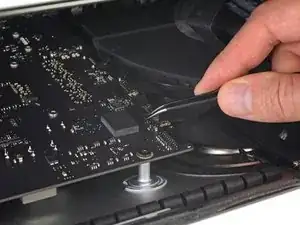
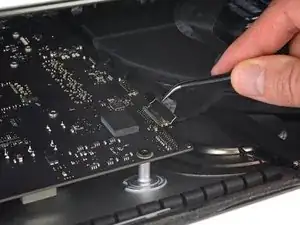
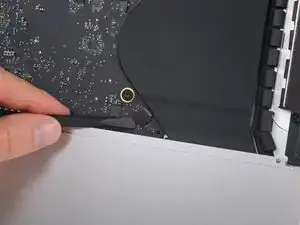
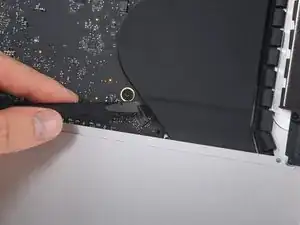
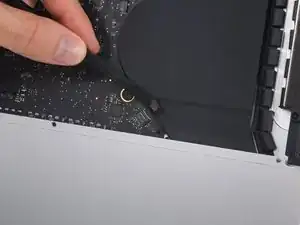
    • Continúa sosteniendo la pantalla con una mano, mientras muevas hacia arriba el soporte de metal en el cable de datos de la pantalla.

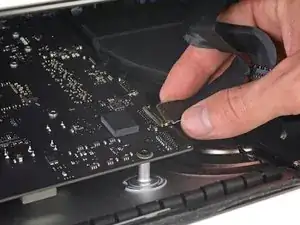
    • Con cuidado tira el cable de datos de su zócalo en la placa lógica.

    • Asegúrate de quitar el conector del cable hacia arriba, manteniéndolo paralelo a la placa base, para evitar dañarlo.

    Cannot seem to find a replacement cable for this, as I suspect mine is damaged. Can’t even find a part number. Anyone know what it might be?

    Jeremy Brainard -

    https://www.amazon.com/gp/product/B08TTL...

    That's the part I ordered for mine and it seems to work ok. I did make a point of contacting the seller and advising them of my requirement and they ensured I got the right part and it matches the description of the link. Bear in mind I bear no responsibility if yours does not work since I am just sharing what I did and what I ordered. Thanks.

    Jim Stanford -

    I also need that cable.

    cameronjpu -

    It's a little difficult to tell... but looking at the connection to the logic board on the video data cable, are the pins faced up or down?

    On the display, same question since it appears you have to "twist" the cable during the reconnection step.

    Jim Stanford -

    For this particular cable, take a good look before pulling on anything. Plug is locked on its socket with a bracket. You can lift this bracket by holding the small, flat black plastic handle that is attached to it. If you're struggling to grab it, use the end of the pizza roller handle to lift it, or the tweezers. Cable then comes off by pulling parallel to the main board.

    Froggy Manny -

  21. m3V4TQFe6DgIXYuF
    m3V4TQFe6DgIXYuF
    yZM3Md1BCHXDXXZn
    • Levanta la pantalla a una posición casi vertical .

    • En este punto todavía hay una tira de adhesivo a lo largo de la parte inferior de la pantalla que mantendrá la pantalla al marco como una bisagra. Puedes aflojar este adhesivo trabajando la pantalla hacia arriba y hacia abajo unas cuantas veces.

  22. NXHcDMt52ENK4HPi
    NXHcDMt52ENK4HPi
    b6qImCFu2OHQHfip
    xMgGXmp4o3Pik4Y1
    • Si es necesario, se puede utilizar una tarjeta de plástico para cortar las secciones restantes de la tira adhesiva inferior.

    The bottom adhesive strips have small tags at a 90 degree angle that can be used as handles to strip them out at this point. https://d3nevzfk7ii3be.cloudfront.net/ig...

    Dom -

  23. V4PqOetM2FuNQDNf
    V4PqOetM2FuNQDNf
    5GW2KD3C4FYXniog
    FuOZoIpxcQjjpXrW
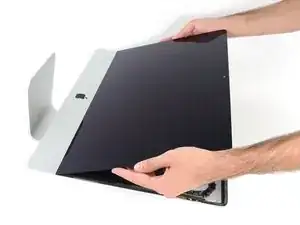
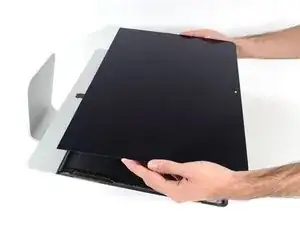
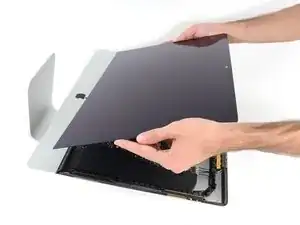
    • Levanta la pantalla del marco y sácala del iMac.

    • Puede que sea necesario levantarla lentamente por un lado para despegar el adhesivo restante.

    • Ten mucho cuidado al manipular la pantalla, es grande, pesada y está hecha de vidrio.

    • Después de cortar el adhesivo, no se puede usar para volver a sellar la pantalla en su lugar. Sigue esta guía para reemplazar las tiras adhesivas que aseguran la pantalla a la carcasa trasera.

  24. Y6rgiDSintoHTbSh
    Y6rgiDSintoHTbSh
    TQY6Rva3IOMgdCPo
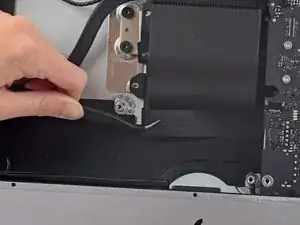
    • Retira los siguientes cinco tornillos Phillips que sujetan el brazo del soporte inferior en su lugar:

    • Cuatro tornillos de 3,2 mm

    • Un tornillo de 1,7 mm

    • Es posible que tengas que despegar el adhesivo de la pantalla que recubre el borde inferior de la carcasa del iMac para acceder a los tornillos.

    These screws are VERY small and very easy to lose. Ideally you use a magnetized screw driver to help here.

    Charlie Nancarrow -

  25. bMsILZASiLpPMxXI
    • Retira el brazo del soporte inferior (también conocido como "chin strap") de la carcasa del iMac.

    The 'chin strap' is very easily bent, which makes it difficult to put the very small screws back in place.

    Charlie Nancarrow -

    Questa staffa a cosa serve ?

    Nicola Demetrio -

    Non rimetterlo che cosa comporta?

    Nicola Demetrio -

  26. vnCZOVJAfQMkCXVO
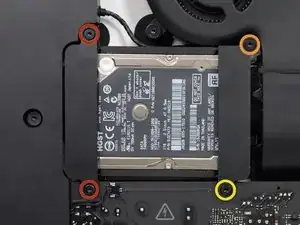
    • Retira los siguientes tornillos Torx T10 que aseguran los soportes del disco duro al iMac:

    • Dos tornillos de 21 mm.

    • Un tornillo de 9 mm.

    • Un tornillo de 27 mm.

    At step 26, when reassembling, it's super easy to over-tighten the 9mm screw and strip the brass ferrule out of its hole in the plastic bracket (%#*@).

    roberttrevellyan -

    Mine has 4 different length screws, the two red colored 21mm screws in this guide are actually two differ lengths

    anonymous 523 -

    Mi imac does not have a HDrive whats the steps to follow?

    Charlie -

    buongiorno, l'imac del 2019, non monta alcuna ssd, ma monta una m2 direttamente sulla scheda madre!

    pertanto nella guida andrebbe aggiunto il cavo sata con sensore temperatura da aggiungere sulla scheda madre, per poter collegare un nuovo hd ssd altrimenti rimarrete come me bloccati con un imac aperto e non assemblato, in attesa di ricevere il cavo acquistato su internet da amazon o terze parti.

    vi consiglio inoltre di aggiungere una foto reale del ò'imac 2019 nella guida in cui manca l'ssd, renderà subito la problematica che avranno in molti!

    Donato Altomare -

  27. MFEFhp6PYNe1LMei
    MFEFhp6PYNe1LMei
    YOZ6AmbKs2AlGURG
    • Retira los soportes izquierdo y derecho del disco duro del iMac.

  28. mvMdQktTba6hAHXt
    mvMdQktTba6hAHXt
    Xrb5HKoQvsB3M1aL
    ngWQxHCLD5HUmXC1
    • Los siguientes pasos acercan sus manos a la cara expuesta de la fuente de alimentación. No toques la cara de la fuente de alimentación ni ninguna de las soldaduras expuestas. Al tocarlo se corre el riesgo de una descarga de alto voltaje de los muchos condensadores grandes conectados a la placa.

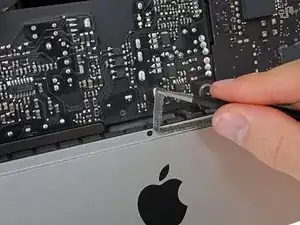
    • Usa la punta de un spudger para empujar cada lado del conector del cable del botón de encendido y sácalo suavemente de su zócalo.

    I would advise that before removing the PSU unit and all other components from the bottom of the case that you remove the 5 screws at the bottom of the display which hold an insulation strip in place.

    The guide shows this piece removed, but does not tell you how to remove it.

    There will be 5, small J1000 screws. The middle one, which goes over Apple Logo is the shorter one of the 5, all others are the same length. Once this piece is gone removing the components is much easier, and chance of damage lessened.

    [deleted] -

    Added to the guide. Thanks for the tip!

    Jeff Suovanen -

    No need to remove power board and logic board and all other components, just remove the fan and it is quite "easily" accessable to change the RAM. Just need to use the tools to remove the old RAM and carefully install the new RAM.

    I just did it without removing the logic or power board

    Oleksandr Trokhymchuk -

    could you elaborate a little more, I would love to skip the rest of these steps. How did you accomplish this?

    ej P -

    Oleksandr Trokhymchuk,

    Thank you! You just saved me so much time! I wouldn’t call this “easy” but it saved me a lot of time and effort.

    Joshua Ericson -

    ej P: remove the fan assembly first. Then remove the connector that runs from the iSight camera to the logic board on the left.

    the RAM is located right near that cable. It’s tricky to remove but you can pop open the connectors with a black nylon stick and the RAM chip will pop up at 45 degrees. Make a mental note on which way you will need to install the new ram as it’s tough to see. For the Crucial memory I got it was label side facing away you (facing towards rear metal enclosure).

    the second chip has a plastic adhesive piece on it that you should probably attach to the new ram.

    remove both chips then install the new ram in sequence from the board out.

    Wizdom On Wheels -

    In the photo for Step 28, the power button cable connector is placed around the power board screw hole on the top left of the power board.

    However, on the iMac I upgraded, the power button cable connector was “fed” through the power power screw hole on the top left of the power board. The cable was too short to run around and below the hole.

    Hence, I had to ensure the cable was “fed” through the hole during re-assembly and the screw carefully screwed back through the hole.

    I guess every iMac is assembly just a bit differently, just to make repairs that much more fun.

    Tim Telcik -

    This is not correct and may have been assembled incorrectly during a previous repair.

    Charlie Nancarrow -

    Just replaced the hard drive and RAM with SSD and 16GB respectively and did NOT remove the power supply or logic board. Tricky is a word to describe putting the RAM in without removing the logic board. You work in the dark with little room to get your fingers in between the logic board and the back of the case. I put the first RAM chip in without a problem (the one next to the logic board), but the second to four tries and dropped it behind the logic board three times before finally getting it to position correctly. Just impossible to see and must work but feel. Still it was faster than removing all the components… though did remove the fan (needed cleaning anyway). All in all I can’t say enough about the help the guide was through the upgrade ! Thanks !

    Ray Burgard -

    I found this connector to be very tight and was afraid of breaking it off. I just kept slowly working on it—it did eventually come out.

    I did try to sneak the RAM in without removing the logic board but my fingers were too big. I found it too difficult and just continued on with this guide.

    Mikkif -

    I was not able to install the memory without removing all the components. My fingers are too big and I could barely get in that tight spot to swap out the memory. The hardest part about the power supply is that one connector under the chin next to the Apple logo. Once it is out, you are home free because it is so easy to plug it back in when you are putting it all back together again. Ridiculous that Apple did not put a simple access door behind those memory slots because they are on the backside of the Mac! They did an access door on the PowerBooks and it did not ruin the appearance. They could have designed a cool looking pop out door that only had a thin seam around it so it would still look good. Then you could remove the access door to upgrade the memory easily.

    Peter Hillman -

    Does anyone know if this is the same situation as in the 2017 model? I just changed RAM in the 2017 version and also skipped taking out the logic board. I just bent a pair of tweezers and put some tape around the tips to make them less scratchy and used them to place the RAM modules into the slots. Worked supereasy and much much quicker than performing the complete tear down of the whole machine.

    Nils Witte -

    This step is impossible!

    Cecily Walker -

    @wizdomonwheels, I don’t see how I can get the RAM shield off of the logic board to access the RAM without removing the logic board. What am I missing?? I’m guessing that those of you that are suggesting this technique are working on older iMac models that don’t have the RAM shield.

    jiclark -

    Yes, you are correct. It is likely the various steps are a bit different on each model. If I recall I was likely working on a 2015 or older system. If there’s a shield in the way, I can’t think of a way you could get around it without pulling the logic board.

    Wizdom On Wheels -

  29. FRyHHB3eYim1Mlap
    FRyHHB3eYim1Mlap
    QYTUyMIUOCpNBKj3
    • Usa la punta de un spudger para empujar cada lado del conector del cable de control de la fuente de alimentación y sácalo suavemente de su zócalo.

  30. CH3APYFIpiKhphHv
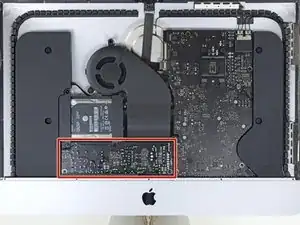
    • Remueve los dos tornillos Torx T10 de 7.2 mm que aseguran la fuente de energía a la carcasa posterior.

    • En los nuevos modelos de iMac son tornillos Torx T8 de 7.2 mm.

    • Durante el montaje, ten cuidado de no atrapar el cable del botón de encendido detrás de la placa.

    In my case, the left side corner of the PS was caught against the Lower Support Bracket, and I had to remove the LSB in order to get the PS freed and out.

    I think the author Walter Galan should put this in the main section of his instructions. I have TWO identical iMac 14,1 / i5 2.7GHz / 21 Inch Late 2013 / Order ME086LL/A. They both required removing the LSB. Thank you very much Walter Galan & others for your contributions.

    Ted Horodynsky -

    Those screws were definitely not T10 but T9 on my unit

    Vincent Monteil -

    Those screws were T8 on my unit.

    jag32mobile -

  31. ydiE3k5Fa2YpKhyx
    ydiE3k5Fa2YpKhyx
    2WOoukeWyEZYOdGS
    • Cuando trabajes en la fuente de alimentación, ten mucho cuidado de no tocar los cables del condensador o cualquier junta de soldadura expuesta en la parte posterior de la fuente de alimentación. Solo maneja el tablero por los bordes.

    • Inclina la fuente de alimentación hacia adelante.

    When replacing the PSU (on the re-build) take care not to trap the power button cable behind it - I did...

    Dave Hallett -

  32. PKvyIF2PGHKLVC2I
    PKvyIF2PGHKLVC2I
    QS1usHIbpanvhs6M
    mWlTKHdQmhbCG6Sm
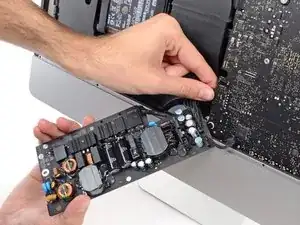
    • Tira de la fuente de alimentación ligeramente hacia arriba y hacia afuera del gabinete trasero.

    • Gira la fuente de alimentación en sentido antihorario, levantando el lado derecho aproximadamente una pulgada más alto que el izquierdo.

    In my case, the left side corner of the PS was caught against the Lower Support Bracket, and I had to remove the LSB in order to get the PS freed and out.

    I think the author Walter Galan should put this in the main section of his instructions. I have TWO identical iMac 14,1 / i5 2.7GHz / 21 Inch Late 2013 / Order ME086LL/A. They both required removing the LSB. Thank you very much Walter Galan & others for your contributions.

    Ted Horodynsky -

  33. wWakaG6mtCcwjET3
    wWakaG6mtCcwjET3
    yOSa1on1CEscZMhj
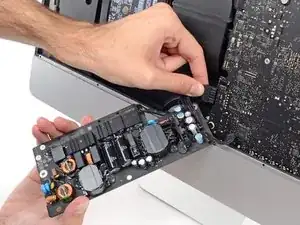
    • Desliza la fuente de alimentación hacia la derecha para despejar los tornillos de la carcasa trasera.

  34. jLV1p6yQHGorKX6J
    jLV1p6yQHGorKX6J
    RXTvMCHuVc2YG6Bw
    AhUBHxjjc4AVbOIJ
    • Balancea la fuente de alimentación hacia adelante y retírala de su hueco en el gabinete trasero.

    • No intentes quitar completamente la fuente de alimentación del iMac, ya que todavía está conectado a la placa lógica.

  35. qeKSCvwUpYnww3Xq
    qeKSCvwUpYnww3Xq
    DpV1XSNW6lES4k6h
    • Ten mucho cuidado de no tocar los cables del condensador o cualquier junta de soldadura expuesta en la parte posterior de la fuente de alimentación. Solo maneja el tablero por los bordes.

    • Voltea la fuente de alimentación para acceder a la conexión del cable de alimentación de CC detrás de la placa lógica.

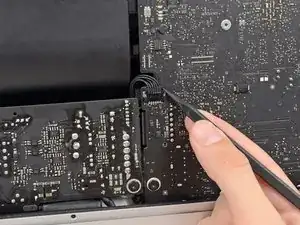
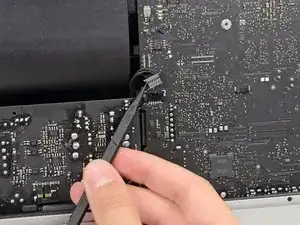
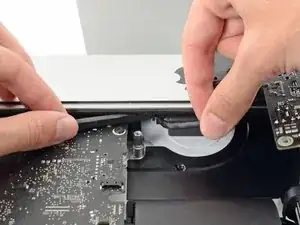
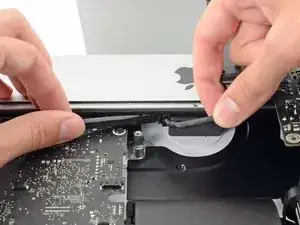
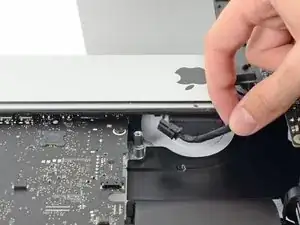
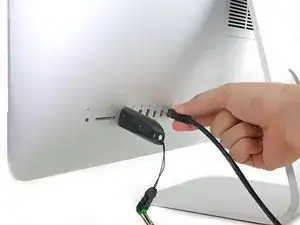
    • Presiona la lengüeta en la parte posterior del conector del cable de alimentación de CC y extraela de su zócalo en la parte posterior de la placa lógica.

    when pulled the cable, even slightly, the actual female piece that connects to the logic board came off. am i screwed?

    Racheal Major -

    Repairing sockets that come off the logic board is possible, but very specialised work. Unless you have a magnifying lamp and the necessary desoldering and soldering skills, it will be difficult but not impossible.

    Charlie Nancarrow -

    The tab is at the far end of the connector, so you’ll need to reach farther than you might think.

    lkollar -

    When I pulled the disconnect, I pushed down on the disconnect, instead of pushing down on the tab on the disconnect and bent those pins… tried to straighten the bent pins and two of the pins broke off the logic board. Will I need a new logic board or can I purchase the pins…?

    Ray AA -

    I could not disconnect this cable without fear of breaking something (as previous posters did). I found that I could skip this and the next step by wrapping the power supply in a couple layers of a small towel (to prevent shorting with any other metal surfaces), and laying the power supply on the aluminum face of the iMac near the Apple logo. This got it out of the way enough to do what I needed on the logic board (changing PRAM battery) after completing removal of the other items in this guide.

    Phil McInnis -

  36. X1O2EONkUfMWVDIU
    X1O2EONkUfMWVDIU
    afj3FkjCDfAuRAC3
    IpAy5PoZ5NsXFekL
    • Puede que te resulte útil colocar el iMac boca abajo para los próximos pasos.

    • Usa el extremo plano de un spudger para presionar el clip en el lado del conector del cable de entrada de CA hacia adentro.

    • Mientras presionas el clip de liberación con el spudger, toma el cable de entrada de CA y extrae el conector de su enchufe.

    I didn't disconnect the input cable to the power supply. Because I had the machine lying on its back throughout, I placed it on to the metal bit at the bottom of the machine instead (with a cloth to stop the metal getting scratched). The AC inlet cable was pretty tricky to get un-locked, and the PSU sat on the case fine. It didn't hinder anything else throughout the guide.

    Dave Hallett -

    I thought from Dave’s comment that I could leave the power supply completely in place, but I was mistaken. In order to remove the hard drive assembly after you remove the center screw in it, you’ll need to at least unscrew it and the HD assembly will slip out. Like Dave said, you don’t need to unplug the AC or PSU, which I left hanging.

    Getting power supply to the logic board unplugged is also tricky without unscrewing the two bottom screws. They didn’t make this part easy.

    delacrj2 -

    Kleiner Rechtschreibfehler - statt „denac“ muss es wohl „den iMac“ heißen

    Gonzalo -

    Au ja. Du kannst so was selbst ausbessern. Einfach auf “Übersetzen" gehen und loslegen.

    VauWeh -

    I would like to thanks Dave Hallett for his tip of not removing the AC inlet connector of the power supply. I simply wrapped the board in bubble wrap and taped to the iMac case, out of the way, thus giving access to the remaining disconnection procedures and preventing the board from scratching to the iMac case. It also made reassembly much simpler.

    Rob Hogan -

    Yeah, that AC inlet plug was a nasty one to unplug, mainly because I was trying not to bump the solder joints on the PSU. After a few wiggles and pulls while manipulating the spudger tool to release the clip, it finally unplugged. Made it easier by removing the PSU completely so you don’t have to worry about it. Don’t worry, plugging it back in is a breeze!

    Peter Hillman -

    With the right tool this plug comes out very easily. Forget about your tiny computer tools, go to the garage and grab a regular old needle nose pliers. Grab the clip and the plug at the same time. The plug will come right out.

    Carin Ann Loewen -

    Carin Ann— The most helpful comment on this procedure. After reading what you wrote I maneuvered the board, grabbed the clip with my left hand (a little awkward because of the cooling enclosure), squeezed the front of the plug, and got it out.

    Glen Kohler -

    +1 for needle nose pliers!

    Sam -

  37. 2VMnTxjOOO1L43of
    • Retira la fuente de alimentación del iMac.

    erreur: retirer "la carte d'alimentation" et non" le disque dur" !!!!!

    Moreau -

  38. IBchvnpx6554SHJh
    IBchvnpx6554SHJh
    jLqgVF2XZOkqBAdw
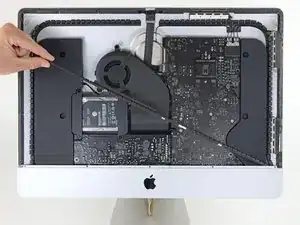
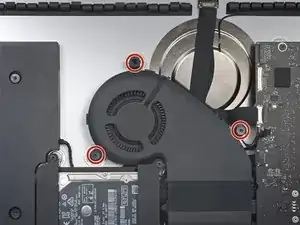
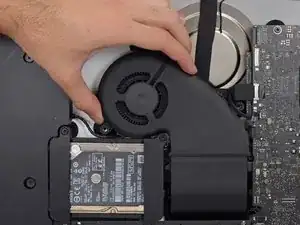
    • Tira suavemente del conector del cable del ventilador directamente desde su zócalo en la placa lógica.

  39. 1gYVUM6CGnCxNNJN
    • Retira los tres tornillos Torx T10 de 10 mm que sujetan el ventilador a la carcasa trasera.

    • El tornillo superior tiene un separador de goma adherido a su cabeza para soportar la pantalla; déjelo en su lugar.

    In this photo the hard drive brackets and tray are fully assembled. But, you’ve just dismantled about half of it already in early steps. This photo is apt to confuse you a bit when you’re doing everything in reverse order.

    Timothy Reynolds -

    Another way to say what Tim said above:

    For reassembly, this picture, showing the hard drive brackets back in place, is misleading. Leave them off still.

    IF, at this stage, you reinstall the hard drive brackets, when you get to the time to reinstall the power supply, you will have to backtrack and take the brackets off.

    Tech Medic -

  40. wnVqqqD5gF6xqW2a
    wnVqqqD5gF6xqW2a
    X5QHlckCAJJWfZJv
    • Retira el ventilador del iMac.

    For reassembly, this picture, showing the hard drive brackets back in place, is misleading. Leave them off still.

    IF, at this stage, you reinstall the hard drive brackets, when you get to the time to reinstall the power supply, you will have to backtrack and take the brackets off.

    Tech Medic -

  41. rAirT1GHZP1qpIqC
    rAirT1GHZP1qpIqC
    FI1BVEajFcTkxyGe
    fH3KYDKkVeWLdH2L
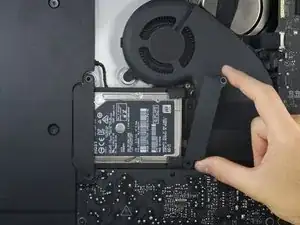
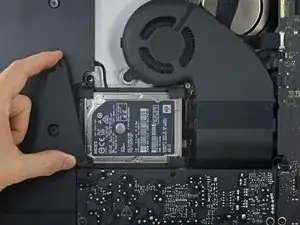
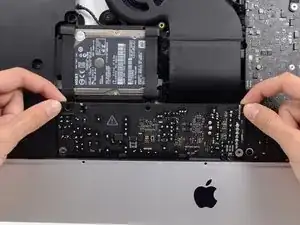
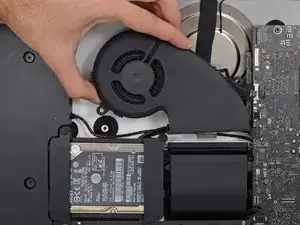
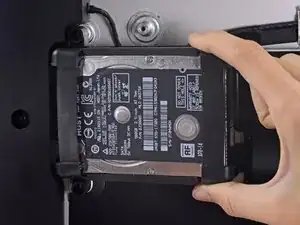
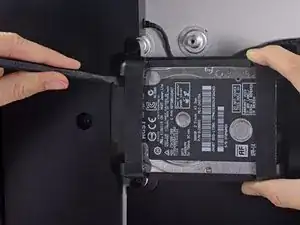
    • Levanta el disco duro desde el borde más cercano a la placa lógica y extraelo un poco del hueco.

    • El disco duro está conectado por un solo cable de alimentación / datos SATA; no intentes extraerlo completamente del iMac todavía.

    The newer drives have rubber ends and an adhesive side, be careful removing them if replacing the drive and be sure they are securely pushed back into the holder

    Carl Schultz -

  42. xAT4mnLlMEmZaE1l
    xAT4mnLlMEmZaE1l
    nUVTcTkKjNk2phCg
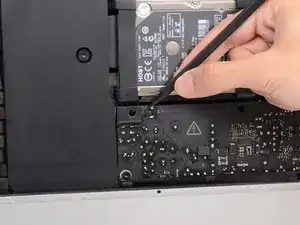
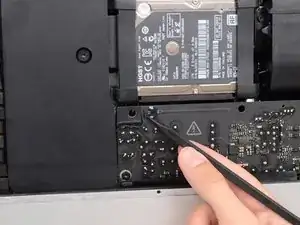
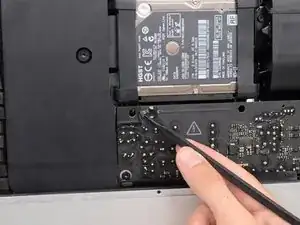
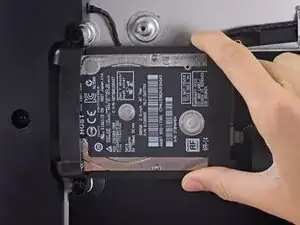
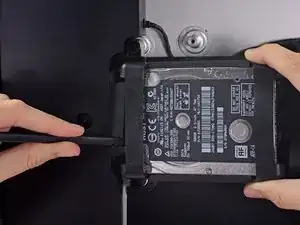
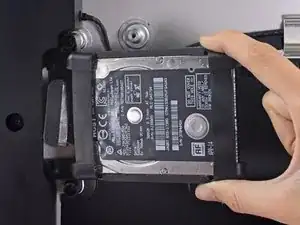
    • Usa un spudger para desconectar el único cable combinado de alimentación y datos SATA separando suavemente su gran conector de plástico del disco duro.

    When reconnecting the SATA cable, there is nothing to make the connector hold still, and it is hard to reach, so it took several tries. I ended up taking off the rubber baby buggy bumpers to get more room, and then jamming them back on after getting the SATA connector snugged up.

    bstaud -

    If by rubber baby buggy bumper, you mean left speaker, then yes, I agree. Reinstall the hard drive before the left speaker.

    jerrid_foiles -

    Kudo to @jerrid_foiles! I was going crazy trying to attach the SATA cable until I took the two screws out of the left speaker and slid the top end of it aside by about 3/4 inch. Make the whole process SO MUCH easier!!

    jiclark -

    We solved this by removing the hard drive tray screw, then inserting the cable into the SATA hard drive. Then hold the hard drive a bit out of the way to insert the 7.3mm hard drive tray screw.

    Marjie -

    Agree with this method, found it an impossible task to reconnect the SATA connector until removed the tray screw, then it was relatively easy to reconnect and then replace the tray screw.

    daveedwards -

    Also agree with this method!

    jmorphett5 -

  43. gPY6hXsOGJ1vn6ij
    • Retira el conjunto del disco duro del iMac.

    When reassembling, I found it easier to loosen the HD tray screw from Step 48 and pull the tray outwards from the left side in order to plug the SATA cable in more easily.

    Cool_Breeze -

    Thanks! I, too, had a hard time reconnecting the SATA cable.

    boboswell -

    I found this helpful too!

    Anwar -

    And DON’T do what I did, which is to remove the left speaker - which can easily lead to breaking the cable between the power on button and the power supply. The cable is routed through a hidden slot at the very bottom of the left speaker

    bsmith1 -

    I did loosen the speaker so I could get a tool behind the SATA cable to push it on to the SSD drive. Otherwise hard to align cable.

    Noah Ralston -

    I found the easiest way to connect the SATA cable was to not screw the plastic hard drive tray down until you plug the drive in. That way you can easily push the connector in and due to the cable you’ve got some wiggle room. You can position the tray then just lift one end of the drive up and secure the screw. Then just push the drive down.

    Chris Caldwell -

    This was the step that I had the most trouble with. I’m used to replacing a hard drive in a MacBook Pro, where the “plug” that you plug the drive into is a rigid thing that you can firmly press the hard drive into.

    With the iMac, the plug is situated on the end of a non-rigid cord, so the plug moves back when you try to snap a drive into it. Also, those two rubber gasket things that you adhere to the side of the drive really make it difficult to maneuver the now-overly-chubby drive towards the plug.

    After must frustration/concern, what I ended up doing was temporarily removing the rubber gasket things, using the “spudger” as kind of a lever behind the “plug on a cord” so that it didn’t move as much, and then pushed the gasket-less SSD into the plug.

    Once I got it connected, I put the rubber gaskets back on the sides of the SSD and kind of coaxed it down into place, using the pointy end of the spudger to get the chubby corner pieces to “sit” correctly in the rigid plastic tray that the SSD kind of rests in.

    Jack OnFlickr -

    From another comment elsewhere on this repair, I *highly* recommend removing the two screws holding the left speaker in place, then sliding it just a tad out of the way to be able to easily attach the SATA cable. You don’t have to move it much to make the whole process so much easier!

    jiclark -

  44. HlyFX1SKeB5XaS1A
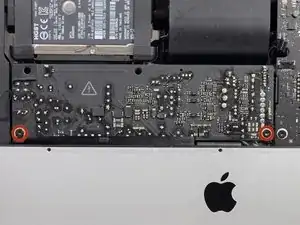
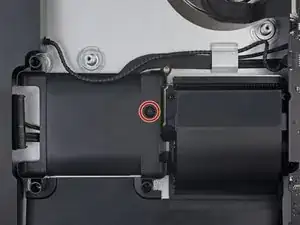
    • Retira el tornillo Torx T8 de 7,3 mm que sujeta la bandeja del disco duro a la carcasa trasera.

  45. WHcOrWobQNNZeior
    WHcOrWobQNNZeior
    dPAqvkcXmGpQwMvq
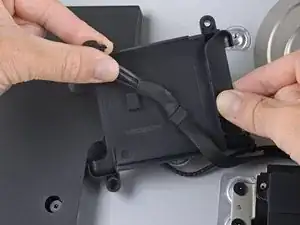
    • Retira el cable SATA de los clips en la parte posterior de la bandeja del disco duro.

    • Retira la bandeja del disco duro.

  46. JEsPRvPMFKPLp5OK
    JEsPRvPMFKPLp5OK
    TuZySaCUvfdXBXY1
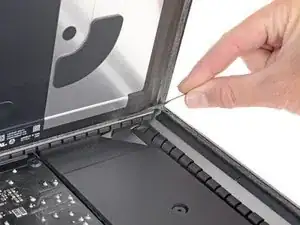
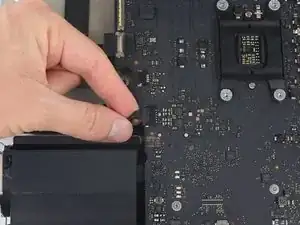
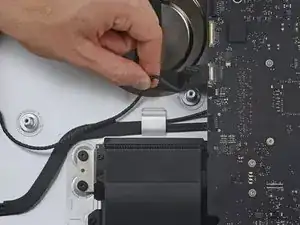
    • Tira con cuidado del cable del altavoz izquierdo para sacarlo de su zócalo en la placa lógica.

  47. D51gdUGxZ3AvIgCd
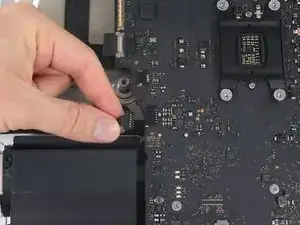
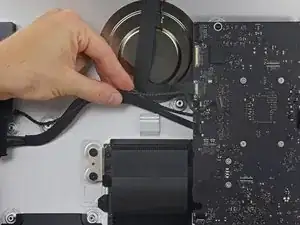
    • Desconecta el cable del altavoz izquierdo tirando de él hacia arriba para sacarlo del clip de retención en la parte posterior de la carcasa trasera.

  48. PPslOJpbNCYXfS1N
    PPslOJpbNCYXfS1N
    yRMteRIkDKWAU2gU
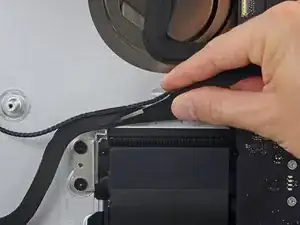
    • De manera similar al paso anterior, desvía los cables SATA y de alimentación tirando de la trenza hacia arriba para sacarlos del clip de retención.

  49. aKOJpkAxPCMiXtPi
    aKOJpkAxPCMiXtPi
    hb4CjyEYjYej3Irf
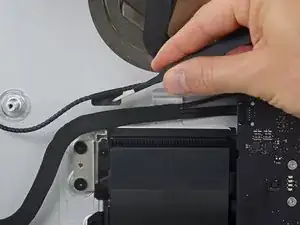
    • Despega el trozo de cinta que conecta el conector del altavoz izquierdo a los cables de alimentación y datos SATA.

  50. TvUP2KJ35YILsJgX
    TvUP2KJ35YILsJgX
    KaLL2hJVHrY1xHMi
    ZcUTUiR4rWTEifIP
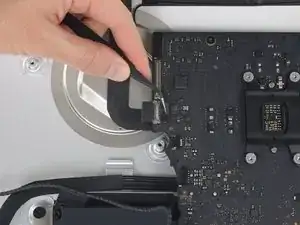
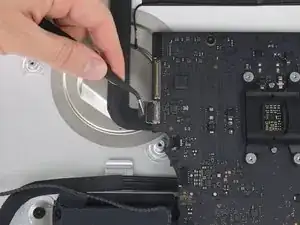
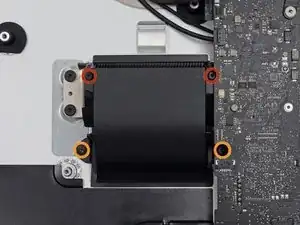
    • Levanta el soporte de retención de metal en el conector del cable de la cámara FaceTime.

    • Saca el cable de la cámara iSight de su zócalo en la placa lógica.

    • Este es un conector delicado que puede dañarse fácilmente.

  51. kKAkZISMtblWboHT
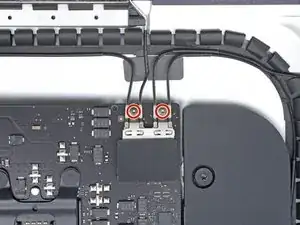
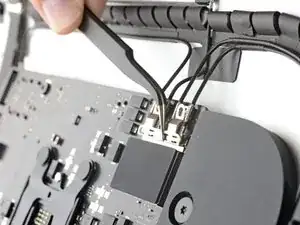
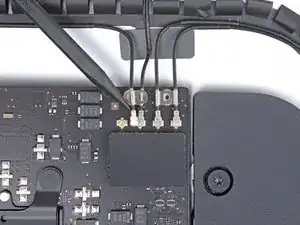
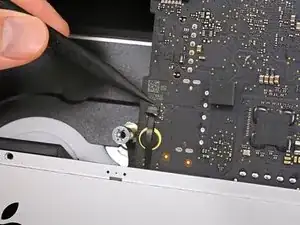
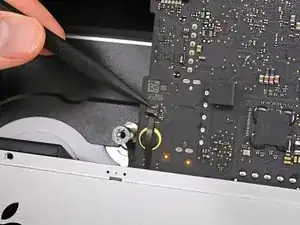
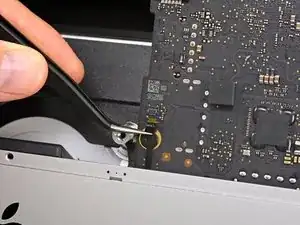
    • Retira los dos tornillos Torx T5 de 4,0 mm que sujetan los cuatro conectores de antena AirPort/Bluetooth.

    On my A2116 iMac19,2 3.0 GHz i5, these two screws were T4 Torx (same as the T4s securing the RAM cover in step 62) not T5 Torx.

    Zarino Zappia -

  52. bfdQshviyZgEYxrd
    bfdQshviyZgEYxrd
    EuwZCQKBOC2xnBVJ
    wnZAsXrEMlcXyONZ
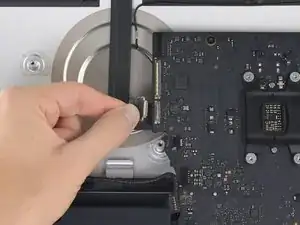
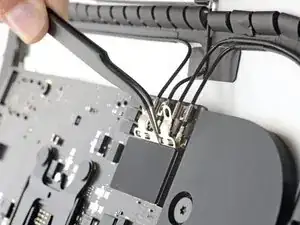
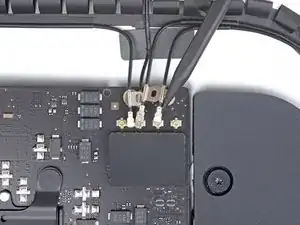
    • Gira la parte superior del soporte del conector AirPort/Bluetooth para alejarlo de la placa lógica, luego levanta el soporte y retíralo.

    • Durante la reinstalación, asegúrate de alinear las lengüetas de la parte inferior del soporte con los orificios del protector EMI. Estas lengüetas deben asentarse completamente dentro de los orificios antes de instalar el soporte.

  53. IUUbh6EhGejksWe2
    IUUbh6EhGejksWe2
    Cj5gtQFTaDDHp2DW
    WSJSGudM6HmUDn3l
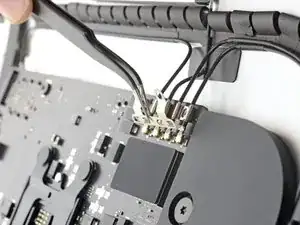
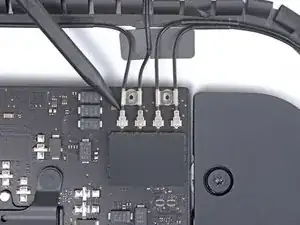
    • Usa la punta de un spudger para sacar los cuatro conectores de antena de sus enchufes y desconectarlos de la tarjeta AirPort/Bluetooth.

  54. vyFlNtaUT1yUH6HF
    vyFlNtaUT1yUH6HF
    QnEGWpLEVy3VSAEG
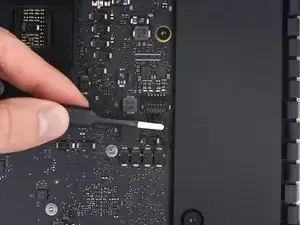
    • Usa un par de pinzas o tus dedos para tirar del conector del cable del altavoz derecho hacia abajo y sacarlo de su zócalo en la placa lógica.

  55. OdPVtlWK6TeqPEnm
    OdPVtlWK6TeqPEnm
    hZokClWNoRZmS4n5
    BPJt3yhuTEbv5dtR
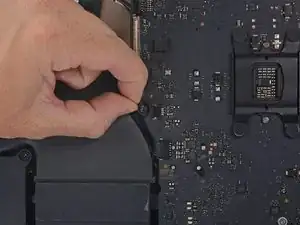
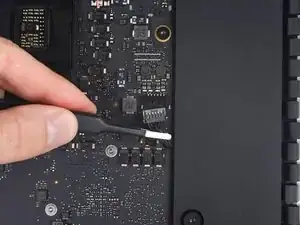
    • Usa el borde plano de un spudger para hacer palanca en el conector del cable del conector de auriculares de su zócalo en la placa lógica.

    • Empuja el cable ligeramente hacia la derecha para quitarlo del camino de la placa lógica.

  56. H45gWVABEDbRphkK
    • Despega la cinta que cubre el conducto de escape.

  57. kOqJZvEfAVJSGIfD
    • Retira los siguientes tornillos Torx T8 que sujetan el conducto de escape al gabinete trasero:

    • Dos tornillos de 6,2 mm

    • Dos tornillos de 4,7 mm

  58. tEpJYJjRc2ovFpSy
    tEpJYJjRc2ovFpSy
    VIqSSd2fW5tx6gsT
    TBVjjCqNGAvbSDC1
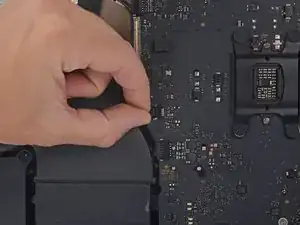
    • Usa la punta de un spudger para abrir la solapa de retención en el conector ZIF del cable plano del micrófono.

    • Asegúrate de hacer palanca en la solapa de retención con bisagras, no en el enchufe en sí.

    • Usa pinzas para tirar suavemente del cable plano del micrófono para sacarlo de su zócalo.

  59. aAw2er4tESOMM1Jk
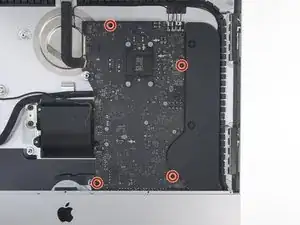
    • Retira los cuatro tornillos Torx T8 de 7,3 mm que sujetan la placa lógica a la carcasa trasera.

    On my 2019 A2116 (i3), there is a black vinyl sticker over the lower left screw, possibly a tamper-detection sticker like the ones on the CPU bracket on the 2013 Mac Pro.

    Rana Raychoudhury -

    I think that sticker is just to protect the microphone cable from possible shorting out on the screw, since it lays across it.

    jiclark -

  60. jJUoZKFgxHo6tgvk
    jJUoZKFgxHo6tgvk
    ZQPBTH1AFQCYFXBO
    HquXQeLPUxCSRbE5
    • Al retirar e instalar la placa lógica, ten cuidado de no dañar el delicado cable plano del micrófono en la parte inferior izquierda de la placa.

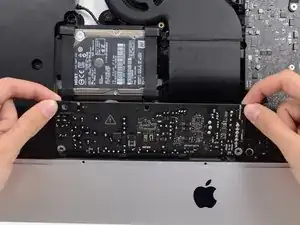
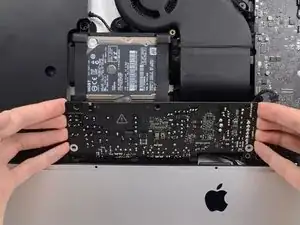
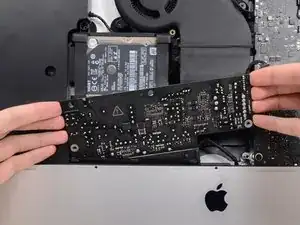
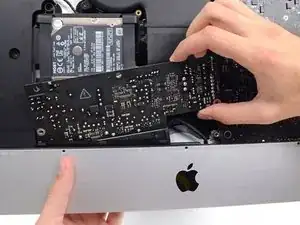
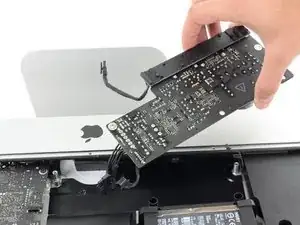
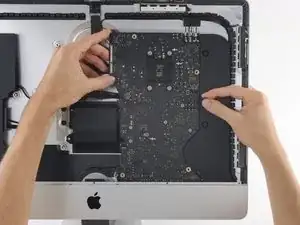
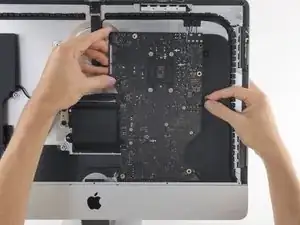
    • Inclina la parte superior de la placa lógica lejos del gabinete trasero.

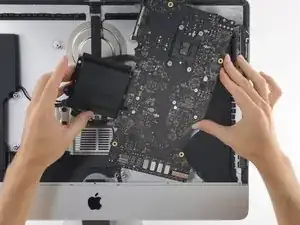
    • A medida que inclinas la placa lógica, tira del conector del altavoz derecho hacia la derecha y fuera del camino de la placa.

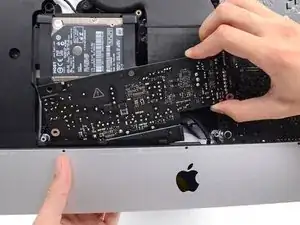
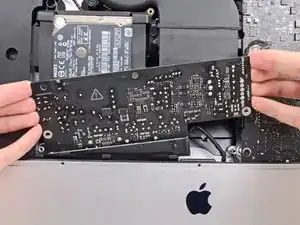
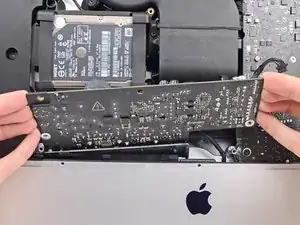
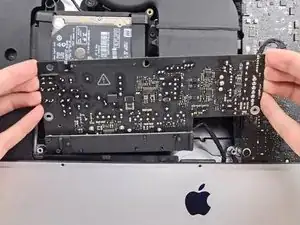
    • Levanta la placa lógica hacia arriba y hacia afuera del iMac.

    • Ten cuidado de no enganchar la placa en ninguno de los postes de tornillos del gabinete trasero.

    this would have been a great place to include a picture of the other side of the motherboard. to see the PCIe slot, for instance.

    David -

  61. u2UPTHWR5gKyRruS
    u2UPTHWR5gKyRruS
    ARGpUPRDrd2Iwpdp
    • Cuando vuelvas a armar tu iMac, ten mucho cuidado de alinear correctamente los puertos de E/S exteriores. La placa lógica puede quedar torcida incluso cuando está asegurada con todos sus tornillos.

    • Usa una unidad flash USB y/o un cable Ethernet para mantener la placa lógica asentada correctamente mientras aprietas los tornillos.

  62. mLsNcMalhlCnxHNA
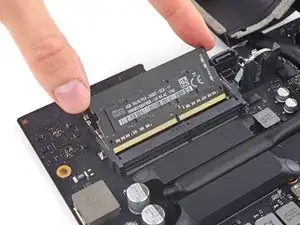
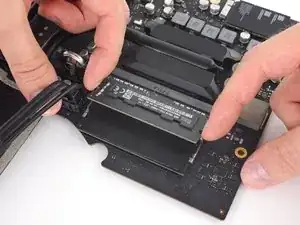
    • Manejando la tarjeta por los bordes, gira la tarjeta lógica al inverso para acceder a los dos modulos RAM.

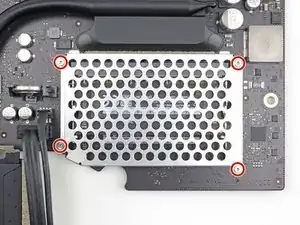
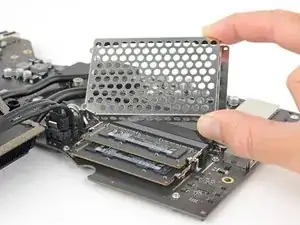
    • Utiliza un destornillador T4 Torx para remover los 4 tornillos de 2.4 mm que aseguran el escudo de la RAM.

  63. OqmtyDVWUlKBJoSD
    • Remueve el escudo de la RAM.

  64. ZKxSxjFeTTOmmaYM
    ZKxSxjFeTTOmmaYM
    2yMLSpJ2VQHUp3lq
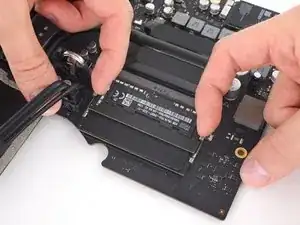
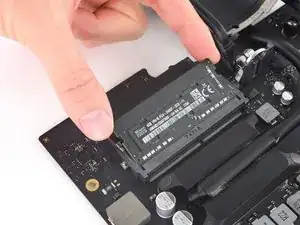
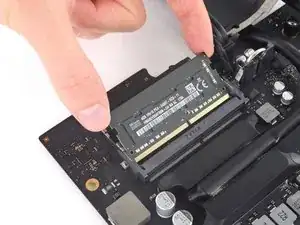
    • Dos seguros mantienen el modulo RAM en tu lugar, uno en cada lado. Usando tus dedos, separa los dos seguros contra el modulo RAM.

    • Cuando se libere, el modulo RAM se levantará con ángulo.

  65. B4tsnREY6owAwFWK
    B4tsnREY6owAwFWK
    AhC2KKyTOMlKA1SE
    • Levanta el modulo RAM a un ángulo cercano a 30 grados y deslícelo hacia afuera.

    • Al manejar el modulo RAM, toca los bordes exteriores solamente. Ten cuidado de no tocar los conectores color dorado en el borde de abajo.

    • Para instalar un nuevo modulo RAM, deslízalo en su lugar al mismo ángulo hasta que se ajuste y después presiónalo hacia abajo hasta que los dos seguros encajen en su lugar.

  66. Q5qRUpRGiNnfr3NO
    Q5qRUpRGiNnfr3NO
    TafYZvnpmvInGaPN
    • El modulo de RAM original más cercano a la tarjeta lógica puede contener una almohadilla térmica adherida a su lado superior (del lado contrario de la tarjeta logica, entre los dos DIMMs).

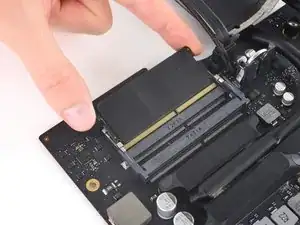
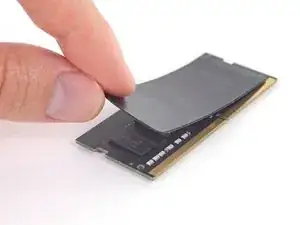
    • Si tu RAM incluye la almohadilla térmica, despréndela y transfiérela hacia tu RAM de reemplazo antes de instalarla en la ranura baja.

    I did this! and changed the HD to SSD. And it works much faster than before. I chose to just use some painters tap to temporarily hold the glass display in place while I tested the computer to make sure it worked fine. The only problem Ive had is some lagging and occasional temporary drops (a second at most) by the mouse. Could this be the result of anything I did? Maybe the antenna? My keyboard seems fine, so that seems to rule out a problem with the antenna, unless the mouse and keyboard use different parts of the antenna. Getting the antenna wires back onto those sockets before attaching the bracket was more difficult than these instructions make it seem.

    BRUCE CLARKE -

Conclusión

Compara tus piezas nuevas de reemplazo con las partes originales, puede que sea necesario transferir componentes restantes o remover protectores de adhesivo de la nueva parte antes de instalarla.
Para reensamblar tu dispositivo, sigue los pasos de arriba en orden inverso .
Lleva tus residuos Electrónicos a un centro de reciclaje certificado.
¿La reparación no salió como planeaba? Visita nuestra comunidad de respuestas para ayuda en la resolución de problemas.

Adam O'Camb

Miembro Desde 11/04/15

179525 Reputación

15 comentarios

I attempted this upgrade myself because iFixit labeled this as Moderate difficulty. The entire process took me seven hours from start to finish, and when I was done my computer would not turn on. I tried to do this repair myself because my local computer company wanted $400 to do this upgrade using Apple RAM, and I couldn’t afford that at the time. I had to take the iMac in to be serviced when it wouldn’t turn on, and the computer company just quoted me a price of $600 for a new logic board if it was damaged during the upgrade.

I am posting this to warn anyone else who is considering doing this upgrade to hire a certified technician. Do not go by iFixit’s difficulty rating. If you do, you may risk even greater expense if something goes wrong, like it did with my own attempt.

Perhaps iFixit should consider changing the rating on this task to Extremely Difficult, or Advanced, or LOL DON’T EVEN TRY IT to warn any other unsuspecting customers who are looking to save a little money.

Cecily Walker -

It is very likely you just missed plugging in the cable from the power button to the power supply. Very easy to do and very easy for the very small cable to slip behind the power supply and you never notice.

Always a good idea to check each step as you go and read the whole guide from start to finish before you start and also in the process of reassembly.

Charlie Nancarrow -

I did this in about 3-4 hours over a Saturday afternoon. I had previously done hard rive upgrades in a 2009 iMac and a 2012 MBP. I was encouraged by a tech friend and pored over the guide for a few times to get my courage up and then discussed the step by step with him first on a zoom call. The courage is required to remove the screen. After that the guide is very solid and clear and the steps are easy to comprehend though removing the power supply is a bit tricky and the microphone cable can be elusive. The only mistake I made is when reapplying the screen, having already checked function, I got into a sweat and banged to sick it on with the VDU cables not properly connected. I would recommend have some help for the screen re application and talk it through so you avoid that kind of schoolboy error. Having removed the screen and re-applied it I am very happy. A great guide.

Jon H Smith

Jonathan Smith -

Sehr gute Beschreibung, jedoch stellt sich mir eine Frage nach dem Wieder zusammen setzen benötige ich doch einen Vergleichsweisen Kleber der meinen Bildschirm auf den Rahmen setzt. Damit er nicht herunter fällt. Gibt es da welche zu kaufen oder hält das wieder von alleine?

Ich habe einen IMAC 4k 21´Zoll 2019 und möchte gerne Arbeitsspeicher und CPU tauschen.

Michael Meschenat -

id did it in 3,5 hours, no problems at all, everything works as described.

Josef Niggemeyer -

I used this instructions to upgrade my iMac with 32Gbytes RAM and 1Tbyte SSD. Everything went well in about 4 hours of hard work. You’ll need the right tools, adhesives to put the screen back and, above all, be very careful with the cables and the logical board, otherwise you’ll have a huge problem! May God bless who created this tutorial!!!! Thank you very much. By the way, fusion drive sucks!

Othon Batista -

Possibly a sad story, possibly a happy ending. I upgraded my iMac with an Intel i9 9000 CPU, 32 GB of ram and a 1Tb SSD - Not too difficult apart from the microphone cable which is a b*gg*r. I did shut down the computer (and disconnect the power supply 24 hours before attempting the upgrade. Knowing how one can ‘miss something, I initially assembled the computer screen and held it is place with masking tape so that I could check everything out. Started up first time and ran as sweet as a nut. Good - I obtained the official adhesive strips and this afternoon installed the screen permanently. Now it will not switch on (the computer starts OK with the Apple Hmmm sound). I have been really gentle with the display cables and now I am at a loss of how to proceed. Taking it to a local repair shop next week.

Rod Peel -

Reseat the cables, they can take an extra (very careful) nudge to really seat home and square.

Charlie Nancarrow -

Great guide! I replaced the fusion drive with an SSD in while I was in there, and this was a really pleasant repair. Having the ifixit opening tools and guide made it all go very smoothly. Thanks!

Mark Pruett -

This repair is cake. Changed the ram, hard drive and cpus in the last five iMacs. How come cpu switch isn’t on here?

blakebest -

Successfully used this guide, after using similar guides for a 2017 version of this iMac to replace both RAM and hard drive in both models. SATA SSD drive greatly improves speed of the machine. Having done this sequence of steps multiple times now, it does get easier each time. I have it down to about 1.5-2 hours now. I was a bit surprised, however, to find the RAM shield on this model (not present on the 2017 model), mostly because the tool required to remove it was not listed in the required tool list. Luckily I did have a T4 Torx in my toolbox so it did not cause a delay in completing the fix. (Tried to add it, not sure if my edit saved or not.) Thank you for this guide!

jan -

After having seen this very well illustrated guide and watched the very good video from OWC, what I can say is: God! Why the heck couldn't Apple's designers just provide a backdoor on the iMac to make upgrading RAM easier (like on some older iMacs)? We're talking about... RAM upgrade, not CPU upgrade! We miss those old Steve Jobs days so much!

Arty -

What kind of ram needs the Mac to upgrade it? Now I have 2x4GB but I want to upgrade to 16 or 32 because Photoshop doesn't run good with 8gb

Daniele Vecchi -

I try with crucial 2x16GB and corsair 2x32GB they are labled as mac memory. Owc is good choce too.

cumledomla -

Like first comment I made a mistake and my iMac not started .Re assembled it again 15 times changing ram in one place to other, old one, new one.Only original moduls working and top one .At last it was that slot near pcb was to tide and ram partly fitted. Even it locks at place needed some force to get inside. Finlay started and everything is ok. Just you may advise to look how deep is module inserted in slot.

What type of thermal pad is used between ram modules?

cumledomla -