Introducción

Esta guía solo demuestra como remover la unidad óptica.

El Xbox 360 esta diseñado para que la unidad DVD trabaje solo con con la consola en la que este instalada. Reemplazar la unidad DVD con una unidad DVD de reemplazo no funciona, ya que el reemplazo tiene una unidad llave de DVD diferente, la cual la consola no aceptará.

  1. yMUJPMnCJJuiSO6X
    yMUJPMnCJJuiSO6X
    14IrWYZVEVr1aEfS
    • Agarra el conjunto del disco duro y presiona el botón de liberación mientras levantas su borde delantero.

    • Quita el conjunto del disco duro de la ventilación superior.

    WARNING: Just replacing the drive will not make it work correctly. Microsoft has married the drives to the motherboard. Hence, in order to get full operation out of the drive you'll have to perform more steps not listed here. Search in the FAQ on this specific topic for more details. Otherwise, before buying a new drive, try cleaning the inside of the old one and/or replace the belt involved in opening and closing the drive door.

    - Good Luck

    Eric -

    Thanks..helped!

    joseph zulu -

    bress the button and lift with the same hand! i thought mine was stuck because of this pic!!!

    Maths with Luigi -

  2. J6CIpEaLOoYAQHxb
    • Pon la consola verticalmente con el borde inferior hacia arriba.

    • A lo largo del siguiente procedimiento de apertura, el dedo de una herramienta de apertura de Xbox 360 se puede usar en lugar de un spudger.

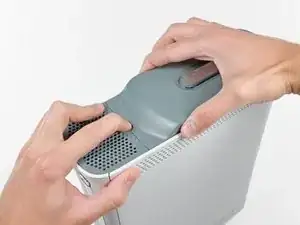
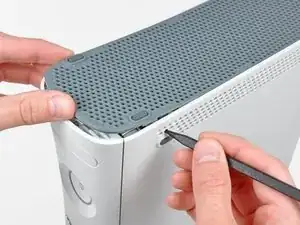
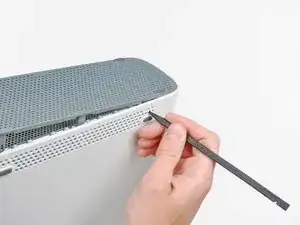
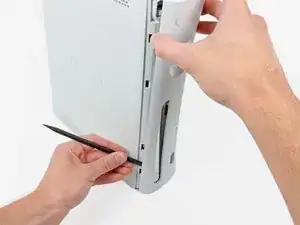
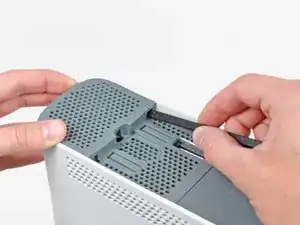
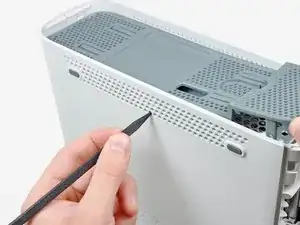
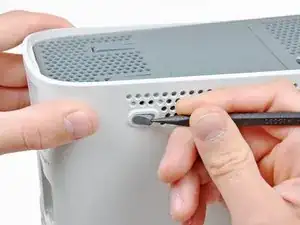
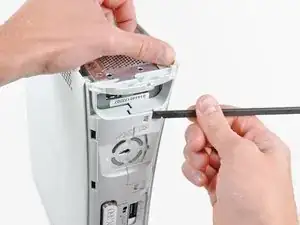
    • Inserta el extremo plano de un spudger o el borde de una herramienta de apertura de Xbox 360 en el pequeño hueco en el borde frontal de la ventilación inferior.

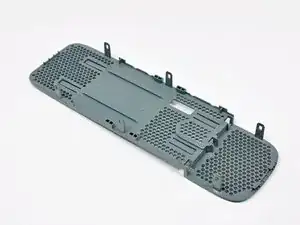
    • Levanta el borde frontal de la parte inferior de la ventilación de la placa frontal.

    You can avoid this step by pulling the front cover off. Just make sure you don't break the springs for the USB bay area.

    Repair Doctor -

    Hello, thank you ifix for this guide, I followed this guide, I got stuck at some point but I resolved it. Also I want to share this resource: Step by Step guide to fix Xbox 360 errors it helped me go through all the things associated with Xbox 360 and the troubleshooting of errors. Hope this can also help you all.

    Christopher Sage -

  3. ELe3ImNHnfjH5CMS
    ELe3ImNHnfjH5CMS
    XlYWdcnwtOrB1W3S
    NJBPRBLSExTr3Den
    • En los siguientes pasos, usarás la punta de un spudger o el dedo de una herramienta de apertura de Xbox 360 para liberar los clips a lo largo de los lados izquierdo y derecho de la ventilación inferior. Sus posiciones están resaltadas en rojo.

    • Insertarás la herramienta en los agujeros hechos en las piezas de la carcasa lateral de plástico blanco,

  4. MacUdYZ1EwkBWQmW
    MacUdYZ1EwkBWQmW
    kL3iWK2V1YIMoyBX
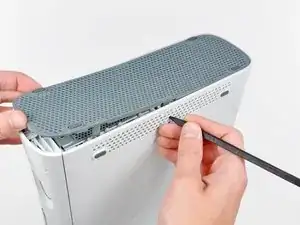
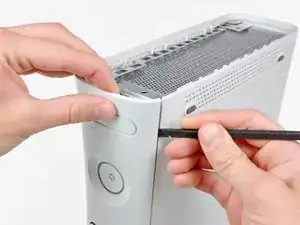
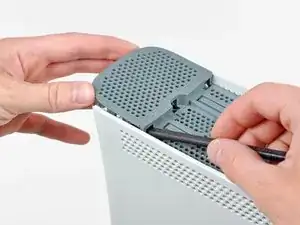
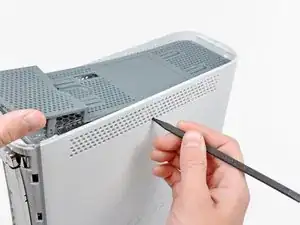
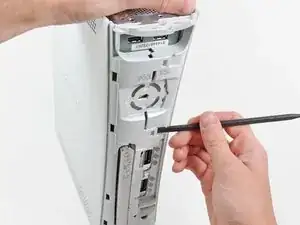
    • Para soltar los clips, trabaja desde el borde frontal de la ventilación inferior.

    • Mientras levantas ligeramente el borde frontal de la ventilación inferior, usa la punta de un spudger para empujar los clips lo más cerca del frontal de la ventilación inferior hacia adentro de la consola.

  5. vPypAIcA45sMw4Y4
    vPypAIcA45sMw4Y4
    o6vXGPFRiS5OhrXC
    • Repite el mismo proceso para soltar los clips centrales de la ventilación inferior.

  6. HS2EJegmA2DGOAE1
    HS2EJegmA2DGOAE1
    3VgWioIEgIExHeDa
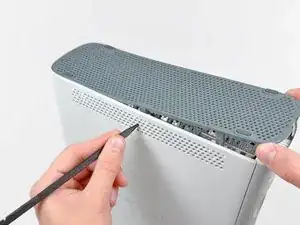
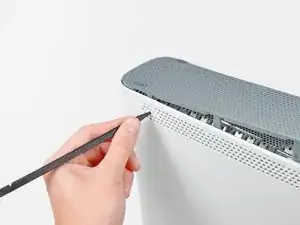
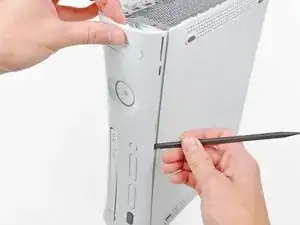
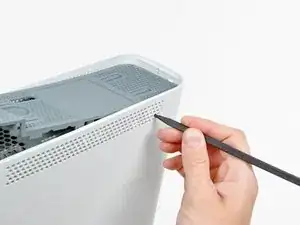
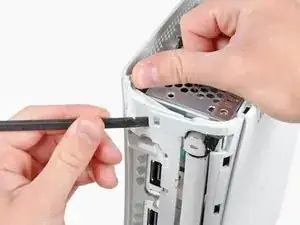
    • Usa la punta de un spudger para soltar los clips en la ventilación inferior muy cerca de la parte trasera de la Xbox.

  7. IIcCSDqQGMSuBFJW
    • Quita la ventilación inferior de la 360.

  8. K34QYfxVrrftatym
    K34QYfxVrrftatym
    ytuwV2efqMfxRndW
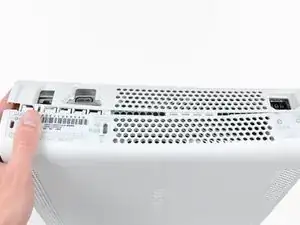
    • Inserta el extremo plano de un spudger entre la placa frontal y la carcasa exterior cerca del botón de encendido.

    • Pasa el spudger por el borde de la placa frontal para liberar los clips que lo sujetan al frontal de la consola.

    • También puedes realizar esta tarea utilizando el borde de la herramienta de apertura de Xbox 360, pero puede rayar la carcasa de plástico.

    • Alternativamente, puedes usar tus manos para quitar con cuidado la placa frontal de la Xbox.

    The faceplate just pulls off, using a tool is completely unneccessary. https://beta.support.xbox.com/help/xbox-...

    Erik Tomlinson -

  9. xM4CxhxJnIT4eHCA
    • Repite los mismos movimientos que se mencionaron anteriormente para liberar el lado izquierdo de la placa frontal.

  10. uqjqI2HkmxeYCGNH
    • Quita la placa frontal de la cara frontal de la consola.

  11. HMMFtOmkPd6YTvo4
    HMMFtOmkPd6YTvo4
    CM3dOusgANm2syl1
    • Pon la consola en vertical con el borde superior hacia arriba.

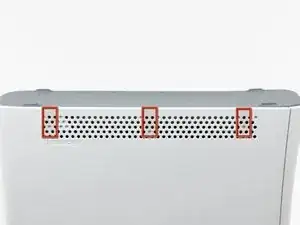
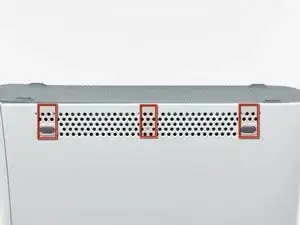
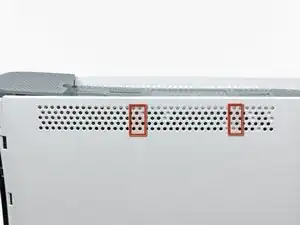
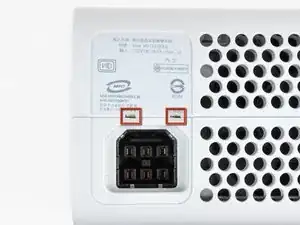
    • La ventilación superior está sujeta a la consola con clips. Los dos primeros clips están debajo de la ventilación superior, lo más cerca de la placa frontal, como se muestra en las fotos.

  12. hLQONPwYWw5wwuku
    hLQONPwYWw5wwuku
    vG3S2NKpGQNSJi2m
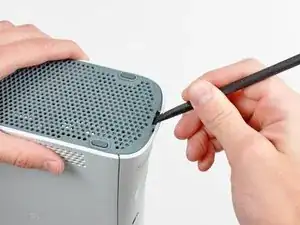
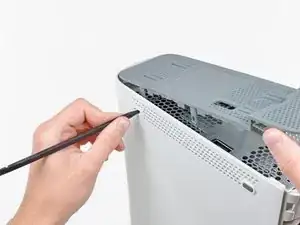
    • Inserta el extremo plano de un spudger en los pequeños huecos previamente mencionados para soltar los clips.

    • También puedes usar el dedo largo de una herramienta de apertura de Xbox 360 para lograr esta tarea.

    I found it easier to open these clips using the pointy end of the spudger rather than the flat end. Just slide it in against the side of the case and the clip will pop off.

    dave -

  13. Jcd3cuuefWPTrKGO
    Jcd3cuuefWPTrKGO
    ESFwEvEAkCyE1Y51
    GHihpIrQVQUlSBCN
    • En los siguientes pasos, usarás la punta de un spudger o el dedo de una herramienta de apertura de Xbox 360 para liberar los clips a lo largo de los lados izquierdo y derecho de la ventilación inferior. Sus posiciones están resaltadas en rojo.

  14. cLODuehWcnPCYpHx
    cLODuehWcnPCYpHx
    ZNDntxLmkPnmgeDd
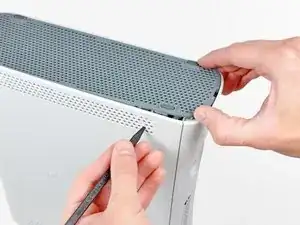
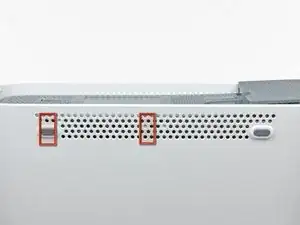
    • Para soltar los clips, trabaja desde el medio de la ventilación superior.

    • Mientras levantas ligeramente el borde frontal de la ventilación superior, usa la punta de un spudger para empujar los clips lo más cerca del centro de la ventilación superior hacia adentro de la consola.

  15. 3NS6J5nJKAOQxDdZ
    • Usa la punta de tu spudger para soltar el clip en la ventilación superior más cercana a la parte posterior de la carcasa superior de la Xbox.

  16. satartHPCh3cCoKK
    satartHPCh3cCoKK
    pfYZbHEZFGAGpkAw
    • El último clip está oculto debajo del pie de goma más cercano a la parte posterior de la consola.

    • Usa la punta de tu spudger para soltar el clip en la ventilación superior más cercana a la parte posterior de la Xbox.

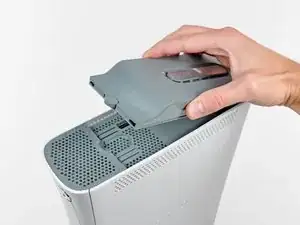
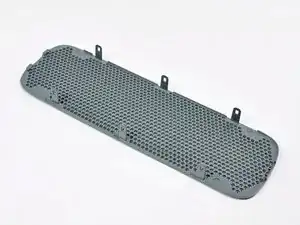
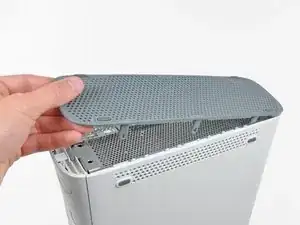
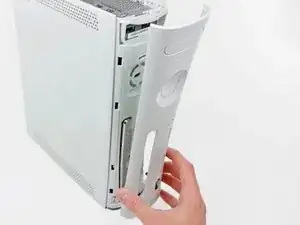
    • Quita la ventilación superior de la 360.

  17. IyFVa2YVF16dYNPr
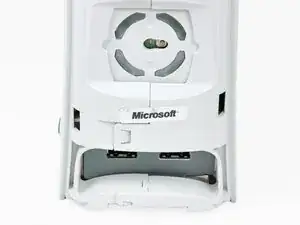
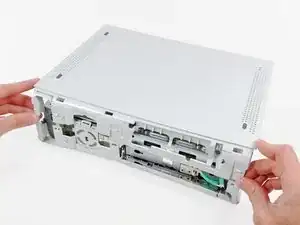
    • Pon la consola en vertical con el borde superior hacia abajo.

    • Con cuidado quita la etiqueta de la garantía de la consola.

    There is an alternate to breaking the seal. If you open the back first starting with the opposite side of the sticker you can get the rear to "Clam Open" retaining the seal.

    Eric -

    LOL “Romove the warenty seal”

    Alexander Wiand -

  18. bfLLW2eb1mul2OvC
    bfLLW2eb1mul2OvC
    nGyMgcPrm6q5alKf
    PatF4YGqcIFHXTGM
    • Las carcasas superior e inferior se sujetan con varios pestillos, localizadas en la parte delantera y trasera de la consola. Estos pestillos deben ser desenganchados para separar la carcasa superior de la consola.

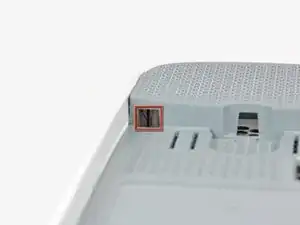
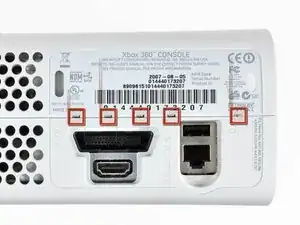
    • Usa el extremo plano de un spudger para soltar los siguientes pestillos:

    • Encima de los puertos USB delanteros.

    • Debajo de los puertos USB delanteros.

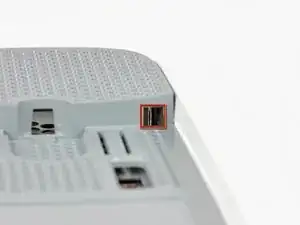
    • Encima de las ranuras de la unidad de memoria.

  19. 3xXd6DhVwt4ibPIW
    • Inserta el extremos plano de un spudger y haz palanca hacia arriba para soltar el último pestillo localizado encima del botón de ejección.

  20. G54PXDV62XGnhhuV
    • Levanta ligeramente la porción frontal de la carcasa inferior para asegurar que las pestañas en el frontal se han solatdo completamente.

  21. xCaY2FIFFFI4Isfv
    xCaY2FIFFFI4Isfv
    RSrCtVYWkTQCbQaq
    • Las carcasas superior e inferior se sujetan juntas por siete pestañas localizadas en la parte trasera de la consola. Sus posiciones están resaltadas en rojo en la foto.

  22. Yujni1lYPGpADBlS
    Yujni1lYPGpADBlS
    kOdJT5HjlrWoW44h
    FaKq6NRVtQOZjelM
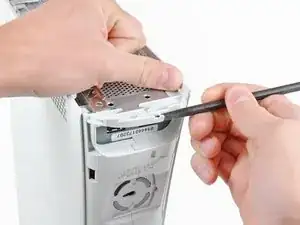
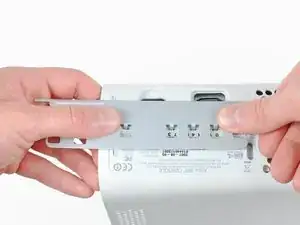
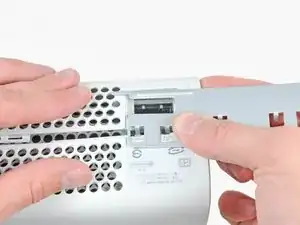
    • Presiona la herramienta de apertura de la Xbox 360 en las pestañas que sujetan la carcasa inferior a la carcasa superior cerca de los puertos de E/S.

    • Mientras presionas hacia abajo la herramienta, separa las carcasas inferior y superior para liberar las pestañas restantes.

    I didn't have an XBox tool, so I followed instructions in this video for this step (https://www.youtube.com/watch?v=qaxIB6cX...) to pry it open with your fingers and a screwdriver.

    Nick Karnik -

    The small (metal) women's hair clip is best for un-latching the tabs. The screw drivers just make the holes bigger.

    Denny Ross -

    You can also use the pointed end of a plastic spudger to push each clip free while you separate the case with your free hand.

    Michael Carson -

  23. IAAAOka4GMbPLtIU
    IAAAOka4GMbPLtIU
    r1n4vHDX1G6iMJg5
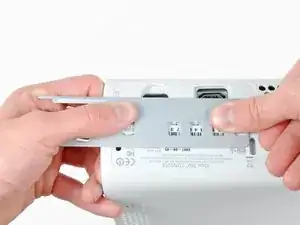
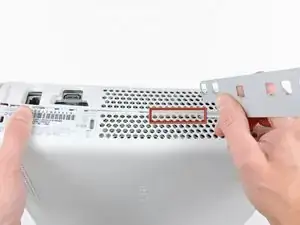
    • Mientras separas las carcasas superior e inferior, usa la punta de un spudger o el dedo de una herramienta de apertura de Xbox 360 para empujar la pestaña larga resaltada en rojo hacia el centro de la 360.

    • La pestaña debería soltarse, dejando las pestañas cerca del conector de corriente como la única parte que sujeta las carcasas superior e inferior juntas.

  24. ONLOcaEGdYN5F5XJ
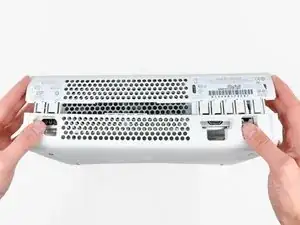
    • Empuja la herramienta de apertura de Xbox 360 hacia abajo en las dos pestañas que quedan cerca del conector de corriente.

    • Separa las carcasas superior e inferior para soltar completamente las pestañas restantes.

  25. jrKfppdCFKeYeJTs
    • Orienta la consola para que la porción frontal mire hacia abajo.

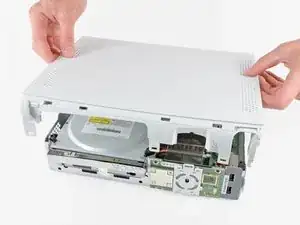
    • Agarra la porción trasera de la carcasa inferior y levántala hacia arriba para separarla de la consola.

    • Ten cuidado de no doblar demasiado la carcasa inferior cerca del enchufe de corriente, ya que se puede partir fácilmente.

  26. vKpq2mTLPKe6FEdf
    vKpq2mTLPKe6FEdf
    hPMYNsCmxTPh1auj
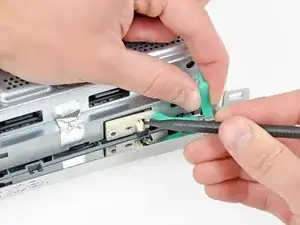
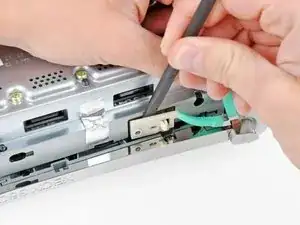
    • Usa la punta de un spudger para soltar la pestaña que sujeta el botón de eyección a la carcasa de metal.

    • Inserta el extremo plano de un spudger entre el botón de eyección y la unidad óptica

    • Apalanca el botón de eyección de sus postes de sujeción y quítalo de la 360.

    • Esto también se puede hacer usando la herramienta de apertura de Xbox 360.

  27. xWrVtTRiATabXKR5
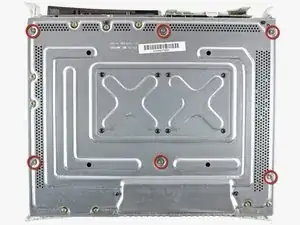
    • Quita los seis tornillos plateados T10 Torx de 64 mm que sujetanla carcasa superior a la carcasa de metal.

  28. xK4P5MWDdRargYm4
    • Orienta la consola para que la carcasa superior mire hacia arriba.

    • Levanta la carcasa superior hacia arriba y quíatala de la consola.

  29. MZPUUJVPxxANUeoT
    • Quita la cinta de metal que sujeta la unidad óptica a la carcasa de metal.

    Does anyone know if the Silver Tape is Lead Tape?

    Sean -

  30. ZtSZCTiWnI1mFySC
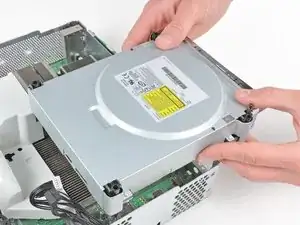
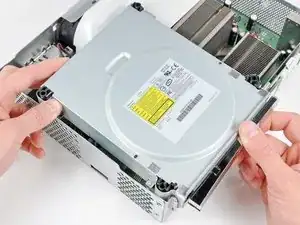
    • Levanta ligeramente la unidad óptica para poder acceder a desconectar los conectores SATA y de alimentación localizados en la parte trasera de la unidad óptica.

    • No intentes quitar la unidad óptica completamente aún. Dos cables aún la conectan con la placa base.

  31. aP5BgixloKHsaQOB
    aP5BgixloKHsaQOB
    bFYsJNjL6UUJtumE
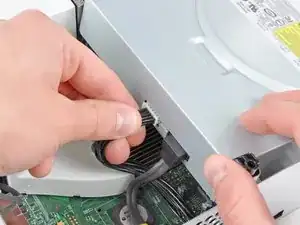
    • Agarra el conector de alimentación por sus cables y tira recto hacia afuera de su zócalo en la unidad óptica.

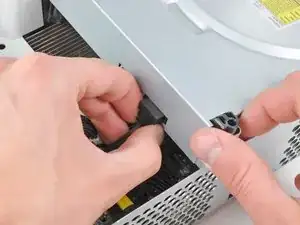
    • Desconecta el conector de datos SATA de su zócalo en la unidad óptica tirando de manera recta.

    I found the power cable to be very tough to get out, at least it is the first time doing this.

    Nick Flacco -

  32. NlR5YgLZKUOY6y2G
    • Saca el conjunto de la unidad óptica de la carcasa de metal.

    Be careful not to lose or break the two teeny metal clips securing the optical drive assembly snugly to the metal casing on either side of the drive's front face. I used a spudger to press in the topmost tines on these clips because they were catching on the drive and bending up. The clips should stay on the metal housing, not come off with the drive.

    Vaughn Baker -

  33. cQCjShViScyHMfJf
    cQCjShViScyHMfJf
    sLNNFLmrJAXxqRSK
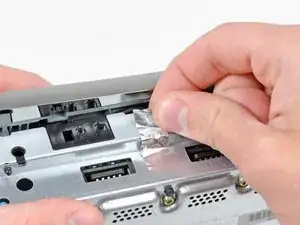
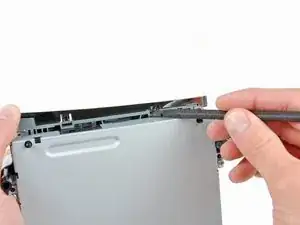
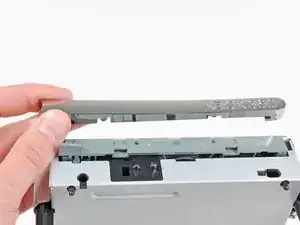
    • Mientras presionas la cubierta de la unidad óptica hacia la cara frontal de la unidad óptica, usa la punta plana de un spudger para soltar los dos clips de retención en el lado inferior de la cubierta.

    Ignore this step.

    Wade -

  34. MDY1gUIs1fcEEWLx
    • Remueve la cubierta de la unidad óptica.

    • Solo queda la unidad óptica.

    Ignore this step.

    Wade -

Conclusión

Para reensamblar tu dispositivo, sigue estas instrucciones en orden inverso.

Walter Galan

685928 Reputación

23 comentarios

who knows xbox360 can use desktop drives?We have all kinds of drives,but i am not sure if it is fit for xbox360.

Thanks

Rex Yang -

That has nothing to do with this guide. If you have any question regarding this equipment, go to the answer section.

oldturkey03 -

General comment, you make no mention of removing the PCB from the DVD drive if it's being replaced. Any particular reason for that?

Pete B -

Very easy to follow, got my drive fixed...thanks!

Brian Davis -

" Replacing a defective optical drive with a replacement optical drive does not work. The replacement will have a different DVD drive key, which the game console will not accept."

Not entirely accurate, that statement.

Having fixed a PS3 blu-ray drive by following the excellent guide on here, tried the same technique.

I had a bad drive in my xbox, and I replaced it with a new drive (of the same type). I took the daughter-board from the faulty drive and transplanted it to the good drive. It involved stripping down both drives, disconnecting 2 ribbon cables and unsoldering about 8 wires, transplanting the daughter-board - and resoldering the wires. Then reassembling. It worked for me, anyway.

Dave -

Sounds like an extremely patience depleting process.

brandonowlgarden -

I did this once on one of the newer 360s that are more basic, with help from someone , using scissors.

brandonowlgarden -

I am getting the famed red ring of death now...it there any troubleshooting I can do to fix this? I followed all steps and made sure that each wire mirrored the old unit.

Dereck Reeves -

you actually can swap the drives out pretty easy. you just rip the key off of the old drive and flash it on the new one. you have to make sure you purchase the same drive model and the use jungle flasher. would they allow an extraction and flashing guide on here? and while you are at it, you can mod them pretty easy as well ;)

daniel sawyer -

How come you do not have the instruction for replacing the laser?

CesarHEB -

How come Ifit it does not have intructions for replacing the XBOX360 LASER?

CesarHEB -

Because, You cannot replace the laser without replacing the drive. It is not possible to replace the laser.

brandonowlgarden -

No instructions on how to replace the PCB or what kind of drives there are?

xChrisS41x -

Great instrucitons

Thomas -

So easy a GIRL can do it! Thanks!

Lynn Sailor -

This guide is incomplete thus the pictured console wont work upon drive replacement. Please finish the steps for flashing for they are a very required step in replacing the drive at all.

Wayne Urban -

Author just ended the repair when there were more steps needed lol. I have done so many of these repairs and it shouldn’t be in the difficult section. If the PCB is ok, just swap it into a different drive deck you know that works. If your PCB is broken , you will need an X360 USB Pro and 3rd part software to extract the key and flash it and original firmware to the new PCB. I should update this tutorial for it is pretty weak.

toreskey -

What kept you from fulfilling your proclamation?

Kai und der Andere -

I realize my 360 is old but I cannot afford to replace it with the one. I replaced the dvd drive and same wont read problem, so I swapped the old board with the new and verified it is the board that is bad, not the drive itself.  Now what do I do? Give up and scrap it? How expensive is the fix to replace the board? Are the parts still available? Im not concerned with the technical difficulty.

Kevin InFlorida -

This guide sucks. He says you cant swap the disc drives without the logic board or it wont work. Then proceeds to swap the drive but doesnt actually show anything about swapping boards too lol

So people will follow this guide and miss a huge key part, thus ending with a nonworking disc drive lol

Crap guide.

gameskeet -

It's right there in the header section. It literally says that this guide is ONLY about taking out (and in reverse order putting back in) the optical drive and that, for a new drive to work, it wont work without extra steps. So only very inattentive people will end with a nonworking drive.

But instead of contributing and adding a corresponding guide on how to exchange the logic board in the drive you chose to nag and have a whinge.

Crap comment.

Kai und der Andere -

Thank you so much. I was able to fix my Xbox 360

Kimberly StClair -

You will have to transfer the daughterboard.

PRAM Colfax -