
Introducción
Reemplazar la batería en tu Fairphone 2 es fácil y no requiere herramientas.
Partes
-
-
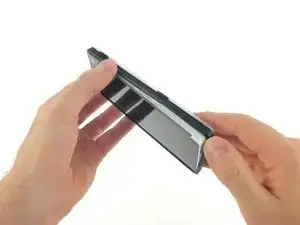
Solo despega la tapa trasera comenzando en una de las esquinas y sigue por todo alrededor.
-
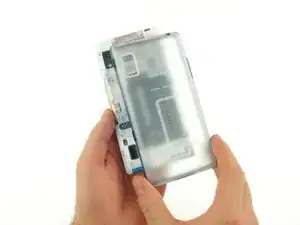
Saca la tapa trasera.
-
-
-
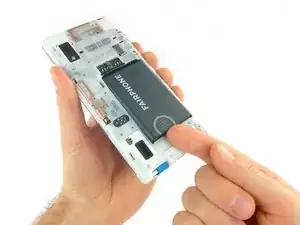
Empuja la batería hacia la parte superior del teléfono.
-
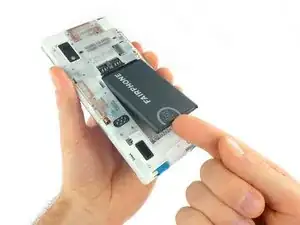
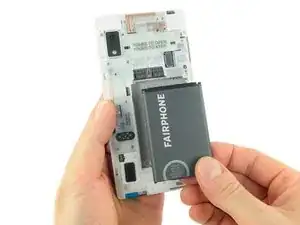
Tira la batería hacia afuera del teléfono.
-
Conclusión
Para volver a ensamblar tu dispositivo, sigue estas instrucciones en orden inverso.

Un comentario
It's not necessary to remove the rim unless you are to do more than just replace the battery.
It would be good to start by saying, “Switch off the phone,” as most owners won't be accustomed to disassembling electronic devices.
My cover is broken - the rubber is lifting from the hard plastic. What can I do? Where can I purchase replacement cases? Perhaps the iFixit app could affiliate with the parts suppliers and host a link for when parts go missing or broken.
Osh Gates -
Thanks for the hint. We added a link to the spare part directly from Fairphone (also for all the other guides and parts). Be aware that Fairphone only ships to European continental countries as stated on their page: https://support.fairphone.com/hc/en-us/a...
Tobias Isakeit -
It wasn’t obvious that the outer rim of the cover alaso need to be unclipped after the back cover was removed.
Once I did that, everything was easier.
Stephen Morton -
It wasn’t obvious that the outer rim of the case also needed to be removed. Once I worked this out, everything was much easier.
Stephen Morton -
I am with Stephen Morton. I didn’t understand that there was an independent rim, but once I saw Stephen’s comment, it was quite easy. I think you should add this as a stage in this process.
M ichael Cross -
The image is misleading. The black rim and the back cover are two different items and do not come out together. The first to be removed is the back cover, here the transparent item, and then remove the black rim in the opposite direction as the back cover. Please fix the image, as it can be risky to try to do it as shown.
Domingo Alvarez Mendez -
I’ll add to what other people are saying, trying to raise the topic for a change. You cannot remove the cover as a whole, it has two pieces that must come separately.
Aloïs Glibert -
The above confusion comes from the fact the picture shows the original 1-piece cover with a soft rubber rim, whereas all recent FP2 are sold with the new slim cover that comes in 2 part : first remove the back, then the front part. Hope this helps!
-> the pictures should be updated as they are not accurate for new users most probably needing the help now
tonidekohlanta -
We have a separate guide for replacing the slim case version of the back cover / bumper. You can find it here: Reemplazo de la carcasa fina de Fairphone 2
Tobias Isakeit -