Introducción
Esta guía de reparación fue creada por el personal de iFixit y no ha sido respaldada por Google. Obtén más información sobre nuestras guías de reparación aquí.
Utiliza esta guía para reemplazar la batería en su Google Pixel. Con el uso diario, una batería típica durará entre 18 y 24 meses antes de perder una capacidad significativa. Si necesitas recargar tu teléfono constantemente o se apaga sin previo aviso, cambiar la batería podría ser la solución que necesitas.
Cuidado: Debido al fuerte adhesivo que mantiene la pantalla en su lugar, el espacio mínimo para las herramientas de apertura y el alto calor necesario para fundir restos de adhesivos, hay una alta probabilidad de que dañes tu pantalla durante el proceso. A menos que también quieras sustituir la pantalla junto con esta reparación, trabaja con muchísimo cuidado y prepárate para sustituir la pantalla, en caso de que algo no funcione bien cuando vuelvas a colocar todo en su sitio. Sigue las instrucciones al pie de la letra y ten en cuenta todos los avisos que se indican para aumentar la probabilidad de que todo vaya bien.
Antes de desmontar el teléfono, descarga la batería por debajo del 25%. Una batería de iones de litio puede incendiarse y / o explotar si se perfora accidentalmente. Si tu batería está hinchada, toma la precauciones apropiadas.
-
-
Apaga el dispositivo
-
Prepara un iOpener para calentar las esquinas de la pantalla y ablandar el adhesivo de debajo. También puedes usar una pistola de aire caliente o un secador
-
-
-
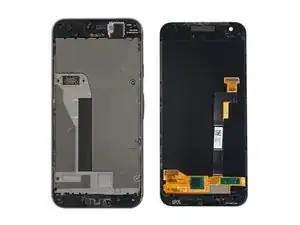
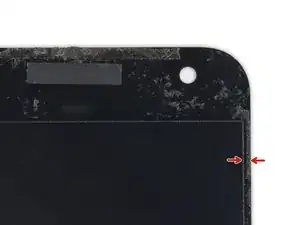
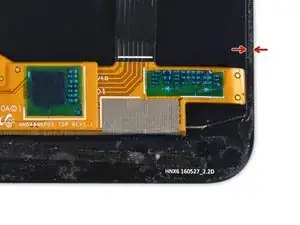
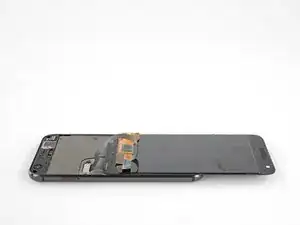
Como referencia, la parte posterior del panel de visualización se muestra a la izquierda. Observe el estrecho espacio libre entre el lado de la unidad de pantalla y el panel OLED. (Los biseles indican este espacio en el frente).
-
-
-
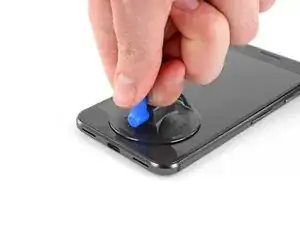
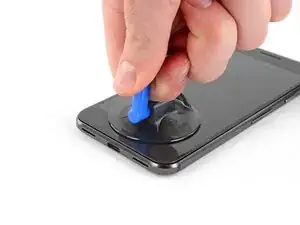
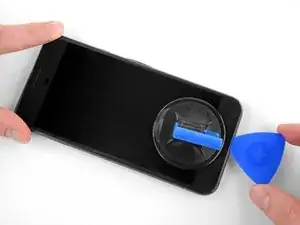
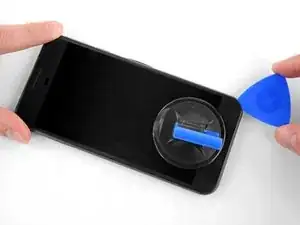
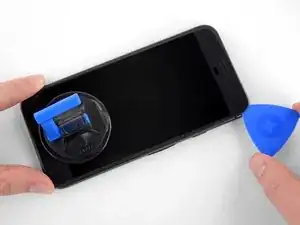
Usa una manija de succiónpara levantar la pantalla y crear un pequeño espacio entre la pantalla y el chasis del teléfono.
-
Es posible que debas aplicar más calor si esto no aparece. No te impacientes, esto llevará tiempo. Una vez que puedas insertar suavemente una herramienta en el espacio, continúa con el siguiente paso.
-
-
-
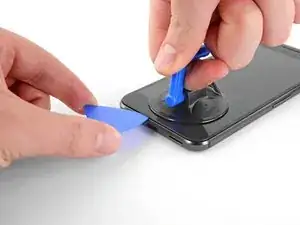
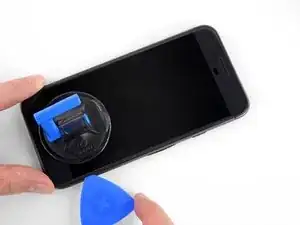
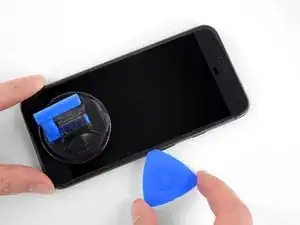
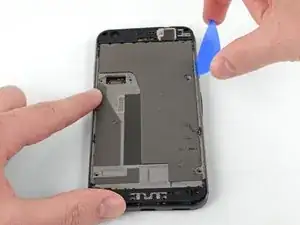
Inserta un púa de apertura o una tarjeta de juego en el espacio entre el chasis y el ensamblaje de la pantalla.
-
Comienza a deslizar la púa de apertura alrededor del borde de la pantalla, cortando el adhesivo que lo asegura.
-
-
-
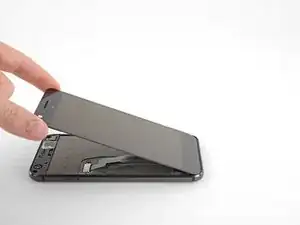
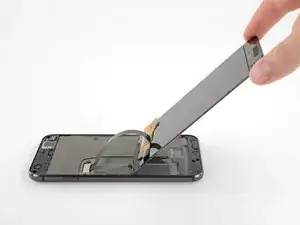
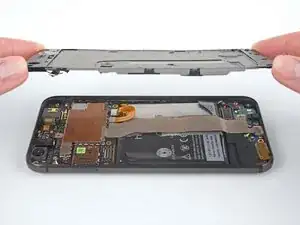
Con el corte adhesivo, levanta lentamente la pantalla desde la parte superior (el lado con el recorte de la rejilla del altavoz), gírala cuidadosamente verticalmente hacia la parte inferior del dispositivo y colócala sobre su cara, como se muestra.
-
-
-
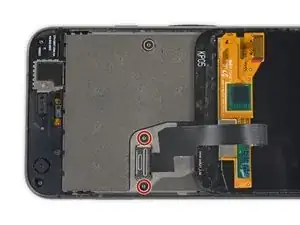
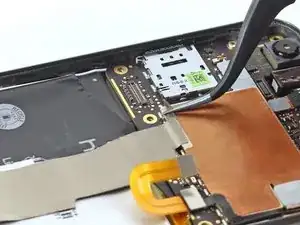
Usa un destornillador Torx T5 para quitar los dos tornillos negros T5 de 3.5 mm que sujetan el soporte del conector del cable de la pantalla.
-
-
-
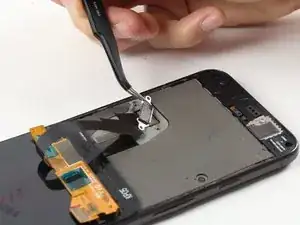
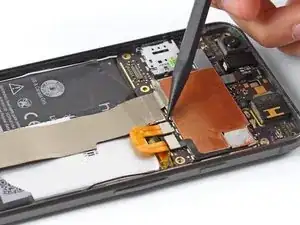
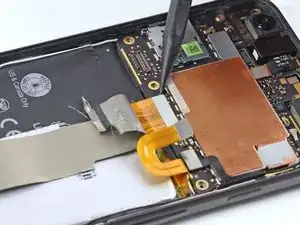
Usa pinzas para quitar el soporte que sostiene el conector de la pantalla en su lugar.
-
Esto es solo una pieza de metal y debería salir muy fácilmente. (El cable se retira en el siguiente paso).
-
-
-
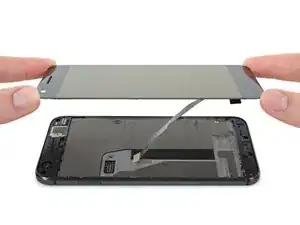
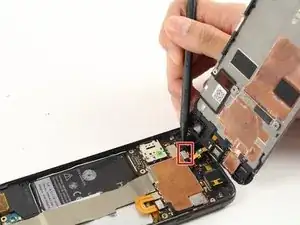
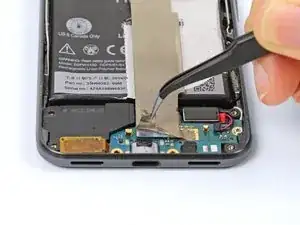
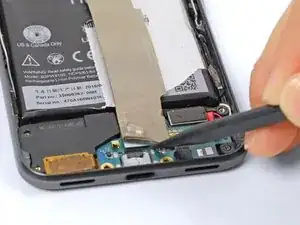
Usa un spudger para levantar el conector del cable de la pantalla, liberando la pantalla.
-
No fuerces este tipo de conector en su lugar, ya que puede dañarse. (Necesitarás sentir un ligero chasquido, pero la fuerza más allá de esto dañará permanentemente su conector).
-
-
-
Quita la pantalla
-
Durante el proceso de arranque después del reensamblaje, la pantalla pasará por una secuencia de calibración. No toques la pantalla durante este proceso, ya que podrías provocar una calibración táctil incorrecta y crear problemas táctiles.
-
-
-
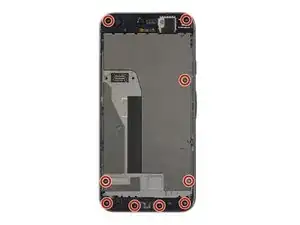
Usa un destornillador Torx T5 para remover los nueve tornillos de 3.5 que aseguran el marco medio.
-
-
-
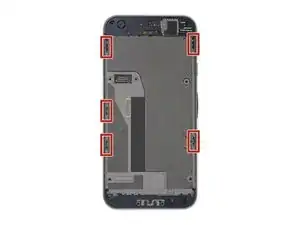
El marco medio está retenido herméticamente en su lugar por cinco clips. Para liberar esos clips, aplica presión internamente con una herramienta de apertura como se muestra en los pasos de abajo.
-
-
-
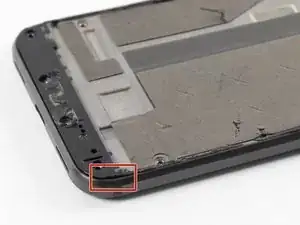
Introduce una púa de apertura dentro de la muesca que está localizada en el borde inferior derecho del teléfono.
-
-
-
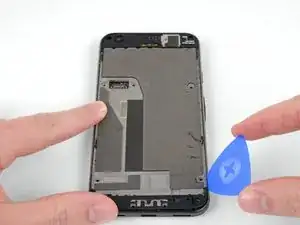
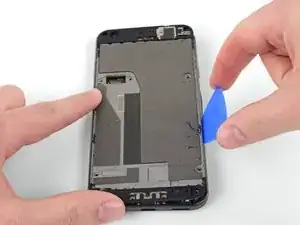
Desliza la púa de apertura hacia arriba en ambos lados del dispositivo en el espacio pequeño entre el marco medio y la carcasa posterior para liberar los clips que lo mantienen en su lugar.
-
-
-
Usa un spudger para levantar el conector del cable del auricular hacia arriba, desconectándolo de la placa base.
-
Remueve el marco medio del dispositivo.
-
-
-
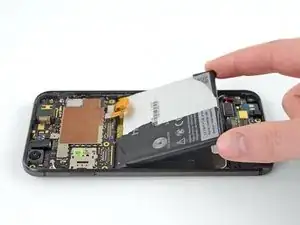
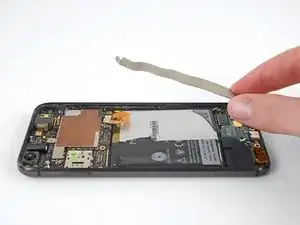
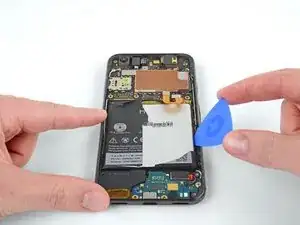
Con unas pinzas, despega la tira plateada que corre a lo largo de la batería para dejar al descubierto el conector que se encuentra debajo.
-
-
-
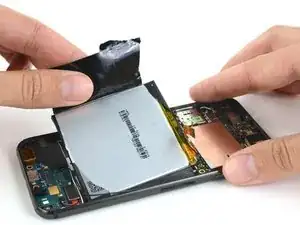
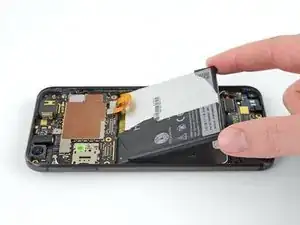
Quita la bateria.
-
Retira el adhesivo restante del teléfono y limpie las áreas que tengan pegamento con alcohol isopropílico y un paño sin pelusa.
-
Asegura la nueva batería con adhesivo precortado o cinta adhesiva de doble cara. Aplica el nuevo adhesivo al teléfono, no directamente a la batería.
-
Presiona la nueva batería firmemente en su lugar durante 5-10 segundos.
-

Compara tu nueva pieza de repuesto con la pieza original, ya que es posible que tengas que transferir los componentes restantes o eliminar los soportes adhesivos de la nueva pieza antes de instalarla.
Para volver a montar tu dispositivo, sigue los pasos anteriores en orden inverso.
Después de completar esta guía, calibrar la batería recién instalada.
Lleva tus desechos electrónicos a un centro de reciclaje certificado.
¿La reparación no salió según lo planeado? Consulta nuestra comunidad de respuestas para obtener ayuda para la resolución de problemas.

72 comentarios
I doubt many people can get past step 1 without it being game over. Take special care, read the comments, and other guides as well.
I broke mine too. Not the glass but the display panel underneath.
For those who are going to try opening theirs: pay extreme attention to the fact that the display panel extends somewhat beyond the bottom edge of the visible part of the display where the cable connects and, if that wasn’t bad enough, the bottom bezel has a !&&* of a lot adhesive on it. Don’t insert plastic opening tools on the bottom corners - if you do that, you will damage one of the unprotected corners of the panel like I did. If I had to do that again, I’d probably start from the top edge instead.
The new screen ended up costing me the equivalent of $80, and I was surprised I was able to walk into a store and buy one at all in a country where Pixel was never officially available in the first place. They didn’t have white ones in stock so I went with a black one.
Same. Even when being warned and trying to be super careful.
Another trashed screen. This phone is a difficult one if you have not done one before. I would recommend not even bothering with prying under the sides and just concentrate on the top and bottom. The edges only allow about 2mm at most before you run into the LCD.
Tyler -
+1. Don’t bother trying to save the screen. Just save yourself the stress and buy a new screen on ebay for $35 before you begin. I have never botched a repair and I still managed to break my display on this. Yes, I was super careful, it took me like 45 minutes to finally get the display loose, and when I put it all back together, the display was totally dead.
At today’s pricing just buy a new screen and be done with it.
Jon -
I took mine apart again today because my second battery stopped holding a charge after 1.5 years (also I played too much Pokemon Go) and buying a new phone in 2020 feels like a downgrade. This time I was able to remove the display intact. Took my time, used a hair dryer for heat and pieces of thin cardboard to separate. Also the fact that I probably didn’t do a decent enough job of gluing it down the last time helped.
Success! I was able to replace the battery in my pixel although it took much longer than expected. I highly recommend using a playing card (or several) to cut through the adhesive as it can fairly easily bend around the fragile components. Patience is needed as it took me nearly an hour to get the screen off, reheating, gently prying and cutting with the card. Once past the screen it was fairly straightforward despite the pre cut adhesive being too long. The adhesive comes back into play during the reassembly prep as it took at least half an hour to remove the old adhesive and prep for the new. Be aware that the foam on the mid frame is alcohol soluble and will dissolve on contact. The new adhesive for the screen took some gentle massaging to line up but ultimately went on without much fight. All back together, it works (hopefully with renewed battery life). I would say allocate at least 2 hours unless you’ve done it before.
josh9623 -
This took me about 2 hours. I was very, very careful, and it was a success! No broken screen.
When reassembling, does the adhesive still hold the phone together when closed or do we need to apply more adhesive?
Jess Haddow -
Step 10 addresses this: there should be a plastic sheet that looks like your screen in the repair kit. This is the new adhesive for reassembly.
Peter Karski -
Unfortunately also cracked my display on the way in. You have to go pretty deep under the top and bottom of the screen but BARELY in around the sides, especially the corners. If I had to do it over again, I would have either tried a playing card or put some type of depth limit/mark on my pick so I didn’t go more than a few millimeters in.
Matthew Jastremski -
Use plenty of heat here and take your time. Start from the top, then the sides. use a gentle prying motion with the picks but don’t go too deep.
Richard Wood -
It’s EXTREMELY easy to crack the screen. Just buy a new display module before fixing it. The old screen will be disposable.
Buyi Yu -
Don’t even waste your time with the iOpener. I went straight for the hair dryer and opening picks took 30 mins to get the screen off with no issues.
eric duchene -
Hair dryer worked for me, thanks!
David Gault -
As others have said, the iOpeners didn't work for me at all. I tried microwaving, I tried boiling, but even when the iOpener was too hot to touch the phone didn't get that hot. A hair dryer eventually worked, but took a long time too, and I had to pull quite hard (similar to pulling on a really stuck LEGO brick, I was surprised my screen didn't crack). I also dripped some isopropyl along the edge where I could lift it a teeny bit but not get a pick in, which seemed to get the gap to widen. Once I had an edge up and could start sliding the pick along though everything went much more smoothly. Reading other comments, I bet a heat gun would have been a better tool.
Mark Fickett -
If you haven’t purchased this kit yet then stop right here. The difficulty, as stated, is very difficult. This was my first attempted repair. I spent a good hour heating the adhesive and felt good about getting the display off. I even paused to boot the phone to make sure I didn’t damage the screen before flipping it over - it worked fine still! Then I went to pull the display from the top using the picks. Shattered the corner of the screen. $129 for a new screen. At this point, the Pixel 3 is $499. I bought a new phone. Just be prepared to break the screen. Many people mention it in the comments. I felt confident I could do it. I couldn’t.
Michael Neil -
do yourself a favor and purchase a replacement screen when you order a battery. it’s impossible to remove the screen without damaging it no matter how careful you are.
Andrey Gerasenkov -
100% agree. So glad that I did. My new screen was only £20 from ebay - took ages to arrive as it came from China, but works perfectly.
Daniel Yeo -
I managed it - this was my first repair. It’s a lot harder than I was expecting, but totally doable! I recommend just sliding the very edge of the pick around first until you find a corner that starts to peel up. Once you can see under the screen (without bending it, of course!), you can go further in to break the stubborn adhesive globs. It took me just under 30 minutes to remove the screen.
Peter Karski -
My tip: Place a hot-water bottle on the screen for 2 minutes. Use the suction handle to lift one edge and insert an opening pick. Use an opening tool to cut through the adhesive at the bottom and place another opening pick in the second corner. Place the hot-water bottle on the phone again and wait 2 minutes. Cut through the sides with the opening tool (if you are focused it's nearly impossible to put this tool in too deep) and do the same on the top of the phone as on the bottom. I was afraid of the high difficulty, but it only took me 15 minutes to remove the screen with no problems. Medium difficulty.
Dorian -
I didn’t crack the screen, but somehow the thing wouldn’t power on after. Not sure if it was heat, or if I borked the cable somehow. New screen went in and it works great.
Chris Jones -
It IS possible to get the screen off without breaking it, just take your time. I spent about an hour using the included picks along with the iopener.
That said, the adhesive is a bear to fully remove from the screen without marring it up.
Kixwooder -
I didn’t fully remove the old glue; When I put it back together, I melted the old glue (and some new glue) to seal it all closed again.
David Gault -
Tip, use a gallon ziplock bag with some hot water (maybe 150 degrees). Place the phone on a towel and fold the towel over and shield the part you aren’t working on, then use the bag for ~30s to apply and re-apply heat as needed. I first heated up the entire phone and ended up separating the screen from the glass (thus breaking the screen). The second time I did it, I just heated up one section at a time and I succeeded in removing the screen without breaking it.
Daniel Beardsley -
Couldn’t get it open with anything, including dunking it (wrapped in a ziplock) in freshly boiled water for from 2 to 20 minutes. But then I managed to get it with only minor discolorations along top and bottom edges (which are noticeable when the screen is off or on dark backgrounds).
What did the trick was setting the heat gun to 100°C and heating it really up close for 2 minutes. 60°C didn’t do squat, but 80-90°C would probably work better, without damaging the screen.
With that done, the glass required a little bit of force to lift up, force of gravity on the rest of the phone wasn’t enough.
gelraenua -
I attempted this with an iOpener and gave up as it didn’t seem to heat it enough to lift the edge of the screen.
I remembered I had a heat gun at that point (duh, should’ve been what I started with). I had the gun at 350 initially and moved it around relatively quickly. But, discovered that if I lingered a little it discolored the screen (tested and the screen still works where it’s discolored, but it’s slightly off-color at one corner). I ended up using 200 deg (F) instead and moved more slowly. I put slight pressure on with the suction cup while heating the edges and finally got a corner up. Plopped a pick in there and used another pick to slowly cut along that edge while heating where cutting. I kept a pick plopped in each corner as I went. Once I got most of the screen free I grabbed the edges of the screen to keep upward pressure from the glue and heated any places that were still stuck with the heat gun and cut the last strands with another pick.
TL;DR - The iOpener doesn’t seem sufficient for this job.
Jonathan Stucklen -