Introducción

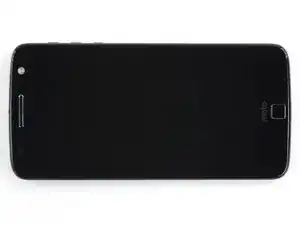
Esta guía muestra cómo abrir el Motorola Moto Z para reemplazar una batería muerta o gastada.

La pantalla es una pieza extremadamente frágil y no tiene ningún tipo de refuerzo. Hay una gran probabilidad de que rompas la pantalla Trabaja despacio y con cuidado al manejar la pantalla.

Antes de comenzar, descarga tu batería por debajo de un 25%. Una batería cargada de ion de litio puede prender fuego y/o explotar si se perfora.

Si tu batería está hinchada, toma precauciones adecuadas.

  1. AOhWsAmeA3BjCQYI
    • Calienta un iOpener y aplícalo al borde izquierdo del teléfono durante al menos 90 segundos.

    • Se puede utilizar un secador de pelo, una pistola de calor o un hornillo pero ten cuidado de no calentar demasiado: la pantalla OLED y la batería interna son susceptibles a daño por calor.

    • Mientras esperas que el adhesivo se ablande, sigue adelante y lee el siguiente paso para tener una idea en dónde hacer la palanca.

  2. B3AD1TEtWaQNbuQw
    B3AD1TEtWaQNbuQw
    SESAOm3TZKfiLIxx
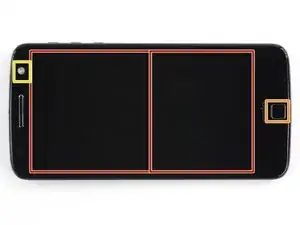
    • En los siguientes pasos, cortarás el adhesivo alrededor del borde del ensamblaje de pantalla.

    • Para evitar daño, no cortes en las siguientes áreas:

    • El panel OLED

    • El botón de inicio

    • La unidad flash

  3. ecDSu1IwXefvHyOe
    ecDSu1IwXefvHyOe
    Sl2XHVITPZBMAA1V
    45l3ETvbWoLXAHYt
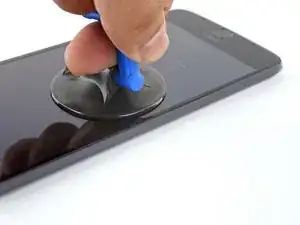
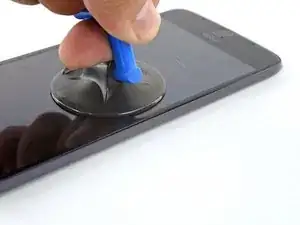
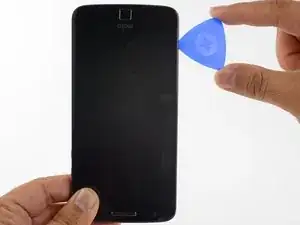
    • Aplica una ventosa lo más cerca posible del borde calentado.

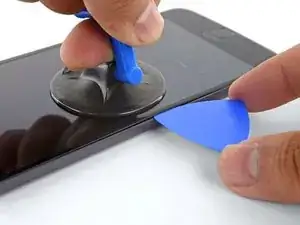
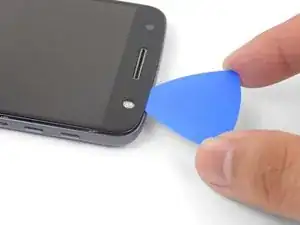
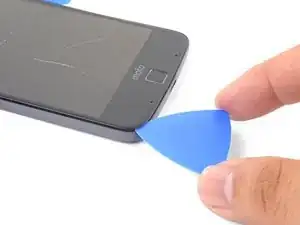
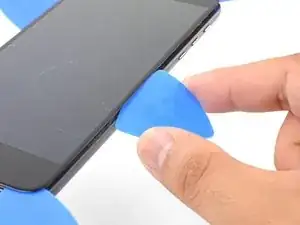
    • Levanta la ventosa e inserta la punta de una púa de apertura en la grieta.

    • No insertes la púa más de 1,5 mm. Insertar la púa demasiado podría dañar el panel OLED.

  4. oIt5C4Ld2ZDNBqFF
    oIt5C4Ld2ZDNBqFF
    vV1rcoBNSTvN5yRd
    rTHWq4cY2OoSYtRm
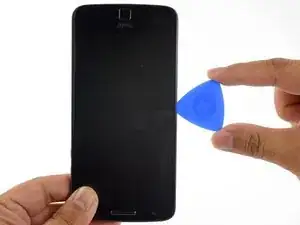
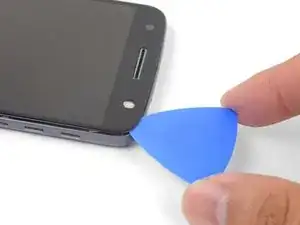
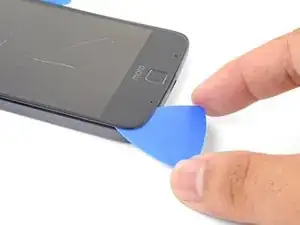
    • Con cuidado desliza la punta de la púa de apertura a lo largo del borde del teléfono, asegúrate de no cortar más de 1.5 mm.

    • Mientras deslizas la púa por el borde, sentirás la punta de la púa presionarse contra el borde del panel OLED. Hasta allí es donde llega la púa sin dañar el panel.

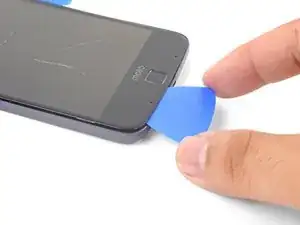
    • Una vez que hayas separado el adhesivo, deja una púa de apertura en el borde para evitar que el adhesivo se vuelva a sellar.

  5. bUsMXMKnGssnwu5A
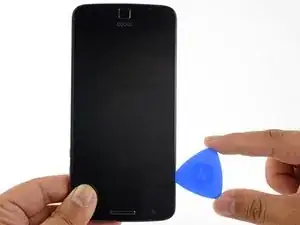
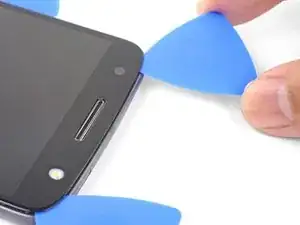
    • Repite el procedimiento de calentar, levantar y cortar para el resto del borde largo del teléfono.

  6. wSBsESUHl1PVsuNR
  7. rYGN2OAKDGmOhlTG
    rYGN2OAKDGmOhlTG
    14kej2hZQVqIk2J2
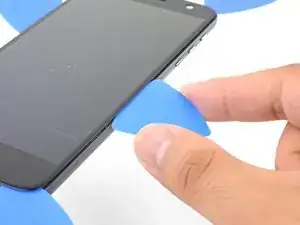
    • Inserta una púa de apertura en la esquina del lado del flash del teléfono y con cuidado corta alrededor de la unidad de flash.

    • No inserta la púa más de 1,5 mm en el borde.

    • Una vez que termines de cortar, deja la púa en la esquina para evitar que el adhesivo se vuelva a sellar.

  8. ICwKD6Xk6t4TxUJb
    ICwKD6Xk6t4TxUJb
    pjHLdexBUTu3FjVI
    odQrxdZ4ckAPau5I
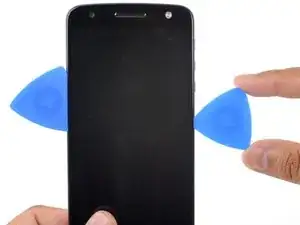
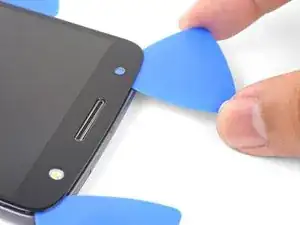
    • Inserta una púa de apertura en la esquina superior restante del teléfono.

    • Con cuidado corta a través del adhesivo en toda la parte superior del teléfono.

    • No insertes la púa más allá de 12,5 mm.

  9. CdtgmSxofc6FivmV
    • Aplica un iOpener caliente al borde inferior en el teléfono durante al menos 90 segundos.

  10. 2cGQEyKevPlyC6mE
    2cGQEyKevPlyC6mE
    pEWg1m4XQYxs2kmH
    tjWsxZdsvq6HgZbv
    • Inserta una púa de apertura en la esquina inferior y corta hacia el botón de inicio deteniéndote antes de llegar.

    • Una vez que termines con la esquina, deja una púa en el lugar para evitar que el adhesivo se selle.

    • Repita el proceso para la otra esquina inferior.

  11. brUPNyqVDPZVCP21
    brUPNyqVDPZVCP21
    p4HKLBK3hFxuYY1A
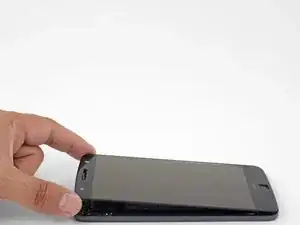
    • Con cuidado tuerce la primera púa de apertura ligeramente para ayudar a liberar el adhesivo del borde.

    • Repite el mismo proceso para cada púa restantes moviéndolas cuando sea necesario y torciéndolas ligeramente para liberar el adhesivo.

  12. PSbMswxRT54lC3jW
    PSbMswxRT54lC3jW
    yUnYjJkaQWgN1oUY
    XROmdJOEYlNDElxe
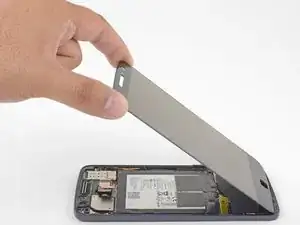
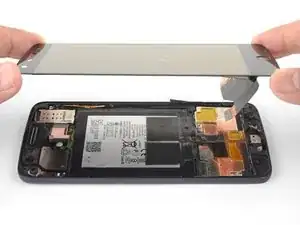
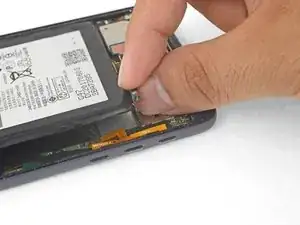
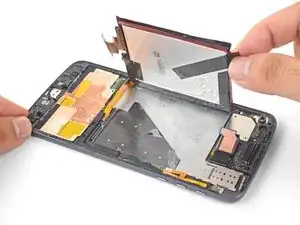
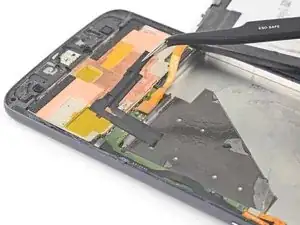
    • Levanta el extremo del auricular de la pantalla para proporcionar acceso a los cables de pantalla.

    • No abras la pantalla más allá de 90 grados y siempre brinda soporte al panel de pantalla.

    It says lift home button end of display but the photo shows lifting the earpiece end.

    Lynne Ayers -

    Good catch! I have fixed the step.

    Arthur Shi -

    When I finally got mine opened, all I see is a white piece of metal. Nothing like you photo…UhOH…

    Diana Myera -

    Oh no! It sounds like a different model! Motorola phones are notorious for their similar sounding naming conventions.

    Arthur Shi -

  13. AliGuJ5ZLd1KkOub
    AliGuJ5ZLd1KkOub
    1TNRwfivjGnX2WXk
    N5HiOnp4LXA5YLcu
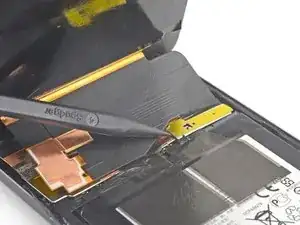
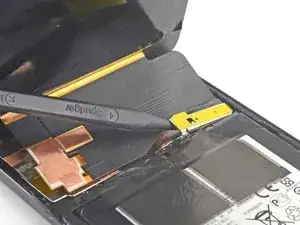
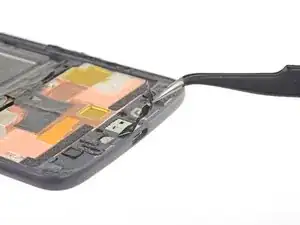
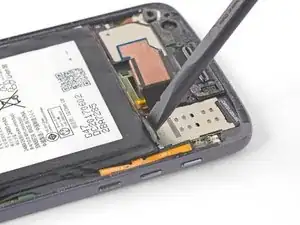
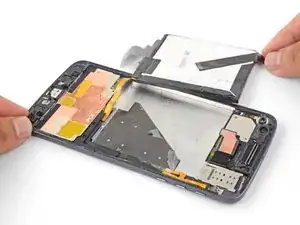
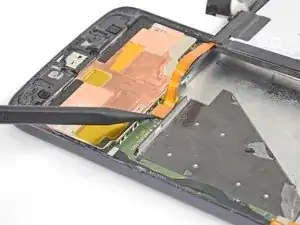
    • Usa la punta de un spudger para levantar el escudo del cable de la pantalla.

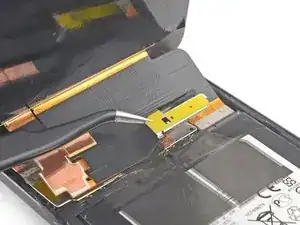
    • Remueva el escudo de cable de la pantalla.

  14. AmvnVWuA4bcqApdC
    AmvnVWuA4bcqApdC
    SYEPgOWWepwwPHaW
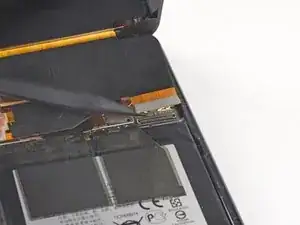
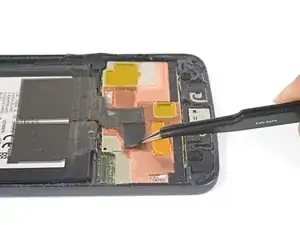
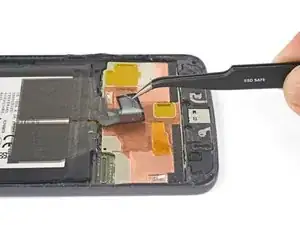
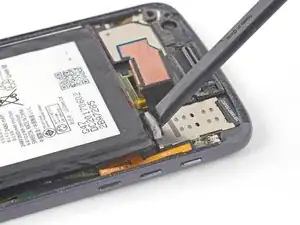
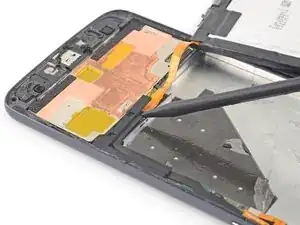
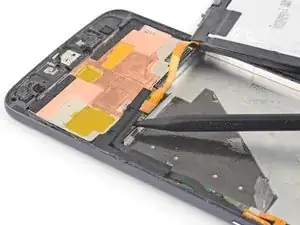
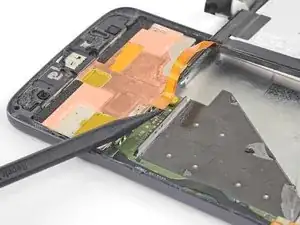
    • Usa la punta del spudger para levantar y desconectar el conector del cable de pantalla de su zócalo.

  15. MffriIMQwph2MZhw
    MffriIMQwph2MZhw
    kepJQHIFFmTjkKUv
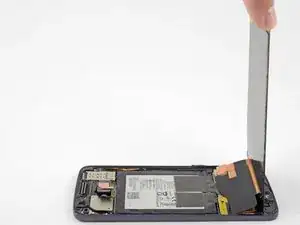
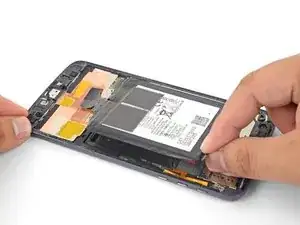
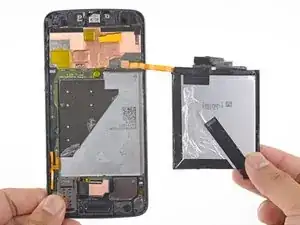
    • Remueve el ensamblaje de la pantalla.

    • Antes de volver a instalar el ensamblaje de la pantalla, remueve completamente cualquier adhesivo y vidrio restante del marco.

    • Luego de remover todos los rastros de pegamento y cristal del marco, limpia las áreas de adhesión con alcohol isopropílico 90% (o más) y un paño libre de pelusa o filtro de café.

    • Asegúrate de encender tu teléfono y prueba tu reparación antes de instalar el adhesivo nuevo y volver a sellar el teléfono.

    • Usa el adhesivo de pantalla para Motorola Moto Z para volver a sellar tu teléfono.

    By removing the traces of glue from the frame, you will also remove the protective covers of the microphone and whatnot at the home button side,, as well as the speaker cover at the other side, because the glue does its duty…

    dr_baeschtlr -

  16. pTieonyRatFkw1Sf
    pTieonyRatFkw1Sf
    QyNSx5Eb1wyXfMaJ
    YwbVbeYk132DEUwP
    • Usa pinzas para despegar la cinta negra que sujeta la batería al marco.

    • Si tu batería de reemplazo no viene con esta trozo de cinta, transfiérela de la batería vieja a la batería de reemplazo.

    Well. ithis is multilayer tape - at least three *very* thin layers. Expect ugly results, if any.

    dr_baeschtlr -

  17. xFtqgksvbqVTPWEi
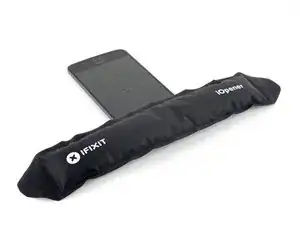
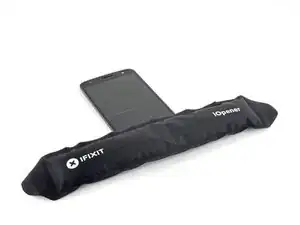
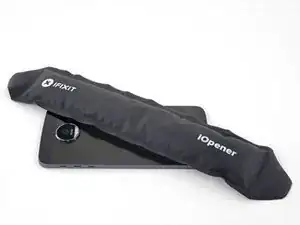
    • Coloca un iOpener caliente en la parte posterior del teléfono como se muestra durante al menos 90 segundos.

  18. LSuKPJBL5mJwGawX
    LSuKPJBL5mJwGawX
    UItWMA1siVekX1WW
    pVPSYOxIHDWlOKbW
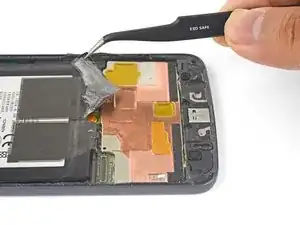
    • Utilizando un par de pinzas o tus dedos, toma la lengüeta negra de la batería y despacio tira hacia arriba hasta que la esquina esté suelta.

    • No remuevas la batería por completo ya que está todavía conectada a través de una cable flexible.

  19. MVlV3aoZPifwUWoC
    MVlV3aoZPifwUWoC
    FOmBUSRTP1LdPL2i
    • Sigue este paso solo si la lengüeta de tu batería está rota. De lo contrario, omite el próximo paso.

    • Inserta un spudger en el borde inferior de la batería y lentamente levanta la esquina.

  20. uXXLU1plvqraRBBT
    uXXLU1plvqraRBBT
    vZVYhRVNgBeSgU2s
    5tIyxXlbtORmM4UW
    • Con cuidado gira la batería hacia el borde derecho.

    • Coloca la batería en una superficie de trabajo mientras tratas de no tensionar el cable de la batería.

  21. nI1RRDBBmqWIOqGG
    nI1RRDBBmqWIOqGG
    1SE2ebrEBoXXlkJM
    5HbwKAHWRtmkilhA
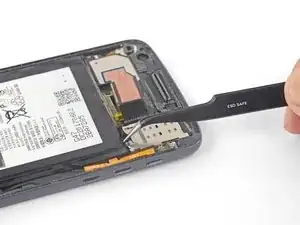
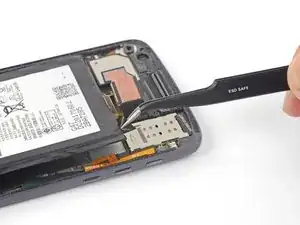
    • Usa la punta de un spudger para levantar el soporte del conector de batería.

    • Este soporte está sujeto en su lugar con adhesivo y lengüetas.

    • Remueve el soporte del conector de la batería.

    • Cuando vuelvas a instalar el soporte, asegúrate de alinear las lengüetas en el soporte con las marcas en el borde izquierdo del marco.

  22. XLqgrRkEEGEIeAYT
    XLqgrRkEEGEIeAYT
    H3TLVwn1DiAK2Wlq
    • Utilizando la punta de un spudger, levanta el conector de la batería de su zócalo.

  23. CZbTsfhcblTeComv
    • Remueve la batería.

    • No vuelvas a utilizar la batería luego de removerla, ya que es esto posa un peligro. Reemplaza con una batería nueva.

    • Para instalar una batería nueva:

    • Remueve cualquier resto de adhesivo del teléfono y limpia las áreas pegadas con alcohol isopropílico y un paño anti-pelusa.

    • Aplica tiras adhesivas pre-cortadas ocinta de doble cara a la parte expuesta plateada del compartimiento de la batería, no en la capa de espuma negra.

    • Presiona la batería firmemente en su lugar durante 5-10 segundos.

    Really need to include how to apply the adhesive for this device, I had to go find a video on youtube which happened to be an iphone 6 video that gave me an idea on what to do, but even then, it was still guess work.

    Andrew Scorgie -

    Check out the link to the adhesive card guide in the last step—that should you a pretty good idea of how to prep the phone and battery for installation and how to use our pre-cut adhesive card and apply the adhesive. Let us know if we can change something to make it easier to use!

    Adam O'Camb -

    Only just noticing the reply now since I am redoing the adhesive on a second Moto Z I have (screen adhesive failed on its own) and while that guide is pretty good (and something I may well use now on the original one if it fails again!), I was more thinking about how to apply the display adhesive that comes within the kit. There were no instructions on how to use that.

    Andrew Scorgie -

Conclusión

Compara tu parte nueva de reemplazo con la parte original. Podrías necesitar transferir los componentes restantes o remover los respaldos adhesivos de la parte nueva antes de la instalación.

Para volver a ensamblar tu dispositivo, sigue estas instrucciones en orden inverso.

Tras seguir los pasos de esta guía, calibra tu batería recién instalada.

Lleva tus residuos electrónicos a un centro de reciclaje autorizado.

¿La reparación no resultó como lo planificaste? Consulta nuestra comunidad de respuestas de Motorola Moto Z para ayuda en la resolución de problemas.

Arthur Shi

Miembro Desde 03/01/18

219093 Reputación

27 comentarios

Kindly link me to the suitable adhesive tape for sticking back the screen…

Thank you

Anwesh Maile -

Hi Anwesh,

You can use Tesa tape for that purpose.

Arthur Shi -

I have a Moto Z Droid from Verizon. You have instruction for the Moto Z and Moto Z Droid Force. Battery replacement on the Droid Force is much easier. How do I know which one I have?

Budbradley -

Hi Budbradley,

According to Phonearena, it looks like one easy way to tell is the rear camera:

The Z has a 13MP camera, while the Z Force Droid has a 21MP rear camera.

The built-in internal storage are also different:

The Z has 32GB while the Z Force Droid has 64GB.

Hopefully you can check your specs with those and figure out which version you have.

Arthur Shi -

The hardest step in this guide is when you remove adhesive glue behind the LCD panel.

Second is clean residue glue [For this i use lint-free cloth soak with alcohol and rub on glue]

One more note - Moto original battery is su..k. Mine is degrade in 6 moths.

Rawin Juangrat -

The hardest part about this repair was definitely removing the screen ( the rest is easy once you’ve opened the phone). I believe I would not have ruined my screen had I used a heat gun rather than the iOpener provided in the kit. The iOpener did not properly heat the adhesive and caused me to have to pry a little harder than I would have had to if I used a heat gun. That little extra force causes a big difference when the screen is so thin. On this particular repair, save yourself the money and don’t buy the whole kit. Buy the battery somewhere cheap and use a heat gun like I should have. Paying the extra money for the kit also cost me the price of a new screen $100+… not a happy camper.

Gabriel Arthur -

The hardest part for me is sourcing a battery that is the right thickness for an xt1650-03!

I am on the 3rd different gv30 manufacturer/ brand --on 2 different xt…-03 and they're all too thick. My last hope was a “Cam…Sin…” brand that was 3.3mm thick. Noooooope; that still didn’t work!

Please help!

P.S. the heatgun did make the prying WAY easier (especially if you drop the extra repair money on some suction-cup-pliers) —BUT— if you heat it too long (or even graze the inside of the semi-opened phone), you seriously risk “scorching" the screen, wilting the speaker diaphram, and/ or the mic screens.

…like i did the first time.

SNfoil_hat_king -

I have the exact smae problem. On my battery, it says it is an original Motorola Part. So did the seller on eBay. Model-Number and Code are exactly the same, so is capacity. Still, the new battery is to think and has a slighlty different design. This is really annoying, the phone works again, but I cannot glue it back together.

Benjamin Geese -

Can you check if your original battery is actually thinner than 3.3 mm? If so, I’ll need to look into the guide to see if something needs to be fixed.

Arthur Shi -

I have to change the battery of my xt1650-03, too. All sellers on a|_iexpress have negative comments from at least one or more buyers complaining that the battery is a few mm too thick. How can I find the right one?

This phone starts to annoy me so bad… it dies at 60 ish percent when drawing too much power…

Martin Hammer -

You can order a battery from iFixit here. We actually sell OEM Motorola parts, and this would be an OEM battery. If it doesn’t work out, we have great customer service! Plus, I would be interested to hear if the OEM battery is for some reason non-compatible.

Arthur Shi -

I followed the instruction, and I could replace the battery, but no image is shown on the screen. When I push the power switch, the mobile vibrates, so I think battery is Okay. Did I damage the screen when I remove the screen from my mobile?

Takeo Otani -

The screen was connected to the mobile but not glued with adhesive tape yet. Is that the reason why?

Takeo Otani -

Hi Takeo,

The screen does not need to be glued in before you test the phone. I would suggest checking the display connector, re-connecting it to see if that helps. Otherwise, it may be a broken screen.

Arthur Shi -

Thank you very much for your reply. I re-connected the screen three times, but there’s no change, no image is shown on the screen. I followed the instruction, but  I may have applied strong force to the screen when I remove it from the mobile? It was really hard to remove the screen because the heater does not heat the mobile to soften the glue. I will replace the screen and see the result.

Takeo Otani -

I replaced old screen with new one, put the connector and turn on the switch without installing home button, but that does not work, no image is shown on the screen. I removed the battery and re-installed it, check all the connectors & wires, and I could not find any problem. What is the cause of the problem? mother board has been broken?

Takeo Otani -

Hi!

Did you find out what was the problem?

neven nevenković -

The problem my moto Z had in the past is, battery charge immediately decreased from more than 80% to 0% when I started an app. I thought this problem was related to the battery, but it was not?

Takeo Otani -

Saludos desde México no carga mi moto z y no es el centro de carga la pila está bien

Joseluis -

Hi, I’ve replaced the battery as instructed above. The batteries match. Phone will turn on, but not the screen. I’ve removed and reattached it several times but nothing shows on the screen. It worked fine prior to replacing the battery.

Jason

dr.jay -

Hi Jason,

Sorry to hear that! Here are some general troubleshooting ideas that may resolve the issue.

Arthur Shi -

Yeah, this repair *is* difficult. I broke the LCD (not the gorilla glas) and ripped the cables. The glue really is strong! So why does the Moto Z have an Ifixit score of 7? Even removing those small plastic and metal clips is hard as you don’t find which is the recommended way of removal.

JPT -

My moto Z had same symptoms as Takeo Otani’s. Never over-used it, kept it cool, no drops, no scratches, clean USB port.

I am also convinced, bad battery was the problem: phone indicated a full charge after just 20 mins of charging. battery life just ~2 h in standby. Energy-intensive apps like camera, let phone re-boot. After rebooting a fully charged phone (over night), it was <30% charged.

MY BATTERY REPLACEMENT ATTEMPT TODAY BROKE THE DISPLAY, ALTHOUGH, I WAS EXTREMELY CAREFUL with plektra tools, hair dryer and suction pad, even dipped tools in isoprop, which helped a bit to “cut” the glue threads.

Half way of removal (>1 h), noticed a little thin crack (in the back-layer, from bottom-right corner to 2 cm above moto logo)

Took another 1 h, until front was removed.

Last switch-on try: VIBRATES, but SCREEN is DARK -> VIBRATE reboot loop. Dis/Re-connected display twice. no change.

MOTO Z NOT SERVICE-FRIENDLY AT ALL!

Not tried new battery! Will not buy new display nor moto!

BE MOST CAREFUL WITH BOTTOM 4 cm REMOVAL!

Oliver Sternekoster -

This was a complete disaster. I was so careful, took tons of time with it. But near the bottom, as many have stated, the screen cracked a hairline crack and separated from the glass. This is more than difficult, because it requires some kind of finesse in some specific way that you can’t explain on this site or even a video. Following instructions exactly and being beyond careful does not give one the knowledge or finesse to do this repair successfully. I ordered a new screen and I hope that the battery I put in works. There’s no way to know until I get the new screen, and then hope that there isn’t something else wrong that happened in some specific way with the connectors or cables or electrical contacts in there. Disaster. And the tools are subpar too. Broke the smudger tip trying to pry off the bracket. Bent the tweezers too.

Daniyal Kazi -

I’m sorry to hear about your experience! The screen is unfortunately heavily glued onto the phone, making repairs difficult. As for the bent spudgers and tweezers, please contact our customer support and we’ll get it sorted for you!

Arthur Shi -

Exactly what I was afraid of happened. I installed the new screen and it’s not working. I just get a black screen. After plugging into a charger for several minutes, holding down the power button and hearing vibrations, I determine that the phone must be on. But screen is just black. No damage was done to this screen. It was brand new and I put it in. But something somewhere went wrong. How could I know what that was going to be? Is something not plugged in right? Did it get “fried” like someone said in another post?

Unless there’s an easy fix for what’s going on that I can try, this entire attempt to fix has been a complete disaster.

I do not have time to wait for another screen, nor do I want to pay for another screen that could just as easily not work either after I try to put it in.

Daniyal Kazi -

I understand your frustration! Thanks for bravely giving this difficult repair a chance. You may be able to test the display this way: leave the battery out, carefully reconnect the display to the phone, and plug the charging cable into the phone. Then, try to power on the phone. If the phone vibrates and the display does not light up, then either the display or something on the motherboard is bad. Again, I’m really sorry for the bad repair experience.

Arthur Shi -