Introducción
Incluso años después de su lanzamiento en 2014, el OnePlus One es un teléfono inteligente popular. Sin embargo, sus baterías integradas probablemente se habrán gastado después de todos estos años de uso.
Aunque las baterías incorporadas no fueron diseñadas intencionalmente para ser reemplazadas por usuarios finales, esto todavía es posible. Las baterías de repuesto están disponibles en las tiendas en línea. Algunos de ellos incluso mantienen el diseño original de las baterías OnePlus One.
Las baterías se conectan a la placa base a través de una cinta que debe desconectarse con cuidado primero. Con este fin, abre el teléfono inteligente y desmonta la cubierta de la placa base. Las baterías en sí no están embaladas en una tapa dura. Por lo tanto, se requiere un cuidado extra al quitarlos.
Esta guía te guiará paso a paso a través del proceso de extracción de las baterías y le brindará consejos útiles sobre las dificultades mencionadas. Una vez que hayas retirado la batería, simplemente puedes enchufar la tuya ejecutando los pasos en orden inverso.
Partes
-
-
Extrae la bandeja de la tarjeta SIM.
-
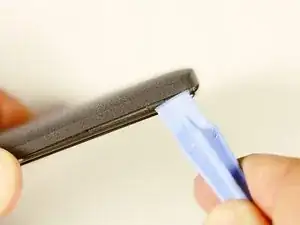
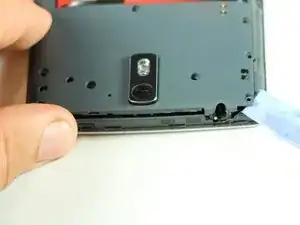
Usando la herramienta de apertura de plástico, con mucho cuidado separa el panel trasero del cuerpo principal del terminal. Ten especial cuidado en los alrededores del ranura SIM y otros puntos débiles.
-
Si encuentras alguna resistencia debido a los puntos de fijación ocultos en la parte interior del terminal. No te preocupes; mueve la herramienta en dirección opuesta al seguro y punto por punto!
-
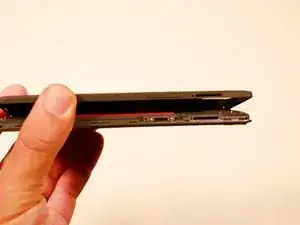
De arriba a abajo, de izquierda a derecha, sentido horario o contra-horario, una vez llegados a la mitad del terminal, el panel se retira fácilmente con la mano.
-
-
-
Usando un par de pinzas, retira los tapones de plástico.
-
Una vez que se revelan los tornillos ocultos, usa un destornillador PH # 00 para quitar los tres tornillos de 3.175 mm.
-
Utiliza el destornillador PH # 00 para quitar los seis tornillos 3.175 restantes.
-
-
-
Con una herramienta de abertura de plástico, levanta suavemente la cubierta de plástico negro y retírela del dispositivo.
-
-
-
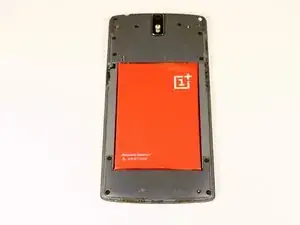
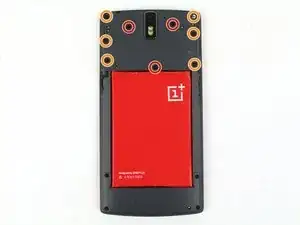
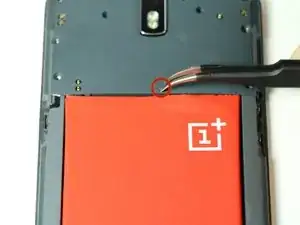
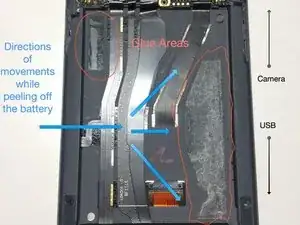
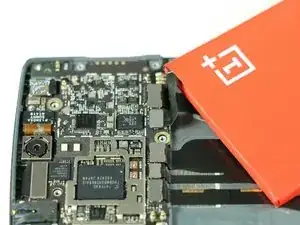
Una vez que retiramos la cubierta de la placa madre, notamos que la batería está intacta y tiene una cinta negra adherida a ella, que está montada en la placa lógica.
-
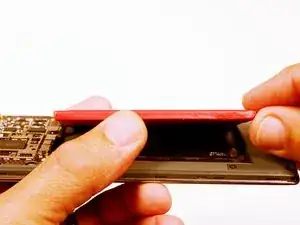
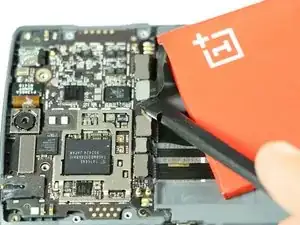
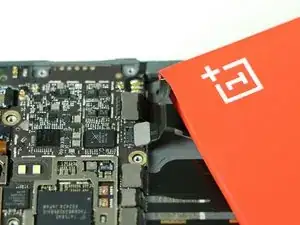
Usando el spudger, comienza a levantar la batería con cuidado desde el lado opuesto a la cinta. Ten en cuenta que hay un adhesivo de alta calidad que mantiene la batería en su compartimento, así que proceda con precaución.
-
-
-
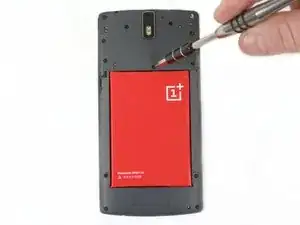
Una vez que se ha liberado la batería, usamos el siempre útil spudger negro para levantar y liberar la cinta de la batería de su base.
-


Para volver a montar tu dispositivo, sigue estas instrucciones en orden inverso.
36 comentarios
The Apple iPhone sim ejector is not long enough to work on an OPO. A paper clip is a better option.
There will be a compatible battery with one pin OnePlus
Successfully accomplished, thanks to your clear instructions. One note: the adhesive on my unit was applied in about a quarter inch strip along the right underside of the battery as you view it from the back. Peeling up the left side allowed me to reach and release the adhesive on the opposite side with the spudger or knife blade.
That Guy -
Thank you! I use a slim (but not sharp) butter knife to nudge the battery out slowly by poking the adhesive tape along its length. It was a bit unnerving because I was afraid of damaging the soft battery. Worked out in the end.
One note to add is that the original battery connector's top was glued to the motherboard cover. I had to remove the battery before I could successfully sepearte the 2. My phone is still working and I'm charging it right now! :)
Thanks for the very detailed guide.
It doesn't mention you have to remove SIM tray first.
pawel -
I used the #0 for the rear panel screws. The #00 is too small and will slip, stripping the screws if you're not extra careful.
anonymous 2668 -
where can i buy the battery??
Shaun Davis -
Has anyone answered this? I am looking too.
Elie Daou -
They sell it on here, although I found mine on eBay.
Roger -
Aliexpress for $9 (original)
David van Ballegooijen -
The last three hidden screws are a !&&* of a time consumer to remove. probably you would need only a certain type of tweezers - I got stuck at midway and now I cannot get go have my phone detect the sim card either probably because the six screws are removed. I can now turn the phone back on but with no service or wifi connections are detected. This phone is a disaster!
Manan Shah -
Ivdid that too but son in law found I had reinstalled sim card in backwards or upside down.
wildcat75666 -
Where did you buy the micro USB piece? Thanks a lot!
Davide Rota -
EBay. I bought new battery cause old ibe was dead would not charge. Just ordered new cables fit 9.00 something free shipping. Anyway hope this fixes problem cause new battery did not fix problems.
wildcat75666 -
I was able to open going from the microusb slot and working my way around. The corners are tough, though.
Roger -
in my phone the battery was glued with double sided adhesive tape, only on the right side. I pried the left side up first, and carefully removed the battery. to lift the battery I used first used a suction cup(?) followed by a plectrum like tool to lift te battery, and keep it lifted
Eelco Busch -
A word of caution: the back panel is harder to remove than you might think. Especially because you may be removing the *screen* by mistake. When you have a "grip" with the tool make sure the metallic border is not coming off with it, and when you have removed enough to be able to lift the panel, make sure it isn't attached by ribbons - in that case you've been removing the screen. A good idea is to gently press your finger nail against the weak plastic located between the back and the SIM slot, and going up and down and sideways until you hear a click. Then you can start from there with the opening tool. As recommended be very gentle around the SIM slot.
Menahem Julien Raccah Lisei -
Where do I get the plastic opening tool?
Julie Hejducek -