Introducción

¿Necesitas actualizar a un enfriamiento de verdad? ¿O reemplazar un disipador de calor reventado? Sigue esta guía para reemplazar el disipador de calor en tu Xbox One.

Nota que separar el disipador de calor del CPU compromete el componente térmico original. Necesitarás limpiar y reemplazar la pasta térmica con una nueva. Mira this guide for directions on how to do this.
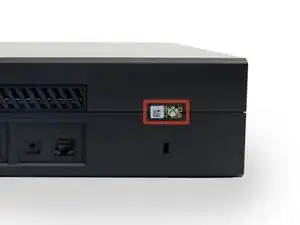
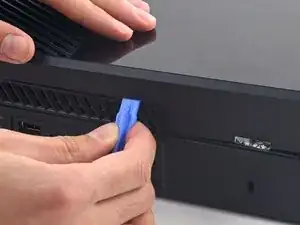
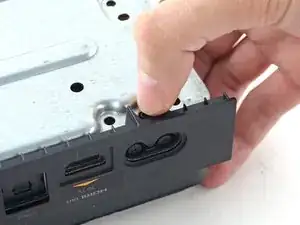
  1. fFCGnAVFSWO6MSIo

    In the United States the Magnuson-Moss Warranty Act of 1975 is a Federal Law that states that stickers and clauses are illegal. It says you can open your electronics without voiding the warranty, regardless of what language of that warranty says.

    Dustin D'Amour -

    Stickers are illegal!?

    Brandon -

    For anyone concerned, if you apply heat with a blow dryer or heat gun you can carefully remove the sticker without damaging it, making it impossible to know that the sticker was ever removed.

    Kelton Stewart -

    All the immature comments aside, thank you Dustin for sharing the information.

    Wade -

    xbox를 열기 위해서 이러한 위조방지 테이프를 자르거나 떼어내야 합니다. 하지만 걱정 마세요. 여러분이 무언가 직접적으로 망가트리지 않는한 ms는 보증을 취소하지 않습니다.

    승대/SeungDae 정/Jeong -

  2. TSL4QNCOtv534Yqk
    TSL4QNCOtv534Yqk
    nCL6Av6fkN1uQMAu
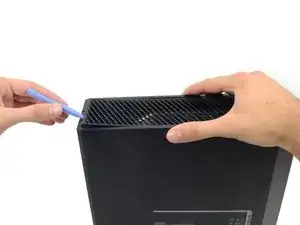
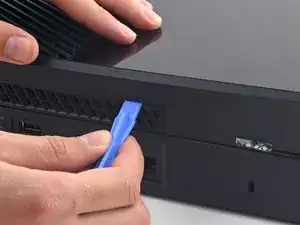
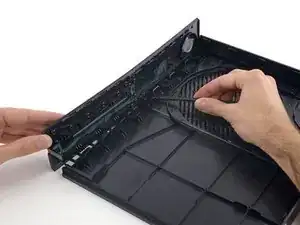
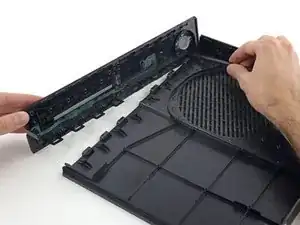
    • Usa una herramienta de apertura de plástico para levantar y quitar la rejilla de ventilación de plástico que rodea el puerto USB lateral.

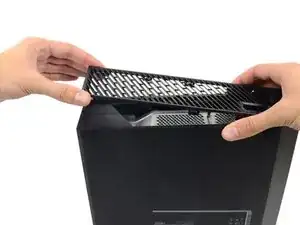
    • La rejilla de ventilación es bastante flexible y se mantiene en su lugar con clips de plástico débiles; comienza a hacer palanca desde la parte posterior y sácala.

    - 플라스틱 오프닝 도구를 애용해서 측면 usb 포트를 둘러싼 통풍구를 들어올려 분리하세요.

    - 이 통풍구는 무척 유연하며 연약한 플라스틱 클립으로 고정되어 있습니다. 뒤쪽에서부터 들어올려 분리하고 떼어냅니다.

    승대/SeungDae 정/Jeong -

  3. BLMgn4Ddrlxat2SY
    BLMgn4Ddrlxat2SY
    KaRwhVrrZiGkLdCK
    • Hay una pequeña pestaña de plástico que refuerza la esquina frontal de la Xbox.

    • Desliza la pestaña hacia atrás y quítala.

    Do u sell that plastic tag I need it

    Brandon -

    Here is What's Stated in Step-3 : (There is a small plastic tab that reinforces the front corner of the Xbox.) Actually, the "Tab" is NOT SMALL at all. See the Picture: The "TAB" is the Piece that this Person has their Thumb on, is the Tab that you NEED TO SLIDE TOWARDS THE "REAR" of the Unit. You will be able to tell How this Large Tab Holds the Top and the Bottom Case Covers together. Take Note how to Replace this tab back where it Belongs, when you are putting the Case Covers back together. Hope that this comment will help you. 6-29-2017

    B.L. Spence -

    - xbox의 전면 모서리를 지지하는 작은 플라스틱 탭이 있습니다.

    - 뒤쪽으로 똑바로 밀어서 제거하세요.

    승대/SeungDae 정/Jeong -

    What is this small tab referred to as?

    What is it called i need to order one.

    James Lipsey -

  4. DmSmGaCLJiWlvSFm
    DmSmGaCLJiWlvSFm
    SSs6u5TVjnYrJyRo
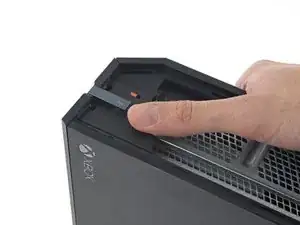
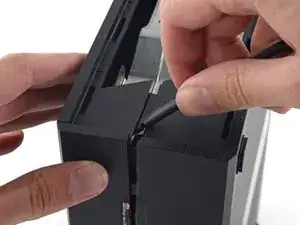
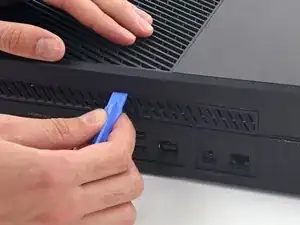
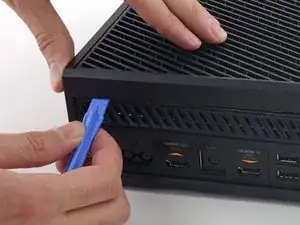
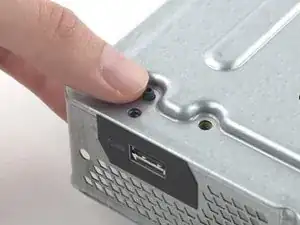
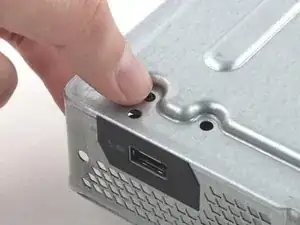
    • Inserta el extremo plano de un spudger entre la carcasa superior e inferior donde se encuentran en la parte trasera de la abertura de ventilación lateral.

    • Hay un clip de plástico fuerte que conecta las dos mitades de la carcasa (la primera de muchas), por lo que deberás usar un poco de fuerza.

    • Deja el spudger en su lugar hasta que abras la carcasa por completo. Los clips son muy elásticos y pueden hacer que la carcasa se cierre mientras trabajas.

    prying does not work. my spudger is causing damage. my soft. plastic. spudger. and the %#*@ thing does not move. this is a common issue with the instructions on this site. you write instructions like you assume people have extensive repair experience. describe the plastic tab. add detail. because simply prying WILL damage the case. hire a %#*@ writer. cause you guys do not know how to precisely convey important detail. constant problem with tech companies actually. no writers.

    Kevin Michaels -

    - 벗겨낸 통풍구쪽부터 상판과 하판 사이의 틈으로 spudger의 평평한 끝을 밀어넣습니다.

    - 플라스틱 클립들이 꽤 강하기 때문에 생각보다 강한 힘을 사용해야 합니다.

    - 케이스를 완전히 열 때까지 spudger를 계속 끼워두세요. 클립이 강해서 작업도중 다시 닫힐 수도 있습니다.

    승대/SeungDae 정/Jeong -

    it would be very very nice that the part, that you sell, will Fix. This an ols Tutorial. The new opening tools that you sell, will not help anything, cause there is no flat sign on the side. you link these tools at this tutorial, but never tested, if the new tools work. so i tell this you, no they dont fit. Thanks for nothing.

    Zeroslammer -

    I ve made it this far with only a Lego membership card and a flimsier amusement park card (I'm a big year old)

    Shadow Killz -

    I had to use a 1/32nd flathead screw driver. In the corner to get it started push the top joint of the case down and up will simultaneously pulling up and down to seperate the seam. You will need a 3rd hand to insert the 1/32nd flathead and pry up to get the case started.

    I had a virgin never opened xbox day one og so that might be why I had to do it this way.

    KSI AZZAZLE -

    even the wikihow instructions are better

    Ethan Banks -

    It’s easier if you push the top empty area part of the plastic with your finger, and stick the spudger about 3/4” (2 cm) away from the back of the xbox and start prying. You have to do this because that is the only spot where there are no clips in the way. If you do any less or more distance, the clips are in the way, and you’ll never be able to pry open the Xbox because the tool can’t get in.

    Saul Torres -

    A youtube video I found explains this step better. You are meant to pull up on one half and push down on the other, this separates the two halves. Then use a spudger on the rear of the console to separate the clip right under the warranty sticker, then move down the back of the console to the other clips

    Zachary Avery -

  5. ogjOrFJJcnxckrPw
    ogjOrFJJcnxckrPw
    JcHGErqMBV2dtooS
    • La interfaz entre las cajas superior e inferior está asegurada por varios clips a lo largo de la parte trasera y el lado restante de la Xbox.

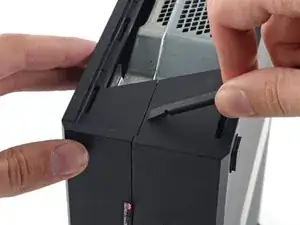
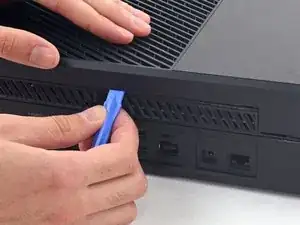
    • Inserta una herramienta de apertura de plástico entre la carcasa superior e inferior para separar el clip sobre la ventilación trasera.

    - 상판과 하판 사이에 끼인 후면 단자판은 여러개의 클립으로 고정되어 있습니다.

    - 플라스틱 오프닝 도구로 후면 통풍구의 클립들을 분리하세요.

    승대/SeungDae 정/Jeong -

  6. WhqL5lXoOtd5OkSa
    WhqL5lXoOtd5OkSa
    a5dTIdSMJqCQ6NHL
    • Sigue moviéndote por la parte trasera de la Xbox, levantando los clips.

    • Asegúrate de que el spudger permanezca en su posición de bloqueo. Incluso si la carcasa se abre lo suficiente como para que el spudger se caiga, los clips restantes son elásticos y pueden cerrar la carcasa por completo. Mantén el spudger en el espacio para proteger tu progreso.

    - 후면을 따라서 계속 클립을 들어서 분리하세요.

    - spudger가 제대로 꽂혀 있는지 중간중간 확인하세요. spudger가 빠질정도로 케이스가 분리 되더라도 남은 클립들이 매우 탄력적이라서 방심하면 도로 닫히기 십상입니다. 원활한 진행을 위해 spudger가 잘 꽂혀서 사이를 벌리도록 유지하세요.

    승대/SeungDae 정/Jeong -

  7. v5JQjSLJyhE3W2hY
    v5JQjSLJyhE3W2hY
    CAl1npTqiKdrFpqG
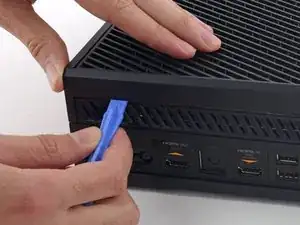
    • Sigue sacando clips. Puede ser útil deslizar la herramienta de apertura de plástico a través de los clips.

    • Para cuando llegues al borde más alejado de la carcasa trasera, la carcasa superior debería estar lista para salir. De lo contrario, pasa la herramienta de apertura de plástico por la esquina y coloca los clips a lo largo del costado sin el puerto USB.

    - 클립들을 계속해서 분리합니다. 클립들을 가로질러 플라스틱 오프닝 도구를 주욱 미는 것이 도움이 될수도 있습니다.

    - 후방 케이스를 따라 분리하면 상판이 열릴 기미가 보여야 합니다. 만약 열릴 기미가 보이지 않는다면 모서리부터 플라스틱 오프닝 도구로 분리를 시작하고 usb포트가 없는 쪽을 따라서 클립 분리를 다시 시도하세요.

    승대/SeungDae 정/Jeong -

  8. Bc1SKUHI3FWBknsV
    Bc1SKUHI3FWBknsV
    VkjRDdLoOFC4P3LT
    bxFDQqHFvjiMAqOl
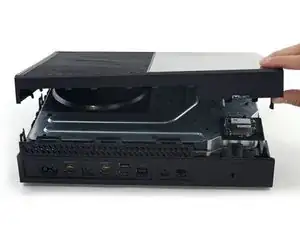
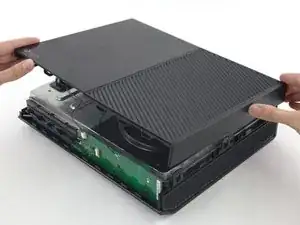
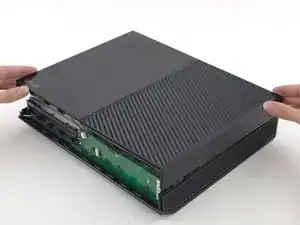
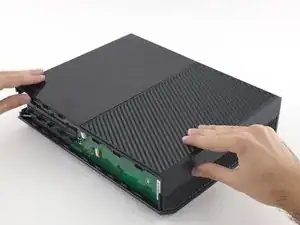
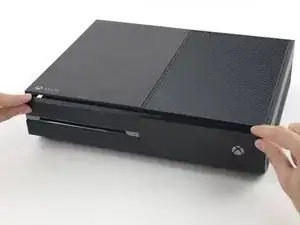
    • Comenzando con el spudger que dejaste en la grieta, levanta la carcasa superior para liberar los últimos clips.

    • Usa una herramienta de apertura de plástico para abrir cualquier clip rezagado que no se haya liberado.

    • No intentes quitar la carcasa superior todavía, ya que aún está conectada por el cable del botón del panel frontal.

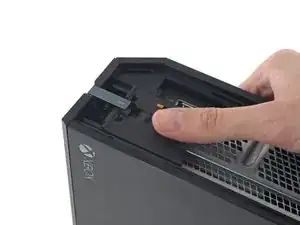
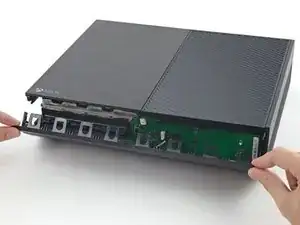
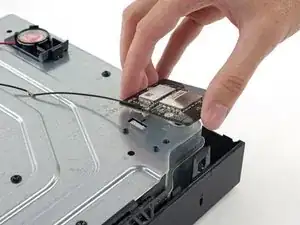
    • Levanta ligeramente la carcasa superior y muévala para acceder al tablero del panel frontal.

    I got confused here. I couldn’t unclip the front panel at all. I found out that if I open the case like a clamshell (or a book, with the front being the spine of the book) I popped right off easily.

    Omar Ramos -

    Yeah, I saw your comment afterwards but this is exactly what I ended up doing as well. just a note for anyone reading this be careful of the flex cable as it does seem to put a questionable amount of strain on it when you open it in this manner.

    Graham Holt -

  9. sQaX6NR2yUNmcpZE
    sQaX6NR2yUNmcpZE
    5idQPgXXOnPUgTuE
    JpmqCQgvktBT6IZW
    • El cable del botón frontal tiene un conector ZIF único: presta atención a los próximos pasos para desconectarlo de manera segura.

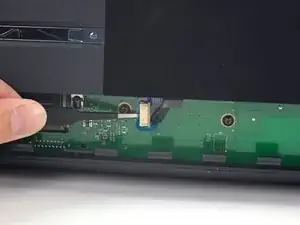
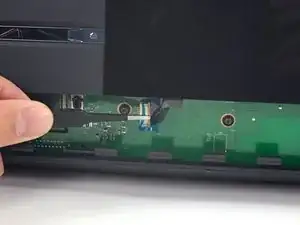
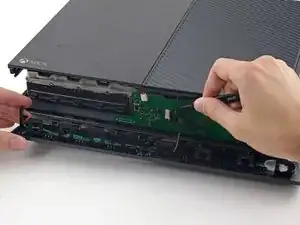
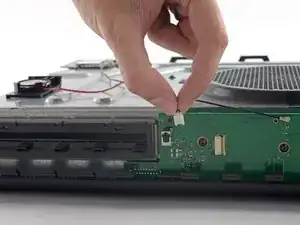
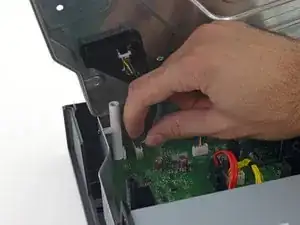
    • Usa pinzas para levantar el bucle de retención de plástico azul sobre el conector blanco de la placa.

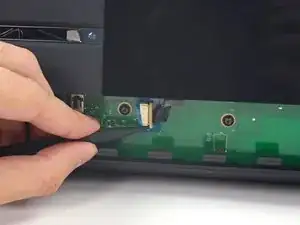
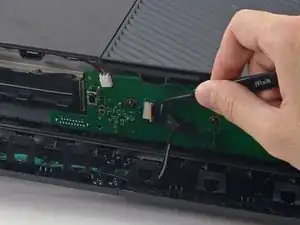
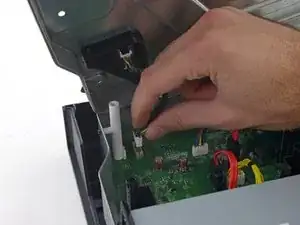
    • Usa la punta de un spudger para empujar la lengüeta de bloqueo del conector hacia el cable para desbloquearlo.

    I recently took my Xbox one apart to clean it and for some reason it's on for a couple minutes then it cuts off

    Ali -

    Or anyone else who has this problem or reads this on this thread, which is not the correct thread for this question by the way, here is a link to the forum for that. It could be any of a number of issues including overheating, Portland elation, or infestation, among others.

    Xbox One turns on then turns off after a few minutes

    Rooster Blue -

    Is there somewhere that I can buy a replacement zif connector

    Black Light -

  10. AHFqUGqKrLOvs6Mw
    AHFqUGqKrLOvs6Mw
    UKFO6I2mNG5CuVx1
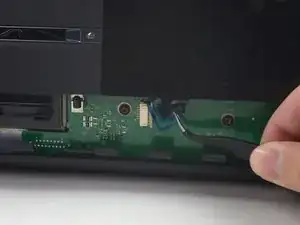
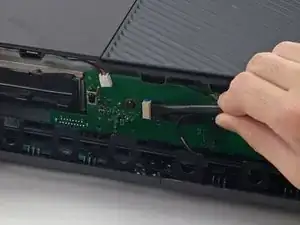
    • Usa unas pinzas para sacar el cable directamente del conector de la placa.

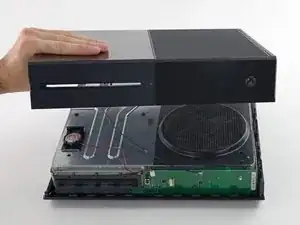
    • Retira la carcasa superior superior.

    I broke that peice that white connector peice what can I do?

    devinthomason -

  11. 2FCYpEe2HZMronDK
    2FCYpEe2HZMronDK
    jg6d6lTGcEVZjWCq
    6LxAZJy1HGaIBKUj
    • Los siguientes 4 pasos son instrucciones para volver a armar. Sáltalos para continuar con el desmontaje.

    • Usa el extremo plano de un spudger para liberar los clips que sujetan el panel frontal a la carcasa superior.

    • Retira el panel frontal del resto de la carcasa superior.

  12. kANCmbqNSW4gTaKm
    kANCmbqNSW4gTaKm
    fJSHsP4srEitpBI1
    rXaw12h6dMmByhSk
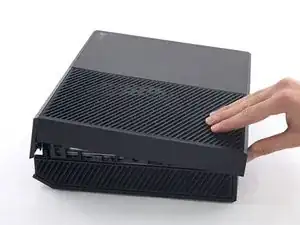
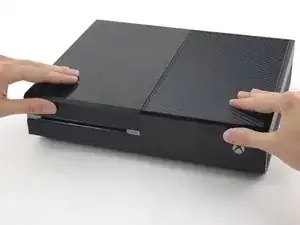
    • Vuelve a colocar la parte superior de la carcasa superior.

    • Alinea los clips y presiona firmemente para volver a colocarlos alrededor del perímetro.

  13. mlcHYVINYhfQhGKJ
    mlcHYVINYhfQhGKJ
    lVXM56UFy2OiQAuD
    4K2KXjxGnI2JJOCH
    • Apoya el panel frontal cerca de la parte frontal de la Xbox.

    • Usa pinzas para reemplazar el cable del botón frontal en su zócalo ZIF.

    • Usa el extremo plano de un spudger para empujar el seguro ZIF hacia la izquierda para asegurar el cable.

    My Xbox stopped working after this thanks

    nathan jackson -

    Mine did as well, its possible it may be the same reason. For me I had to unplug and plug it back in a few times and then clean off the contacts with isopropyl alcohol. Seems simple but if you haven’t already, I would try it.

    Alex Pascone -

  14. Iesh2ypKDM2MNTFi
    Iesh2ypKDM2MNTFi
    AKpcaAwyYcAC5k6H
    xOdLB1rAhB1shyVI
    • El borde inferior del panel frontal tiene ganchos de plástico que se entrelazan con ganchos de plástico del borde frontal de la carcasa inferior.

    • Con el panel frontal en un ángulo de 45 grados, entrelaza sus ganchos de plástico con los de la carcasa inferior.

    • Empuja la parte superior del panel frontal en la Xbox, como si cerraras un buzón. Presiona firmemente para que los clips que sujetan el panel frontal a la carcasa superior se bloqueen de forma segura.

  15. LQkgBcyYCwXArnom
    LQkgBcyYCwXArnom
    gWBVBocWb1NkHPXS
    IK1GfZDHgomdP6Am
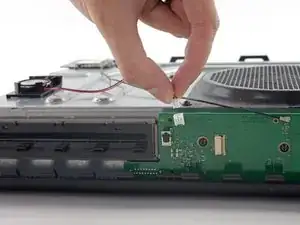
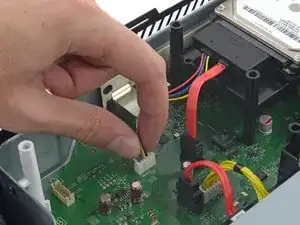
    • Tire suavemente del conector del cable del altavoz para desconectarlo de la placa del panel frontal.

    • Tenga cuidado de tirar del conector del cable y no del conector de la placa. Es bastante endeble y es posible que accidentalmente lo saques del tablero por completo.

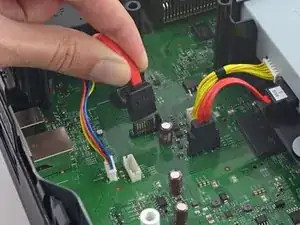
    • Use el extremo plano de un spudger para desconectar el cable de antena de la placa del panel frontal.

    If this connector is broken off, will that prevent the control panel to not work at all and NOT turn on? Is there a fix or work around IF this connector is broken off?

    Michael Eh -

  16. utZcNKWNa2TR5jcM
    utZcNKWNa2TR5jcM
    UKGjtWqMYPZnANKg
    VV1kMmQXDuLBoYUn
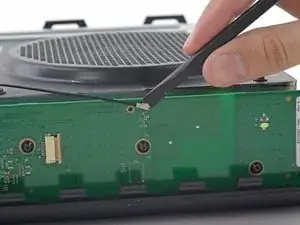
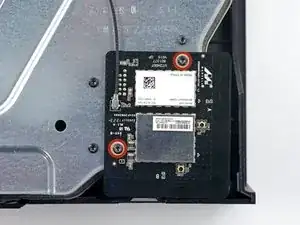
    • Retire los dos tornillos Torx T8 de 9.5 mm de la placa WI-Fi.

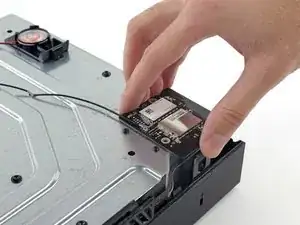
    • Levante la placa de Wi-Fi directamente desde su zócalo en la carcasa de metal superior.

    • Deje el cable de la antena de la placa Wi-Fi en su lugar, mueva la placa de Wi-Fi a un lado, exponiendo el tornillo con la etiqueta "C3" que estaba debajo.

    When reassembling- put the outer ones on first to secure the port to the metal. Then putting the wi-fi board into the port will be easy

    Nate Ennis -

    Will a cracked WiFi Board affect network connectivity?

    Kyle Webb -

    The T9 fit but was a tad big, for me the T8 worked fine

    Saul Torres -

    Where can i get a T9

    Wyatt Kyker [STUDENT] -

  17. hdHUGHWFaRvYVGhS
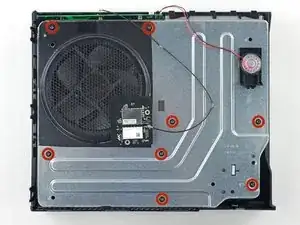
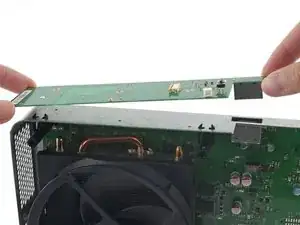
    • Retire los ocho tornillos Torx T10 de 65 mm de la parte superior de la carcasa metálica superior.

    Two of the 8 were stripped even before attempting to remove….ugggh

    Michael Massaro -

  18. VWMbtpnPxeXNBkVr
    VWMbtpnPxeXNBkVr
    dePENJIUnbGQohoU
    • Levante, pero no retire, la carcasa de metal superior.

    • El cable de interconexión de la placa Wi-Fi conecta la carcasa metálica superior con la placa base.

    If I need if Fix-It board

    Ramontoby13 Toby -

  19. rhjLPwOefpXlZN1d
    rhjLPwOefpXlZN1d
    RNCLEQRZGWR2dUfP
    • Desconecte el cable de interconexión de la placa Wi-FI de la placa base.

    • Retire la carcasa de metal superior.

    This connector may be exceptionally difficult to remove, and it is not strictly necessary for the replacement of the hard drive if you are careful.

    Rowan -

  20. 2bWQsTEPYDH3QytG
    2bWQsTEPYDH3QytG
    nRRFBst3KIYl6jqC
    foCoe4KPsNpjYa4E
    • Desconecte los cables de alimentación y datos SATA del disco duro de la placa base.

    I found that it is not necessary to take out the hard drive in order to remove the front panel module. If you can lift the whole metal enclosure a little to get to the right most torx screw, then you do not need to move the hard drive.

    Taiji Saotome -

    Thanks for letting us know about when the open day is going to be. Will make sure get my work completed by rushmyessay before the day so I can attend it in peace.

    shuaib ahmd -

  21. Wwcs4BNWEjGDZaHT
    • Levanta y quita la bandeja del disco duro de la Xbox.

  22. xYnovXjomBHPZO1G
    xYnovXjomBHPZO1G
    GmEDkZityGAY5wIv
    wXVRaIuE6HVDEX3x
    • Desconecta la alimentación de la unidad óptica y los cables de datos SATA de la placa base.

    I their a way to replace the motherboard pins the piece that connects to the hard drive, part on the motherboard that connects to HD

    Frosted Flakes -

  23. SVVTEqfLpq1BkoSf
    • Quita el ensamblaje de la unidad óptica de la Xbox.

  24. YPOnMQyOxqDfMEIg
    • Levanta el conjunto de la tarjeta madre fuera de la carcasa inferior.

  25. 5iqMRnkOaYfXXJyi
    • Remueve los tres tornillos T9 Torx de 9.5 mm que aseguran la tarjeta del panel frontal.

  26. DLZ1uUi43Yx6Y6IO
    • Desconecta la tarjeta de panel frontal de su socket en el frontal de la tarjeta madre.

  27. uEOULnmVGloIGG6f
    uEOULnmVGloIGG6f
    1OrXN2tShUrB3rdh
    fEcCfOMN3oY5bqxa
    • Dos postes de tornillo de plástico negro se unen al marco con púas de plástico elástico.

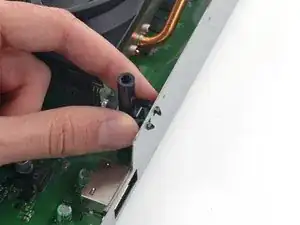
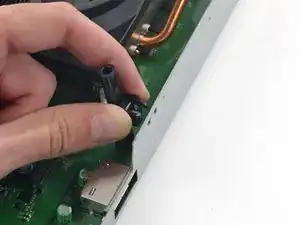
    • Presiona los brazos juntos y jala las púas hacia afuera a través del marco para remover los postes.

  28. NUfFtZoku2bXXRET
    NUfFtZoku2bXXRET
    G4no2MoVUEAZThXp
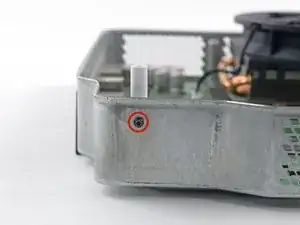
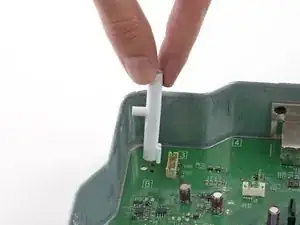
    • Remueve el tornillo T9 Torx de 9.3 mm que asegura el poste del tornillo blanco al marco de metal.

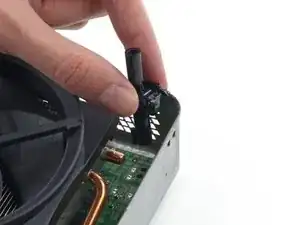
    • Remueve el poste de tornillo blanco del marco.

  29. A2rK36iX2tdyVnGg
    • Voltea el marco inferior de metal y el conjunto de tarjeta madre, para colocarla sobre el ventilador.

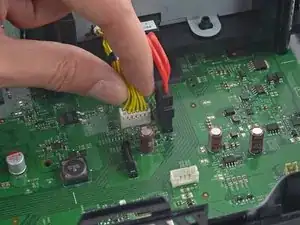
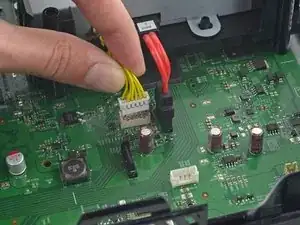
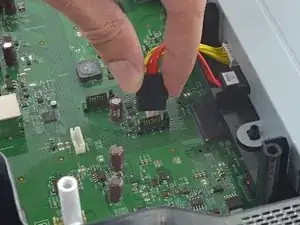
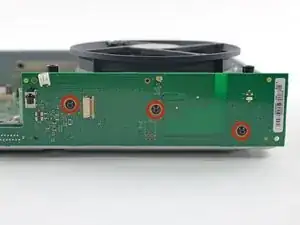
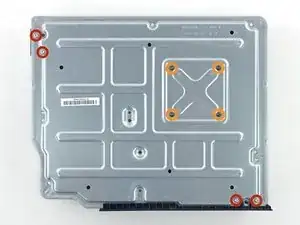
    • Remueve los siguientes tornillos del inferior del marco inferior:

    • Cuatro T10 Torx tornillos de 11.2 mm

    • Cuatro T9 Torx tornillos de 9.5 mm

  30. hbFOGQfMTVZ4MWEQ
    hbFOGQfMTVZ4MWEQ
    OERo2dZN2pmDhnxT
    2yKXIvOyYWQHpN6F
    • Dos pequeños conectores de plástico protuberan a través de la carcasa trasera de metal -- uno debajo del lado del puerto USB, y otro debajo del puerto AC. Estos puertos se atoran en la carcasa inferior de metal y hacen difícil remover la la tarjeta madre.

    • Presiona los dos puertos a través de la carcasa inferior de metal.

  31. egbqb4FCjCNGVZ3U
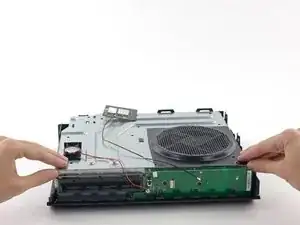
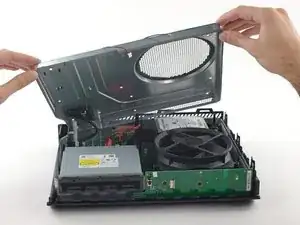
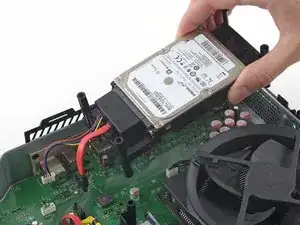
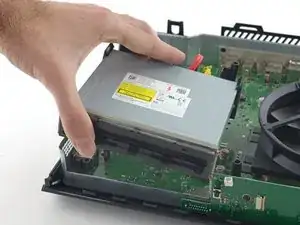
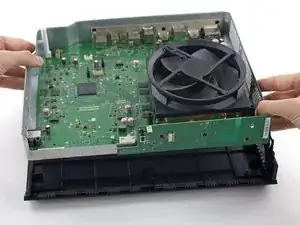
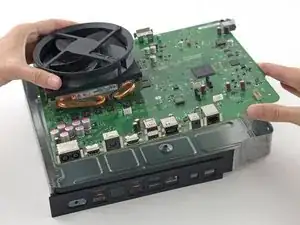
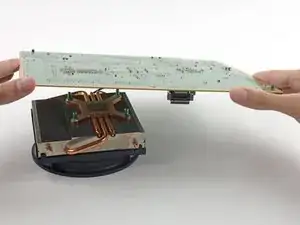
    • Levanta la tarjeta madre y disipador de calor/conjunto de ventilador fuera de la carcasa inferior de metal.

  32. UoNxhjQTwkGs1frv
    UoNxhjQTwkGs1frv
    HDZFxIaTuwhjhXlS
    • Desconecta el cable del ventilador de la tarjeta madre.

  33. wyAwsSLbEFQOO5JP
    wyAwsSLbEFQOO5JP
    qYbQB4ZVvCwD5R6E
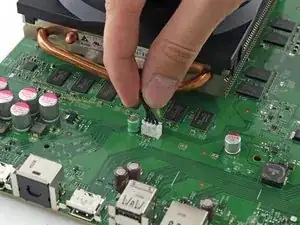
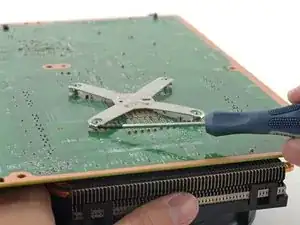
    • Inserta la punta de un pequeño destornillador de cabeza plana entre el poste y el borde exterior de un brazo de la abrazadera - X.

    • Gentilmente rota el destornillador, levantando el brazo de la abrazadera - X arriba y lejos del poste.

  34. Xn6ZYYNIW4WrQVAE
    Xn6ZYYNIW4WrQVAE
    wn4Bi4rCaAMfpHJx
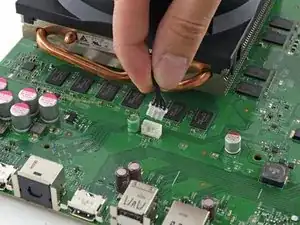
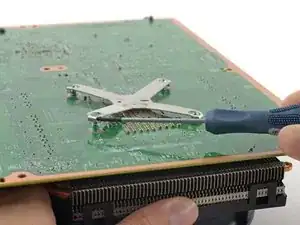
    • Usa la misma técnica de rotación para liberar un brazo más de la abrazadera - X de su poste.

    • Remueve la abrazadera - X.

  35. w5wVJIRpr3TrKYKt
    w5wVJIRpr3TrKYKt
    V6jYebMIatoJInSB
    • Levanta la tarjeta madre del ventilador/ conjunto de disipador de calor.

    • Cuando estes reensamblando tu Xbox, sigue nuestra guía de aplicación de pasta térmica en este punto para aplicar una nueva capa de pasta térmica al CPU.

  36. AAi14LYGF2GKJtxs
    AAi14LYGF2GKJtxs
    oNOQTtka1XpoQELu
    NhLXSfX54mJetrMD
    • El ventilador esta sostenido al disipador de calor con cuatro clips de plástico resistentes.

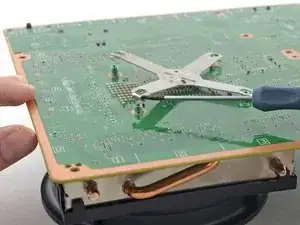
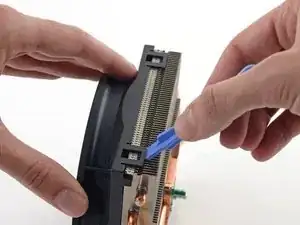
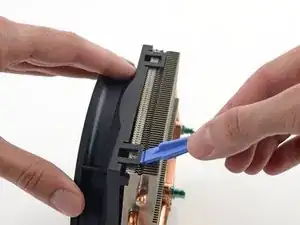
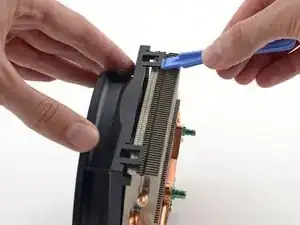
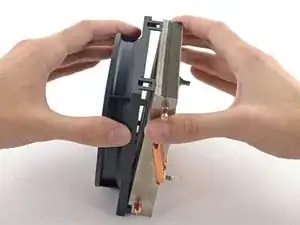
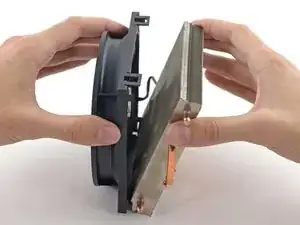
    • Usa una herramienta de apertura de plástico para hacer palanca en los dos clips en un lado del canal en el lado del disipador de calor.

  37. bXNusWGTeeIfqFHy
    bXNusWGTeeIfqFHy
    EUIYoBrfujOm1kMx
    • Separa el disipador de calor del ventilador.

Conclusión

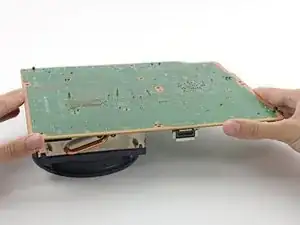
Para reensamblar tu dispositivo, sigue estas instrucciones en orden inverso. No olvides aplicar una nueva capa de pasta térmica a tu CPU. Sigue this guide para aprender como.

Andrew Optimus Goldheart

Miembro Desde 17/10/09

494159 Reputación

5 comentarios

Can you by chance get the measurements for the heatsink such as the mounting points and height of the heatsink?

marshalljosh -

Hi.I've just wondering can i put a liquid metal thermal paste i think the radiator has to be copper and that's all , pluses of the procedure that liquid metal thermal paste doesn't age, and the xbox will need only fan cleaning

Kiril Angelov -

Do you have any tips on getting the heatsinks back bracket back on?

Tim Rauls -

Pry on the sides in a x formation, and when you get it on the post, just push down till you see it click in to the groove on the heatsink post

etho gamer -

Disassembled removed dust with a brush, replaced the thermal paste and reassembled in 50 minutes. Feeling like a pro lmao.

Szczepan Ciołkosz -