Introducción

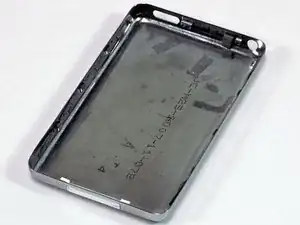
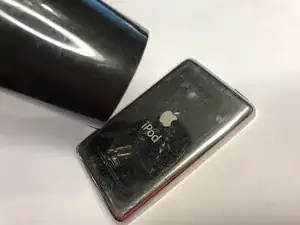
La mitad trasera brillante de el case de tu iPod.

  1. EOPVpiWLPKgTEOOr
    • Apple diseñó sus nuevos iPods para ser muy difíciles de abrir sin destruir componentes principales. Debido a la placa frontal y trasera metálicas, y los 13 (sí, 13) clips metálicos que mantienen las carcasas juntas, éste es uno de los iPods más difíciles de desarmar.

    • Procede con precaución, y considera la advertencia de que podrías dañar significativamente tu iPod más allá de su condición actual. También podrías necesitar un par extra de herramientas plásticas de apertura durante la instalación, ya que son fáciles de romper mientras abres el iPod. ¡Diviértete!

    • Antes de abrir tu iPod, asegúrate que el interruptor de bloqueo está en la posición de bloqueo.

    Actually, there are only 11 metal clips. From the face side:

    On the top, only 1 clip centred 35mm from LHS. Avoid the first 30mm on the LHS, and the last 20mm on the RHS

    On the RHS there are 4 tabs centred at 20mm, 40mm, 65mm and 85mm from the top. Take great care to avoid the topmost 15mm

    On the LHS there are 4 tabs centred at 20mm, 40mm, 65mm and 85mm from the top

    On the bottom, there are 2 tabs, each one 10mm in from the edge.

    Also, I bought 2 spudger bars with the battery, and found them invaluable. The plastic ones supplied are nearly useless

    astutebs -

    Okay, I’m a noob, what’s an LHS…I assume it’s “Left..H…S" and RHS is “Right…H…S”, but please elucidate.

    Miguel FC -

    Left Hand Side

    Right Hand Side

    darren_chalk -

    take your time, be patient, it’s hard but you can do it. Watch other videos from youtube for battery replacement for your model to supplement this written procedure - particularly with regard to releasing the battery ribbon connector. I have the hardest one to crack open I and got it done and I’m 63 years old with bad hands…..my ipod classic now works good as new!!!!!!

    Donald Diebold -

  2. Xf2Hhubc5hJ5qZCi
    • Abrir este iPod es un desafío. No te desanimes si te toma un par de intentos antes de que el iPod se abra. Conviene recordar el ángulo de la punta de la herramienta de apertura de plástico cuando la insertas dentro del iPod. Idealmente, el ángulo debería ser lo más vertical posible mientras aún liberas el borde del panel trasero.

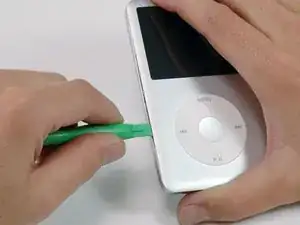
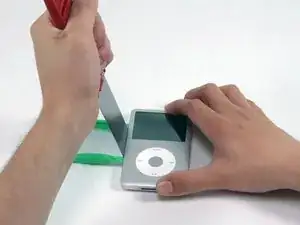
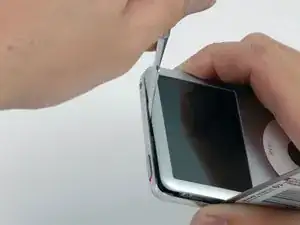
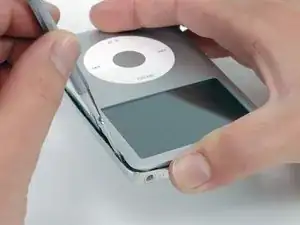
    • Inserta una herramienta de apertura de plástico dentro de la junta entre el frente y la parte trasera del iPod.

    I think this must be a 5th gen ipod class and the gap is larger. I have a 6th gen ipod classic, the plastic open tool can't insert in!

    The battery(thick) I bought from ifixit has problem: the cable is not same length as the original one. Be carefully.

    linhaiyxs -

    AWESOME!!!! Couldn't b happier,1 hour and 10 mins to switch out headphone jack (had music through one speaker) and battery since I had it open. Really only had to use plastic spudger,metal spudger and 1.5 inch puddy knife. Plastic separators didn't really help,for 3 bucks I'm not complaining. Already had a 00 screwdriver. All told,$43.00 for parts and I have my 120 gig iPod back.

    David Fizur -

    Before starting to pry open the case, look closely at the pictures in steps 21 and 23 to better understand the clips to be released and the location of the clips. It will make the probing with the spudger more effective.

    Jim Athay -

    Don’t waste time here…just use the metal spudger.

    Hwyman -

    what jim says. that pic of the clips should be up here so you can visualise what you’re trying to do, before you trash the rails.

    duncan rmi -

    I agree with Hwyman. I spent quite a bit of time trying to open the case with the plastic opening tools but could never get it into the joint. Then I went tried the iFixit Jimmy tool along with the metal spudger for the rest of the steps. It made is so much easier. I completed the entire job within an hour.

    Bruce Baumgart -

    I used a watch back removing tool, it is thinner and made of metal and opening my 5th generation classic iPod was a cinch …. really ….. and I am usually quite clutzy. I inserted it and moved it slightly to the left very gently to separate the back and front and those clips just popped open.

    It must have been okay because it all popped back together again after I replaced the battery. No issues with bent seam, back or anything I had read here.

    Thank you original poster, these instructions were great.

    Well Goodness Me -

    I also ended up putting a small piece of electrical tape over the Hold switch as I kept bumping it with my fingers. That worked really well but it did leave a residue that I then needed to clean up with isopropyl alcohol afterwards.

    Hannah Tanquary -

    What happens if you do it without the hold button switched? Because I just did that.

    Candice Kush -

  3. P5NwZ4jP1sYo4UTO
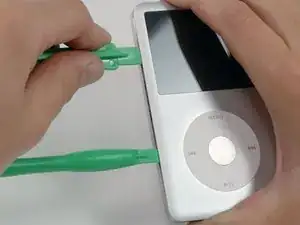
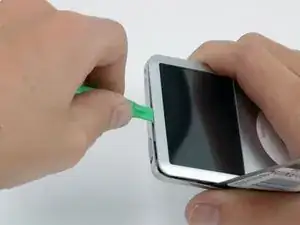
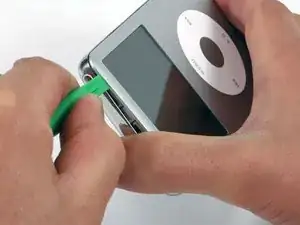
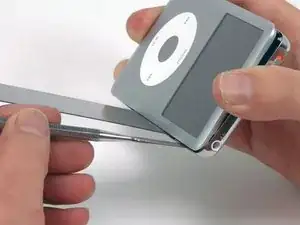
    • Inserta otra espátula plástica de apertura en la junta entre el frente y la carcasa trasera del iPod, dejando aproximadamente pulgada y media entre las dos herramientas.

    Stick yer dick in. Yer gonna f it up folks

    doug -

  4. U6UpLStuFxclrQse
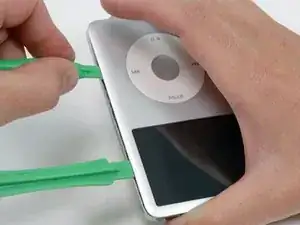
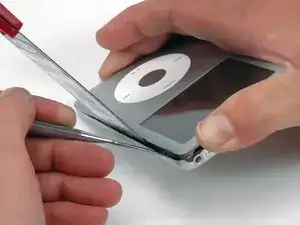
    • Con cuidado y con algo de inclinación, inserta una espátula alrededor de 1/8 de pulgada dentro de la junta entre las dos herramientas de apertura.

    • Hay unos delgados raíles metálicos bordeando la parte trasera interior, así que ten mucho cuidado al introducir la espátula.

    The plastic tools are fine for holding the tabs open or for prying open partially open sides, but you're much better off using the metal spudger to open em

    parthmukeshbhatt -

    I couldn't agree more about the plastic opening tools! The metal spudger worked loads better when it came to actually opening the device. Yes, the metal tool's tip was much sharper than the plastic (and hence, easier to cut your fingers on if your grip slips) but it was substantially more effective in the end. :)

    Kimberly Valdovinos -

    At my local hardware store they offer stiff and flexible putty knives - which kind is better for this purpose?

    anonymous 4032 -

    Don’t do this! The putty knife is too wide and will damage the inside of the case. You can see in the photo for step 19 how the metal clip rail has been bent out of shape. You need to use a narrower tool the will fit between the protrusions on the clip rail (which is where the clips actually are). This video shows a better, albeit more dangerous, method using an x-acto knife. I used the method shown in the video but with a #18 chisel blade on the x-acto knife. With the iPod on its back, I inserted the blade with the beveled side down. Then I pried the side out slightly and peeked through the crack with a flashlight to make sure that the blade was positioned between the protrusions, readjusting as necessary. I used multiple knives to prevent released clips from reengaging. Use this technique at your own risk, and wear adequate hand and eye protection as the blades are very sharp and somewhat brittle.

    Robert Watkins -

    I used the iFixit Jimmy instead of a putty knife. I also watched the x-acto knife video that Robert Watkins linked to in order to find where the clips are located. I slid the Jimmy into those locations until the tool bottomed out and then move on. I only used the metal spudger (to initially open a gap), the Jimmy (to open the clips), and occasionally a plastic spudger (to hold open gaps while I relocated the metal tools to a new section). Pro tip: Use the Jimmy as a letter opener after you fix your iPod.

    Hwyman -

    I used two small putty knives manufactured by a company called Albion Engineering. They make caulk spatulas in multiple sizes. Took me less than 2 minutes to get the back cover off, with no damage to the sides or clips. And - it was my first time! Highly recommend these, especially if you are in the business.

    Ronald Zanarotti -

  5. R2DvwfB3dvQbK3re
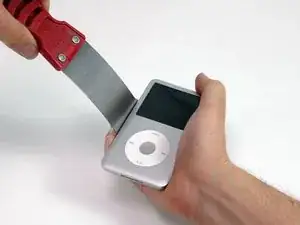
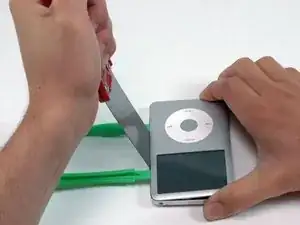
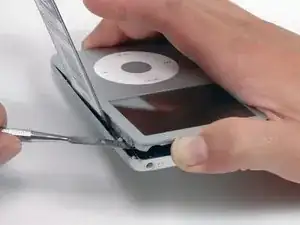
    • Empuja con tus dedos sobre el panel trasero detrás de la espátula, para minimizar el doblamiento. Lentamente, dobla la espátula (tal y como se muestra en la imagen) para asegurarte de que la mayoría de los enganches de metal de este lado del iPod se suelten.

    • La teoría tras este método no se basa en no doblar el panel trasero, sino en doblarlo de manera que pueda recuperar fácilmente su forma. Por lo tanto, cualquier doblez del panel trasero debería alejarlo del iPod, y no empujarlo hacia la superficie curvada. Este método, además, también soltará la mayor cantidad de enganches laterales posible.

    I disagree with the “theory” here. You don’t have to bend the case at all. Watch the x-acto blade video on youtube (it’s linked above in the Step 4 comments). The idea is to slide whatever wide flat tool (putty knife, x-acto blade, iFixit Jimmy, etc…) in between the clip and the body. Setting the iPod flat on the table instead of holding it will help and you won’t cut yourself if a tool slips out. As you disengage clips, you will find that the body will start coming out on it’s own without having to flex your wide tool and bending the case in the process.

    Hwyman -

  6. Aus3DVJwhU2Oi2XH
    • Separa la espátula del iPod, y vuelve a insertarla más cerca de la esquina del iPod, usando el mismo tipo de movimiento que antes.

    • Si es posible, intenta NO doblar la esquina del panel trasero.

  7. Zh61HMJTVf6GOnJL
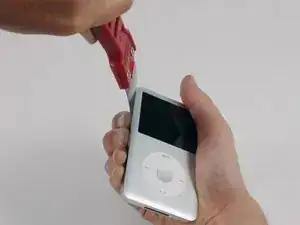
    • Inserta una herramienta de apertura de plástico en la junta entre la parte delantera y trasera del iPod, esta vez hazlo en la zona que está entre el botón deslizante de bloqueo y el conector de auriculares.

    • Tendrás más facilidad para doblar la espátula hacia abajo y hacer más espacio para la herramienta de apertura, ¡pero asegúrate de no doblar la esquina del panel trasero!

    The clip holding this part of the iPod together is different from the others around the iPod and you might want to keep the spudger in place until you've opened the iPod completely.

    Karsten -

    This is how I broke my whole entire screen.

    Joe Kenny -

  8. lQnXSnIqFFHYFUVX
    • Cerca del centro de la pantalla, inserta con cuidado un Spudger metálico en el espacio creado por la herramienta de apertura de plástico.

    • Es fácil crear un desperfecto en el panel trasero que será muy visible y difícil de reparar. Al separar este panel, intenta que el Spudger gire sobre el borde en lugar de doblar el panel hacia afuera.

    • Usando el Spudger metálico, separa el enganche único que tiene la parte superior del iPod.

    This was the most difficult step in opening for me. Place the device on a hard surface and press with increasing force until you feel the clip push down and out of the way.

    joe -

  9. MoDaS4mX4mn1WvSB
    • Inserta de nuevo una herramienta de apertura en la junta entre la parte frontal y trasera del iPod, y ahora hazlo cerca de la otra esquina superior.

  10. qBJKen3ZbYTv4CP4
    • Repite la operación de introducción de una herramienta de apertura, esta vez en el otro lado de la misma esquina del iPod (tal y como muestra la imagen).

    • Te resultará más fácil si le das un pequeño ángulo a la herramienta de apertura de la otra parte de la esquina, generando así un hueco suficiente.

  11. V3XBmgJqAtYTq6pp
    • Separa la herramienta de apertura de la parte superior de la esquina, y colócala en la junta entre la parte delantera y trasera del iPod del mismo lado donde tienes colocada la anterior (tal y como hiciste en el otro lado, deja una distancia de pulgada y media entre ambas herramientas).

  12. QcQN5bms11KoOrWZ
    • Con algo de ángulo, inserta la espátula un 1/8 de pulgada entre las dos herramientas de apertura.

    • Nuevamente hay una serie de raíles metálicos en los laterales del panel trasero, así que ten cuidado al insertar la espátula.

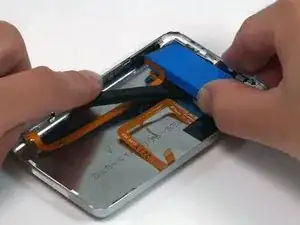
    • Una vez que la espátula ha separado el borde del panel trasero, colócalo en ángulo hasta que esté en vertical, y muévelo hacia dentro con cuidado (pero de manera firme) para que se inserte en el iPod a través del hueco que has generado con las herramientas de apertura.

    • Empuja con tus dedos sobre la parte trasera y por detrás de la palanca, para minimizar la necesidad de doblar ninguna pieza. Siempre que puedas, dobla ligeramente la espátula para asegurarte de que separas todos los enganches posibles de este lado del iPod.

  13. YSoJRkQKe5VE5dNP
    • Los enganches metálicos de la esquina se agarran fuertemente al panel frontal. Es necesario soltarlos para abrir el iPod.

    • Coloca el spudger metálico con cuidado en la zona donde está el clip de metal problemático.

  14. 5EZ1hnqBvkYuPIUy
    • Mueve el Spudger con cuidado para insertarla por completo en el panel trasero.

  15. UKcbQL5sWoTlMTW2
    • Empieza a separar, con cuidado, el clip del panel frontal.

    • Es fácil crear un desperfecto en el panel trasero que será muy visible y difícil de reparar. Al separar este panel, intenta que el Spudger gire sobre el borde en lugar de doblar el panel hacia afuera.

    What can i do if unintentionally removed the retaining flap connector from the logic board?

    molina6711 -

  16. IV6xKXYtN1a5InEr
    • Sigue empujando el panel frontal con el Spudger hasta que la sujeción se suelte.

    Συνεχίστε να πιέζετε προς τα επάνω το μπροστινό πάνελ με το spudger μέταλλο έως ότου ελευθερωθεί το μεταλλικό κλιπ.

    ermiskaspis -

    I couldn't have said it better.

    mike -

  17. eJyKsFumyvX3RE2P
    • Hay dos cables planos conectando el panel trasero con el resto del iPod. En el paso siguiente, ten cuidado y no los dañes al manipular las piezas.

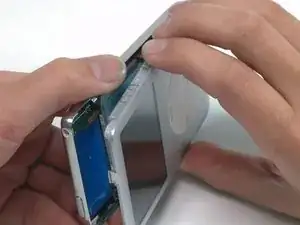
    • Agarra el panel frontal con una mano y el panel trasero con la otra.

    • ¡Respira profundamente!

    • Con mucho cuidado (MUCHO CUIDADO), suelta el resto de enganches de la parte trasera separando el panel frontal y trasero (imagina que la parte baja del iPod fuera una especie de pivote), con cuidado de que no dañes los cables planos que mantienen ambas partes unidas.

  18. kMEETwSmQLWep3py
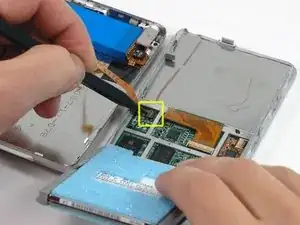
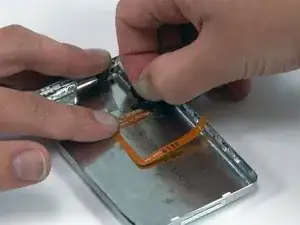
    • Usa el Spudger para levantar la solapa que mantiene en su sitio al cable conector.

    • Esta solapa solo necesita levantarse unos 2 mm. Es un conector sensible, y si haces mucha fuerza podrías separarlo de su placa lógica.

    • Desliza el cable plano naranja de la batería fuera de su conector.

    Be careful here. I screwed up and ruined the iPod's motherboard when trying to reconnect the battery cable.

    greekman07 -

    very easy tear off battery connection from the logic board,very careful when open that plastic lock.

    andraskiss -

    Be EXTREMELY careful not to lift too far up and remove the whole piece from the motherboard. You'll never get the pins to line up correctly again without breaking the solder joints and ruining the motherboard if you do. iFixit failed.

    bcook -

    totally screwed up, pulled out the whole

    agnesmadness -

    the connector came out with the battery cable ,almost lost it. I did get it back in though.

    elsprato13 -

    Same thing happened to me. How did you get it back in? Pkease....

    molina6711 -

    Yeah, this battery connector is extremely fragile if you pry too hard you will lift the whole connector plastic off the board. A really, really bad design from Apple having that type of connector like that. The white plastic part is not secure at all to the logic board so when you pry the tab up, you may lift the whole thing up.

    rgarjr -

    Had no problem disconnecting the cable, I used a nylon spudger to press the connector down while using a plastic pry tool to pull the cable up, be patient, it might take time.

    Tip for reassemble: Use a tweezer to reinsert the cable, again, it might take time.

    Luis Soto -

    ifixit fail. Be VERY careful pulling up that lever or the whole connector will pop right the !&&* out and you will never, never, NEVER get that sucker back in. Time to buy a new one, %#*!^@.

    Jeff White -

    Just poke this latch up from behind. It's a little scary, but it literally just popped straight up for me.

    Gordon Krupsky -

    You MUST put the warning in the instructions not to pull out the connector. Everything worked perfectly, seriously perfectly, until I went to put the battery cable back in and realized I had popped the connector out and it pulled all of the metal prongs out. Without a way to reconnect metal to metal, this basically just killed my ipod. It's trash now. Such a disappointment. Will not be recommending this site until you fix this one instruction.

    djbagwell -

    Took me a long time to figure it out. The retainer literally pulls up ... straight up, not hinged. The retainer is the (at leeast on mine) grey thingy with a rounded top. I finally got the courage to gently pry it up (2 mm = 1 smidgen) and tthe connector pulled/fell out. Gods know if I'll ever get it back.

    Larry Osborne -

    I pulled the connector off the motherboard, trying my best to be gentle. The instructions need to be more specific about what to pull and in what direction. The spudger wouldn't grip onto anything and I tried to rock the retainer out, not sure which way it needed to go before releasing. Then, voila, the whole thing came off. That's the end of life for my iPod classic, which I've had since 2008.

    David Harbin -

    Is there a way to reconnect? Does it have to be re-soldered?

    Blake -

    1 use a fine tool to lift the brown tab of the latch vertically up

    2 use tweezers to grip the ribbon along its horizontal run then lift out. Don’t grip the last section that bends into the motherboard connector or you might short circuit the battery conductors, which are not insulated for the last 12mm or so

    3 make sure the latch is fully up when you want to connect the ribbon of the new battery, as it falls down very easily and stops the new battery ribbon entering the connector

    anonymous 2502 -

    I released the battery first (with the spudger), which enable the whole case to be butterflied. Then, using a splinter probe with a slight hook lifted the retaining clip, and removed the existing battery lead. Then using a very fine tweezers inserted the new battery cable, and pushed the retaining clip back into place, while holding the cable with the tweezers. All good.

    astutebs -

    Jesus is there a way to buy the brown clip?? It was dangling and I just popped it out of the socket!! When I tried to put that back in, it just broke its leg.. I need help guys! The motherboard is safe though.

    Sizun Cho -

    Late answer by myself. There ARE brown clips available in Aliexpress. I bought them!

    Sizun Cho -

    Once you bought the connector how did you managed to put it back in? Please!!!!!

    molina6711 -

    How can I order the connector in Aliexpress? How do you know you are buying the right thing?

    molina6711 -

    It would be extremely helpful if we had a better closeup of these parts. It seems the color of these parts is different from model to model. Maybe even from MB to MB. Getting the cover off was easy. But now I have no idea what I am looking at.

    Ronald Zanarotti -

    Definitely need to hold the retainer in place while you pull the ribbon. Worked like a charm!

    Ronald Zanarotti -

    1. Looking directly down on the iPod, use a small tool, apply a very light force on the back of the brown retainer pushing toward the front of the iPod.

    2. Looking directly down on the iPod, use a small tweezers to apply a very light force to grasp the battery cord as close to the brown retainer as you feel comfortable, Try not to touch the brown retainer. While still holding the tweezers, use another very light force to lift the battery cord end toward the back of the iPod.

    (I skipped to step 24 because none of my tabs were bent. Also, I was very careful with the headphone cable/keep the two halves together. )

    zeek stahl -

    List the caution first before the step. This is crucial and I thought I did it myself. Turned out I just didn't put it back together correctly and didn't get the battery connected. When I opened it up the second time the battery cable was just dangling. Need to make sure the connection is snapped back down and give a slight tug on battery cable with plastic spudger.

    SEAN Tanton -

    Yup, I’ve joined the flock of people who pulled the whole connector out. I was trying my hardest to reassemble without breaking anything and thought something needed to be flipped down. LESSON LEARNED: The retainer hinge pops up and down VERTICALLY, like toast in a toaster. If the black head and white tongue are flush at rest, it’s closed. Hook the black around the convex side, then lift it up. When open, the black part is noticeably taller.

    Ally Gator -

    Yep. pulled the whole thing apart. the explanation and the picture are not clear enough. they should add a picture where the cable is pulled to show that you don’t want to pull the whole thing

    Syavin Eka -

    Happened to me as well but not because of iFixit’s guide, I followed a Youtube tutorial that didn’t mention this could happen. Anyways, just leaving a comment here to say that it’s possible to reconnect the connector to the motherboard (assuming it’s not damaged beyond repair) as long as you know how to solder stuff (and have the tools for it). Otherwise taking your iPod to a repair shop might be your only option (other than throwing it away but please consider not doing that if the iPod can be fixed, we have enough e-waste already).

    Héctor Cabrera -

    The best way is to pull the battery flat cable alone, and insert it after done.

    gperiusdaufenbach -

    What can i do if unintentionally removed the retaining flap connector from the logic board?

    molina6711 -

    What can i do if unintentionally removed the retaining flap connector from the logic board?

    molina6711 -

    GRRRRR. make the instruction HOW TO REMOVE IT SAFELY, not just "be careful" !!!!

    Darcy Twarog -

  19. ksHuAT13tY4aXEC2
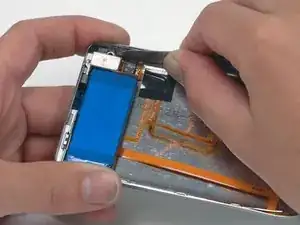
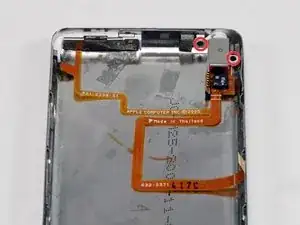
    • Coloca el panel trasero junto al iPod, con cuidado de no retorcer el cable naranja del conector de los auriculares.

    Be careful not to damage the hold switch ribbon there...

    Karsten -

  20. jQUWPhQGbL3NcGhR
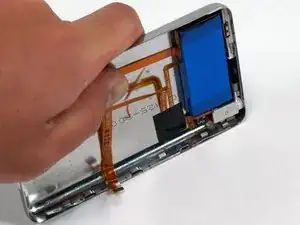
    • Levanta el disco duro con una mano para poder acceder al conector de los auriculares, que se encuentra debajo.

    • Usa el Spudger para levantar la placa de plástico que mantiene el cable del conector de los auriculares en su lugar. La placa girará 90 grados, soltando el cable plano.

    • Desliza y quita el cable plano naranja del conector de los auriculares.

    • El panel trasero ahora está completamente separado del iPod.

    I don't know if this step is totally necessary. If its not feel free to skip it just be careful to avoid tearing the ribbon.

    kevman12 -

    I recommend not doing this. I couldn't figure out how to reattach and broke the jack in process. There is no need to do this step, just be careful not to strain this connector.

    JOSHUAEGILLESPI -

    This is probably the most difficult part because the jack is so tiny and it's not obvious that it contains a "flip up" retainer. A very difficult step.

    robertdraznik -

    How do I get that little 90° clip to stay back down with the new ribbon in it

    Nar -

    How do I get the little clip to stay down holds the year Jack ribbon to the motherboard

    Nar -

    I just pulled. The thing flipped up automaticly 90° degrees.

    tellmiger -

    This step (and next few “repair” steps) is not worth doing unless you mangle the case when you pry it open. If it doesn’t look all bent up, leave this ribbon attached and skip ahead.

    Hwyman -

    I detached the cable by flipping the clip as described.

    Attaching the cable again was no problem using the plastic spudger to turn the clip back to its ‘close position’.

    Georg -

  21. ZqokKYnhxsBlHtmk
    • Ahora, ¡a reparar los daños causados al separar las partes internas del iPod Classic! Es muy probable que por lo menos uno de los enganches de metal del panel trasero se haya doblado hacia arriba. Estos clips deben apuntar siempre hacia abajo para poder reajustar el panel trasero.

    Right, I thought the way that this was phrased is a tad confusing. Basically, once you've separated the front and back panel, insure all the prong-like-clips around the sides of the back panel are all down - not sticking up after opening the ipod. I skipped the step because it was confusingly put. I ended up successfully swapping the battery, however when I went to put the ipod panels back together, they wouldn't clip back properly. This made it very fiddly. Anyway, hope that helps.

    Joe Parkes -

    Please post a picture of what they are supposed to look like? I think you mean bent outward.

    Jason Bidwell -

  22. WDEgpxbtNAi3NXWE
    • Sujeta el lado ancho y plano del Spudger y aprieta sobre el enganche hacia abajo, con cuidado de no romper el trozo de metal fino y separarlo del panel trasero. Alternativamente, puedes usar unos alicates de boca plana para reducir el riesgo de que se te deslice la herramienta y dañes el conector de los auriculares.

    • ¡Ten cuidado de no dañar ninguna de las partes del conector de los auriculares al recolocar estos clips!

  23. tYBTkePhQYKJqUqv
    • En una superficie limpia y dura, coloca el panel trasero sobre su perfil. Con cuidado pero de manera firme, empújalo contra la superficie para colocar la placa lateral de nuevo en su posición.

    • Quizás necesites hacerlo varias veces para conseguir que los laterales queden rectos. Es mejor empujar los bordes de la carcasa más hacia adentro y no que queden sin empujar lo suficiente, porque al colocar el panel frontal recolocarás cualquier exceso en su alineación correcta.

    • Ahora que el panel trasero ya tiene un estado espléndido, ¡ya puedes reparar tu iPod!

    My iPod wasn’t closing very well, then I noticed that I didn’t do this. Thanks!

    TheYootz Media Group -

    I ended up used a set of squeeze clamps with soft rubber jaws to very carefully apply pressure to either side of the case and top and bottom all around the perimeter in order to square it back up.

    Hannah Tanquary -

  24. hMRrgDMkouvUGWsj
    hMRrgDMkouvUGWsj
    s2tTvXQMKXXIGO3I
    • La batería está conectada con el panel trasero con un adhesivo. Ten cuidado de no romper el conector naranja de los auriculares o los cables planos al separar la batería.

    • Usa el Spudger para levantar la batería y el cable naranja enganchado, y separarlos del iPod. Si tienes un iPod de 160 GB, la batería será más ancha de la que se muestra en la imagen.

    • Si tienes algún problema al separar la batería, puedes usar un secador de pelo o una pistola de calor en la parte trasera del iPod para reblandecer el pegamento que mantiene la batería en su lugar. Ten cuidado con no sobrecalentar la batería.

    Just wanted to say THANK YOU to whoever made this tutorial!! Kinda unclear in some areas, but I got it! Thanks so much!!!

    shaunlovesyou -

    I just want to say that with out this tutorial I could never have taken my iPod apart the biggest help was the addition of the putty knife. It took about 30min cause I took it slow. My iPod is charging and seems to be working thank you

    PMM -

    dont do this, as u see, any one can edit it, it's like wikipedia, not reliable.

    sophia -

    I do this and my ipod works now!

    loquetraoul -

    Thanks for this. It worked for me without any hitches. Your presentation, products and packaging are all first rate.

    tripplc -

    All very easy to do. Ive just "frankensteined" a 100Gb classic and working all fine. Very simple and clear instructions.

    Been using iFixit for almost 10 years in my data recovery company and always been informative in getting Macs opened easily and with great results

    michael earl -

    Within the first minute, I pushed a plastic opener through the flesh of my opposite index finger. Within the second minute I peeled back about 3/16" of my index finger nail. Within the third minute I broke the tips off of first one and then the other of the supplied plastic openers. On the fourth minute, I threw the entire kit -- brand new replacement battery included -- in the trash. Thanks for absolutely nothing!! Ken Queale

    K Queale -

    Sounds like you're just clumsy...

    bjoernskytte -

    Absolute waste of money. I have been working on it for an hour and half. Blue tools wore out the first 1/2hour

    Dave Sherman -

    My hold button ribbon was in the battery glue and tore when I pried the battery loose. I 'm going to try to replace that part with luck that will be all I have to do.

    elsprato13 -

    I just did the exact same thing. In retrospect, it strikes me that if I would’ve warmed the iPod’s back with a hair dryer to soften the glue holding the battery, this would’ve been a lot easier. Learn from my mistakes people. :-)

    Greg Rankin -

    There are several hard tasks in this process and this step was hard for me. Took me a while to detach the battery without damaging the cables. But with some patience I succeeded.

    Great guide, by the way.

    Luis Soto -

    I have been trying unsuccessfully to get into my ipod to replace the duff battery for a long while. Now, armed with your instructions and the right tools I have done it! (not without considerable frustration with those pesky clips I might add). The plastic spudgers are useless by the way. It took a while to work out how to release the battery ribbon cable and larger picture of the clip action would help. I too found the battery glued to the ribbon cable beneath it. Perseverance, patience and a steady handed are a must for this one. Well done and thank you!

    Colin Kaye -

    I did it all, plugged into the charger for 10 hours and it shows charging… I unplugged it and is dead.

    Nora Saba -

    Battery replaced. MB spooled up when I plugged the unit in. Now waiting for it to charge. This process was actually pretty easy with the help of this tutorial. A lot easier than an iPad repair with all the glue. No way could I have done it without the help. So far: every iFixit! repair I have done has been a success. Thanks!

    Ronald Zanarotti -

    When finish replace battery, need to restore?

    TOAT POOPONG -

    No you do not

    Bailey Halifax -

    The instructions were great! I completed the repair with an hour. I can’t ay enough about the parts, tools, and repair guides from iFixIt. I recently replaced my hard drive with an SSD drive on my iMac and the repair guide for that was spot on as well. Thank you, iFixIt!

    Bruce Baumgart -

    Any luck fixing the hold button ribbon Greg? Mine ripped too.

    Lachlan Griffin -

  25. EEkjIs4QmA2tUHLQ
    • Use una mano para sostener el cable en su lugar y pele la cinta negra que aseguran los cables hacia el panel trasero con la otra mano.

    I saw some YouTube videos where they were able to reuse the black tape on the new backplate, so I took some time to carefully remove it, without success. However, since I was replacing my iPod 7th Gen with a 240GB disk (thicker than the original), the new thicker back plate did not need the tape since the cables are separated form the case.

    Luis Soto -

  26. TiSoErFARJnHuHxL
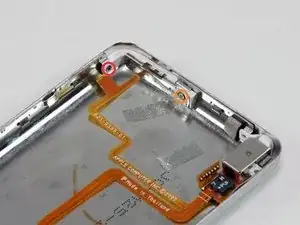
    • Remueva los dos tornillos Phillips negros que aseguran la entrada de audífonos hacia el panel trasero.

    • Estos son PEQUEÑOS! Asegúrese que tenga un destornillador de tamaño 00 en su mano.

    One tip when reassembling. These screws are very tiny and difficult to handle even with magnetized drivers, so I used the PH000 tip of the iFixIt kit to pick the screws and screw the first turns. Then switch to a PH00 to tighten them. Actually, using a PH00 of a cheaper set I bought to open the iPod, worked better since the length of the screwdriver was shorter than the case.

    Luis Soto -

    You can also use a Phillips 000 for these. I also accidentally picked up the wrong screwdriver and got one out with a Phillips 0, but I think there's a definite risk of stripping your screws if you're not careful with this one.

    Gordon Krupsky -

    When re-assembling, if you dip the tip of the screwdriver a couple of mm into a pot of vaseline, then place the screw onto the tip, it will hold the screw nicely in place until you tighten the screw (ie it will stick to the tip without dropping off)

    anonymous 2502 -

  27. RyPtuZxeSDRK6jBC
    • Remueva los siguientes dos tornillos:

    • Un tornillo Phillips negro que asegura el Hold Switch cerca de la esquina de el iPod.

    • Un tornillo plateado Phillips que asegura el otro lado de el Hold Switch.

  28. PayLWyY2fLBZdhFN
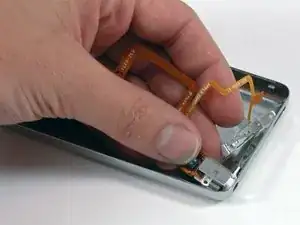
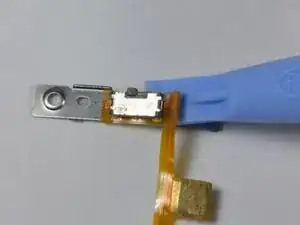
    • Levanta el interruptor de retención de su alojamiento en el panel trasero. No quite sel interruptor de retención por completo en este momento, ya que está conectado al mismo cable que el conector de auriculares.

  29. vLTILT2Y6lG2Zo1c
    • Desliza el conector para auriculares fuera de su alojamiento en el panel trasero.

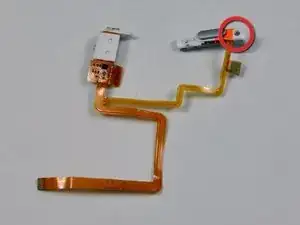
    • Levanta el conector de auriculares y sostén el ensamblaje del interruptor fuera del iPod.

  30. UMVxH6mrTIoIE3NI
    UMVxH6mrTIoIE3NI
    dtTxWffLtmJB1Noj
    • Si solo estás tratando de quitar el panel posterior, puedes omitir los pasos 30 y 31.

    • Si tu conector de auriculares de repuesto incluye el interruptor de retención de plástico blanco, simplemente vuelve a instalar el conector de auriculares de repuesto.

    • Cuando reemplaces el conjunto del interruptor de retención, observa el pasador de ubicación cerca del orificio en la posición del tornillo plateado, concéntrate al colocarlo y el resto encajará en su lugar. Una vez que esté todo atornillado, recuerda quitar la cinta de respaldo de la almohadilla de contacto justo a lo largo del conector.

    • Si tu pieza de repuesto no incluye el interruptor de retención de plástico, sigue los siguientes pasos para transferir el interruptor de retención de plástico a su nuevo conector para auriculares.

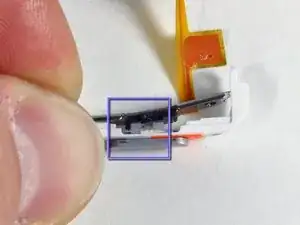
    • Retira el único tornillo Phillips más cercano al interruptor de retención.

    • Levanta la parte de plástico del interruptor de retención para separarlo del cable plano naranja.

    • Asegúrate de que la muesca negra se alinee con el deslizador gris durante el montaje del interruptor (mira la imagen 2).

  31. jl6amnYT3GCaPx1H
    • Utiliza la pequeña herramienta de apertura del iPod para despegar con cuidado el cable de cinta naranja y el interruptor de sujeción negro conectado hacia arriba de la parte trasera de metal.

    • Cuando vuelvas a colocar el interruptor de retención de reemplazo, asegúrate de que los dos postes pequeños en la parte posterior del interruptor estén alineados con los dos orificios en la parte posterior de metal.

  32. KYLaf2nNWqpDlbCY
    • Queda el panel trasero

Conclusión

Para reensamblar el dispositivo sigua las instrucciones en orden reverso.

iRobot

Miembro Desde 25/09/09

0 Reputación

5 comentarios

Thanks!

Can I swap rear panel fat to slim? I mean I have 6/7’th gen 120 Gb with slim SSD and what to close it with rear panel from 6’th gen 80 Gb - for 3 mm less width. So question: Is this 80Gb-iPod’s rear panel is compatible to my 120Gb-iPod?

Alex -

Yes, you can. I upgraded the hard drive with a solid state and needed the extra space.

Jason Bidwell -

Just would like to have a confirmation that the rear panels of 5th Gen. (Video) and 6th Gen. (Classic) are identical. Some replacement panels are listed as “fits 5th, 6th & 7th” and some are specific…

Ryo Hayashida -

What is the plastic for the charging port on the panel called?

The RETRO Past -

I mean the plastic that was left in the panel

The RETRO Past -