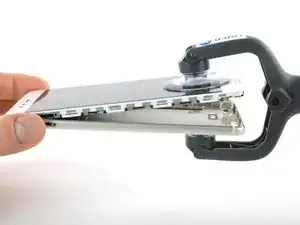
Introducción

Usa esta guía para reemplazar el ensamblaje de pantalla incluyendo el marco de tu Huawei P9.

Antes de desmontar tu teléfono, descarga la batería por debajo de 25%. La batería puede prenderse fuego y/o explotar si se la perfora accidentalmente, pero las chances de que pase son más bajos si la descargas.

  1. 4PyHbYrcjSvJWL1j
    4PyHbYrcjSvJWL1j
    DNEduDWvuNoZPq1J
    c6BOqyVgVAnvZQVi
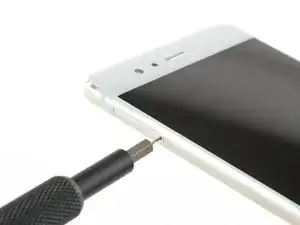
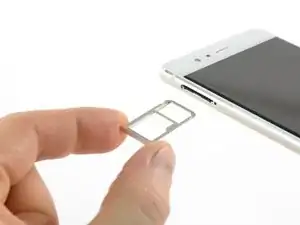
    • Primero apaga tu teléfono y remueve la bandeja de tarjeta SIM.

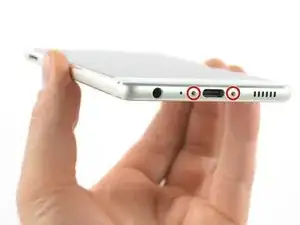
    • Destornilla los dos tornillos Pentalobe P2 ubicados en la parte inferior al lado del puerto USB C del dispositivo.

    • Si la pantalla está rota podrías usar cinta para proteger tus ojos en caso de que haya trozos de vidrio y para poder sostener mejor el teléfono para abrirlo.

    your supply kit -IFIXIT does not have a screw driver bit small enough to unscrew the two Pentalobe P2 screws for my Huawei Mate P9 pro

    phone. Where can I get help from ?

    Vincent Leung -

    Hi Vincent!

    Our Pentalobe P2 bits work perfectly in the Huawei P9. If you already have a driver handle that has a 4mm socket, you can use one of these bits in it and that should work fine. Otherwise, if you prefer the P2 screwdriver itself, you can find that tool here.

    I hope this helps!

    Kadan Sharpe -

  2. BRleOapCGqBVnTQC
    BRleOapCGqBVnTQC
    FwiZGa4HkhlOKIT3
    • Usa un ISclack o un mango de ventosa para separar la unidad de pantalla del panel trasero.

    • No remuevas el panel trasero completamente aun. Hay un cable conectado al panel. Va desde el sensor de huella digital hasta la unidad de pantalla.

    If you cant get suction because of cracks in the screen, use wide tape to create smooth surface.

    Kent Alexander Johansen -

    If your screen is smashed, and nothing else will work (iSclack etc), you can get a thin blade between the casing and the screen assembly and the bottom. The screen assembly can then be pried out. I fought with mine before discovering this. Be careful of the broken glass.

    Rob Collins -

    I struggled to remove screen with suction cups due to damage to the back case. I used a jim to pry from bottom by usb c port, worked well.

    Philip Lloyd -

    Be very carrefull as it can open in one fell swoop !

    Jean-Marc Boisseau -

    On my model, I had 2 Little torx screws beside the USB port. If so, the screen won’t come out with them on.

    Lola Gillet -

    Interesting, sure those were 6-starred (Torx) and not 5-starred (Pentalobe) like mentioned in step 1?

    Tobias Isakeit -

    Are there any tips to help loosen the screen after taking the screws out? I brought in an extra person to help with the suction cup whilst I tried to pry the screen away with it still only moving at most 1mm (maybe less) and not enough to get any pry tools in. Ending up using quite a lot of force - far more than I think I should be to no success. As it stands I’m just ending up doing minor damage to the base of the screen/case.

    A Birch -

    Hey A Birch,

    just for the case, I mention — it’s important to pull out the SIM card tray, otherwise, it will block the opening procedure and you’ll damage your phone. In case the frame is damaged or bent you’ll need more force to open the phone. In general, the opening procedure should be fairly easy.

    Dominik Schnabelrauch -

    On this step, I found it hard as the screen and the motherboard are attatched, but instead just the screen is coming up, any tips for getting under and lifting up the motherboard + battery. (Trying to do a battery replacement). The screen with that wire on Step 15 for some reference :)

    Nathan T -

    Received my kit yesterday and now trying to remove the screen from the case with the suction tool. Having extreme difficulty and cannot even get a pick in to prise it off. Still trying…

    Alan Farrow -

    Found it easy to remove screen from case using the sucker while holding the edge of the case down using the blue spudger that came with the kit. Came off in seconds…

    Alan Farrow -

    If you have difficulty removing the display from the case, make sure to not just remove the screen. Apparently, if the case has received a knock or the motherboard is sticking to the case, it can be very, very difficult to move the motherboard as well as the screen.

    However, the whole screen and motherboard assembly needs to come out. If only the screen moves, chances are the ribbon cable that attaches it to the motherboard may get pulled out of its socket or may even get damaged. I suggest to not use excessive force on the display and be very careful when attempting to pry it open. You need to get a purchase on the whole screen/motherboard unit, not just the screen.

    Using a lever through the USB C port and the hole for the headphone jack may help to get the motherboard assembly moving. Be careful, though to not damage theses parts.

    I think the guide should be amended to point out the possibility of moving the screen only and its associated dangers.

    Thomas Kuehne -

    I found the screen/motherboard very difficult to move. I used the sucker (down near the USB/screw end) and the broad end of the spudger in the USB port (I was careful (I hope!) to not insert the spudger too far so I was just pressing against the case). It needed a lot of force and can away sunddenly but has left the fingerprint cable intact.

    I have looked at other comments and I had removed the 2 screws next to the USB port and the sim tray, it was just plain sticky.

    David Crane -

    I couldn’t remove the screen cause I was afraid to break it!! Also using two suction caps it was impossible to lift. I tried with a thin blade but nothing to do. Is there any “trick” to release it? Why is it so strengthly stuck? Please somebody give some suggests…

    Gabriele Greggio -

    Try to make sure to remove the SIM card tray and the screws at the bottom end of the phone before you try to lift the display, both block the display whilst removing the back cover. For the case that you’re using two suction cups instead of an iSclack, try to place them as close to the bottom edge as possible. For the case that the suction cups fall off easily, you can put a little water on them before pressing them on the phone. As you mentioned you can try using a blade/opening pick/jimmy as a lever during the removal procedure or you can use a tool like a spudger and insert it into the USB port to press the assembly out of the rear cover but take care to avoid damage to the port. The plastic clamps can sit really tight sometimes. In case the frame is damaged or bent you’ll need more force to open the phone.

    Dominik Schnabelrauch -

    PS I spent my money to buy battery and tool kit but if I can’t open it I wasted money believing in this “guide” that show all as a kind of easy DIY… actually it’s easier to make a damage bigger than repair!

    Gabriele Greggio -

    Heating the aluminium back of the phone with a hairdryer to about 60C helps. Aluminium expands more than twice as much as the glass which anyway remains cool away from the hairdryer. Then the suction pliers and the spudger through the 3.5mm audio jack hole finally did the trick. I was about to give up!

    J B Graham -

    I strongly agree with JB Graham : the fix should suggest to heat the phone if you encounter difficulty to open the case. I had to heat it a while until I could make the two parts move with the suction cups.

    pichel -

    I just replaced the battery of the Huawei p9. I had to open the phone using a thick, blunt needle using the headphone jack. After creating a gap, I carefully fulled the phone apart by my fingernails, with no problem whatsoever. No risk of damage doing it this way. Of course, you need to be carefull not to damage the contact pins inside the jack, but at least there is no risk of damaging the screen this way.

    I don’t understand why the suction cups are the preferred method to open the case. They just popped of by applying a scaring amount of force…

    Next time I will immediately use the headphone jack.

    M Brt -

  3. X1MPLayTq1F5uLiC
    X1MPLayTq1F5uLiC
    OZ2clDIO3g3DEtiL
    • Desconecta el sensor de huella digital utilizando un spudger.

  4. RsCaUdATkD2Tvxkx
    RsCaUdATkD2Tvxkx
    hlCmBSqrFLJdjGPM
    PRHAuXb4wO2NlcMF
    • Desenchufa el cable de antena.

    • Remueve la pegatina que se encuentra sobre el tornillo.

    By carefully removing the cable from the antenna, the solder broke and the connector remained attached to the cable.

    It was therefore not possible for me to reattach the cable during reassembly.

    Nevertheless, I don't notice any malfunction after turning the phone back on: the WiFi and the 4g signal are good and I don't see any difference neither in terms of performance nor quality.

    Maxence Laurent -

  5. WHeMocCRaaG5PfMb
    WHeMocCRaaG5PfMb
    oYfWKH5uTEri1VEo
    YsZttPuQbDPNpgSK
    • Destornilla los dos tornillos Phillips #00 que sujetan la placa de metal en su lugar.

    • La placa que cubre el conector de batería tiene dos pequeños ganchos en cada lado. Usa una pinza para liberarlos y desengancharlos con cuidado moviéndolos hacia arriba.

    Removing the plate can be a bit difficult. It was stuck behind the other plate. It bended a bit while removing it, but it doesn't harm if it does.

    Steven -

    I actually couldn’t get this plate out: as mentioned by Steven there is a slight lip (shown on the photo - the tweezers are pointing to it) and this is under another plate above. That was just a minor complication, the real problem is that I couldn’t release the end of the plate nearest the edge, In the end I had to gently bend the plate up.

    David Crane -

  6. ggPJOixVHqWUaKg2
    ggPJOixVHqWUaKg2
    BHudHxmaWOgbouDk
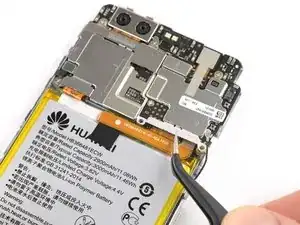
    • Ahora puedes desenchufar el conector de batería y dóblala hacia un lado.

    • El modelo EVA-L09 tiene una antena NFC adherida sobre la batería.

    • Si solo estás quitando la batería para acceder a la pantalla, puedes dejar la antena NFC en la batería.

    • Marca este lugar en la batería con un rotulador para el rearmado. Con cuidado despégala y asegúrate de no romper o arrugar la antena.

    • Para el rearmado, coloca la antena NFC en la batería donde estaba antes así los contactos se alinean con sus contrapartes.

    Just changed (05/2020) the battery on an EVA-L09 model and could not see an NFC antenna. There were no other cables leading to the battery unless it was integrated within the power ribbon somehow. Will have to wait and see after the first charge has finished to see if I still have NFC. No biggy as I never used it. Could really use a picture or some way to show where it should/could be. Thanks.

    Jimbo -

    It should look somewhat similar to the P9 lite NFC antenna seen in this guide: Reemplazo de batería de Huawei P9 Lite

    Tobias Isakeit -

  7. H4WaFVuRkVYHtZJY
    H4WaFVuRkVYHtZJY
    uhV5QR4jYffg4ovy
    • Libera los extremos de las lengüetas de adhesivo para sostenerlas bien.

  8. FVSRWiDElIImuZBD
    FVSRWiDElIImuZBD
    NY3Av3VWT26IbYDc
    vvAIVuwD4nINbrSs
    • La batería está sujeta con tres piezas de adhesivo, una lengüeta extraíble en el centro y del lado de la bandeja SIM. Una tercera pieza de adhesivo del lado del botón no tiene lengüeta.

    • Jala de las lengüeta con un movimiento lento y constante para liberar la batería.

    • Si las lengüetas del adhesivo se rompen, tendrás que usar un iOpener para calentarlas y ablandarlas un poco así puedes hacer palanca y sacar la batería con un spudger.

    • Hay dos cables que van directamente por debajo de la batería. Ten cuidado de no dañarlos cuando hagas palanca con un spudger. Puedes ver su posición en la última foto.

    • Levanta la batería despacio hacia el botón de lado y libérala de la pieza escondida de adhesivo restante.

    • Cuando vuelva a armar tu teléfono, reemplaza el adhesivo viejo con tiras adhesivas desprendibles, cinta adhesiva de doble cara o tiras adhesivas precortadas.

    Hi, does the LCD Screen and Digitizer Assembly with frame come with new adhesive tabs or battery stickers? I read that if there are no stickers the battery could move and cause damage. Please let me know, i would like to be sure before i place my order.

    Javier -

    Hi Javier! The P9 display kit does have battery adhesive. It’s visible as two orange strips, which are the adhesive release liners. We’ll be sure to specify it better in the component list. Thanks for asking!

    Sam Goldheart -

    Merci mille fois à l’auteur de ce tuto qui est vraiment super

    Jean-luc 11/12/2018

    jean-luc maitay -

    Removing the battery was a bit hard. The tape broke, so it was not easy to remove the battery. I didn't use the Iopener to heat it. I finally succeeded to remove it.

    I do noticed that the battery was very flexible. Wondering if this means she's very old or is it normal after charging a lot of times, or is or maybe because it got humid (my phone is sometimes damped when I have it my shirt when cycling). Compared to the new battery it's a huge difference.

    Steven -

    Those batteries are allways soft. So, don‘t worry.

    Mathias -

    It will be easyer, if you remove first the mainborad and then the battery. That’s my experience after the repair of this phone.

    Albert Dreistein -

    Hi, what does it mean

    use the iopener for heating the stickers

    ?

    Does it mean that for this operation it is used a hot air gun? I watched the ifixit page of iopener, but I didn't see such a gun

    Pinuzza -

    Hi Pinuzza,

    you can find our iOpener here. It is a tool to gently loose adhesive with heat. A heat gun is a more radical way and should be used carefully. You can easily damage components by overheating them. Here is a guide how to use our iOpener.

    Dominik Schnabelrauch -

    @Dominik: First af all thank you very much for the reply and for the extremely detailed guide. I've seen many tutorials, and I put this as the best one, because it considers very important aspects, e.g. to be careful about the electronic components below the battery, the fact that there are 3 stickers, and so on. That said, I have some doubt about iOpener (the same item I had seen and referred to previously): I cannot distinguish 1) the item below the picks and on the left side of the screwdriver, 2) the item on the right side of the picks, 3) the item below the suction cup. Above all, I have an enormous doubt and curiosity about the fact that this tool allows an easy extraction of the battery even heating the stickers, i.e., what tool in the packet should it be the candidate for this purpose, and how?

    Pinuzza -

    (How can it heat?)

    Pinuzza -

    Perhaps can I heat biadhesive stickers using a plastic rod? Perhaps like primitives did, quickly rubbing blades of straw? If I don't understand exactly, I can't buy anything

    Pinuzza -

    @Dominik, I've just seen the iOpener guide you linked. However, I'm not able to understand: Have I to put all the items of the tool in a microwave? Why heat a screwdriver or the suction cup? I can't see how this could heat the adhesives: they are below, protected by battery.. how heat may reach them?

    Pinuzza -

    @Pinuzza you only need to place the iOpener in the microwave, not every tool that is needed for the repair. Heat up the iOpener as explained and it will save the heat. Place it on the areas where the adhesive sits underneath the battery/display/etc. Leave the iOpener in its place for at least two minutes so that the heat can reach the adhesive. This will work through the battery, display and/or a circuit board. This way you’ll loosen the adhesive, what makes the removal significantly easier.

    Dominik Schnabelrauch -

    @Dominik, okay now it’s more clear, but I can't understand exactly what is the iOpener in the image you linked (I think iOpener be the name of the entire tool). I see a black fabric case (with iOpener label) which seems to contain all the repair items.. is this the heater? Or the two transparent underneath rectangle?

    Pinuzza -

    Hi Pinuzza,

    the black fabric case you see in the picture is the iOpener. There’s a liquid in the fabric sleeve that saves heat. This is why you place the iOpener in the microwave to save heat there and then on your device to soften adhesive afterwards. All other parts in the picture are tools for repairing, prying and to cut adhesive. From left to right: screwdriver, 6 opening picks (flat tool to cut adhesive e.g. during a screen removal), blue flat battery blocker (is used if you can’t disconnect the battery in an easy way e.g. in an iPad you can slide it between the connectors), suction cup to pull up displays or rear covers, plastic card (bigger tool to cut adhesive in hard to reach areas e.g under bigger battery packs), the blue opening tool (to cut adhesive and prying tool), tweezers, spudger (all-purpose prying tool to cut adhesive and/or disconnect cables). In this guide you can see that you only place the iOpener in the microwave. All other tools are packed separately and not in the black fabric.

    Dominik Schnabelrauch -

    @Dominik, thank you very much for the detailed reply! Now it's all clear!

    (And compliments for the very well supplied and assorted store…and tutorials :)

    Pinuzza -

    Would be useful to see recommended points to place the spudger to lever out the battery. I used the corners at the top (i.e. at the edge where the plate I couldn’t remove!) and slowly forced out the battery (which did bend quite a bit).

    David Crane -

    These phones are now about 3 or 4 years old and the adhesive has had time to bake pretty hard. Of course the tabs break off as described. Without the iOpener I used a hair dryer on low fan, hi heat intermittently for about 5 minutes and used three spudgers under the battery using the guide picture of the ribbon cables under the battery to choose the safe places for the spudgers. You have to shift them as you ease it out as the small ribbon cable weaves to the centre. Like others have said, the battery bent and distorted to an alarming amount and I was glad I had discharged it to almost flat following the guide.

    J B Graham -

    Replacing a dead battery in 2020. Sticky tabs snapped of course. I lifted the battery up ever so slightly with a long flat spudger/spade so I could get the fine tweezers in there a grab as much as I could. Seems to be the top half inch/1.5cm that’s baked and brittle. The rest came out with no fuss.

    I have the EVA-L09 model but could not find an NFC antenna so… kinda hoping for the best once I’m done charging. Could there be a photo added of one if at all possible?

    Jimbo -

    Si vous n’avez pas de iOpener, vous pouvez utiliser une poche de gel chaud/froid pour les contusions (ex Actipoche)

    If you don't have an iOpener, you can use a hot/cold gel pouch for bruises (ex Actipoche)

    Karine JALLEY -

    Merci a ce tutto qui est vraiment tres bien mis a part que pour ouvrir le tellephone la ventouse ne suffit pas il faut utiliser un spatule (spudger) en faisant appui par la prise usb c et pour decoller la batterie il faut prendre une pince car elle est vraiment collé fort sinon vraiement tres bien ce tutto!!

    boos -

  9. msVxr4sikD5Yr4Ry
    • Remueve los otros cinco tornillos de Phillips #00 de la placa madre.

  10. 2iK2rIaPoxNZBVFs
    2iK2rIaPoxNZBVFs
    PoyC2vRyghsEkQB4
    LnFf5lTkNuR4ATcs
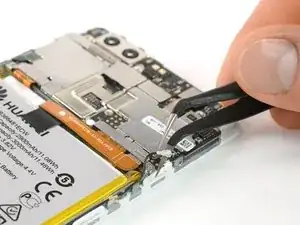
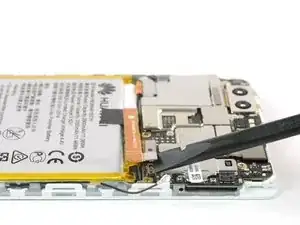
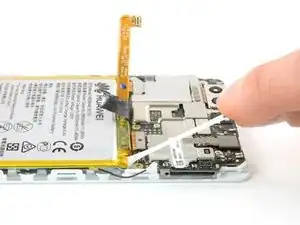
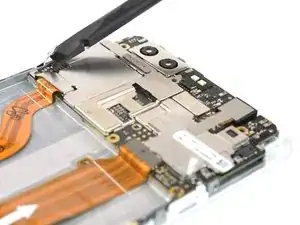
    • Desconecta el cable flexible de la placa madre así como también el cable de botón de encendido y botón de volumen.

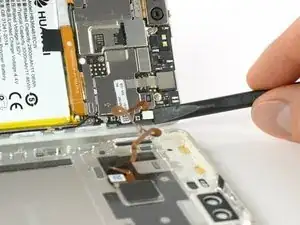
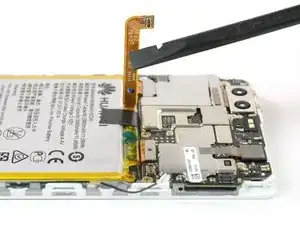
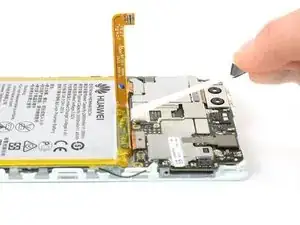
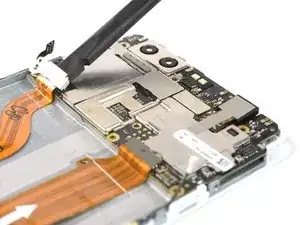
    • Desenchufa el cable flexible de pantalla LCD.

  11. hREMycr2PYDPfIHt
    hREMycr2PYDPfIHt
    5jbYtP4JlMmAcEOw
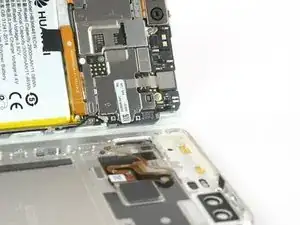
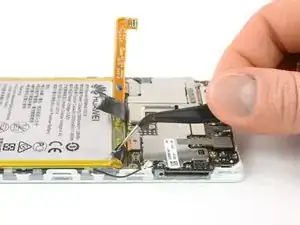
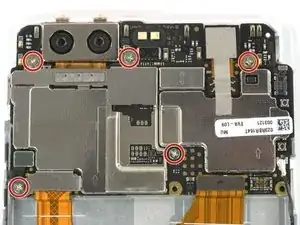
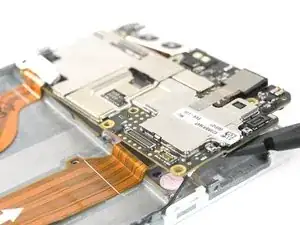
    • Remueve el ensamblaje de placa madre.

    • Remueve el altavoz auricular (ten en cuenta que hay adhesivo debajo)

    Hi, can you tell me what is this pink foam-like round things? I am about to buy your LCD Screen and Digitizer Assembly with frame, but i am unsure if it comes with this pink foam circles or if i have to buy that separately. Also if it is something important to have in the replacement. Please let me know so i can be sure what to expect before i place my order.

    Javier -

  12. dVsZKuoKfyeHmrL1
    dVsZKuoKfyeHmrL1
    EqEuME6QqRMho2cg
    • Remueve el módulo de sensor de proximidad de su soporte.

    • Si la unidad de pantalla nueva no tiene ya junta de goma del sensor de proximidad, tendrás que transferirla desde tu pantalla nueva.

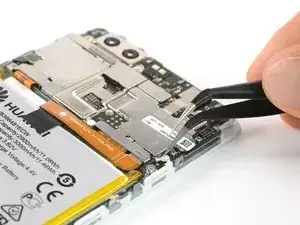
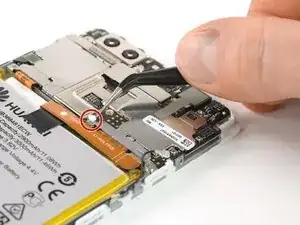
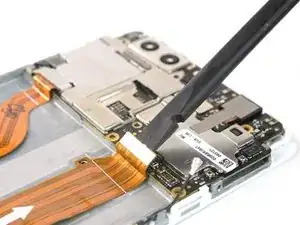
    • Cuidadosamente despega el cable flexible de la placa madre.

  13. hJO2pIlwaigTJ5YA
    hJO2pIlwaigTJ5YA
    xFSLEgNUWrLVWubG
    IS4sxQKfbJSKkXAp
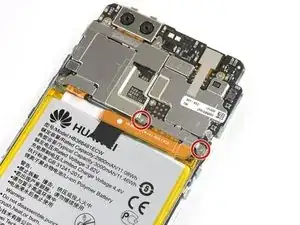
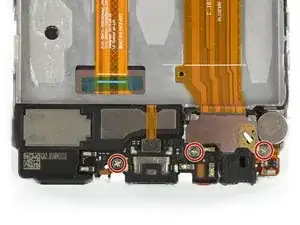
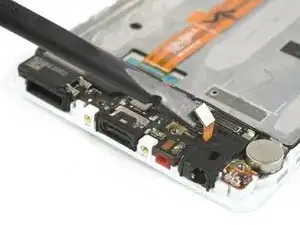
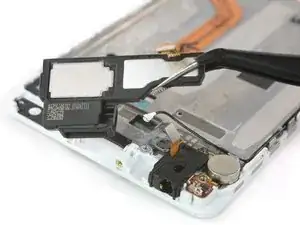
    • Remueve los tres tornillos #00 Phillips de la placa hija.

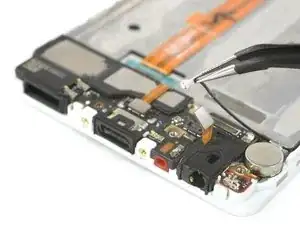
    • Con cuidado remueve el soporte de metal. El conector de toma de auriculares podría quedarse pegado al soporte.

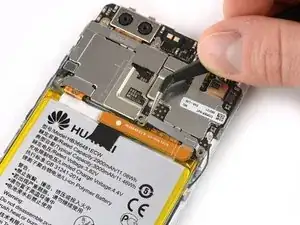
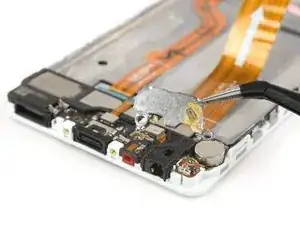
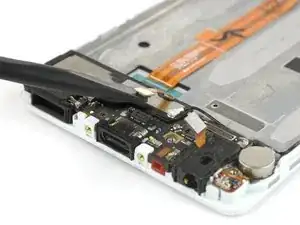
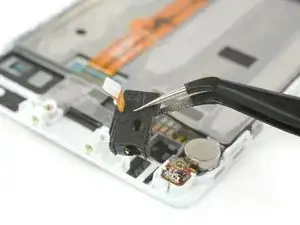
    • Desenchufa el conector flex de la placa madre y haz a un lado el cable.

    Achtung: Es könnte sein, dass das Kabel der Kopfhörerbuchse mit der Metallhalterung veklebt ist. Das war bei mir der Fall, somit ist das Kabel der Kophörerbuchse beim entfernen der Metallhalterung abgerissen.

    Albert Dreistein -

    Danke für den Hinweis. Wir haben den Text nun aktualisiert, um das zu berücksichtigen. Schade um deine Kopfhörerbuchse jedoch.

    Tobias Isakeit -

    War nicht so schlimm, da die Kopfhörerbuchse nicht mehr richtig das Klinkenkabel hielt.

    Albert Dreistein -

  14. BADZNEEWqPVVb46O
    BADZNEEWqPVVb46O
    Rqg4xpHDOlUiDZYG
    • Desconecta el conector flex de la toma de auricular.

    • Desenchufa el cable de antena.

  15. MVrfRwIAdcRC4JGy
    MVrfRwIAdcRC4JGy
    YygXtM6nGYbY5TaD
    cXuStYsw1eOGf5Vk
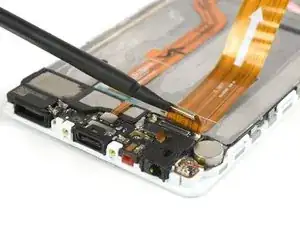
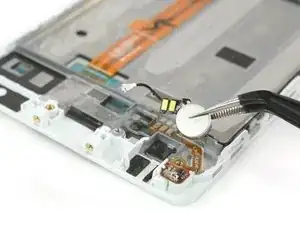
    • Desenchufa el conector de altavoz.

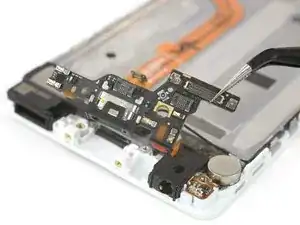
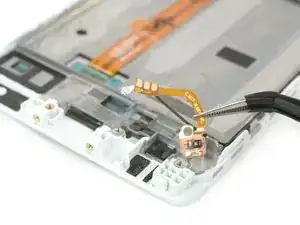
    • Remueve la placa hija.

    • Levanta el altavoz y separa el adhesivo que lo sujeta al ensamblaje de pantalla.

  16. KTTMrPHkZfYoM56G
    KTTMrPHkZfYoM56G
    WfGB4nKpc3Rs5Qkb
    RBigEb6m6JvCgjNQ
    • Remueve la toma de auricular de su hueco.

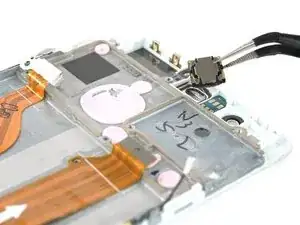
    • Levanta el motor de vibración de su zócalo adherido en el ensamblaje de pantalla.

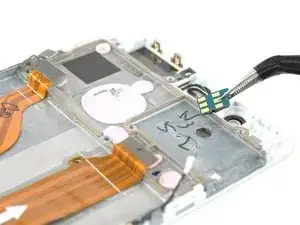
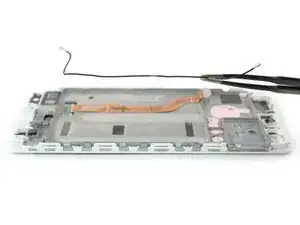
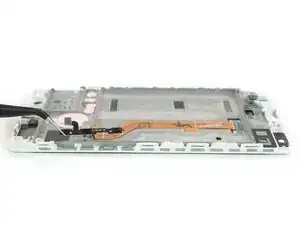
    • Con cuidado remueve el cable de contacto frágil del adhesivo que lo sujeta de su marco.

  17. UVInYXKuVrHZNamU
    UVInYXKuVrHZNamU
    5SWwgTiPYVswiK1Y
    xiinPcSgtdwVAybE
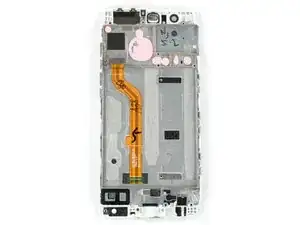
    • Remueve el cable de antena y el cable de botón de volumen y el botón de encendido en cada lado.

    • Inspecciona la parte nueva con cuidado y compárala con la parte vieja. Podría haber algunas partes pequeñas que deben ser transferidas.

    • En la parte posterior de la placa madre hay almohadillas térmicas (gotas de color rosa tipo goma) para disipar el calor. Si estas almohadillas térmicas se rompen, están demasiado secas o se adhieren al ensamblaje de la pantalla anterior, es posible que debas aplicar nuevas almohadillas térmicas al nuevo ensamblaje de la pantalla o la placa madre.

Conclusión

Para volver a ensamblar tu dispositivo, sigue estas instrucciones en orden inverso.

Dominik Schnabelrauch

Miembro Desde 23/11/16

169012 Reputación

Un comentario

thank you ifixit

safi alsafi -