Introducción

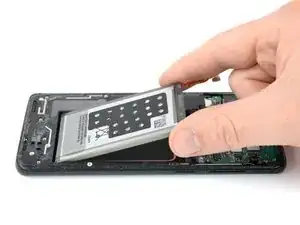
Usa esta guía para reemplazar la batería en tu Samsung Galaxy S9 Plus.

Abrir el Samsung Galaxy S9 Plus dañará los sellos de resistencia al agua en el dispositivo. Si no reemplazas los sellos adhesivos, tu teléfono funcionará normal, pero perderá su resistencia al agua.

Antes de desmontar tu teléfono, descarga la batería debajo de un 25%. Si tu batería esta hinchada, no calientes tu teléfono. Las baterías hinchadas pueden ser muy peligrosas, así que usa protección de ojos y actúa con prudencia, o llévalo a un profesional si no estás seguro de cómo continuar.

Necesitarás adhesivo de reemplazo para conectar los componentes mientras vuelves a ensamblar el dispositivo.

  1. SPUojd6GbtYKZRiM
    • Apaga tu teléfono.

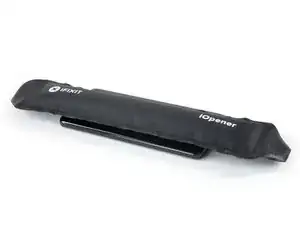
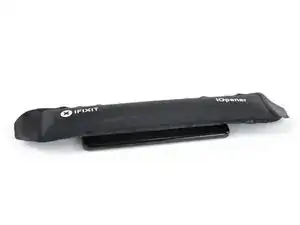
    • Usa un iOpener para ablandar el adhesivo debajo del cristal trasero. Aplica el iOpener durante al menos dos minutos. Puedes repetir este paso durante la extracción de la tapa trasera.

    • El adhesivo del Samsung Galaxy S9 Plus es muy fuerte. Se puede usar un secador de pelo, una pistola caliente o una placa caliente si no puedes abrir el dispositivo con el iOpener. Ten cuidado de no sobrecalentar el teléfono. La pantalla AMOLED y la batería interna son susceptibles de sufrir daños por calor.

    I don't know how much longer should I use for the min heat gun.

    Hui Chen -

    Only heat it up so you can still handle the phone. That depends on your heat gun. Wearing (ESD-)gloves might give you some extra degrees.

    Tobias Isakeit -

    It is very very hard to remove the back glass due to the adesive… I don't know if it is possibile (at least for everyone) to remove it wothout broking the glass

    Luigi -

    This is nearly impossible without breaking the glass or risking overheating. I would say apply heat repetitively for 6-8 minutes. The very most adhesive is across the bottom so push the pry stick way in. I generally start on the rear side.

    Thomas Hayes -

    Whoah NO. It will damage the camera and other sensitive electronics.

    D Harlo -

    Heating the back is essential, challenging, frustrating and, for first-timers such as myself, seemingly impossble, but I will say don't give up...I'll have another comment later.

    cbclistener -

  2. PQKIKM1KtiktSPx4
    • En los siguientes pasos, cortarás el adhesivo que sujeta la tapa trasera.

    • El adhesivo dentro de la tapa trasera está colocado como se muestra en la imagen.

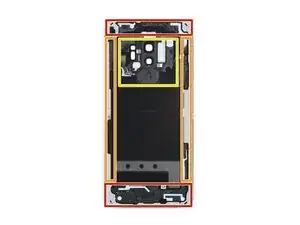
    • Tendrás que cortar el adhesivo en las áreas que se muestran:

    • Porciones gruesas de adhesivo

    • Áreas delgadas de adhesivo

    • Evita hacer palanca o cortar en este área para proteger el cable flexible del sensor de huella digital.

    The yellow portion labeled "Avoid prying in this area" is also pretty heavily glued. I had luck using heat to soften it, but I messed up my fingerprint sensor because the image above is mirrored - I sliced through the right side because the image says it's on the left. The fingerprint sensor cable is actually on the right (when viewing the back side of the phone) on the same side as the phone's volume control.

    Nick Tipton -

  3. vxtP6Nsx2M66cjIW
    vxtP6Nsx2M66cjIW
    VlE33pPfTcFIgD5v
    • Si la tapa trasera de cristal del teléfono está rasgada, la ventosa no podrá adherirse. Intenta levantarla con una cinta resistente o pega con adhesivo instantáneo la ventosa y permite que se pega así puedes proceder.

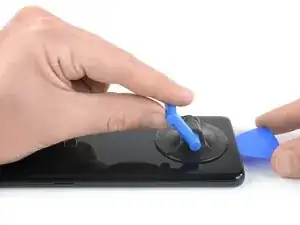
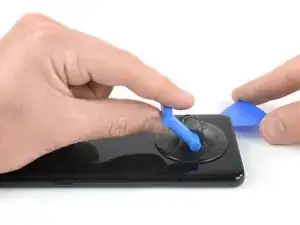
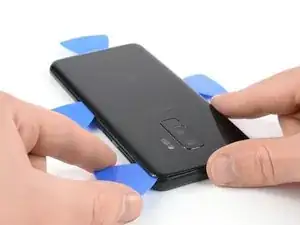
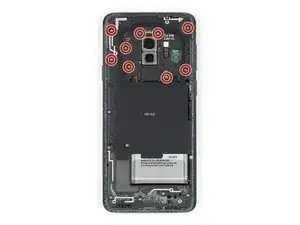
    • Presiona una ventosa sobre la tapa trasera.

    • Levanta el borde inferior de la tapa trasera con la ventosa con fuerza y firmemente para crear un espacio entre la tapa trasera y el marco.

    • Esto podría requerir bastante fuerza. Si tienes problemas, aplica más calor para ablandar más el adhesivo e intenta de nuevo. El adhesivo se enfría muy rápido así que puede ser que tengas que calentarla repetidamente

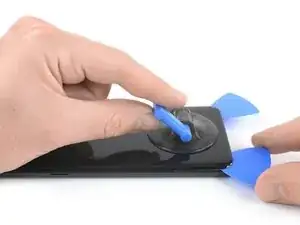
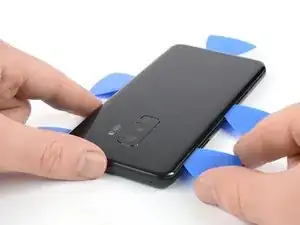
    • Inserta una púa de apertura en la grieta y deslízala hacia la esquina derecha inferior.

    This is the most challenging part. The suction cup can barely hold for the amount of force required...but here's a tip, especially for the first-timers like me. It's not obvious in this image, but the back, curved as it is as it attaches to the frame, is curved because the surface under the back is also curved. Therefore, using an angle for the pick that's a bit tilted up will help to get under the back, and get the cutting of the adhesive started.

    Don't let that give you too much confidence, though. Sufficient heating of the back, to make the adhesive soft enough to yield to the several picks, is essential. Go slow, if you go too fast, or don't have enough heat, you WILL break the glass...as I did. Replacements, fortunately, are easy to find and not too expensive.

    cbclistener -

  4. svFeofEQKnT6GS4A
    svFeofEQKnT6GS4A
    aBxYvHrhFq14ill4
    • Inserta una segunda púa de apertura y deslízala hacia la esquina izquierda inferior.

    • Inserta una tercer púa de apertura en el extremo inferior del teléfono. Esta púa de abertura se queda aquí durante la extracción del cristal trasero para prevenir que el adhesivo se vuelva a sellar.

  5. BxPqWDXMu24ddD55
    BxPqWDXMu24ddD55
    RISoupVRvj25yEIr
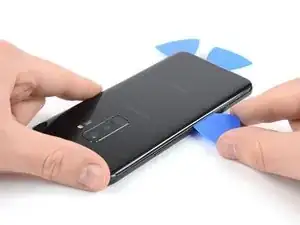
    • Comienza a deslizar la punta de la púa de apertura desde la esquina izquierda inferior a lo largo del lateral del S9 Plus.

    • Deja la púa de apertura en su lugar luego de cortar el adhesivo hasta la mitad del lado izquierdo del teléfono.

    • Desliza la púa de apertura desde la esquina derecha inferior hacia la mitad del marco y déjala allí.

  6. 4GiKTMQKxXFCIhbm
    4GiKTMQKxXFCIhbm
    AELcqeWTvaUkbSHP
    • Inserta una cuarta púa de apertura en el lado derecho del marco y deslízala hacia la esquina derecha superior.

    • Desliza una quinta púa de apertura a lo largo del lado izquierdo del teléfono hacia la esquina izquierda superior.

    • Usa la púa de apertura para cortar el adhesivo restante debajo de la parte superior del cristal trasero.

    • No abras completamente el teléfono aún. El cable flexible para el lector de huella digital está todavía conectado a la placa madre.

  7. 5VjRBIulGhpUhxQn
    5VjRBIulGhpUhxQn
    XoUpbUYyDom3N4NF
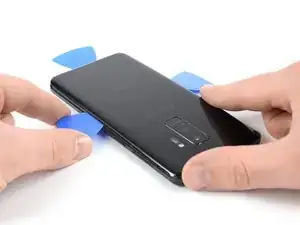
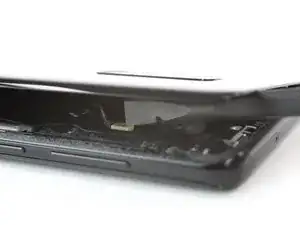
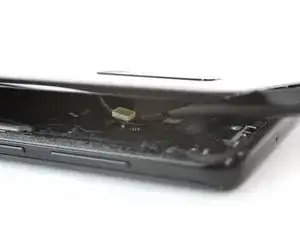
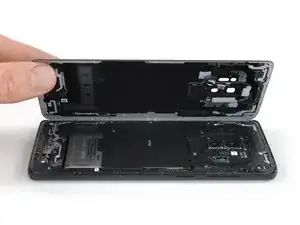
    • Con cuidado levanta el lado del cristal trasero donde se ubica el botón de volumen.

    • Usa el borde de un spudger para levantar y desconectar el cable flexible del sensor de huella digital.

    On my G965U, the fingerprint reader remained in the phone, and instead of disconnecting the flex cable from the motherboard, it was only necessary to disconnect the flex cable from the back glass where it was glued lightly

    lyellread -

    I also have a G965U model S9+, and its fingerprint read also remained in the back glass.

    Nick Tipton -

  8. hwKdSb1q5wbfJcQ4
    • Remueve el cristal trasero.

    • Al volver a ensamblar, sigue esta guía para reemplazar el adhesivo y reinstalar el cristal trasero.

    • Si quieres reemplazar tu cristal trasero, sigue esta guía para transferir el bisel de la cámara trasera incluyendo la huella digital.

    Is it necessary to replace the rear glass adhesive? I have given up on water resistance, just want it to hold in one piece.

    Zachary Shaw -

    Hi Zachary,

    in order to assure that the rear glass sticks to the rest of the phone assembly you have to replace the rear glass adhesive once you removed the rear glass. However you can use a narrow and strong double sided tape, tesa tape or our precut adhesive card. All of these will do their job however as you just mentioned you will lose the water protection of your phone. Before installing all of these it is very important to remove the old adhesive backings (for example with high isopropyl alcohol 90% or higher).

    Sadly it's not possible to replace the rear glass without new adhesive.

    Dominik Schnabelrauch -

  9. aXHuGDrKZHADlYuS
    • Remueve los nueve tornillos Phillips #00 de 4 mm.

    Don´t forget to unscrew the two screws on the left side (one near the battery, and one near the edge).

    Janny 4real -

    My s9+ NFC screws in this step are different sizes most are the same except one is shorter and coloured black and another is just shorter. The phone will not charge now, how can you find out which screws go where?

    H8redflip -

    11 screws need to be removed here. Watch the video to confirm the remaining 2.

    Nick Tipton -

  10. QmFI2i3JivkeHcMx
    QmFI2i3JivkeHcMx
    LSMLXtpxhi5cXfNd
    vkY6vSFuo2nJGYAA
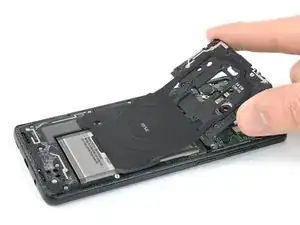
    • Inserta una púa de apertura debajo del lado derecho de la tapa de plástico que contiene la antena NFC y la bobina de carga.

    • Da vuelta la púa de apertura hacia un lado para levantar la tapa y sacarla de sus clips de plástico.

    • Trabaja alrededor de la tapa de plástico haciendo palanca para liberar los clips restantes.

  11. acHgOqVFmxUkKB5G
    • Remueve la tapa de plástico que contiene la antena NFC y la bobina de carga.

  12. 4vovYKM1kCqvQGBV
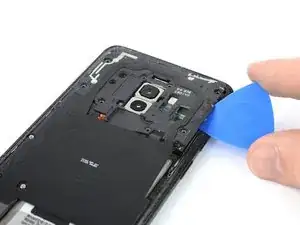
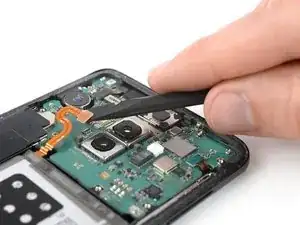
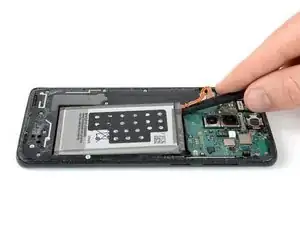
    • Usa el extremo plano de un spuger para levantar y desconectar el cable flexible de la batería.

  13. aS4FdGNOjfrIPsOC
    aS4FdGNOjfrIPsOC
    MomLbQLeEKfWRduY
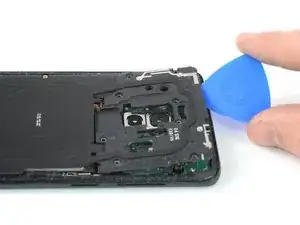
    • Usa un iOpener para aflojar el adhesivo debajo de la batería. Aplica el iOpener durante al menos 2 minutos.

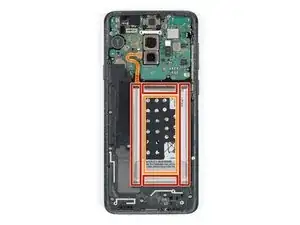
    • En el paso siguiente, solo aplica el spudger en las áreas marcadas en rojo, que es donde se encuentra el adhesivo de la batería.

    • Evita esta área. Hay un hueco en el marco intermedio justo debajo de la batería, y podrías accidentalmente dañar la pantalla.

  14. dGkcYHN6yCHrUohJ
    dGkcYHN6yCHrUohJ
    YKHHAHbeE2dPGtyC
    • Si tienes problemas para levantar la batería, el adhesivo podría no estar lo suficientemente blando. Puedes aplicar algo de alcohol isopropílico debajo de cada esquina de la batería y deja que se penetre durante varios minutos para ayudar a debilitar el adhesivo.

    • Intenta como puedas de no deformar la batería durante el proceso. Las baterías de ión de litio de caparazón blando pueden perder sustancias químicas peligrosas, prenderse fuego o hasta explotar si está dañada. No uses fuerza excesiva o hagas palanca en la batería con herramientas de metal.

    • Inserta el extremo plano de de un spudger en la esquina izquierda superior de la batería donde se encuentra el cable flexible y comienza a levantar.

    • Sigue hacia abajo a lo largo del lado izquierdo de la batería y suelta el adhesivo con el spudger.

    Is the Oled panel have the possibility to get damaged by applying alcohol in removing the battery?

    Laurence -

    Hello Laurence,

    there is no risk that the panel gets damaged by the alcohol. The alcohol is relatively pure and will evaporate quickly.

    Dominik Schnabelrauch -

    Hello, I replace the battery but I scratched the central part where the battery was lying on. As a result, on the screen there is a bad green permanent vertical line. I could go on for a couple of months, but there is a way to replace that part as well? Is now my phone dangerous for myself?

    simnmr69 -

    Hi simnmr69,

    it seems like you damaged your screen during the battery removal. You can replace the screen as well following this guide. However a damaged screen won't be dangerous for you when using the phone but take care to use a new and undamaged battery since a punctured or bent battery may leak dangerous chemicals or cause a thermal event.

    Dominik Schnabelrauch -

  15. d1UCPrZqvYPrSyKE
    • Inserta el spudger en la esquina derecha superior de la batería y levántala.

  16. sRtJ63x2ueARTIiH
    • Remueve la batería.

    • No reutilices la batería luego de haber sido removida, ya que esto es un riesgo de seguridad potencial. Reemplaza con una nueva batería.

    • Para instalar una nueva batería y el adhesivo correspondiente, sigue esta guía

    Anyone know the purpose of the black piece with the holes in it? Do I need to transfer it to the new battery?

    Joe Tobin -

    It is a foam sticker and most likely for transferring heat form the battery to the NFC antenna and to the rear case. If the new battery comes with one pre-installed–lucky you, if not, don’t worry you’ll be fine, too.

    Tobias Isakeit -

    Where is a video for placement of glue stickers??

    Juron Lobo -

    or how to remove the old glue, especially from the rear of the back case lol. Otherwise the kit is very comprehensive

    Julian Davidson -

    after replacing the battery using the Ifixit kit on my S9+ and following the correct procedure for charging the new battery, its still showing up on the Samsung Members app, Diagnostics as being weak and that it needs replacing. I have charged and used the device normally for the last few days and it still fails the test. Am not impressed.

    Julian Davidson -

Conclusión

Para volver a ensamblar tu dispositivo, sigue las instrucciones en orden inverso.

Si es posible, enciende tu teléfono y prueba tu reparación antes de instalar el nuevo adhesivo y sellar de nuevo el teléfono.

Para un rendimiento óptimo, calibra tu batería recién instalada después de completar esta guía.

Lleva tus desechos electrónicos a un centro de reciclaje certificado.

¿La reparación no salió como lo planificaste? Consulta nuestras [comunidad de respuestas] para la resolución de problemas.

Dominik Schnabelrauch

Miembro Desde 23/11/16

169012 Reputación

4 comentarios

One of the best “do it yourself” instructions I’ve ever come accross! Very thorough!!

AK Sand -

Just be careful to remember to try phone parts (such as, battery recharging OBV, Fingerprint sensor…) before closing with the new cover.

Also remember to attach the Wireless card before doing the battery test otherwise the phone will say that can’t charge because the phone is too cold.

That’s because on the wireless charger module there is the heat sensor.

Flavio -

Missed one of the most important parts: Where and how do you install the adhesive pieces? There are a lot of them and the linked article doesn't even come close to explaining it for this phone.

Jason Landon -

Good instruction, I was successful replacing the battery however I accidentally damaged the fingerprint scanner cable because the image showed above is mirrored and I sliced too far in on the wrong side.

Also, a brief note on which adhesives can/should be removed before reassembling would be very helpful.

Nick Tipton -