Introducción

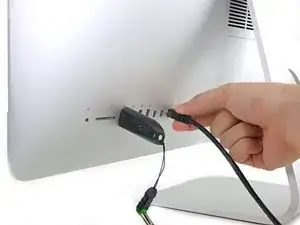
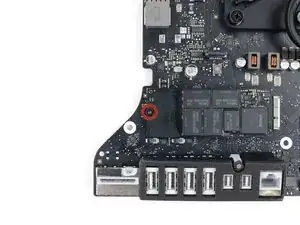
Si tu iMac se configuró con una unidad de estado sólido o Fusion Drive, incluye una SSD blade en la parte posterior de la placa lógica. Utilice esta guía para acceder y retirar la SSD blade.

Antes de comenzar cualquier trabajo en tu iMac: Desenchufa la computadora y mantén presionado el botón de encendido durante diez segundos para descargar los condensadores de la fuente de alimentación.

Ten mucho cuidado de no tocar los cables del condensador o cualquier unión de soldadura expuesta en la parte posterior de la fuente de alimentación.
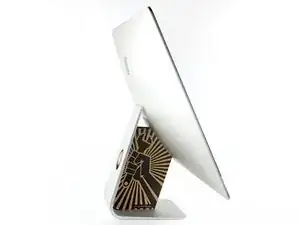
  1. qvnTkhMj1Khcw1SW

    What’s the point of this? You run the wheel around the outside, and then you lay it down anyway to pull the glass and do the rest. The wedge is not needed.

    ebay -

    I have a story to tell about this teardown. It all went wonderfully well until after I completed the process and attempted to format my new SSD drive only to discovery that the capacity of the drive was 256GB… not the 2TB I was sure I had ordered. iFixit was very supportive and helpful in sending me a new set of sticky tape strips and and RMA to return the SSD and some of the other parts.

    I finally had received my new set of strips and the 2TB SSD…. I figured, piece of cake… I already know how to do this… but I watched the video again and started following the teardown…

    …apparently the new sticky tape strips was way more powerful that the original tape and while using the pizza cutter tool and not advancing much, I proceeded to use one of the iFixit credit card style wedges…. I now have 2 pretty severe cracks on the glass of my display, which as clearly explained by @mayer can only be replaced by an entire display… which runs at about $500. Cosmetically it looks horrible, but it works… for now.

    Erich Hentschel -

  2. KHov5rIJNDb1qRAi
    KHov5rIJNDb1qRAi
    WWstOTxbT6Mg4GMZ
    ea1NVoLORufoKsnn
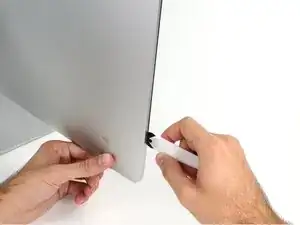
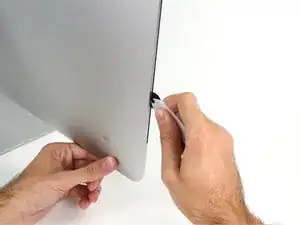
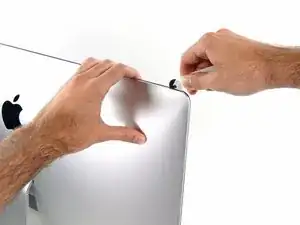
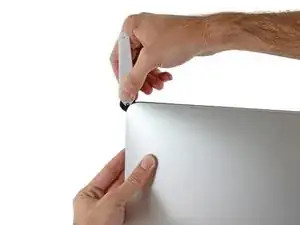
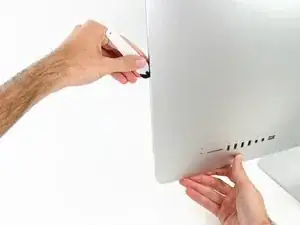
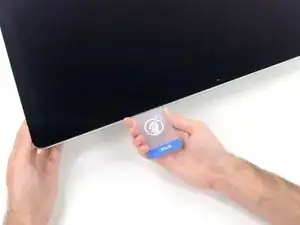
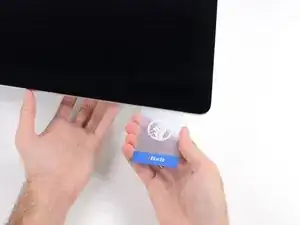
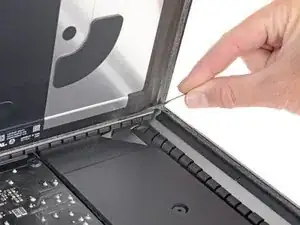
    • Comenzando a la izquierda de la pantalla, cerca del botón de encendido, inserte la herramienta de apertura de la iMac en el hueco entre el panel de cristal y la carcasa posterior.

    • El encaje de la herramienta de apertura de la iMac evitará que empujes la rueda demasiado hacia adentro. Si utilizas otra herramienta, no la insertas más de 9.5 mm (3/8") en la pantalla. Corres el riesgo de cortar los cables de la antena y causar daños graves si insertas la herramienta demasiado lejos.

    Should you run a hair dryer along the edges first?

    Al Val -

  3. q3CZ1tidMXlcgoIQ
    q3CZ1tidMXlcgoIQ
    rHnjd1yBayLNqTtN
    KTtVR5DtVkPVYd4Y
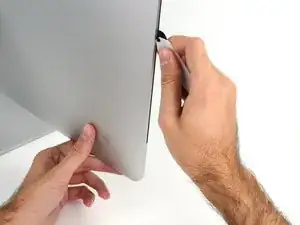
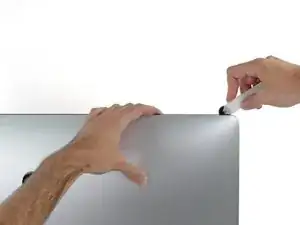
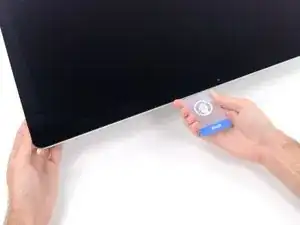
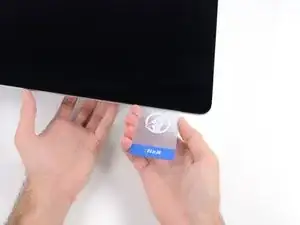
    • Usa la herramienta como un cortador de pizza, pásala por el hueco y cortará el adhesivo de espuma por el centro.

    • Asegúrate de empujar siempre con el mango detrás de la rueda de corte. Si tiras, la rueda podría salirse del mango.

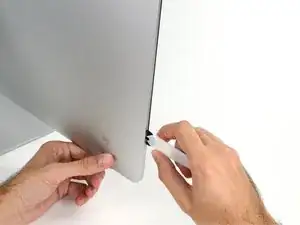
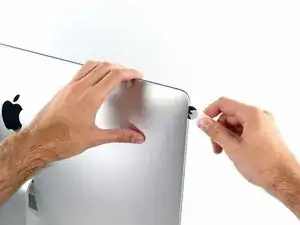
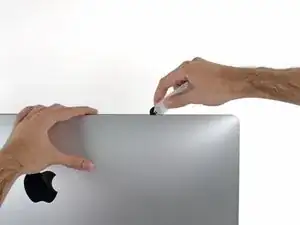
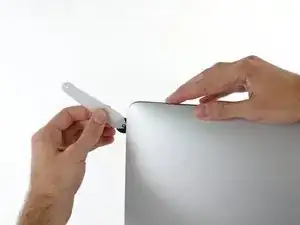
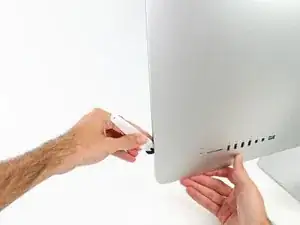
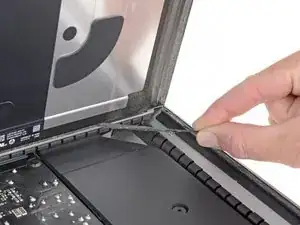
    • Pasa la herramienta por el lado izquierdo de la pantalla.

  4. DL3Vsl22hJBiEQUC
    DL3Vsl22hJBiEQUC
    I1sSvQIKZKIxUJQP
    ZqrgUXS1FMYYPMSS
    • Continúa rodando al herramienta alrededor de la esquina superior izquierda.

  5. uIQeQKO2wRSFOchP
    uIQeQKO2wRSFOchP
    gvmN6noZV1RF3Jja
    • Corta el adhesivo a lo largo de la parte superior izquierda de la pantalla.

  6. ZbtM1gnKNMLvApGO
    ZbtM1gnKNMLvApGO
    xGLHuViOG6iiZRHR
    • Continúa a lo largo de la parte superior de la pantalla.

    • Puede que quieras pasar la herramienta de un lado a otro a través de lo que ya has cortado unas cuantas veces, para asegurarte de que consigues separar tanto del adhesivo como sea posible.

  7. PsXMW5CoXDyhXHAM
    PsXMW5CoXDyhXHAM
    JAULK1Cx3kdL1sMN
    vXTTvMMJZXJmbkPC
    • Empuja la herramienta a lo largo de la esquina superior derecha de la pantalla.

  8. HdQnP2Gt2blNM1Na
    HdQnP2Gt2blNM1Na
    HtXaMYaxdshMTDgI
    • Baja la herramienta a lo largo de la parte derecha de la pantalla.

  9. kSSS26DZATfnLk3Q
    kSSS26DZATfnLk3Q
    SyVUroLGO1X5mAkC
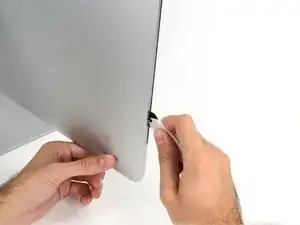
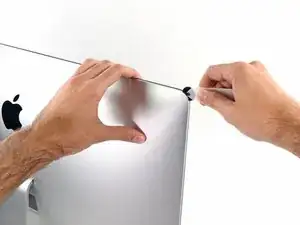
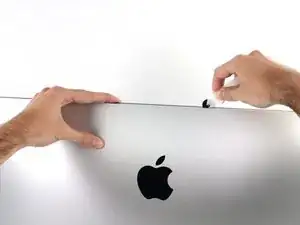
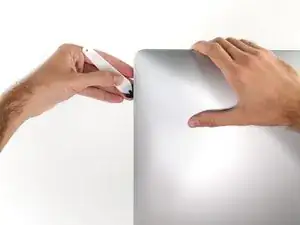
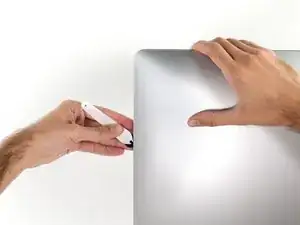
    • Termina de empujar la herramienta de apertura a la parte inferior del lado derecho de la pantalla.

    • En este punto, querrás volver a pasar la herramienta por toda la pantalla, para asegurarte de que cortas la mayor cantidad de adhesivo posible.

  10. vGGIOBrvwJMnSBdS
    vGGIOBrvwJMnSBdS
    jobdKF3VfjwEEE6o
    kXQQFeUFGZvmMM5y
    • Aunque la herramienta de apertura hizo la mayor parte del trabajo, la pantalla seguirá estando ligeramente adherida a la caja. Será necesaria una tarjeta de plástico para liberar lo que queda de este adhesivo.

    • Coloca laiMac boca arriba sobre una mesa.

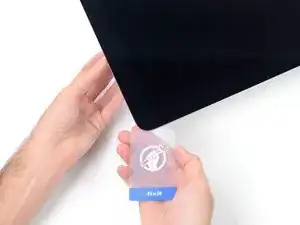
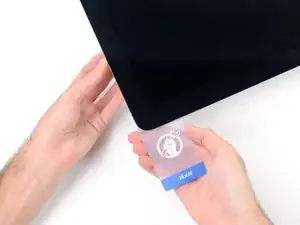
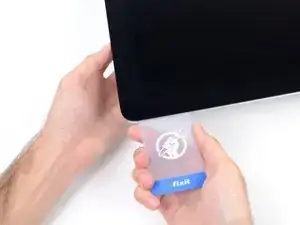
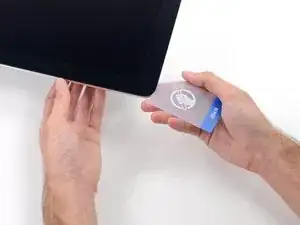
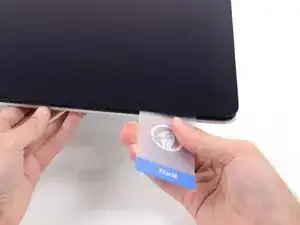
    • Empezando por la esquina superior derecha del iMac, inserta una tarjeta de plástico entre la pantalla y el marco.

    • Ten cuidado de no insertarla más de 9.5 mm o podrías dañar los componentes internos.

  11. ut5JD6JtjXxJqQML
    ut5JD6JtjXxJqQML
    PAssQDYLvD2G5iO3
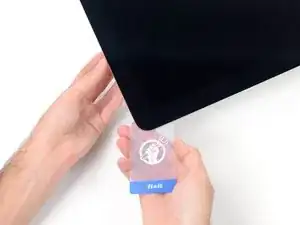
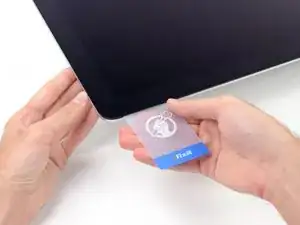
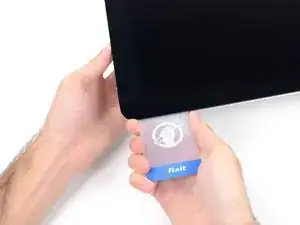
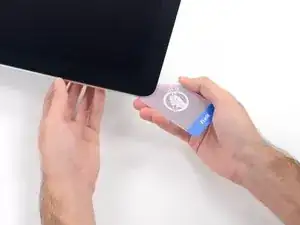
    • Gira suavemente la tarjeta de plástico para abrir el espacio entre la pantalla y el marco, y corte cualquier adhesivo restante cerca de la esquina.

    • Usar demasiada fuerza romperá el cristal. Trabaja con cuidado, y no intentes crear un espacio más grande que unos 6 mm.

  12. NNcaKcnyNAISxxiX
    NNcaKcnyNAISxxiX
    j6rG1dfuABOu2dO1
    nJGOGJvmpMQJkiQj
    • Asegúrate de dejar de cortar antes de la cámara iSight en este paso, o podrías dañarla.

    • Desliza la tarjeta hacia el centro de la pantalla, para cortar cualquier adhesivo restante.

  13. YS6FqSpRAiDQG4GQ
    YS6FqSpRAiDQG4GQ
    WqsOKXvG5huAPhKo
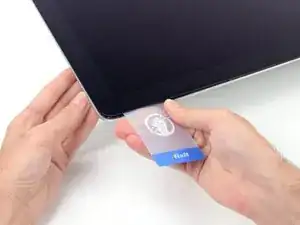
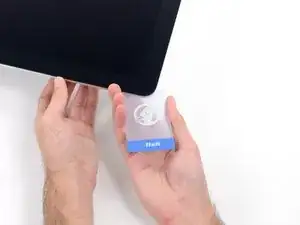
    • Pon la tarjeta en la esquina de nuevo y deje que se quede ahí para evitar que el adhesivo se reajuste.

  14. 21PJZCMtdxPdvyWG
    21PJZCMtdxPdvyWG
    21su2lVZdmdMqNFj
    NVhkQUfEdwlSkUcY
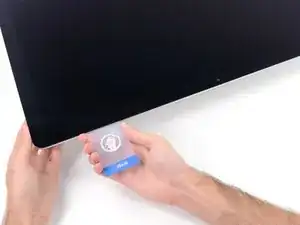
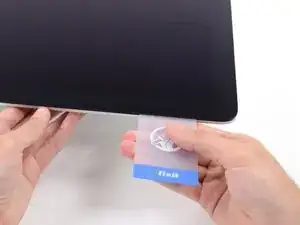
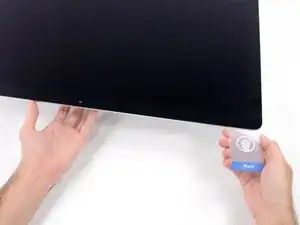
    • Inserta una segunda tarjeta en el espacio entre la pantalla y el marco en la esquina superior izquierda.

  15. e3ydZGUAg4tGPxpq
    e3ydZGUAg4tGPxpq
    4asZcENj1YWTTAaQ
    • Gira suavemente la tarjeta, aumentando ligeramente el espacio entre la pantalla y el marco.

    • Al igual que con el otro lado, muévete lentamente para permitir que el adhesivo se rompa, y ten cuidado de no sobrecargar el vidrio de la pantalla.

  16. saNDXDREhnqVr5IH
    saNDXDREhnqVr5IH
    yUMykLfSY4dkyBvj
    35ISowkckhE1MThI
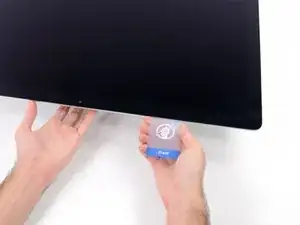
    • Desliza la tarjeta plástica hacia el centro, deteniéndote de nuevo justo antes de la cámara iSight.

  17. Y1GSYcC32e6ll2cv
    Y1GSYcC32e6ll2cv
    swIMklGvuLiQZHEA
    • Inserta la tarjeta de plástico en la esquina superior izquierda

  18. CTHcNsvR2JSpycOK
    CTHcNsvR2JSpycOK
    DkPAlq1IRaSXjP41
    2lBkebhXZXHQfJx5
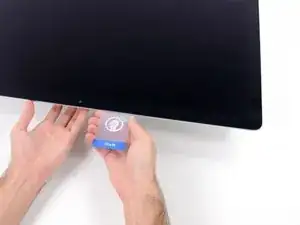
    • Con las tarjetas insertadas como se muestra cerca de las esquinas, gire suavemente las tarjetas para aumentar el espacio entre la pantalla y la caja.

    • Si hay alguna sección que parece pegarse y no se separa, deje de retorcer y usa una de las tarjetas para cortar el adhesivo en el área del problema.

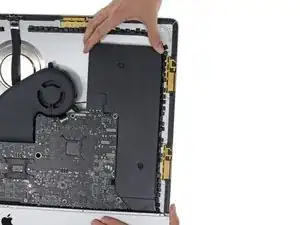
    • Comienza a levantar la parte superior de la pantalla del marco.

    • Levanta la pantalla sólo unos centímetros, ya que aún está unida a la iMac por cables de datos y de alimentación.

  19. Q2TfC5UwSkEOSikR
    Q2TfC5UwSkEOSikR
    MTrFTqNJOBVdqV4H
    • Mientras sostienes la pantalla con una mano, use la otra para desenchufar el cable de alimentación de la pantalla.

    • Levanta la pantalla lo suficiente para tener fácil acceso a las conexiones, pero no tanto como para estirar los cables y tensar sus conexiones (aproximadamente 8").

    Der Stecker muss seitlich wie die meisten anderen Stecker in diesem Modell komprimiert werden, um ihn aus der Buchse auf dem Logicboard zu ziehen. Die Zugrichtung ist parallel zum Logicboard in Richtung Oberkante des iMac. Ziehen ohne seitliches Zusammendrücken der Backen am Stecker könnte den Stecker oder die Buchse beschädigen.

    Ernest Bumblebee -

    These instructions are unclear. They imply the cable can just be pulled out but this step had me stuck for a bit. Searching the webs, I discovered that there are little tabs on either side of the connector. I used my prod tool and poked one side and the connector came out a little. I poked the other side the connector came out without a fight.

    Peter Akey -

    The instruction for this step state this but I was still not expecting two cables. Finally figured out there is a Display Power and a separate Display Data cable.

    wsrb -

  20. PLwxTC26uh2GhoR5
    PLwxTC26uh2GhoR5
    jrJVRXjytJ522PLN
    r2qVa6WfDjnC3vLQ
    • Levanta el soporte metálico de retención del cable de datos de la pantalla.

    • Desconecta el cable de datos de la pantalla.

    • Esta es una conexión delicada que puede romperse fácilmente. Asegúrate de sacar el conector del cable de datos de la pantalla directamente de su zócalo, hacia la parte superior de la iMac.

  21. OukCaMppueWJwd5o
    OukCaMppueWJwd5o
    EuGUiTLe2sAHCQxO
    • Levanta la pantalla hasta una posición casi vertical.

    • En este punto todavía hay una tira de adhesivo a lo largo de la parte inferior de la pantalla que sostendrá la pantalla al marco como una bisagra. Puedes aflojar este adhesivo trabajando la pantalla hacia arriba y hacia abajo unas cuantas veces.

    After rocking the display back and forth a bit, I found it helpful to use my iMac opening tool to gently slide ever so slightly underneath the bottom of the glass to cut the adhesive. This was with the display lowered back into it its normal position. I just worked about 1 millimetre deep at a time and eventually cut through the ~8” adhesive strip at the bottom centre.

    Henry Rose -

  22. ObipUvMrOdU6OUwe
    ObipUvMrOdU6OUwe
    dLOfRlONnG5YXXrL
    UjMBTMMcp2AMhUyw
    • Ten mucho cuidado de no tocar los cables del condensador o cualquier unión soldada expuesta en la parte posterior de la fuente de alimentación (en la caja en rojo).

    • Agarra la pequeña pestaña al final de una de las tiras adhesivas de la pantalla del borde inferior y tira del adhesivo hacia la parte superior de la iMac para quitarlo.

    • Repite este paso con la otra tira adhesiva y quítala.

    • Si alguna de las tiras adhesivas se rompe antes de retirarla, usa una tarjeta plástica para cortar el adhesivo restante.

  23. fTayOtWEDOrUUstD
    fTayOtWEDOrUUstD
    mU65ktCEPdrocgSE
    TAnlppXI4q4GQblK
    • Ten mucho cuidado al manejar la pantalla, es grande, pesada y está hecha de vidrio. La pantalla tiene bordes frágiles. Evita levantar la pantalla por las esquinas.

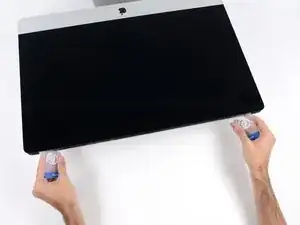
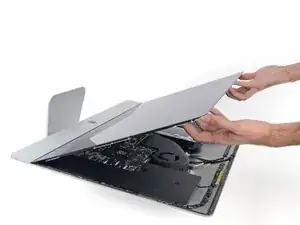
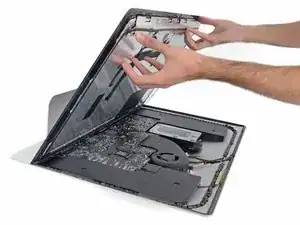
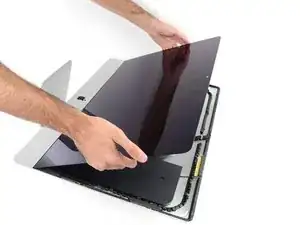
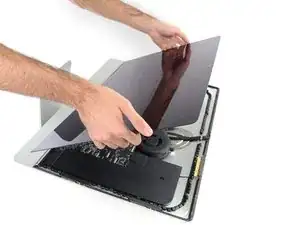
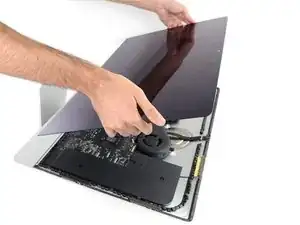
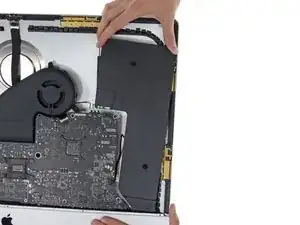
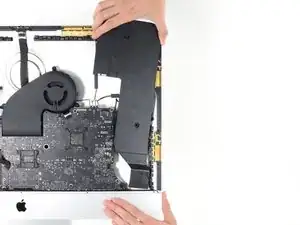
    • Levanta la pantalla del marco y sácala del iMac. Coloca la pantalla boca abajo sobre una superficie plana y suave.

    • Puede que sea necesario levantarla lentamente por un lado, para despegar el adhesivo restante.

    • Después de cortar el adhesivo, no se puede utilizar para volver a sellar la pantalla en su lugar. Sigue esta guía cuando termine la reparación para reemplazar las tiras adhesivas que fijan la pantalla a la carcasa trasera.

  24. IkLPB52BKFCosy5l
    IkLPB52BKFCosy5l
    GWeQuJBpgU2XsRKa
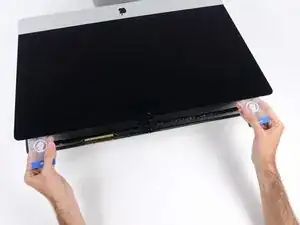
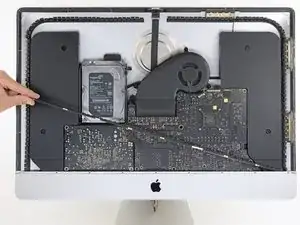
    • Utiliza un destornillador Phillips para quitar los nueve tornillos de 3,2 mm que sujetan el brazo de soporte.

    • Es posible que tengas que despegar el adhesivo de la pantalla que recubre el borde inferior de la carcasa del iMac para acceder a los tornillos.

    These are new steps from when I did this on my late 2015 retina iMac so I believe step 25 and 26 are optional (you can cope without doing it).

    Amuseme -

    I did not find it necessary to remove these screws and this bar

    James Orwin -

    I lost these 8 during the reassemble. The manual tells I need eight 3.2mm screws.

    Can anyone help to clarify what screws I need. I don't really understand this size. Is this M2x3mm?

    Daniel -

  25. wTfuMb3E45pGiUFT
    • Retira el brazo de soporte inferior (también conocido como "correa para la barbilla") de la carcasa del iMac.

    No comments on this ?

    It's quite possibly the most difficult part to put back in the entire process

    The screws are tiny and the there is no easy way to line up the holes on the bracket with the screws

    Having got this far - it wasn't even all that necessary to remove this part in the first place

    Severe pain in the neck

    Eoin -

    After an hour of painstaking mess - I managed to get 7 out of the 9 back in

    By that time I could care less about the remaining 2

    Eoin -

    With the right tools and technique, the bracket can easily be replaced in under a couple of minutes.

    Use a screwdriver with a magnetized tip which frees up one hand and place a screw on the tip first.

    Then line up the screw hole on just one end of the bracket and using a pair of tweezers from the side, hold the bracket in place while you put in the screw.

    Next, do the same on the other end of the bracket. After that, all of the screws in the middle are quick to replace. I didn't really have to touch the bracket again after the end screws were in place.

    Hope that helps someone else since removing this bracket does make later steps a bit easier.

    Max Z -

  26. wkCse3KNtGjp1S2R
    • Quita los dos tornillos T10 de 10 mm.

    I found i didn’t need to remove the speaker nor the hard drive. In fact I managed to remove the old PSU without even removing the chin strap. However, to install the replacement PSU, I had to remove the chin strap. So I would say, remove the chin strap, but you can optionally leave the speaker and hard drive in.

    Cool_Breeze -

    While you do not need to fully remove the screws as once you loosen them a few turns the speaker becomes free. I found that after the removal of the speaker, I turned it over and popped the screws out as this made it easier to replace it later as I could see the alignment before putting the screws back in. If not you may be off a little and you do not want to force the screw back in.

    James Orwin -

    I used a pill container that I got from Walgreens to hold all of the fasteners I removed during the disassembly process. The container has 14 compartments (individual compartments for each morning and evening of the week). I put a small piece of paper in the compartment with the fasteners to note the name and step of the procedure and the size of the tool I used. Hopefully this will be useful when I go to put it back together again.

    Dan Smith -

  27. 1BHDNUCqqNJOMFJJ
    1BHDNUCqqNJOMFJJ
    2DmDmH4EXPf2WqPV
    JWoI1fFugFXExalA
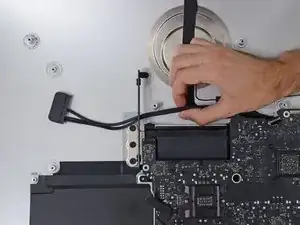
    • Desconecta el cable del altavoz izquierdo tirando de él hacia arriba y sacándolo de su zócalo en la placa base.

    • Retire el cable a través del espacio entre el disco duro y la placa base.

    • Si el espacio entre el disco duro y la placa base es demasiado estrecho para el cable del altavoz, desconéctalo y déjalo donde está.

    I didn’t unplug and de-route this cable. Later, Step 29, has you remove the left speaker. This isn’t necessary. If you can just move the speaker over to expose the hard drive mounting screws, so if you’re not going to remove the speaker, you don’t need to unplug it.

    Anthony Zimmerman -

    on the 2019 iMac, it is horizontal not vertical so pull it horizontally out.

    tarex7 -

  28. fuAXkHYrf16ILX3f
    fuAXkHYrf16ILX3f
    d5BxxgHkf55dopJJ
    lfIdrZLnvJ5AMHRm
    • Ten cuidado con no tocar ninguna de las soldaduras de la parte trasera de la fuente de alimentación. Los condensadores podrían contener suficiente corriente como para darte una descarga peligrosa.

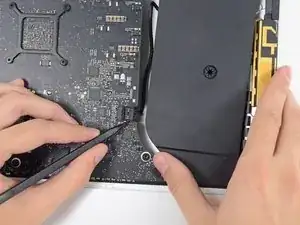
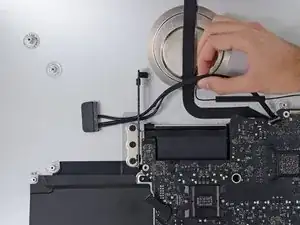
    • Usa un spudger para desconectar la conexión del botón de encendido de su ranura en la placa base.

    Can someone explain what are the solder joint? Or tell me what it looks it?

    brianyu -

    The silver spots on the circuit boards. You may not want to tackle this alone. If you touch these areas, you can possible get a shock -- harming you and your computer.

    Robert -

    there is no need to disconnect the speaker, just unscrew it and move aside slightly to reach the HDD screws (about 5mm) - if you want to replace just the main HDD

    Thomas Webb -

    Take note of exactly what direction this tiny little wire was.

    Joseph Ashe -

    The connector has a plain black side and the other side you can see the 2 silver connectors.. the side you can see the 2 silver connectors faces the front.. the plain side is to the back/against the logic board.

    paul.lynch1 -

    If I leave my iMac unplugged for an extended period, say 24 or 48 hours, is it still possible to get an electric shock from the PSU? Do the capacitors eventually discharge?

    Dominic Pettifer -

    you can do this method, or just wear latex gloves.

    Philip Sedlmair -

    make sure you’ve actually unplugged the mac when running this cable, and not had it plugged in to test the diagnostic LEDs, because one of those wee silver spots is carrying 230v, and its 6mm away from the place the cable runs, So if you have fat fingers like mine, that’s a free wake up zap

    flow in -

  29. ie6MSPEJRdwhepLJ
    ie6MSPEJRdwhepLJ
    MUfv2MeEn4CXucIJ
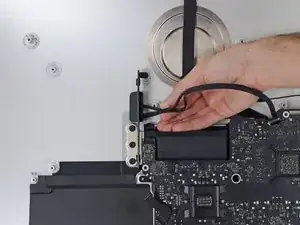
    • Levanta el altavoz izquierdo, hasta que puedas ver el cable del botón de encendido (unos 1.2 cm).

    This is MUCH easier to do if the support bracket along the bottom is removed first. See Reemplazo de Placa Lógica del iMac Intel 21.5" Retina 4K Display (2017) step 25.

    Use a P00.

    To replace it, introduce it like in the photo at the link to be able to hold the right most holes of the chassis and bracket. Replace the first screw, align the bracket to the horizontal and add the screws from right to left. Each one will bring up the next hole in the bracket close enough to screw through. Reverse those directions if you are a leftie.

    Andrew Gough -

  30. qFoeMatHJxBDrads
    qFoeMatHJxBDrads
    yXTFPQCKixIiViER
    VISmV2ZSaU5Kr44U
    • Desconecta con cuidado el cable del botón de encendido de su muesca en el altavoz izquierdo.

    Pay attention: if pulling out the loudspeaker tear off the wire of the power button, Apple have not any service parts except for the whole rear housing!

    Fabio Braga -

    This is MUCH easier to do if the support bracket along the bottom is removed first. See Reemplazo de Placa Lógica del iMac Intel 21.5" Retina 4K Display (2017) step 25.

    Use a P00.

    To replace it, introduce it like in the photo at the link to be able to hold the right most holes of the chassis and bracket. Replace the first screw, align the bracket to the horizontal and add the screws from right to left. Each one will bring up the next hole in the bracket close enough to screw through. Reverse those directions if you are a leftie.

    Andrew Gough -

  31. 4GZNmBvNCnIj3ZGl
    4GZNmBvNCnIj3ZGl
    rS6AH1KffrXtVXxQ
    ypSikGOvbqQJd1Zc
    • Levanta el altavoz izquierdo y sepáralo del iMac.

    • Si el espacio entre el disco duro y la placa base era demasiado estrecho para que el altavoz pudiera separarse, empuja con cuidado mientras lo separas.

    • Empuja desde el terminal del conector, a la vez que tiras desde el terminal del altavoz, para ajustar el cable bajo la ranura de sujeción correcta del disco duro.

    I found it wasn't necessary to remove the speaker from the left side to remove the hard drive. You can remove the screws, and then slide it over to the left — giving more than enough room to access the hard drive.

    Robert -

    me too. don't need to remove it if you only want to change the hd

    Alber Einsten -

    Agreed, wast of time to fully remove the speaker.

    Matthew Gonzalez -

    It is difficult to remove the bottom of the speaker because it bends into the frame. Be careful to remove the power button cable, which also routes in a channel in the bottom of the speaker.

    Eric -

    easier to remove the speakers if you unscrew the front ‘chin strap’ - 6/9 phillips screws that you can see in the picture hold that aluminum piece in place

    flow in -

    Agree. This is MUCH easier to do if the support bracket along the bottom is removed first. See Reemplazo de Placa Lógica del iMac Intel 21.5" Retina 4K Display (2017) step 25.

    Use a P00.

    To replace it, introduce it like in the photo at the link to be able to hold the right most holes of the chassis and bracket. Replace the first screw, align the bracket to the horizontal and add the screws from right to left. Each one will bring up the next hole in the bracket close enough to screw through. Reverse those directions if you are a leftie.

    Andrew Gough -

    The trick with removing the left speaker is that you have to slide it up toward the top of the iMac (continuing to de-route the power button cable carefully as you go) to get it out from under the chin before you lift it up to remove it.

    ace -

  32. PxrBBFccE4MtyuK4
    PxrBBFccE4MtyuK4
    NnvsFkOCqGgxcfLJ
    • Jala directamente el cable SATA de datos/poder para desconectarlo de la unidad.

  33. fCNkWjKoRWTh4qNL
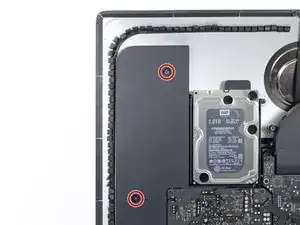
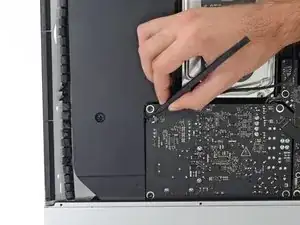
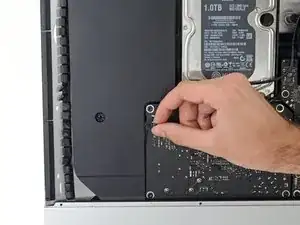
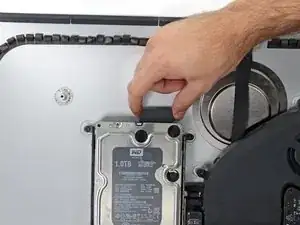
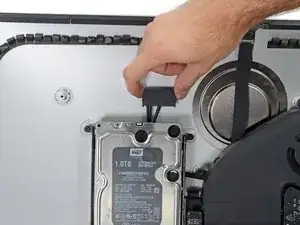
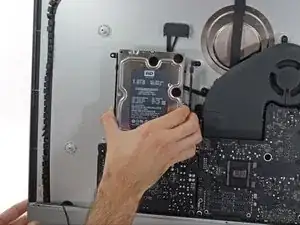
    • Remueve los dos tronillos de 7.3 mm que aseguran la abrazadera izquierda del disco duro a la carcasa trasera.

  34. ZPshuwLMgNCFLAaa
    ZPshuwLMgNCFLAaa
    aOTBHoVAI4tOTwDi
    TuVHwNPAYMsMlSfk
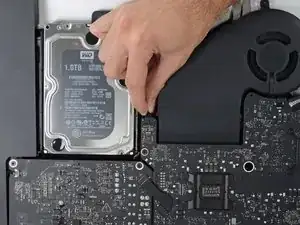
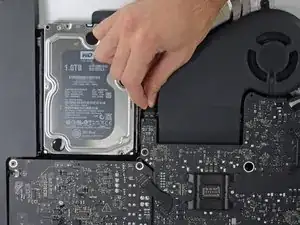
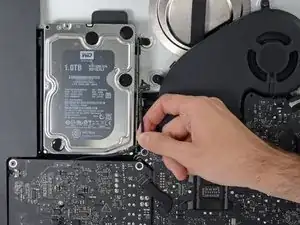
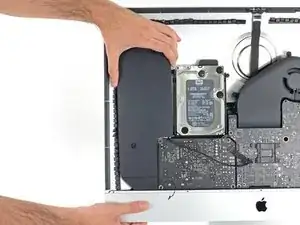
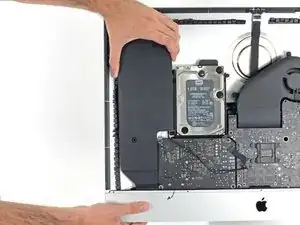
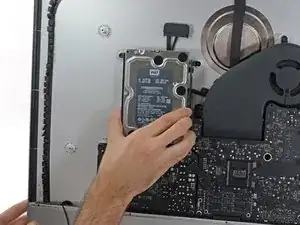
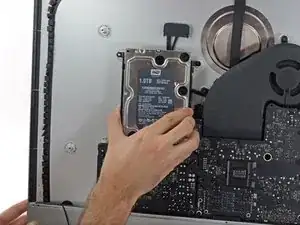
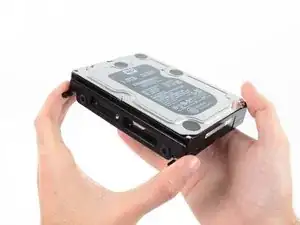
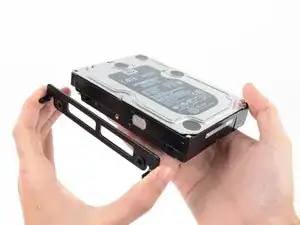
    • Agarra el disco duro y la abrazadera izquierda del disco duro juntos.

    • Inclina el lado izquierdo lejos de la carcasa trasera y desliza el conjunto hacia la izquierda.

    • Remueve el disco duro y la abrazadera izquierda del disco duro de la iMac.

  35. tIFnVNlWZtiKmhrx
    tIFnVNlWZtiKmhrx
    2dW6UjdVRe56RwvN
    • Remueve la abrazadera izquierda del disco duro.

  36. TSg5dgylJtKiwXv4
    TSg5dgylJtKiwXv4
    dsuFLXPV6d2jFrkP
    • Cuando trabajes en la fuente de alimentación, ten mucho cuidado de no tocar los cables del condensador o cualquier junta de soldadura expuesta en la parte posterior de la fuente de alimentación. Maneja solo el tablero por los bordes.

    • Desconecta el cable de control de la fuente de alimentación de la propia fuente.

    I found this cable very difficult to disconnect, be very careful because the cable is between a black tape and it's stuck very hard to the logic board and the cable is very short and you don't have space to move and separate it from the connection! Be patient and take the time you need

    MrSchaeffer -

    I found than putting the flat end of the spudger at the center of the cable, and tilting it got the cable out without an issue.

    jimboom006 -

    I was able to use the flat end of the spudger on the sides. You can see a tiny little clip on each side. Be very gentle!

    Joseph Ashe -

    I simultaneously used the fingernails on my 2 index fingers to dislodge the tabs and continue to pull the cable out. It took a couple seconds.

    Eric -

    ultimately the trick for me was to just pull hard enough, but that part is the scariest part. any tips welcome

    Boris -

    These connectors seem pretty tough to remove until one understands the latch. Each side of the plug are two little sprung tabs (the tab is part of the spring clip which runs down the side of the plug on each side - makes sense once you see the removed plug!). Squeeze them in towards each other and then gently pull the plug from the socket. No great force, or even the spudger, needed once that is done.

    Pete Mackenzie -

    One more tip, has worked on other cables for me. Fish the skinniest spudger tip you have under the cable, and with a finger of your other hand put opposite pressure on the cable against the spudger and gently work it out

    Mike Fleming -

    If u are right handed, i can recomend to use your index left nail to press de bottom sprung, and a flat spudger on the right hand, came off so easy

    Davo Montiel -

    Davo Montiel's tip worked for me. Use the fingernail on your left index finger to press in the tab on the bottom side of the connector and with the right hand use a flat spudger to press in the tab on the top side of the connector.

    Dan Smith -

  37. OvYDOVkRThqL1veJ
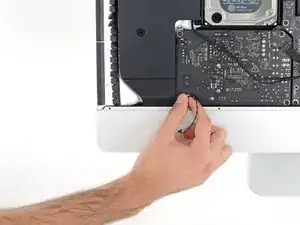
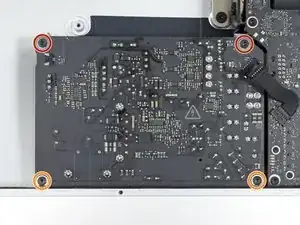
    • Retira los siguientes cuatro tornillos que sujetan la fuente de alimentación a la carcasa trasera (tamaño T8 o T10 según el modelo exacto):

    • Dos tornillos Torx de 23.7mm

    • Dos tornillos Torx de 7.3mm

  38. SjJOCBs6tJnBVydL
    SjJOCBs6tJnBVydL
    GwZoykUUWlcU22J3
    xQRTX4MTgOYlNkkk
    • No intentes quitar la fuente de alimentación de la caja; todavía está conectado a la placa lógica por dos cables.

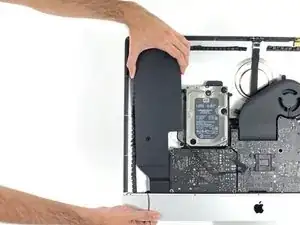
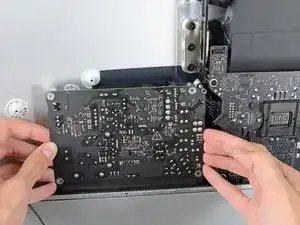
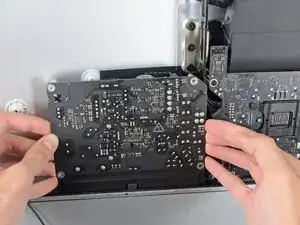
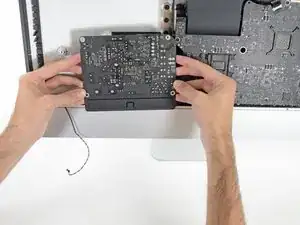
    • Mueve la placa de la fuente de alimentación hacia el borde izquierdo de la caja y hacia arriba para liberarla de la muesca en la placa lógica.

    This is MUCH easier to do if the support bracket along the bottom is removed first. See Reemplazo de Placa Lógica del iMac Intel 21.5" Retina 4K Display (2017) step 25.

    Use a P00.

    To replace it, introduce it like in the photo at the link to be able to hold the right most holes of the chassis and bracket. Replace the first screw, align the bracket to the horizontal and add the screws from right to left. Each one will bring up the next hole in the bracket close enough to screw through. Reverse those directions if you are a leftie.

    Andrew Gough -

    The top right screw on the power supply actually screws into a stand-off screw connected to the back of the iMac case. Once you have removed the 4 x Torx 8 or 10 screws you can move the power supply enough to see the upper face of it.

    It has a Torx 25 slot in it and comes out easily. This will give you a lot more room for your fingers in Step 40, depressing the tab on the DC power cable connector to pull it out, and when replacing it on reassembly. You may find it won’t require you removing the support bracket as in the suggestion above.

    John Blagden -

  39. DSKnhJsHUNIEa3fQ
    DSKnhJsHUNIEa3fQ
    GJDaQ5WUgxmQ1lsh
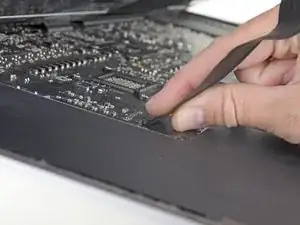
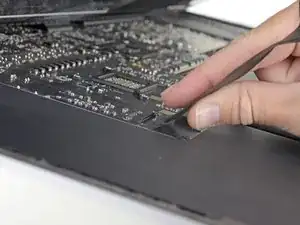
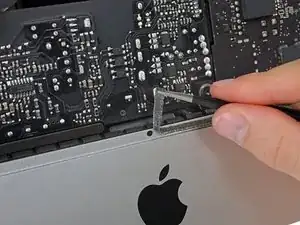
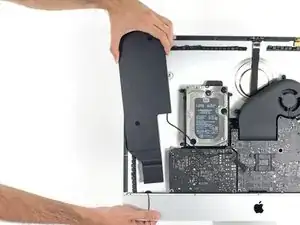
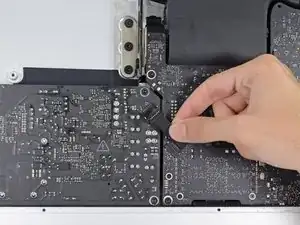
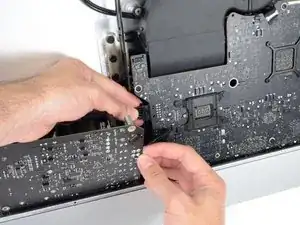
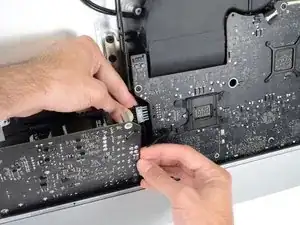
    • Presiona la pestaña del conector del cable de alimentación de CC, luego extráela de su zócalo en la parte posterior de la placa lógica.

    Remember to push in the disconnect tab on the large connector. Carefully insert your finger and push on the tab before you pull on the connector.

    Manuel Collazo -

    Thank you Manuel, this was a tricky one.

    David Zemsky -

    Yes, I pulled the whole socket out because I didn’t know about the tab. Fortunately I was able to place it back in. Not sure if it was glued or how it was anchored but it seems to have a solid connection and I can’t easily pull it out by hand. Once I plug the power cable back in should be ok.

    P. Hisada -

    This connector was very difficult for me to remove (even after pushing the disconnect tab). Eventually I had to use a pair of needle nose pliers to wiggle it back and forth out of the socket. A lot of the cables on the my late 2015 model were very tight and a struggle to get out.

    Anthony Zimmerman -

    I'm struggling with this step. I presume that the tab to which you are referring is behind the connector. I can see a plastic protrusion there but it does not move when I push it. Just to get my finger behind it requires the power board to be moved quite a bit btw.

    Dave Sands -

    Pressing on the release on the back with my finger and at the same time using a needle nose pliers to wiggle the connector with my other hand worked for me.

    Kimbo M -

    i could not get it out by the force of my fingers, so what i did was slightly turn the imac 90 degrees so i could reach the area better, push up (so, vertically) the power control board, push in the tab on the bottom of the connector with my right hand, and slightly wiggle the connector out of its socket with a plier

    Boris -

    removing the chin strap (the front bit of metal running along the bottom of where the screen was) makes this much easier as you can rotate the board and get to the underside

    flow in -

    Left index finger pushing on the tab from behind the connector, using needle pliers in right hand to rock up & down did the trick thanks @starfleet_tone

    Frédérick Charette -

    Just be careful! I’ve seen two systems where the socket was pulled fully off! So the logic board then needs repairs or replacing being just a bit too aggressive!

    Dan -

    Needle nose and wiggling worked for us too. We were stuggling like heck with it when just using hands!

    Mike Manasewitsch -

    This is MUCH easier to do if the support bracket along the bottom is removed first - more space to angle the board upwards. See Reemplazo de Placa Lógica del iMac Intel 21.5" Retina 4K Display (2017) step 25.

    Use a P00.

    To replace it, introduce it like in the photo at the link to be able to hold the right most holes of the chassis and bracket. Replace the first screw, align the bracket to the horizontal and add the screws from right to left. Each one will bring up the next hole in the bracket close enough to screw through. Reverse those directions if you are a leftie.

    Andrew Gough -

    I did as Andrew Gough did, per other videos reviewed. Removed it right away. Just makes things easier, more space for just a few screws :)

    Mike Rehbein -

    The top right screw on the power supply actually screws into a stand-off screw connected to the back of the iMac case. Once you have removed the 4 x Torx 8 or 10 screws you can move the power supply enough to see the upper face of it.

    It has a Torx 25 slot in it and comes out easily. This will give you a lot more room for your fingers in Step 40, depressing the tab on the DC power cable connector to pull it out, and when replacing it on reassembly. You may find it won’t require you removing the support bracket as in the suggestion above.

    John Blagden -

    I used your suggestion to remove the stand-off and then used my left hand index finger to press the tab while rocking the connector side to side with a needle nose pliers. Plug came out easily.

    Dan Smith -

    The tab is a pain in the a$$$ to get your finger in there. I was so horrified at the size of the capacitors that I put on gloves to reduce any amount of shock :-) . To get it loose I would pull out carefully the power board as far as I could than I wedge my index finger under and press the tab and slowly pull until I saw a slight gap between the end of the socket and the plug. I than place the flat part of the black spudger or blue one into the gap and use as it as a wedge to help move the plug forward as I kept the tab pressed.

    Andrew Phillips -

  40. koSSEChiJ6RewCB2
    koSSEChiJ6RewCB2
    nIYKhI5tf6PslNSZ
    YPOgTmvfBWBeLHTl
    • Ten mucho cuidado de no tocar los cables del condensador o cualquier junta de soldadura expuesta en la parte posterior de la fuente de alimentación. Maneje solo el tablero por los bordes.

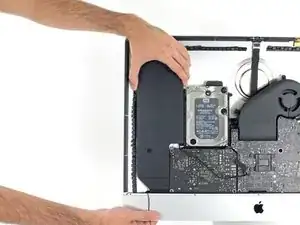
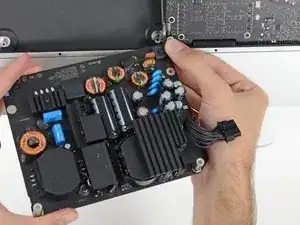
    • Voltea la parte superior de la fuente de alimentación hacia ti, como abrir un buzón, para revelar el conector del cable de entrada de CA.

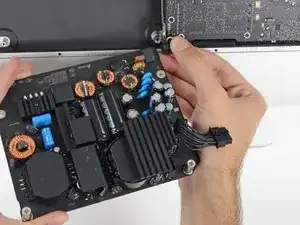
    • Desconecta el conector del cable de entrada de CA.

    To reassemble, do the same in reverse but keep power supply board more upright than slanted down when re-inserting it in to the lower right corner. The lower right screw post has an protrusion under/behind it and the Power Supply's small 2 wire plug must fit between the front of your Mac and the obstruction. Then it just slides right in and then screw it down.

    Dan H -

    There is a small release tab on the cable.

    Eric -

    Wear gloves when doing this to reduce any shock. The size of those capacitors are very unnerving and scary. Also those solder joints.

    Andrew Phillips -

  41. XLZ6JAe5UQRMerFQ
    • Retira dos tornillos T8 de 9,8 mm.

    These are T10's, not T8's

    loren -

    I had one shorter one screw, and one screw shorter than the other two equal size speaker screws, but longer than the stubby screw. :) And I can confirm that these are T10s.

    Patrick Vickers -

  42. fCTmYLw4UHHd5trB
    fCTmYLw4UHHd5trB
    3NTQk3425JfsVXY1
    • Mueve suavemente el altavoz derecho ligeramente hacia la derecha para permitir el acceso a la conexión de su cable en la placa lógica.

  43. foyuA2rUNRhfiYku
    foyuA2rUNRhfiYku
    Ml6ZR3hJmbB62Sb6
    PJS1CD2tUaRrZaqD
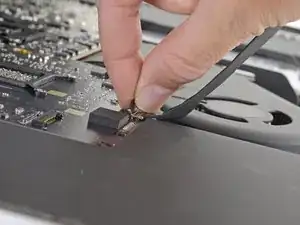
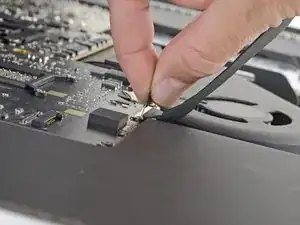
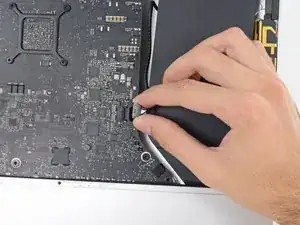
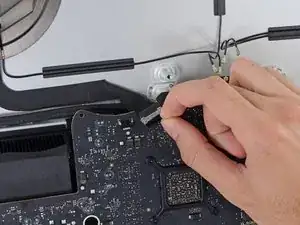
    • Usa un spudger para aflojar el conector del cable del altavoz derecho de su zócalo en la placa lógica.

    • Tira del conector hacia la derecha para sacarlo de su zócalo.

  44. arkIaVcopUlXpfTM
    arkIaVcopUlXpfTM
    2b1lnbTTPXPmynPe
    d31WDKhGFGcmLy2e
    • Levanta el altavoz hacia arriba y retíralo del iMac.

  45. WXntIOVb5NEQugib
    WXntIOVb5NEQugib
    bWBlJvmSsjO2yfKK
    HvlkqipFULhkkLcp
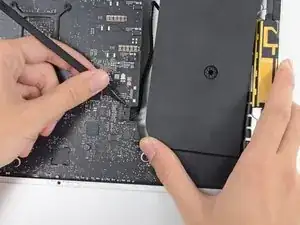
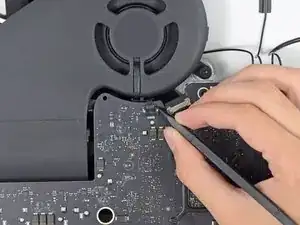
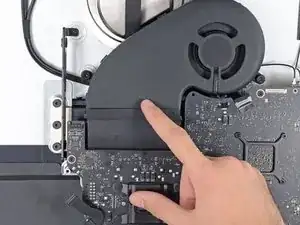
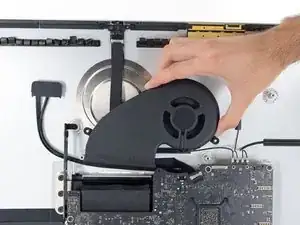
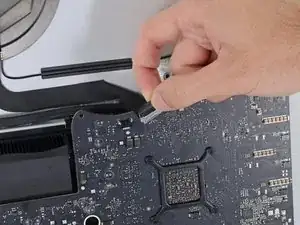
    • Usa la punta de un spudger para desconectar el conector del cable del ventilador de su zócalo en la placa lógica.

  46. Z66SnPhtc1WsoMGO
    Z66SnPhtc1WsoMGO
    AhwZbYEBS1AGM1Wo
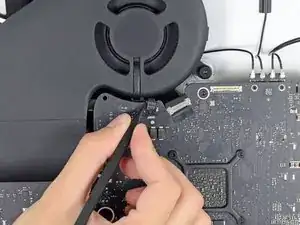
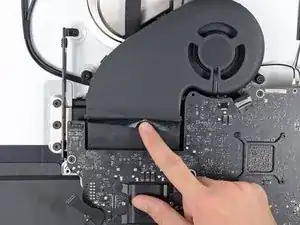
    • Despega la cinta negra que conecta el ventilador al conducto de escape ligeramente.

    • Deja la cinta en su lugar en el conducto de escape—solo necesitas exponer la unión para liberar el ventilador.

  47. hF2H1iMMxroidbUv
    • Quita los tres tornillos T10 de 12.4 mm que sujetan el ventilador a la carcasa trasera.

  48. ZwiHFeKlBBGMNqw3
    ZwiHFeKlBBGMNqw3
    D3khYG2esIDlKZMa
    • Quita el ventilador del iMac.

    Use a piece of tape around the antenna cables to keep them in the same order, makes reassembly a little easier.

    Walter Hayden -

    On reassembly, start the fan power connector into its socket while you slide the fan in.

    ebay -

    I left the antennas attached to the wifi card and removed the wifi card with wires attached. I accidentally broke one of the connectors on the wifi card and had to replace the entire card....

    S. Baxter -

  49. HVZOuLlAiUTsB4f1
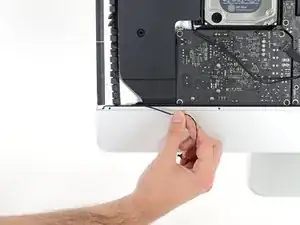
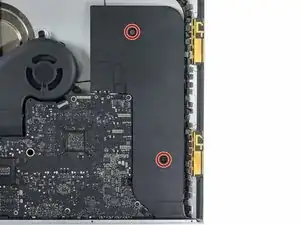
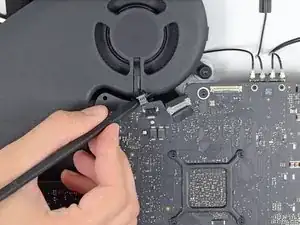
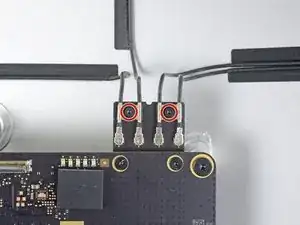
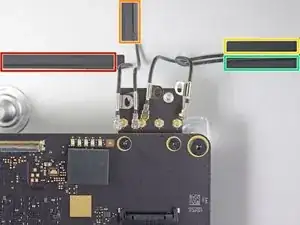
    • Utiliza un destornillador Torx T5 para quitar los dos tornillos de 4 mm que sujetan los cables de la antena AirPort/Bluetooth.

    Rather than unscrew the antenna cables, I usually unscrew the screws on the board and slide out the whole AirPort/Bluetooth module, which means I need not keep track of which antenna cable goes where.

    johann beda -

    Confirmed. 2 T5 screws, and pull the board straight up out of its socket behind he motherboard. Leave all cables attached.

    ebay -

  50. qIA5fvOeCOnWH1Vh
    qIA5fvOeCOnWH1Vh
    XXMEBjJLNYXOl3aY
    nmVCPlZOoapjC5D2
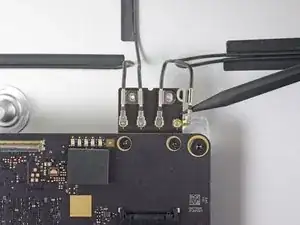
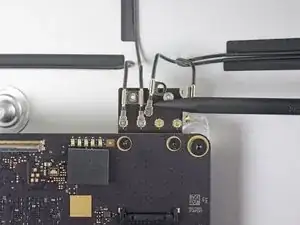
    • Usa la punta de un spudger para desconectar cada uno de los cuatro conectores de antena de la tarjeta AirPort/Bluetooth.

    • Ten en cuenta las posiciones originales de cada conector cuando vuelvas a conectar los cables. De izquierda a derecha en la tarjeta, las antenas están conectadas en el siguiente orden:

    • Extremo izquierdo

    • Parte superior

    • Superior derecha

    • Inferior derecha

  51. LDGWovmq5iqPhCh5
    LDGWovmq5iqPhCh5
    rcpRC6BN2MsLiAJS
    Oy3WASyxuKZMQQ3p
    • Esta es una conexión delicada que se puede romper fácilmente.

    • Levanta el soporte de retención de metal en el cable de la cámara iSight.

    • Saca el conector del cable de la cámara de su zócalo, hacia la parte superior del iMac.

  52. PZGoVl3TfEGOINTp
    PZGoVl3TfEGOINTp
    OYq3NjhImKlULFKy
    GsEHxDSgxuouCSCj
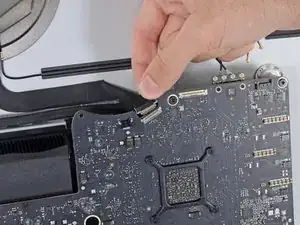
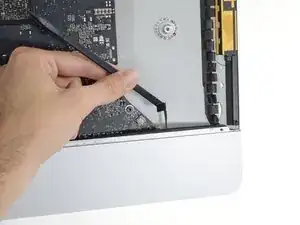
    • Usa el extremo plano de un spudger para desconectar el conector del cable del conector de auriculares de su zócalo en la placa lógica.

    • Empuja suavemente el cable fuera del camino.

  53. Ioj6vLmqt1UTLkBu
    Ioj6vLmqt1UTLkBu
    gBUV2Xy1qEjgOyOT
    lFXqMinhpxQcgWV2
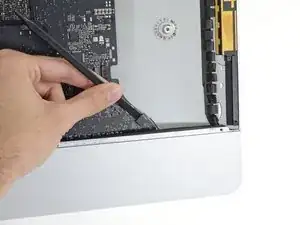
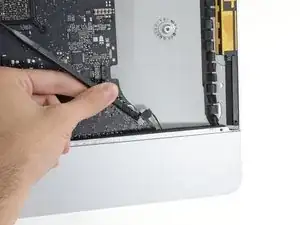
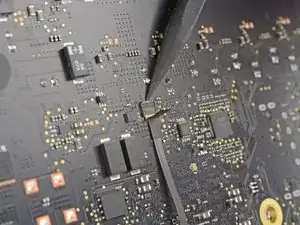
    • Usa la punta de un spudger para abrir la solapa de retención en el conector ZIF del cable plano del micrófono.

    • Asegúrate de hacer palanca en la solapa de retención con bisagras, no en el enchufe en sí.

    • Usa pinzas para tirar suavemente del cable plano del micrófono para sacarlo de su zócalo.

  54. piGgRxFUMj33AWDI
    piGgRxFUMj33AWDI
    ieBtZtFwkdn3cTrW
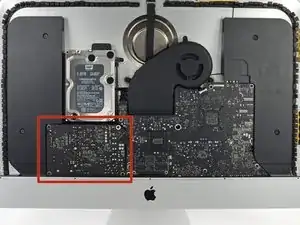
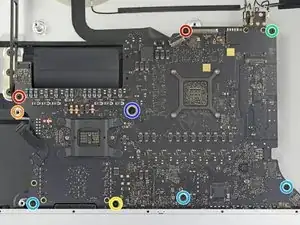
    • Retira los siguientes tornillos que sujetan la placa lógica:

    • Dos tornillos T8 de 23,7 mm

    • Un tornillo espaciador T25 de 20,1 mm

    • Un tornillo T8 de 17,6 mm

    • Un tornillo T8 de 7,2 mm

    • Tres tornillos T8 de 7,1 mm

    • Un tornillo cautivo T8

    • Este tornillo está debajo de un agujero en la placa lógica. Si no estás utilizando un controlador iFixit, es posible que necesites una extensión o un destornillador con un eje más largo.

    A 3.0 Hex driver worked for the T25 spacer screw.

    johann beda -

    1/8” hex worked, too

    ebay -

    For the T25 I used a regular chisel tip screw driver that was exactly the width between two opposite sides of the Torx star

    The standoff is only screwed in by two or so turns and came out very easily for me

    So you shouldn't have to force it and damage threads

    Eoin -

  55. fJgFkZyHLLZdB1YH
    fJgFkZyHLLZdB1YH
    fHGiChnXJmROP3ek
    Yg2G1MP6Jo3XplDC
    • Tira del cable SATA del disco duro y del conector a través del soporte derecho del disco duro. Mueve el cable hacia el lado derecho del iMac, fuera del camino del puerto de escape.

    • No intentes quitar el cable por completo; aún no se puede quitar, pero estorbará para quitar la placa lógica.

  56. KUFY5kVqKEZvTX1t
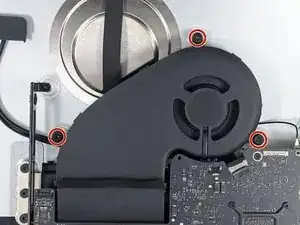
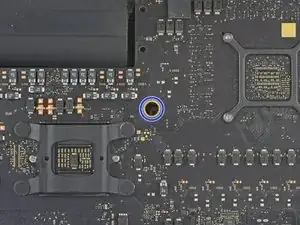
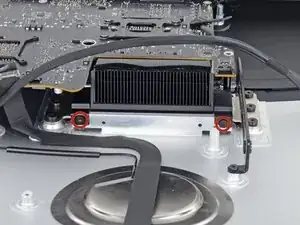
    • Utiliza un destornillador Torx T8 para quitar los dos tornillos de 5,6 mm de la parte superior del conducto de escape del disipador de calor.

  57. cGF6KPqP4fUBB4jw
    cGF6KPqP4fUBB4jw
    WdI1VHP2UFCNPGCu
    ZSWNOLBKTDVCVItY
    • Al retirar e instalar la placa lógica, ten cuidado de no dañar el delicado cable plano del micrófono en la parte inferior izquierda de la placa.

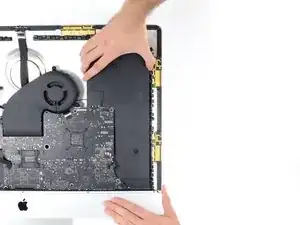
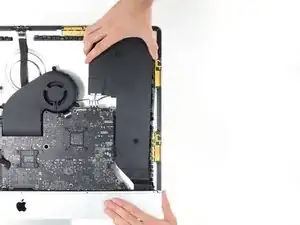
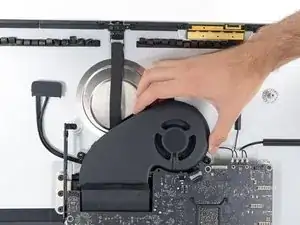
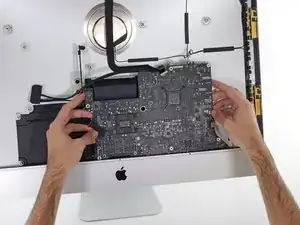
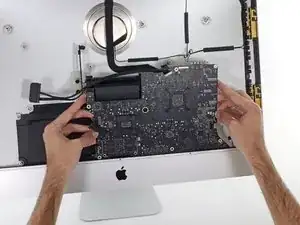
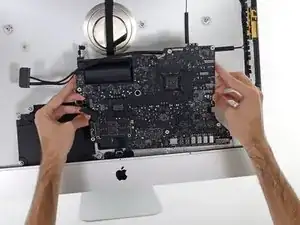
    • Inclina la placa lógica ligeramente hacia adelante.

    • Levanta la placa lógica hacia arriba y hacia afuera del iMac. Ten cuidado de no engancharla en ninguno de los postes de tornillo fijados en el interior de la carcasa trasera.

  58. u1JfbBecaKwUb6Nd
    u1JfbBecaKwUb6Nd
    NsDLWtU6RtvWJA3w
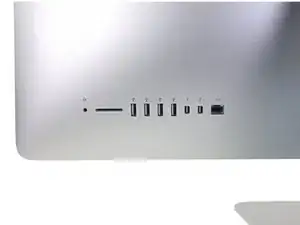
    • Cuando vuelvas a armar tu iMac, ten mucho cuidado de alinear correctamente los puertos de E/S exteriores. La placa lógica puede quedar torcida incluso cuando está asegurada con todos sus tornillos.

    • Puedes usar una unidad flash USB o un cable Ethernet para asegurarte de que la placa lógica esté colocada correctamente mientras la atornillas.

    Insbesondere die USB3.1 Port sollten mit einem Stecker belegt werden! Ich habe nur die USB3.0 (A?) Ports mit Steckern belegt und konnte nach dem Zusammenbau alle Port benutzen, aber nicht die USB3.1 (C) Ports. Am besten überall einen Stecker rein.

    Boris Boesler -

  59. Nkthq3ehRnmhwFZ6
    Nkthq3ehRnmhwFZ6
    tuGd3uRBXo5b2qRC
    ej1gExh1rGuNUGsZ
    • Tira hacia arriba del conector del cable de alimentación SATA para desconectarlo.

    • Desenchufa el conector del cable de datos SATA apretando la pestaña de bloqueo y tirando del conector hacia arriba.

    • Quita el cable SATA del conjunto de la placa lógica para quitarlo del medio y evitar que se dañe.

    Where is this cable sold

    mert -

    Is this picture correct with 7 pins? Or is it form the 5k version? (See comments on that case below).

    There is an cable on eBay with 5 pins.

    Steve Nilsen -

    This guide was written the year before the 5K model first came out. The cable in the photo is definitely for the model listed, although it’s always possible Apple made more than one variation.

    Jeff Suovanen -

    Hey, if you got this far and your iMac is getting along in years, maybe pick up a BR2032 battery and replace the PRAM battery while you’re at it, as you have to get to this point to access it.

    Tom -

    I'm waiting on the battery now! I have a CR2032 in the house, but I looked them up, and they're too different to make me comfortable using one. And I accidentally ordered the BR3032, AAAGH. Sigh. Stupid Amazon put them side by side, and I clicked on the wrong one. :) Must've been Amazon's fault. :) But for sure, I was looking at my computer in pieces, and I looked at that battery, and I thought, wait, when was this thing built? 2017? Um. Might be time for a change.

    Patrick Vickers -

    Tom, great tip on the battery. I put a new one in my 3½ year old iMac.

    Dave Hoppenrath -

    Could have used a warning that this cable is not present in models that shipped with a SSD. I was replacing my blade SSD and adding a new SSD at the same time, only to find that I was missing this cable while my iMac was in pieces. Had to reassemble it without adding the SATA SSD, major hassle.

    Matt Stamm -

    This is a bit of a grey space.

    Clearly you don’t need the cable if you are replacing the HDD or switching it out of a SSD. Its only when you are enhancing your system by adding a drive which you didn’t have before.

    Dan -

    Yeah, it's tricky on that cable. I watched a Snazzy Labs video on upgrading the i5 to an i7 (which left out lots of stuff, thank goodness for this guide and you folks), and in that video he mentioned that you might or might not find the cable inside your mac, so I went ahead and ordered one, and of course, one was in my computer, despite that it had an SSD in it. Was it because it was an upgraded SSD? I dunno. But I'm certainly sorry you had to deal with that, especially as while the difficulty isn't too high on this one, there's SO. MANY. STEPS.
    Sigh.

    Patrick Vickers -

  60. kDwavkqePixeUEsy
    • Quita el único tornillo T8 de 5,3 mm que fija el SSD a la placa lógica.

    What type och screw is this? I just need the measurements, is it a standard M-size screw?

    Peter -

    Did you find out any details about the screw in the end?

    djones -

    I am also searching for the right screw. There wasn’t one there before as there was no M.2 SSD there before (late 2015 iMac with HDD configuration). It’s definitely smaller than the T8 Torx’s I have been taking out so far.

    Boris -

    I bought the 1TB PCIe SSD for my 5K iMac (late 2015). Worked like a charm without any hiccups; great vendor: https://beetstech.com/product/solid-stat...

    Shaheen Ghiassy -

  61. rWmaOPxqTWNCPwtq
    rWmaOPxqTWNCPwtq
    On4EnWy1cqN3hebG
    lYZYjwFwX4JTbpLQ
    • Para evitar dañar su zócalo, no levantes el extremo del SSD más de 15º.

    • Levanta ligeramente el extremo de la SSD y extráelo de su zócalo en la placa lógica.

    • Al reinstalar el SSD, asegúrate de que esté asentado correctamente antes de reinstalar su tornillo de retención.

    this ssd is not for a late 2013!

    this is 2012 year

    cslbox -

    What do you mean? I'm going to buy a ssd to add it in my imac 27 late 2013 the came without it.

    Which part I need?

    MrSchaeffer -

    I think what he meant to say is the SSD shown (Samsun) is for a late 2013. The 2014 iMac uses a Sandisk unit (see the 5k teardown).

    Ifixit have made the mistake of referencing the late 2013 iMac teardown photos here.

    Brent -

    Not get confused! Apple used different vendors of their SSD’s both SanDisk & Samsung supplied SSD’s in this series.

    Dan -

    Which SSD is used in this tutorial?

    Lok -

    For the 2012 iMac 27”, I can confirm the Blade SSD is an 8+18 pin SSDD and I believe this is a SATA drive, NOT a PCIe (NVMe) drive. I took my 2012 apart to try to add an NVMe drive with 2013 macbook adapter, and it does not fit. I didn’t have an adapter that worked so I just replaced the 3.5” HDD with a 2TB SATA 2.5” SSD and left the blade slot empty.

    The SSD drives available from OWC have speeds consistent with SATA drives, so I think the benefit of replacing or filling the blade slot are pretty minimal unless you’re really trying to maximize your available storage space, in which case it’s likely better to invest in an external or network attached solution.

    TL;DR 2012 iMac is an 8+18 pin setup that is likely SATA, not PCI-E so just replace the HDD with a big SATA drive.

    Jakegub -

    Here’s a good source of info The Ultimate Guide to Apple’s Proprietary SSDs And BeetsTech is a good source for the SSD’s

    Dan -

    iMac 27” 2019!

    I did it ;-) and ist works fine … but I had no microfon after reinstall. I had put the adhesive strips over the mic holes.

    So I need to open again with a new pair of adhesive strips ;-)

    I Have installed a Samsung NVME SSD 970 EVO 1TB with the “long” sintech adapter and a Sandisk Ultra SSD 2TB (SATA).

    Matthias -

    I am about to do this to my 27” late 2015. Haven’t decided on which Blade SSD to use yet. But I have bought af Crucial MX500 2 TB SSD SATA.

    I have read a lot of problems with the Samsung NVME SSD 970 EVO.

    Also read a lot about needing a SATA cable from OWC (OWCDIDIMacHDD12) In-Line Digital Thermal Sensor for 27-Inch iMac, to ensure the fann does not spin uncontrollably.

    Have you had any problems with your setup with the Samsung SSD, and did you use the OWC cable ?

    Lars -

    I also did it with the same adapter, ordered for a few bucks from china.

    I’m usign the 970 EVO Plus 1TB, they have updated the firmware and it works out of the box.

    The firmware for older models can be updated directly on the mac with the updater from Samsung (can be installed on a USB stick and used to start the mac with it)

    The standard 970 EVO does not have had the firmware issues, just the Plus had in the past.

    For the blade SSD no OWC cable is required, that is only if a SATA-HDD is replaced by a SATA-SSD, thats a completely different thing.

    maccy -

    Is there supposed to be a heatsink attached to the replacement drive? I don't recall receiving one in the OWC package and I am seeing temps hitting 190 F (almost 88 C) under heavy load.

    Maurice Volaski -

    No heat sink on the blade SSD, you could add one but it won’t really change what you are facing here.

    It does sound like your SSD maybe to small (and/or your system needs more RAM) given what you are doing.

    Keep in mind boot drive (SSD here) is used for virtual RAM, caching and depending on the app scratch space. You want to leave at least 1/4 of the drive empty for best performance. 256 GB or smaller drives will need 1/3 reserved.

    Dan -

    How to boot the system after replacing the ssd? Where is the recovery partition? I have followed all the steps but the screen is black and not even the question mark is displayed.

    LETRA -

    Then you have an issue with your installation as you should be treated with a flashing question mark. Check your displays connections and maybe see if an external display works. Did you use the proper tools and technique within the guide to lift the display off? Many people have damaged the display in the process if they don’t follow the guide to the letter.

    Dan -

    Installed a 2019 SSD in my late 2015 iMac retina, purchased from fast_macs on eBay AOK with nearly 1900MB/s write 1800MB/s read (ish). Also installed Apple 2TB drive too whilst I was doing it.

    Amuseme -

    The 2017 and 2019 SSDs should be the same (or very similar). Both are SSPOLARIS and the same generation. I’m in the middle of doing the same on mine (mid 2017), going from a 2TB Fusion to a straight 1TB blade.

    I purchased this one, based on the excellent feedback:

    https://www.ebay.com.au/itm/144429279418...

    orrelljet -

    If I install a new 2TB SSD to replace my HDD (2019 imac 27), do I have to install a new logic board SSD? I’d rather not have a fusion config any longer (S/W seems buggy - hence my fusion drive problems). I’d much rather have just the new 2TP SSD in place of the old HDD, if possible?

    Chuck Lott -

    Replacing your SATA HDD for a SSD makes a lot of sense! Any size will work.

    You should pull the blade SSD which was mated to the HDD to create the Fusion Drive pair.

    Dan -

    Thanks Dan - blade SSD to be discarded!

    Chuck Lott -

Conclusión

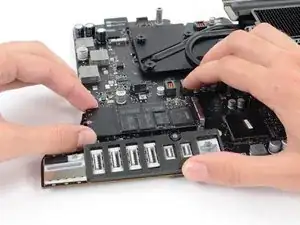
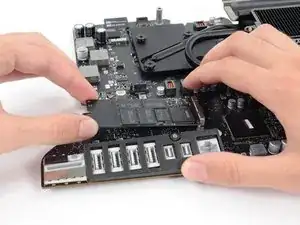
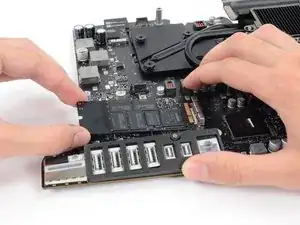
Compara tu nueva pieza de repuesto con la pieza original; es posible que debas transferir los componentes restantes o quitar los respaldos adhesivos de la nueva pieza antes de instalarla.

Para volver a armar tu dispositivo, sigue los pasos anteriores en orden inverso.

Lleva tus desechos electrónicos a un Reciclador certificado R2 o e-Stewards.

¿La reparación no salió según lo planeado? Consulta nuestra Comunidad de respuestas para obtener ayuda para solucionar problemas.

Adam O'Camb

Miembro Desde 11/04/15

179525 Reputación

7 comentarios

is there any way to replace the I.O without swapping the motherboard?

Tristan Haugh -

From cutting through the adhesive to the smoke test this was just under a four hour job for me. One adhesive strip left a complete layer of glue on one side of the screen, and it took me the better part of an hour, about half my supply of wipes, and a plastic razor blade just to clean that one edge up. I’d break the time down as: removing, cleaning, or reapplying adhesives, 2 hours; non-adhesive disassembly, 50 minutes; reassembly, 40 minutes; “oh crap, where’s that tool?” 15 minutes; and about 10 minutes for cleanup, including vacuuming out the fan, heat sink, and vents.

Ed Poe -

Hi there, I need your professional help. I followed all instructions to change my iMac 2017 27" 5K fusion drive with a Samsung EVO 970 PLUS 2TB (with upgraded firmware) for macOS bootable drive and extra EVO 860 SSD 4TB data drive. Then updated to Monterey. My first test was 1200w 2900r, which was different from the youtube video which was roughly 3Krw. Why was that? Then after a few days of work, the mac froze during youtube watch and again during excel spreadsheet, and restarted with a "?" in a folder. I made an online hardware check all OK, then performed first aid, and again all OK. Then rebooted to the same "?" screen. And then rebooted again and now it works. So far! I see in the system prefs - Link Width x1. I made the speed test again and the reading now is roughly 700rw. Screenshots and sys error report bellow. What have I done wrong? And what to do to fix it all? Thanks!

Peter Lane -

Did anyone already thought or experienced to just cut out a square at the back of the frame? its not elegant but my imacs back just faces the wall :) for thermal reasons i can imagine just to stick it back.

dave777 -

Hi, I'm about to change my SSD as well. But I'm unsure because of the slot. In the pictures the slot is almost in the center. But on the Samsung 970 EVOPlus, the slot is almost on one side. Does anyone therefore know it this product will work?

https://www.digitec.ch/de/s1/product/sam...


I have the iMac 2017 27" 5K model with a fusion drive.

Simon Boonstra -

You need a adapter, like this:

https://www.amazon.de/Sintech-M-2-PCIe-2...

info -

Think that a screw part uninstall was missing, it will hold the motherboard in, until you remove it. Located at the bottom of the hard drive bracket, Requires a T20 to remove it. Then the motherboard come out easily as the instructions state. I'd post a photo, but can't on this comment section. My Mod for a customer, is to remove the "fusion", replace that PCIe "blade" with a 2TB from OWC. Reformat the internal 1TB hard drive to be used as extra storage or backup. The screw could have been referred to as : One 20.1 mm T25 spacer screw, mine was a T20. Perhaps there are some differences in models.

Carl Schultz -