Introducción

Tras un uso intensivo o una fuerza excesiva, la carcasa de los Joy-Con de Nintendo Switch puede desgastarse o agrietarse. Esto puede dejar al descubierto los componentes electrónicos de los Joy-Con, lo que los pone en riesgo de sufrir más daños. Sin embargo, los Joy-Cons pueden seguir funcionando sin una nueva carcasa. Te sugerimos que sustituyas la carcasa antes de tener que comprar un nuevo par de Joy-Cons. Si quieres arreglar una carcasa de Switch desgastada, utiliza esta guía para reemplazar la carcasa correcta de los Joy-Con.

El procedimiento para reparar el Joy-Con izquierdo es diferente.

Aunque sustituir una carcasa de Joy-Con solo implica desenroscar y mover piezas electrónicas, algunos pasos requieren precisión para volver a colocar las piezas pequeñas

Como los Joy-Con están separados del sistema principal, no tienes que apagar tu Switch antes de reemplazar las carcasas de los Joy-Con.

  1. JG4F4lwVDWd5Nfrr
    • Retira los 4 tornillos triangulares de la parte trasera de los Joy-Con.

    • Estos son los únicos tornillos de tres alas del Joy-Con. Todos los demás tornillos requieren un destornillador de cabeza Phillips.

  2. TY1I2YNADeMd1mva
    • Abra la carcasa trasera para exponer la batería.

  3. QJHUwltO2SmaVCAf
    QJHUwltO2SmaVCAf
    5QfWFYarWySUCpGS
    • Retira el tornillo que une el riel a la carcasa trasera.

  4. SOenGyoi2MWIVr5h
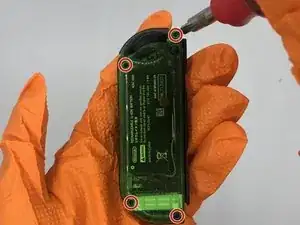
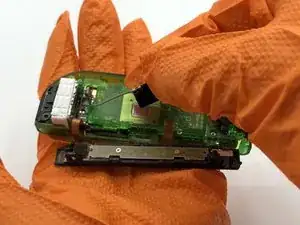
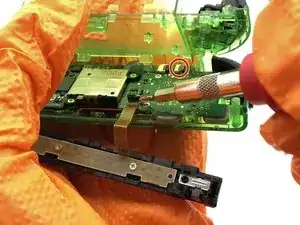
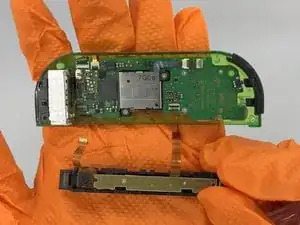
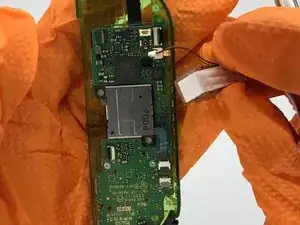
    • Retira la batería y desconéctala de la placa madre. Puede utilizar unas pinzas o sus manos para sacar las conexiones de la placa base.

    • La batería puede ser difícil de retirar debido al adhesivo. Un spudger puede ayudar a separarla de la carcasa.

    I messed up the pins for one of the ribbon cables trying to remove the battery connector, be careful with this one, had to order a new motherboard for my joycon

    Milky Manz -

  5. VHaUnOdIfF42TS1j
    VHaUnOdIfF42TS1j
    tqnwFjXCsOBdLJRQ
    • Antes de realizar el siguiente paso, toma nota de cómo está asentado el cable de la antena para su correcto montaje.

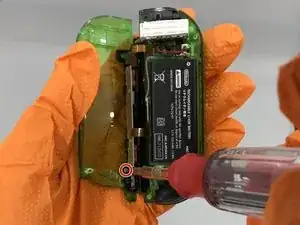
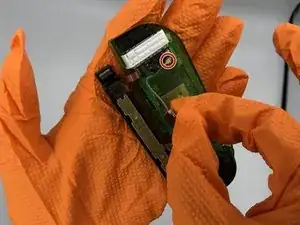
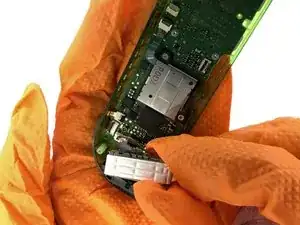
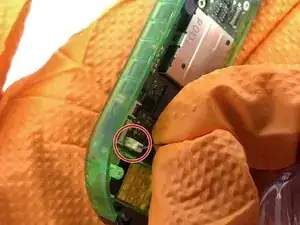
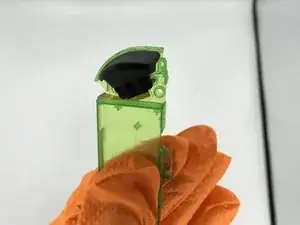
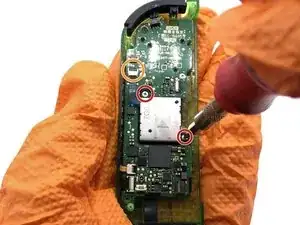
    • Retira el pequeño chip de antena (mostrado en la segunda imagen) y desconéctalo de la placa madre.

  6. EvLRPHpVIHURmyvV
    • Retira los 3 tornillos que sujetan la carcasa de la batería en la carcasa.

  7. KGJuyPdtStmKHFYY
    KGJuyPdtStmKHFYY
    HJYJvgwhPYZh1IOT
    vyAmGbdeoTv6ssm4
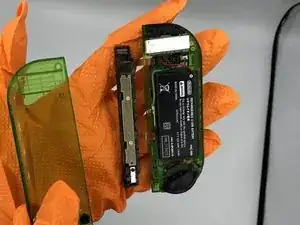
    • Retira los cables de cinta que conectan el carril y la carcasa de la batería a la placa madre. Desbloquea los cables volteando el conector hacia arriba con un spudger, y luego tira del cable para sacarlo del conector.

    Gibt es die Platine für die beiden Taster an der Ladeschiene auch als Ersatzteil? Wenn ich der Joy-Con zusammengebaut ist und damit das Flachbandkabel zusammengedrückt wird funktionieren die beiden Taster nicht. Wenn der Joy-Con auseinander gebaut ist und das Kabel langestreckt ist, dann funktionieren die beiden Taster.

    Ich hoffe, dass es am Kabel liegt und nicht am Kontakt auf dem Motherboard.

    Schulte Kippen -

    HEY, BE CAREFUL WITH THOSE RIBBON CABLE CLIPS.

    The clip towards the R/ZR buttons releases from the side the cable plugs in.

    The clip towards the rumble motor releases from _the opposite side_ as the cable.

    Mr. Llama -

    Thank you for this! I was wondering why it wasn’t coming up lol

    pattie -

    Um… what happens if you accidentally push on the gray part of the one near the rumble motor?

    Elise Glover -

    I found out… it breaks the ability to dock your controller to your switch, you will only be able to play wirelessly and won’t be able to charge your controller. Don’t be like me.

    el15ecg -

  8. EtBWeKrgQG35HUbd
    EtBWeKrgQG35HUbd
    j45DbrWC3jBfTO1W
    fmUuZVJYNpOQvllF
    • Desmonta el motor de la bocina desconectando el conector blanco de 2 clavijas.

    WARNING

    do not attempt to remove the connector if it can be avoided- it is held in place by two incredibly thin metal strips that can easily bend and warp, making it impossible to put the connector back into place.

    The Nones -

  9. wo6kIsCpKC4UFLE4
    wo6kIsCpKC4UFLE4
    GNi2dmBJyN3AYi6O
    Myyd2vSwcij4sdFy
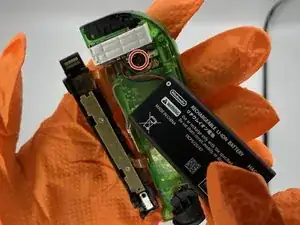
    • Retira el botón ZR negro de la carcasa de la batería.

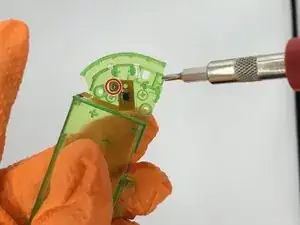
    • Retira el sensor del botón desenroscándolo de la carcasa de la batería.

  10. nSxVaFQPN5cJK6H1
    nSxVaFQPN5cJK6H1
    OXnTeHtUENTrOXxa
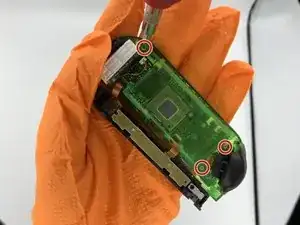
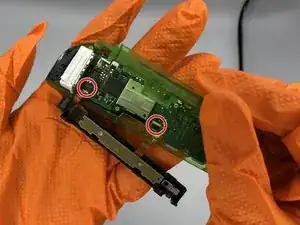
    • Retira los dos tornillos Phillips que sujetan el joystick a la placa madre.

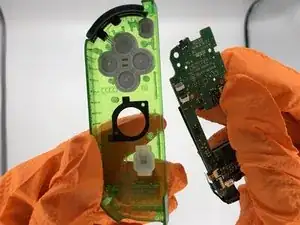
    • Desconecta el cable plano del joystick de la placa madre.

    The joystick ribbon cable releases from the side _opposite_ where the cable plugins in.

    Mr. Llama -

  11. OoUDypUeFgIrmtSw
    OoUDypUeFgIrmtSw
    5ENT6JNDQCEIbxFW
    • Retira las dos tornillos que anclan la placa madre a la carcasa.

    Notable omission: be sure to disconnect the Ribbon cables near the bottom left (directly next to the rumble motor connector). You will have to swap the IR sensor and whatever the gold ribbon cable goes to/is (apologies, I don’t really know). Both are loosely held down with adhesive so just do that when you swap the buttons in the next step. When reconnecting the ribbon cables to the motherboard, I found it MUCH easier to put the ribbon cables back in place before screwing in the motherboard. I am amateur at this (only have fixed a couple iphones and few sets of joycons) but I found the angle to be particularly challenging if the motherboard was screwed in.

    Garrett Catlin -

    Also omitted: be sure to transfer the NFC antenna. It’s the black rectangle that surrounds the joystick that connects to the motherboard with a light brown cable. It’s lightly held in with adhesive, so a little prying should get it loose.

    Mr. Llama -

  12. ua3gxTkkm5pGYUGI
    • Transfiere todos los botones a la carcasa de repuesto.

    • Si falta alguna cubierta de silicona para los botones, es posible que esté pegada a la parte posterior de la placa madre.

Conclusión

Para volver a ensamblar el dispositivo, sigue estas instrucciones en orden inverso.

Matthew Cheney

Miembro Desde 16/01/20

935 Reputación

2 comentarios

Not quite as thorough as the other Joy-con tear down but always a handy thing to have, going by the pictures it gave me all the information I needed personally concerning the screws, so I was able to strip the whole controller down and swap it into another shell. It is straight forward once you get in to it and have to give the author their much deserved credit for posting this up!

Lee Whittaker -

Very good detailed guide, only thing I would change is I’d probably take the rumble motor out right after of even before the battery. It’s pretty easy to remove, you can do it at anytime after opening, and it gets the wires out of the way to make other parts easier.

Dominic Garcia -