Introducción

Usa esta guía para reemplazar la cubierta inferior de plástico en una PlayStation 4 Slim.

  1. HVTGYelJeUQRNBTL
    HVTGYelJeUQRNBTL
    6Z3td3NoCXXHhZQI
    4ybs2g5RHLPUHZ6a
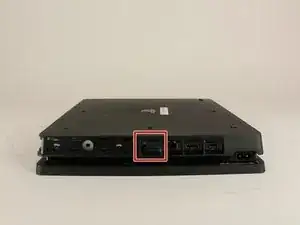
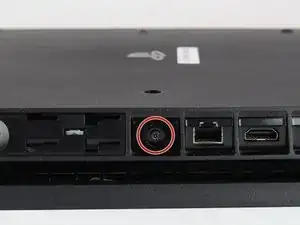
    • Localiza la pegatina de garantía que está al lado de los tres puertos en uno de los lados de la consola.

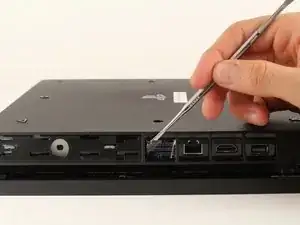
    • Retira la pegatina de garantía levantándola con ayuda de cualquier tipo de espátula de plástico.

    • Quitar la pegatina de garantía NO anula la garantía de ninguna forma.

    Remove the screw directly to the left of that one in the picture as well. Should be silver.

    Elizabeth Johnson -

    ihr seid so ein scheiß haufen das stimmt über haubt nix

    Toaster 95 -

    einfach alles stimmt nicht

    Toaster 95 -

  2. iuwUc5FNjBXlxWDZ
    iuwUc5FNjBXlxWDZ
    NddVVDLyNaEUIPME
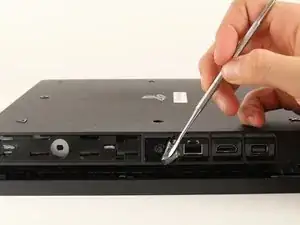
    • Desatornilla y retira el tornillo Torx de 5mm con un destornillador de seguridad Torx T8 girando en contra de las agujas del reloj.

    Are you SURE that it’s counter-clockwise?

    The Stuff -

    Try T9. Fits better.

    Otter -

    T8 fits like a glove for me

    Daniel Henderson -

    Is there anything else you can use

    randomweeb -

    A small flathead screwdriver will work

    shawng6363 -

    There is a small metal rod in the middle of the screw that isn’t allowing my t8 inside. Any insight on this?

    gavinstoutconner@icloud.com -

    Some T8 bits have a hole in the middle that will allow that rod to go through; some do not. If you have a set of multiple bits, check if there are any others labeled T8 or TR8 with that hole in the middle.

    Nicholas -

    There is a metal thing inside of the screw slot any insite on this?

    Tristan York -

  3. SlFEBbB2b3bIl6BX
    SlFEBbB2b3bIl6BX
    oRDOW1Bq6YK4gBJW
    Qs6ybIWcbq4tnNZZ
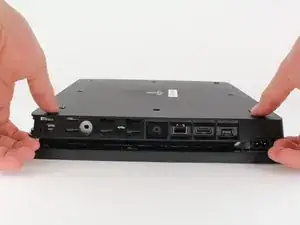
    • Sitúa la PS4 boca abajo con el lado del tornillo que acabas de retirar mirando hacia ti.

    • Haz palanca con las manos hacia arriba (con cuidado)en las dos esquinas mas cercanas a ti.

    • Esto puede requerir hacer un poco de fuerza para abrirlo, pero oirás un click fuerte cuando la tapa se suelte.

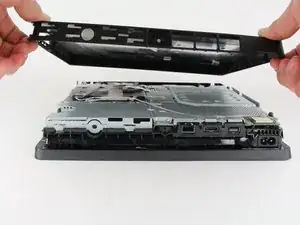
    • Retira la tapa inferior arrastrándola hacia las esquinas inferiores y levantándola.

    It says to place it upside down, but didn't you do so in the previous step? I've been trying to unscrew the screw with my screwdriver that I got from here and if I had to had the system right side up, I'm afraid I might've stripped the screw from all the force I tried to use to get the screw out that will NOT budge. It didn't even move the slightest after removing the warranty sticker.

    Vidal Santos -

    There is a single clip on the left side about 5cms in, and another clip on the right side equidistant to the one on the other side. Jamming a spudger in there first, and lifting those clips helped, and then I had to slide down to lift a total of 4 clips on each side (each about 4cms apart). Then push the cover away from you, if that makes more sense than “sliding it towards the back corners”, since the back corners are technically facing you.

    Emil Fisk -

    It would be easier if you just lifted the top cover of the PS4.

    Poobler -

    The earlier comment by Emil Fisk is spot-on. I found it impossible to remove the cover without first using a spudger to release the four clips on each side.

    midahed -

Conclusión

Para volver a montar el dispositivo, usa esta guía en orden inverso.

Hernan Rodriguez

Miembro Desde 24/01/18

3236 Reputación

2 comentarios

Wo kann man die Bodenplatte kaufen?

Emre Kaman -

Hi hello it's Good

محب علي شاكر -