Introducción

Esta guía es una guía privada interna que se utiliza como requisito previo.

  1. H5WoEX35nCJxJoVc
    H5WoEX35nCJxJoVc
    2h2sAVKwuSa6RdtP
    GOTxbmD6vWqqpGd3
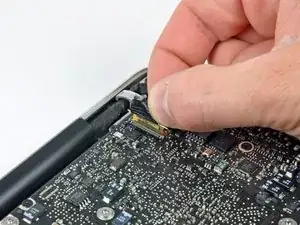
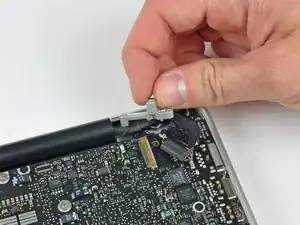
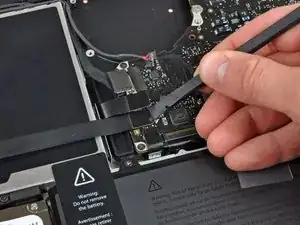
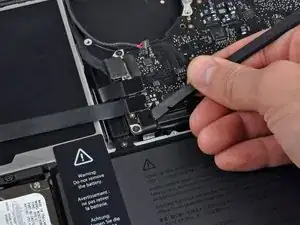
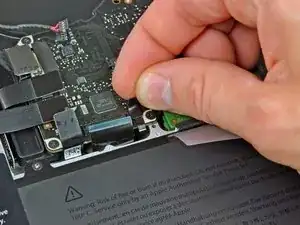
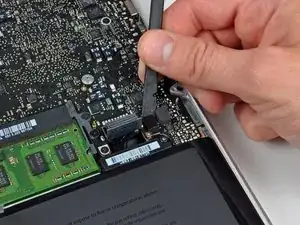
    • Toma la lengüeta de plástico asegurada al candado del cable de datos de la pantalla y gírala hacia el lado de entrada de CC de la computadora.

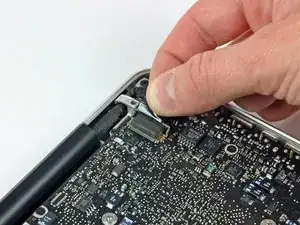
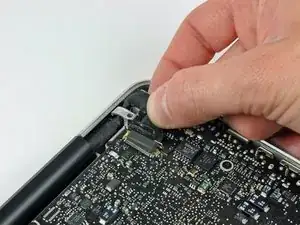
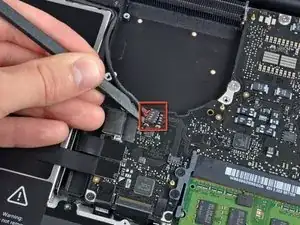
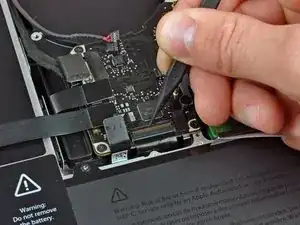
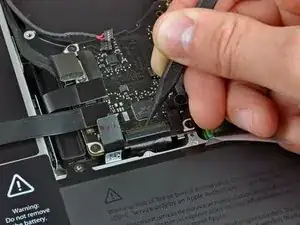
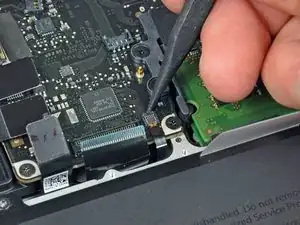
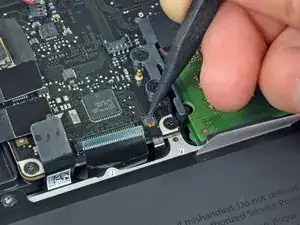
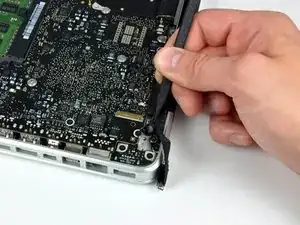
    • Saca el conector del cable de datos de la pantalla directamente de su zócalo, hacia el lado de entrada de CC de la computadora.

  2. gQSfcvhCduWgFmTM
    gQSfcvhCduWgFmTM
    SepnYJ2fJKAXxapY
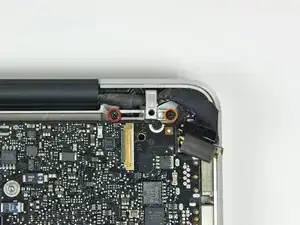
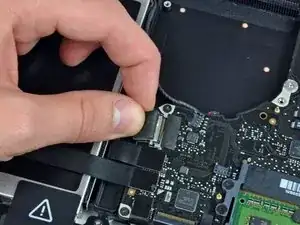
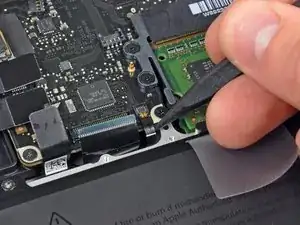
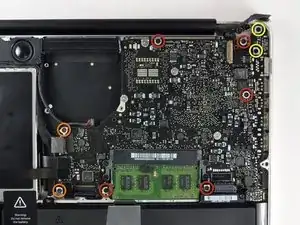
    • Retira los dos tornillos siguientes que sujetan el soporte del cable de datos de la pantalla a la carcasa superior:

    • Una Phillips de 7 mm.

    • Una Phillips de 5 mm.

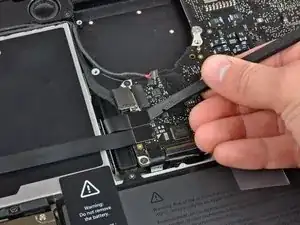
    • Levanta el soporte del cable de datos de la pantalla para sacarlo de la carcasa superior.

    Mine are Torx and got an extra clamp for the cable, just above the left screw

    Martin -

    If you only want to replace the DC-in board, stop here and GOTO 17 (and DO NOT 4 and 6).

    When the Logic board is loose, lift it up on the Harddrive end and shift slightly towards the HD, so that the USB connectors at the outside come free from under the case rim and the board can be lifted up a bit. Then there´s enough room to move the DC in board, pull the cable out with a pair of tweezers, wriggle it out from under the microphone cable and wriggle the new connector in. It can be pushed into the socket with tweezers or a small screwdriver. This worked perfect for me.

    Be careful not to bend the logic board, but otherwise I think there´s much less risk of messing anything up with all the connectors and bits and pieces that need to be loosened and fastened.

    Mike -

  3. 5S2ufCCUjVZjRSVR
    • Usa el extremo plano de un spudger para levantar el subwoofer y el conector del altavoz derecho de la placa lógica.

  4. U6VC4QVXgkmSKuKW
    • En este paso desconectará el cable de la cámara. La mayoría de las máquinas tendrán un pequeño retenedor de plástico autoadhesivo pegado a la placa lógica para mantener el conector en su lugar. Antes de desconectar el cable, asegúrese de que este retenedor esté fuera del camino.

    • Tire del conector del cable de la cámara hacia la unidad óptica para desconectarlo de la placa lógica.

    • Este zócalo es de metal y se dobla fácilmente. Asegúrese de alinear el conector con su zócalo en la placa lógica antes de acoplar las dos piezas.

    There is a small piece just below this connector which is just an adhesive block to keep the connector from coming out. It is easiest to peel it up first with a fingernail or spudger then remove the cable. Likewise reinsert the cable before reapplying the adhesive safety stop.

    Justin Jett -

    I couldn't reconnect this cable correctly, so my camera is not working anymore.

    It doesn't matter to me, I didn't used the camera that often...

    But the Ambient Light Sensor uses the camera to control keyboard lighting, so I wasn't able to see my keyboard in the dark anymore... :(

    If you have the same problem, after a couple of google hits I've found this app: https://www.macupdate.com/app/mac/22151/...

    Problem solved! YAY!

    PS: be careful because WIFI passes through this cable as well!!!!

    simbass -

    Look at the photo intently. The connector is inserting not in parallel, but at a slight angle. The bottom corner of the connector is slightly ahead. It is important! Singular metod to insert it.

    Vladimir -

  5. mpLOpCIkoW2xCqif
    mpLOpCIkoW2xCqif
    W2C43m61pZ6Dyqcb
    eo6LQDikRDMpITI5
    • Usa el extremo plano de un spudger para levantar la unidad óptica, el disco duro y los conectores del cable del trackpad de la placa lógica.

  6. 4Sf1wHms3aaL4MXg
    4Sf1wHms3aaL4MXg
    AE14gLXhNbiplKt4
    C1TOaQijIPD6LtQn
    • Usa la uña o la punta de un spudger para levantar la solapa de retención del cable en el zócalo ZIF para el cable plano del teclado.

    • Usa tu spudger para deslizar el cable plano del teclado fuera de su zócalo.

    When reinserting the keyboard ribbon cable, make sure you push it in all the way (two plastic tools are helpful - one to push it down flat, the other to coax it all the way in). For 3 days after replacing a top case, my MacBook Pro 13" wouldn't start up. I thought the main logic board was fried too. However, reinserting the keyboard ribbon cable again, this time perhaps 1mm farther in, and it started up again! I did the same for the "keyboard backlight ribbon cable" (i.e. reinserted it just to make sure). Really not sure which completed the circuit so is would start, but I suspect the keyboard ribbon cable.

    amiller770 -

    Cita de amiller770:

    When reinserting the keyboard ribbon cable, make sure you push it in all the way (two plastic tools are helpful - one to push it down flat, the other to coax it all the way in).

    I usually use a piece of sticky transparent office tape and stick it over the flat cable a bit further away from the mating part then pull on it. There is no better way to force the flat cable into a stiff connector without damaging the fragile cable.

    Leo Bodnar -

    As others have stated, if the keyboard ribbon cable isn't fully inserted the MBP will not power on. Leo Bodnar's recommendation to use a piece of transparent office tape did the trick for me. Many thanks Leo!

    Matthew Rankin -

    Inserting the ribbon cable for the keyboard was really difficult, but i was able to get it in using a piece of tape and pulling it up, just like the tape on the keyboard backlight.

    Kelly Legner -

    Using a piece of tape is sheer genius Kelly. My mom once said her definition of genius was an idea that, when you hear it, you say to yourself, “now why didn’t I think of that?” But you never would have thought of it. Brava (or bravo) Kelly!

    JonnyLine -

  7. ORKjULSYLhNuFQUi
    • Despega la pequeña tira de cinta negra del conector del cable plano de la retroiluminación del teclado.

  8. omJ1eHiMfXlFtGVO
    omJ1eHiMfXlFtGVO
    GGYWsYuMi5kZONiq
    TPaIFGAGOPyrUnkA
    • Usa la punta de un spudger para levantar la solapa de retención del cable en el zócalo ZIF para el cable plano de la retroiluminación del teclado.

    • Usa tu spudger para deslizar el cable plano de luz de fondo del teclado fuera de su zócalo.

  9. cZ3jLTCybSZqjX1s
    • Usa el extremo plano de un spudger para levantar el conector del cable del indicador de batería de la placa lógica.

  10. 1ttqGf15CrXqgESa
    • Usa la punta de un spudger para quitar el micrófono del adhesivo que lo une a la carcasa superior.

  11. hlvPHn5hLlwTnykQ
    • Retira los siguientes tornillos:

    • Cinco Phillips de 3,1 mm.

    • Dos Phillips de 3,9 mm.

    • Dos Phillips de 7 mm de la placa de entrada de CC.

  12. uqAscA6i2AwOjsxs
    uqAscA6i2AwOjsxs
    1FKTMO2VElhgwKAM
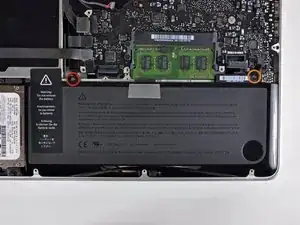
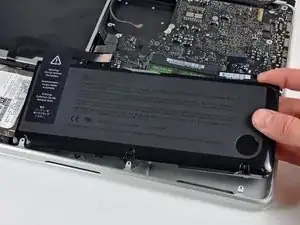
    • Retira los siguientes tornillos de tres puntas que sujetan la batería a la carcasa superior:

    • Un tornillo de tres puntas de 5,5 mm.

    • Un tornillo de tres puntas de 13,5 mm.

    • Saca la batería de la carcasa superior.

  13. MWPHlxOjnkYSuqrw
    MWPHlxOjnkYSuqrw
    ZgwauAvagMTUNQWZ
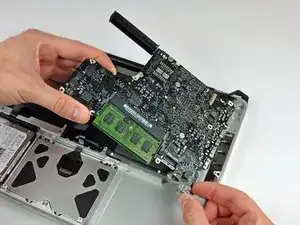
    • Levanta la placa lógica desde su borde izquierdo y levántala hasta que los puertos despejen el costado de la carcasa superior.

    • Separa la placa lógica del costado de la carcasa superior y retírala, teniendo cuidado con la placa de entrada de CC que puede quedar atrapada.

    • Ten cuidado de no arrancar el frágil conector del conjunto del micrófono.

    When putting the logic board back in place, it's easier to angle the mic down in it's place as you are placing the board in, rather than after the board is seated.

    amiller770 -

Conclusión

Para volver a ensamblar tu dispositivo, sigue estas instrucciones en orden inverso.

Walter Galan

685928 Reputación

0 comentarios