
Introducción
Utiliza esta guía para remover la batería pegada de tu MacBook Pro con la ayuda del kit de reemplazo de batería de iFixit. El removedor de adhesivo en tu kit disolverá el adhesivo que sujeta la batería, permitiéndote removerla con facilidad.
Nota: Esta guía te indica que retires los altavoces, la placa lógica y varios otros componentes antes de proceder con la batería. Esto protege los componentes de daños potenciales por parte del removedor de adhesivo. Si solo usas un solvente suave como alcohol isopropílico para aflojar la batería, puedes optar por dejar estos componentes y omitir los pasos 6-45.
Apple lanzó un recall para este modelo en junio de 2019; así que antes de reemplazar tu batería, puedes verificar si eres apto para recibir un reemplazo gratuito de Apple.
El removedor de adhesivo de iFixit es altamente inflamable. Realiza este procedimiento en un área muy bien ventilada. No fumes o trabajes cerca de una flama al descubierto durante este procedimiento.
Para minimizar el riesgo de daño, enciende tu MacBook y deja que la batería se descargue por completo antes de comenzar este procedimiento. Una batería de iones de litio cargada puede crear un incendio peligroso e incontrolable si se perfora accidentalmente. Si tu batería está hinchada, toma precauciones adicionales.
-
-
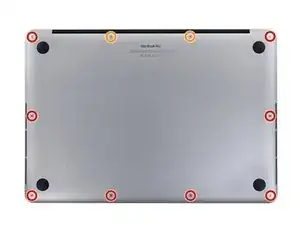
Quitar los siguientes tornillos pentalobe P5 que sujetan la cubierta del MacBook Pro:
-
Ocho 3.1 mm
-
Dos 2.3 mm
-
-
-
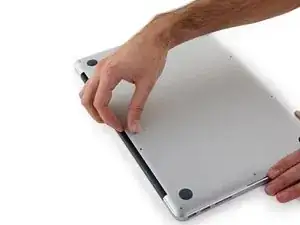
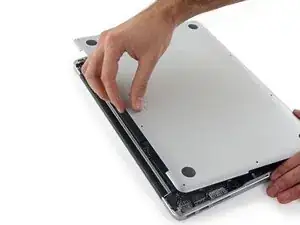
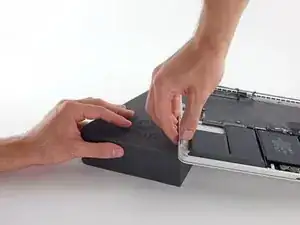
Levantando desde el borde más cercano a la articulación de la tapa, levanta la cubierta del Macbook Pro.
-
-
-
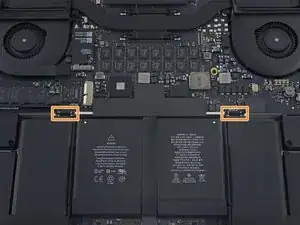
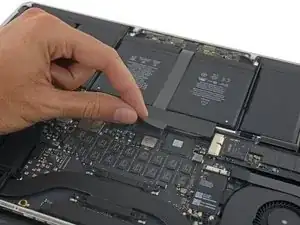
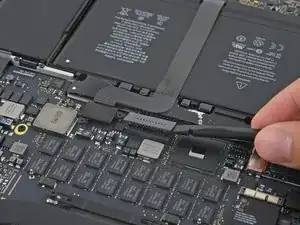
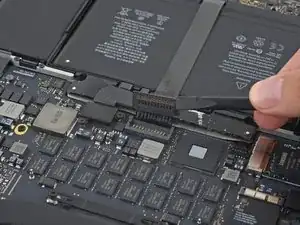
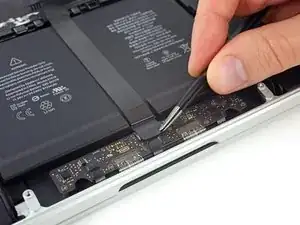
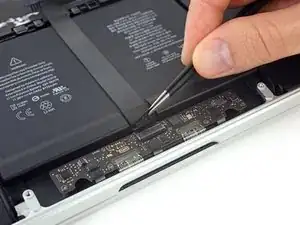
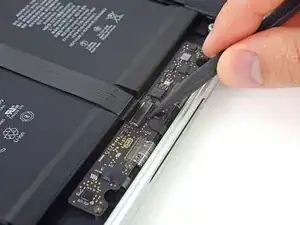
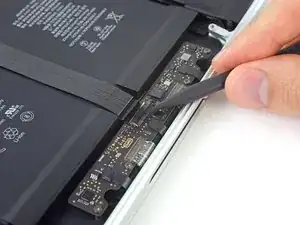
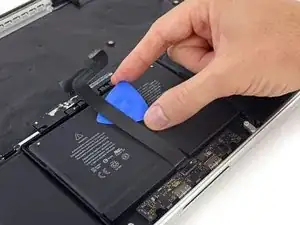
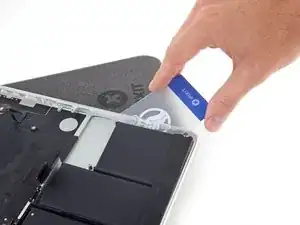
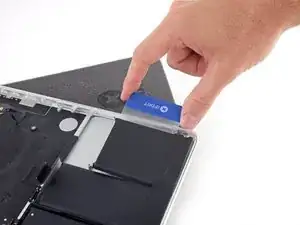
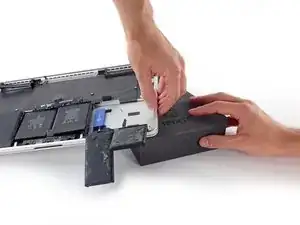
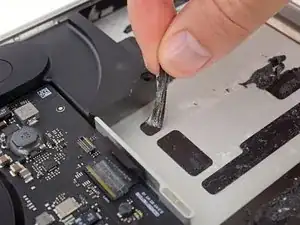
Usando el extremo plano de un spudger, levanta suavemente el conector de la batería directamente fuera de su zócalo en la placa lógica.
-
Dobla los cables de la batería hacia afuera y fuera del camino, asegurándose de que el conector de la batería no entre en contacto accidentalmente con la placa lógica.
-
-
-
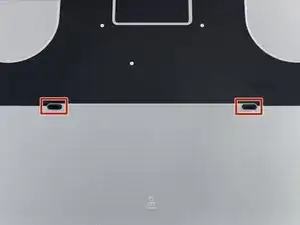
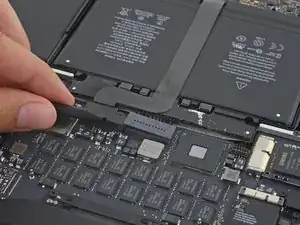
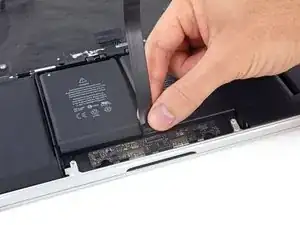
Despega la cinta que cubre el cable de cinta del conector del panel táctil, cerca del extremo frontal de la MacBook Pro.
-
-
-
Utiliza la punta de un spudger para voltear la pestaña de bloqueo negra en el conector ZIF del cable plano del panel táctil
-
-
-
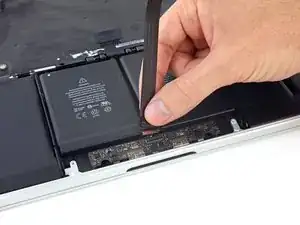
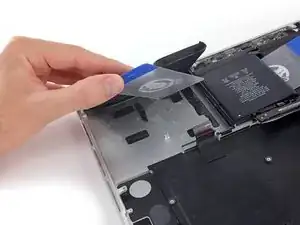
Introduce una pua de apertura entre el cable cinta del panel táctil y la batería.
-
Con cuidado desliza tu pua por debajo del largo del cable cinta para separar el adhesivo que lo sujeta a la batería.
-
-
-
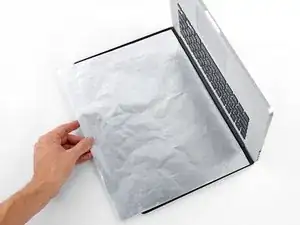
Para proteger tu pantalla, coloca una hoja de folio de aluminio entre la pantalla y el teclado y déjalo ahí mientras trabajas.
-
-
-
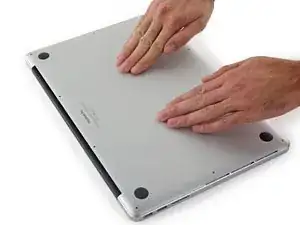
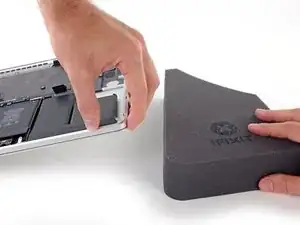
Con el borde frontal de la MacBook Pro hacia ti, levanta el lado derecho y colócalo en un leve ángulo utilizando una bloque de espuma fuerte o libro.
-
-
-
Ahora que tu MacBook Pro está completamente preparada, es hora de que te prepares.
-
Usa protección para ojos al manejar y aplicar el removedor de adhesivo. (La protección para ojos está incluida en tu kit)
-
No uses lentes de contacto sin protección de ojos.
-
Los guantes protectores están también incluidos en tu kit. Si te preocupa la irritación de la piel, ponte los guantes ahora.
-
-
-
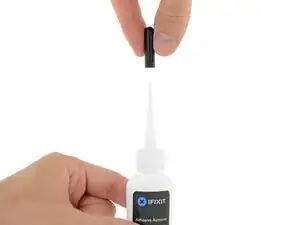
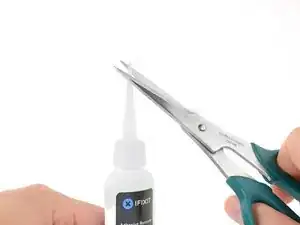
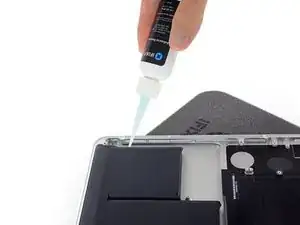
Saca el tapón negro de goma de tu botella de removedor de adhesivo.
-
Usa la tijera para cortar la punta sellada del aplicador.
-
-
-
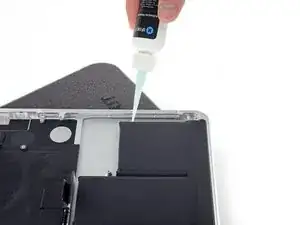
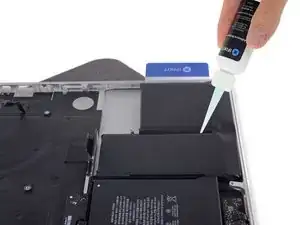
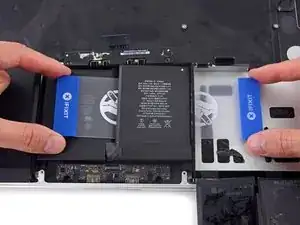
Aplica unas pocas gotas de removedor de adhesivo de forma pareja bajo el borde de la celda de batería que se encuentra en el extremo derecho.
-
Espera 2-3 minutos para que el removedor de líquido de adhesivo para prenetar por debajo de la celda de batería antes de proceder con el próximo paso.
-
-
-
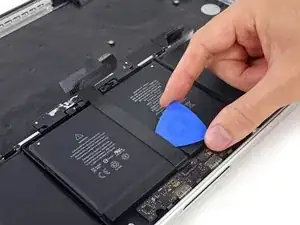
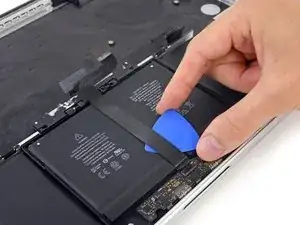
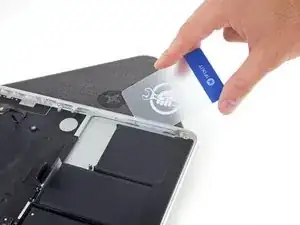
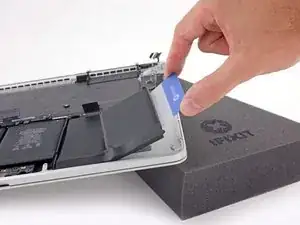
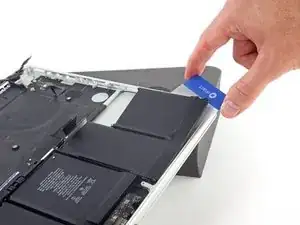
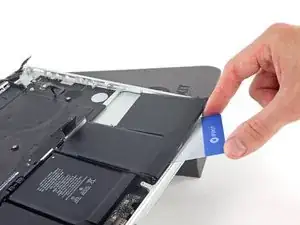
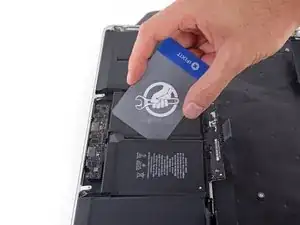
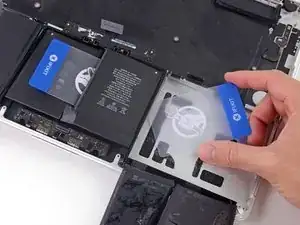
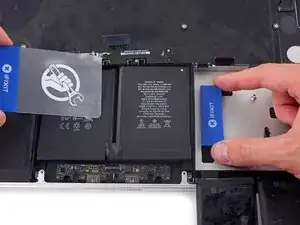
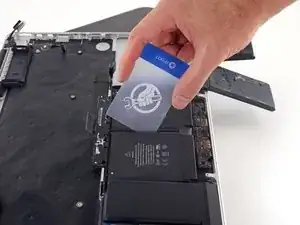
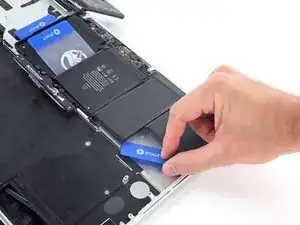
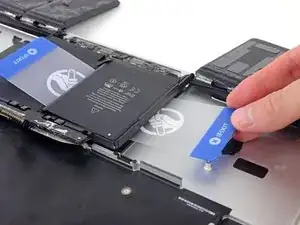
Desliza una esquina de una tarjeta plástica por debajo del borde externo de la celda de batería.
-
Desliza la tarjeta más adentro por debajo de la celda de batería para separarla del adhesivo que la sujeta a la caja de la MacBook Pro.
-
-
-
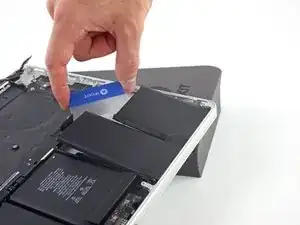
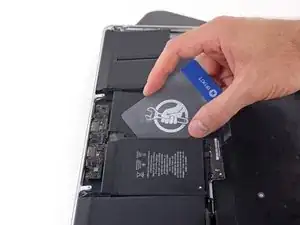
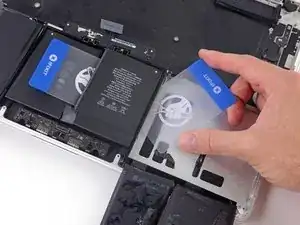
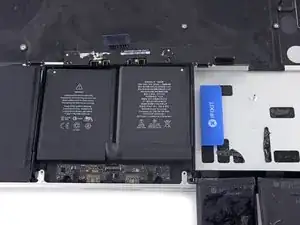
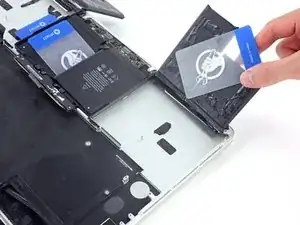
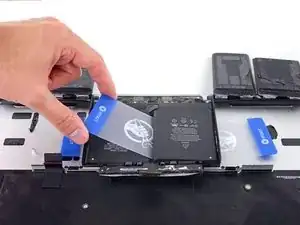
Levanta la celda de batería para separarla de la caja de MacBook Pro, pero no trates de removerla.
-
Deja la tarjeta de plástico por debajo de la celda de batería para evitar que se vuelva a adherir mientras procedes al siguiente paso.
-
-
-
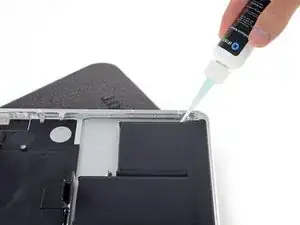
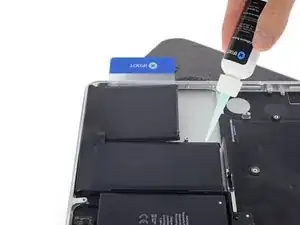
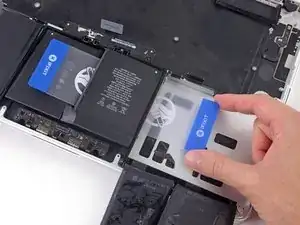
Aplica unas pocas gotas de removedor de adhesivo de forma pareja a lo largo del borde elevado de la siguiente celda de batería
-
Espera 2-3 minutos para que el removedor de adhesivo líquido penetre por debajo de la celda de batería antes de proceder con el siguiente paso.
-
-
-
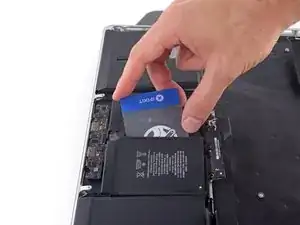
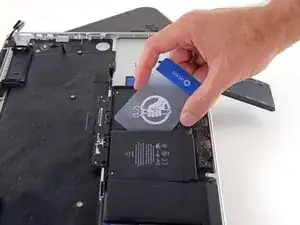
Desliza una esquina de una tarjeta plástica por debajo de la segunda celda de batería.
-
Empuja la tarjeta por debajo de la segunda celda de batería y deslízala de lado a lado para separar el adhesivo.
-
Deja la tarjeta de plástico por debajo de ambas celdas de baterías (o dalas vuelta) para evitar que se vuelvan a adherir mientras procedes al siguiente paso.
-
-
-
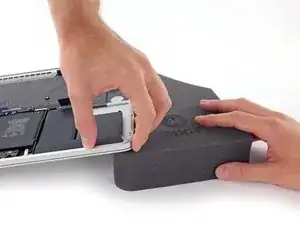
Es hora de cambiar lados. Remueve tu libro o bloque de espuma y colócalo debajo del lado opuesto de tu MacBook Pro.
-
-
-
Repite el procedimiento de los pasos anteriores para separar las dos celdas de baterías en este lado:
-
Aplica tu removedor de adhesivo en el borde elevado de la celda de batería externa y espera 2-3 minutos para que penetre.
-
Desliza una esquina de una tarjeta de plástico por debajo de la celda de batería y luego deslízala toda por debajo de la celda de batería para separarla.
-
Haz lo mismo con la celda de batería adyacente.
-
Deja la tarjeta plástica en el lugar o da vuelta las celdas de baterías para evitar que se vuelvan a adherir durante los siguientes pasos.
-
-
-
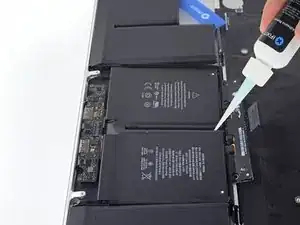
Con el extremo izquierdo de tu MacBook Pro todavía elevado, aplica unas pocas gotas de removedor de adhesivo a lo largo de la línea central entre las dos celdas de batería del medio.
-
Espera 2-3 minutos para que el removedor de adhesivo penetre antes de continuar.
-
-
-
Desliza una esquina de la tarjeta de plástico entre las dos celdas del medio y por debajo del extremo elevados de la celda de batería del centro derecho.
-
Desliza la tarjeta más por debajo de la celda de batería y corta el adhesivo que la sujeta en su lugar.
-
No intentes de separar completamente esta batería aun. Deja tu tarjeta de plástico en el lugar para prevenir que se vuelva a adherir.
-
-
-
Voltea las dos celdas de batería del lado derecho que despegaste sobre el extremo frontal de tu MacBook Pro, si aun n lo has hecho. Esto te permitirá el acceso al borde externo de la celda central.
-
-
-
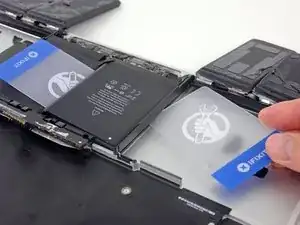
Empuja una esquina de tu tarjeta de plástico debajo del marco de plástico de la batería y por debajo del extremo de la celda del centro inferior.
-
Desliza tu tarjeta completamente por debajo de la celda de batería y déjala allí para prevenir que la celda de batería se vuelva a adherir.
-
-
-
Remueve la primera tarjeta de plástico que insertaste debajo de la celda del centro derecho.
-
Empuja la otra tarjeta un poco más y déjala en el lugar para prevenir que se vuelva a adherir al continuar.
-
-
-
Remueve tu libro o bloque de espuma
-
Con el borde frontal de la MacBook Pro hacia ti, levanta el lado derecho y manténlo parado una vez más.
-
-
-
Aplica unas pequeñas gotas de removedor de adhesivo entre las dos celdas de bateria centrales para que fluya por debajo de la celda de batería restante.
-
Espera 2-3 minutos para que el removedor de adhesivo penetre antes de continuar.
-
-
-
Desliza una esquina de una tarjeta de plástico debajo del extremo elevado del la celda de batería final.
-
Empuja la tarjeta más adentro por debajo de la celda de batería para cortar el adhesivo que la sujeta en el lugar.
-
No intentes separar completamente la celda de batería aun. Deja tu tarjeta de plástico en el lugar para prevenir que se vuelva a adherir.
-
-
-
Si aun no lo has hecho, levanta y voltea las dos celdas de batería de la izquierda para despejar el acceso al extremo externo de la celda de batería.
-
-
-
Repite el proceso que utilizaste para la celda de la batería del centro a la derecha para terminar de separar el adhesivo de la celda del centro a la izquierda.
-
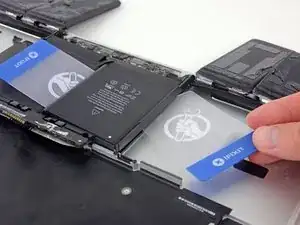
Empuja una esquina de una tarjeta de plástico debajo del marco de plástico de la batería por debajo del borde adherido restante de la celda de batería final.
-
Desliza tu tarjeta completamente por debajo de la celda de batería y déjala allí para prevenir que la celda de batería se vuelva a adherir.
-
-
-
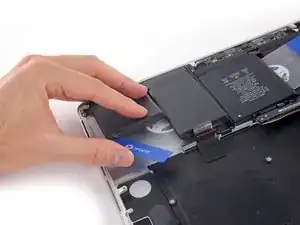
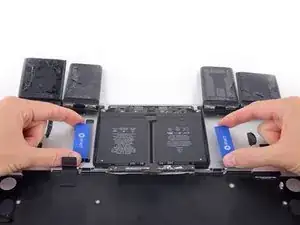
Con una tarjeta de plástica por debajo de cada una de las dos celdas de batería del centro, tuerce y levanta ambas tarjetas para separar completamente las celdas de baterías, junto con el marco de plástico y la placa de baterías, de la MacBook Pro.
-
-
-
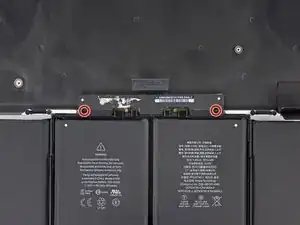
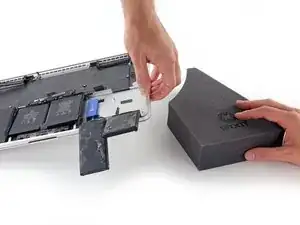
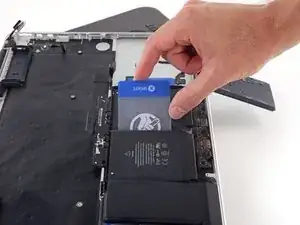
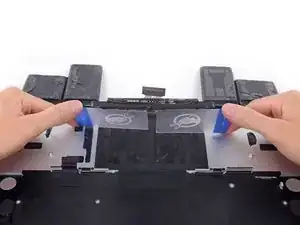
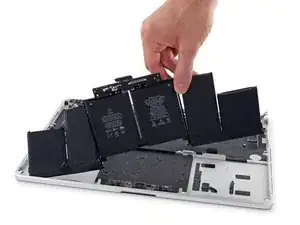
Levanta y remueve la batería
-
Con un poco de suerte, puedes lentamente levantar cada tira de adhesivo con tus dedos.
-
De lo contrario, empapa cada sección de adhesivo con un poco de removedor de adhesivo durante 2-3 minutos y luego raspa y sácalo con un pico de apertura o cualquiera de las herramientas en tu kit. Esto podría ser mucho trabajo, así que ten paciencia.
-
Limpia cualquier resto de removedor de adhesivo y dale a tu MacBook Pro durante unos pocos minutos para que se seque al aire.
-
Calibra tu batería instalada. Cárgala hasta el 100% y luego sigue cargándola durante al menos 2 horas más. Luego, desenchúfala y úsala normalmente para drenar la batería. Cuando veas la advertencia de batería baja, guarda tu trabajo y mantén tu laptop encendida hasta que se duerma. Espera al menos 5 horas, luego cárgala de forma ininterrumpida hasta 100%.
-


Para volver a ensamblar tu dispositivo, sigue estas instrucciones en orden inverso.

192 comentarios
Do I need to remove all these things just to replace the battery or can I just remove the connectors above the battery than the battery?
Tony -
I just went through this process yesterday, and today wondered why I needed to take all that crap out, because I don’t remember anything blocking the battery removal, that would require removing the speakers, logic board, etc. I think it’s because of the acetone adhesive solvent. It’s powerful stuff that can easily damage the system. Maybe, if you are able to get the battery out without the solvent, you can skip all the other stuff. I will say, however, that in my system, it seemed like the adhesive is real solid. It felt like I was pressing the card up against aluminum studs in the frame, until the solvent loosened it up. If you try to remove the battery without the solvent, be very careful not to use excessive force and warp your frame.
See the post I just added, it seems that this is all to be able to remove one of the speaker cables, which I don’t think in necessary. I really don’t like messing with delicate connectors and ribbon cables that I don’t have to.
I have done this job before. I remember that it was easy - did it on the kitchen bar.
In hindsight, I didn't have to take out all the crap. I must have used a different guide. Son of a gun, wasted time. I easily got the battery out without "adhesive remover". Hilarious if "adhesive remover" is acetone, a chemical availabe just about anywhere. Note to self, iFixit needs to be second opinioned. I think this guide is written to make it seem like you need a lot of special tools to do this job. Not true - just a few drivers, usually provided with any battery.
I made it within 1 hour doing Steps 1-5, then Steps 46-50.
I removed battery heating the aluminium frame in the location of battery pack on the opposite side of the frame with NTE HG-300D Mini Heat Gun, and then gently peeling this battery pack with plastic spudger. You may need to reheat the area several times.
For 2 central battery elements you can't heat aluminium frame because they are below touchpad, so I peeled batteries a little bit with spudger, heated the underneath gently, and then peeled it again. Also dental floss could help cutting the glue underneath the battery.
Thanks for your fast approach, worked fine for me as well! I did not use any glue dissolver at all.
Same for me, about an hour. I didn’t use a heat gun, just finagled the tip of the adhesive dissolver around the edges and otherwise followed the directions using the plastic cards. That dissolver is great stuff, worked twice as fast as the instructions.
Thanks for posting your short version. I did mine in about an hour with dental floss and the plastic cards. No heat. No solvent.
So glad I read the comments before going down the path of insanity.
I followed your comment to skip most of the steps and just remove the keyboard cable and the batteries. The replacement of batteries revived my water damaged MacBook Pro which stucked in boot loop.
In the beginning I tried to avoid “finagled“ situation thus only dripped a drop or 2 of dissolver each time. I also use a thin tip to induct the dissolver into the gap. But it’s very hard to do the flossing work and very slow. For the last 2 central pieces I had to drip 10 or more drops for each line of tapes which eventually helped me to remove them.
For someone who can’t order ifixit dissolver, I got my “Arctic Thermal Material Remover” from canadacomputers.com. It may not be perfect but helps. I didn’t use heat gun.
Great article, thanks!
Yan -
Did the same yesterday; took me closer to 4-5 hours as I was being “exceedingly careful”, as it was my wife’s laptop and she’d been hit with a “perfect storm”: battery died and backup was corrupt (backups.db reported a size of 0, and Migration Assistant hung while trying to look for it). o_O Otherwise, everything worked well, laptop is operational again, and my wife’s files have been backed up, migrated to another laptop, and the backed up again - so she currently has 4x copies of all her files. \o/
Zathras -
I’d recommend to do steps 26 and 27 and remove both ends of the touch pad cable!
If you are careful and tilt the whole Powerbook a bit downwards the solvent doesn’t pose any risk as it will run away from the speakers tec..
Did it nearly the same way (without heating). I also loosened the two accessible screws of the two speakers and bent them up a bit to avoid contact with the spreading dissolver and to better slide the plastic cards under the batteries. You just have to make sure that nothing splashes onto the other components when you tilt the dissolver bottle. If you are anxious, you can also protect them with a non-conductive, acetone-resistant cover.
Martin -
After reading through all of the steps, and seeing this comment, I opted to try this approach. Now, my laptop is getting quite old, so I suspect the adhesive has lost some of its original vigor. I did not need to use heat, dental floss, or the adhesive remover and was able to follow the instructions using the plastic cards to remove the battery without any damage to the laptop.
I followed the same steps and used fishing line to "rip" the glue between the battery and case. Found a video that showed it on youtube. It worked great!
Had to have a friend hold the computer in place for one "battery block" to "cut" it, but other than that, it was quite easy. :)
>>I made it within 1 hour doing Steps 1-5, then Steps 46-50.
I also used that method - I very carefully used the minimum amount of solvent to incrementally loosen the battery for removal.
I was concerned about using heat since the old battery was pretty badly swollen - I used the solvent instead.
CCC -
Just finished this repair, I also did not remove all the components. I have never used a heat gun before, but I had a hair dryer lying around and that did the trick. I used the hair dryer even on the middle two cells and it seemed to come loose with the plastic card tools just fine.
These batteries appear to be actual Apple batteries. How did iFixit remove them from the case? If iFixit didn't, were they able to get replacement batteries directly from Apple (since the adhesive is already installed)?
plink53 -
No idea, but check About This Mac… > System Report > Power; on the one I just replaced, Manufacturer reads “ifixit”.
Zathras -
The number of screws listed here is wrong on my model. I had four of the smaller size.
anonymous 1286 -
Just to add to my comment above (I can't edit it because it's anonymous), my MacBook Pro is a mid-2015 15in model 2.8GHz (A1398; EMC2881). For the bottom case it uses six 3.1mm screws, and four 2.3mm screws at the clutch/hinge side of the MacBook Pro. I tried using a 3.1mm screw at the clutch/hinge end, as described in the main article, and they don't fit. It has to be four 2.3mm screws.
anonymous 1286 -
The instructions below have you basically taking ALL of the guts out of case. I’ve been doing my own apple repairs since before ifixit was a thing and this one is a handful. My battery was swelling and I wanted to remove it before it burst or bent the case so I took it out without having a replacement and it occurs to me that aside from using the solvent (liquid) to remove the adhesive, you could probably do this only taking the trackpad ribbon out. I have mine reassembled now and will research the best battery to buy but I think installation will take about 5 minutes. See if you can slip a plastic gift card under the battery and wag/saw the adhesive out without the solvent before you go through all of this. It might work. Note, don’t bend or put too much stress on the battery and certainly don’t puncture it…
br1ansk -
Battery Recall for 15-inch MacBook Pro Retina mid-2015. Check Apple’s site for recalls, and put in your serial number. They replaced my swelling battery for free, regardless of warranty.
Steve -
As we are only replacing the battery, you can safely skip steps 6-26 and 28-48, no need to disassemble the computer to pull out the battery. Use nail polisher remover I was able to pull a super bloated battery out, without disassembling my MacBook.
John Sikking -
I qualified for the recall. These bloated batteries are dangerous! DO NOT, UNDER ANY CIRCUMSTANCES, PUNCTURE THE BATTERIES!
Thanks for the heads-up on the recall.
Datajockeys -
I’m having a problem trying to get the screws off. I have a set of pentalobe screwdriver set. I found one screwdriver that fits perfectly on one set of screws, but I am unable to unscrew it. I tried using some force pushing the screwdriver into the screw, but nothing happens. Any suggestions?
henry_k_wong -
All the screws on mine are the same length for some reason.
ccfman2004 -
I would recommend the first step is: Run the battery down to ZERO before doing any next step. This reduces risk to you, people nearby, to the MBP and greatly reduces the risk of fire. Step 2 should be: Double-check that the battery is at zero.
I like others listed below and on YouTube, disagree with these full tear down 70+ steps being the only focus. I get that I have to be careful not to get the acetone solvent near the speakers. I skipped 25+ steps by: tilting the MBP away from the speakers and using very little acetone solvent. More pressure with the plastic cards and only a few drops of solvent. While giving the full set of instructions is fine it should be very clear that you can (at the user’s own risk) do this.
Kenneth Schleede -
As above—I consider full disassembly to be far riskier to fragile cables and connectors than the risk for solvent spillage. I did steps 1-5 and 46-74. No issues. I HIGHLY recommend the iFixit magnetic Project Mat. It’s a white marker board surface gridded into squares and invaluable for labeling part sizes/steps in disassembly.
philtrit -
As above too. I benefitted from the advice. From step 51 onwards, I found a easier way using tip from China battery seller. Use a 2” width plastic scraper/plastic paint scraper to poke under the battery. Use moderate strength to poke and avoid rough handling of the battery so as not to puncture it. There is no need to pry the battery to avoid stressing it, just use a firm poking action under the battery and the double sided tape adhesive will yield. After 5 min of such poking, the entire battery pack can be removed without the hassle of pouring the adhesive remover from step 51 onwards. Get a scraper with a stronger handle so that it is more comfortable to poke.
https://www.aliexpress.com/item/32889670...
Emma Pn -
Heads up as you go…we (husband/wife team) had a notebook that when screws/covers were removed, we marked the step # and actually taped the screws into the notebook noted by the step number. This was very helpful on reassembly and we knew we would be using the exact screw into the original screw hole.
Ann Brainard -
After replacing the batteries myself, I wouldn’t even consider doing it again. Not that it’s difficult to do—that’s not the issue. The issue is aftermarket batteries. I’ve been using notebooks for well over 30 years, and never had satisfaction with aftermarket batteries.
Modern lithium batteries are an amazing technological feat, but a dangerous one. So even putting aside that I’ve never found any aftermarket batteries with quality anywhere near original, I learned “cheap” aftermarket lithium batteries are downright dangerous.
After doing research into what’s involved with manufacturing lithium batteries, I know there are so many corners to cut, you’ll end up with junk regardless of what you pay.
A week after replacing my batteries with those from iFixit, they showed clear signs of failure. Thank goodness iFixit refunded my money.
After having Apple replace my batteries, everything is back to like-new. For my $199, I got not only excellent batteries, but a new keyboard and trackpad as well. That’s it’s done!!!
AnnoniMoose -
I found an Apple Support link that said MBP battery replacement was $199, but the 2 Apple Stores near my house would not provide any appointments. Instead, I scheduled an appointment with and “Apple Authorized Service Provider” & that repair center quoted about $750 to replace the battery.
I refused, went home, & opened a chat with Apple Support.
After a lengthy & painful chat session where the Apple tech didn’t want to provide a battery replacement quote (he feared other issues with the MBPr), he finally gave me an Apple price of just under $650 to replace the battery.
Did you go into an Apple store, or mail it in? I’m struggling to reconcile a price of $199 to get a battery + keyboard + trackpad against what I was just quoted 2 weeks ago. The new track pad & keyboard might have been due to repair tech error. i.e. they trashed those repairing your batter & had to toss them in.
Bartt.Shelton@gmail.com -
I took mine in after being quoted for a $199 replacement of battery and keyboard, only to have the repair refused as they found a "water sensor" triggered and now I'm left with my AUD$5,000 laptop with messed up keys. Shame on me for not getting this repaired during COVID while under warranty. This is the first time I've truly been disappointed in Apple, but suppose it was bound to happen someday. I was quoted US$ 1479 to replace the battery and keyboard and the sensor (likely the logic board is replaced as well) if I were to send it in to the US repair center. Any chance these sensors can be triggered by humidity?
C0RT -
I 1000% recommend watching this video and performing the battery replacement without all these steps from this guide and without using the acetone solvent. https://www.youtube.com/watch?v=ImonCWcc... (15" inch Retina MacBook Pro A1398 Mid 2015 Disassembly Battery Replacement Repair)
The video is narrated well and the guy goes slow and zooms in where appropriate. Instead of removing all components, he simply removes the track pad cable, battery cable, and unscrews two of the speaker screws on each side. From there, you can lift up the speaker arms where the video guy uses a thin pry tool to push through the sticky tape. No solvent is needed except for residual sticky stuff leftover.
Instead of the thin pry tool, I just used the plastic cards that came with this ifixit kit. It takes a little force and wiggle/jiggle so take your time using the corner of the card to start.
This method makes a difficult 2-3hr job into a much easier 1hr job.
Spencer -
+1 for this approach! I watched the video that Spencer mentioned. It took me a little over an hour, and it was stress-free. https://youtu.be/ImonCWcc1xk
Chris Wicklas -
Another +1 - I followed the video pretty exactly (after having already gone through steps 1-5 here). I'm not sure it's necessary to clean off the adhesive residue as thoroughly as he demonstrates in the video, but the instructions were clear and the end results were good - trackpad still working fine and new battery already charged to 50%.
Jeff Zinn -
Glad I read these comments before plunging into the iFixit instructions.
+1 for skipping the iFixit instructions and using the youtube video linked by Spencer.
I followed the instructions and had my battery replacement done succesfully.
Instead of the metal spatula like thing he used - I used the plastic ifixit credit card things that came with my battery kit.
It took about 15 minutes of wiggling under the battery to free it from the adhesive but it wasn't too bad.
I did remove the residual adhesive as he indicated with isopropyl alcohol - but after finishing my installation I realized it was completely unnecessary. You can install the new battery over the residual gunk and skip that step.
picardo -
Yes! This YouTube tutorial works great and it was really easy to replace the battery. I needed about 75 minutes.
Perform steps 1-5,
Then skip to step 41.
In 41 + 43 do not unscrew the red marked screws.
In 42 an 45 just lift the speakers, do not remove them.
Skip 44
Up from 53, I did not use the glue remover, the plastic cards were enough.
In step 63 watch out to start from the middle. This prevents you from peeling up the lower „platform“.
Great job :-)
weekendiac -