Introducción

Esta guía lo lleva a través de la sustitución de la batería en la PlayStation Vita.

  1. bXHPdJvmOqwnRZ5W
    bXHPdJvmOqwnRZ5W
    Kxh4sK2xMaaiHQtJ
    • Apague y retire la tarjeta de memoria.

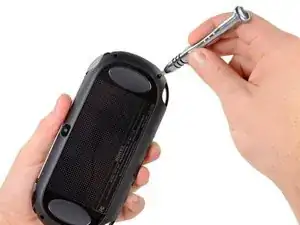
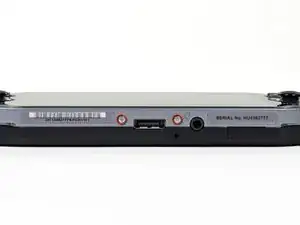
    • Usando un destornillador Phillips # 00, retire los cuatro tornillos de 6,4 mm en la carcasa trasera

  2. WwpKNcKBHnx3iwJP
    WwpKNcKBHnx3iwJP
    36FYDevnAqBvbNY3
    mjh2iFATaa2BKMEs
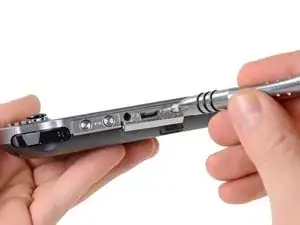
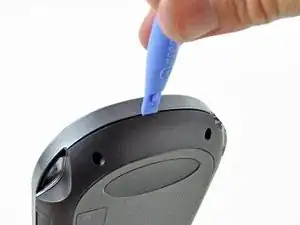
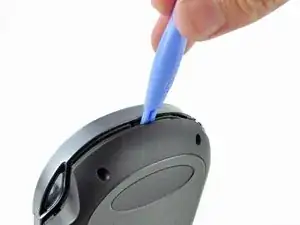
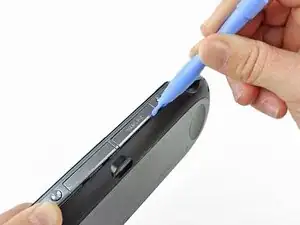
    • Usando la uña o un spudger, abra la cubierta del puerto de accesorios en la parte superior del dispositivo.

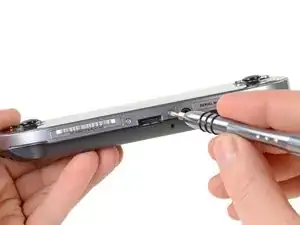
    • Usando un destornillador Phillips # 00, retire los dos tornillos de 5.4mm ocultos debajo de la cubierta del puerto de accesorios.

  3. AH6yWSkBJ4VWv3RB
    AH6yWSkBJ4VWv3RB
    aXih4BBWrQN2fmOK
    • Retire los dos tornillos Phillips # 00 de 5.4mm en la parte inferior del dispositivo cerca del puerto de carga.

  4. bEJVmiEky4mHiDcb
    bEJVmiEky4mHiDcb
    aQOOn4pkOrVFR3hw
    vEQhcA4OEHFKVYLS
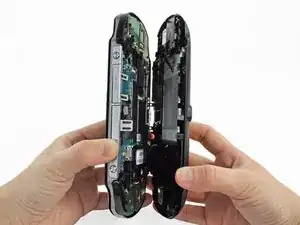
    • Comenzando a los lados del dispositivo, utilice una herramienta de apertura de plástico para separar la carcasa delantera y trasera.

    • Continue deslizando la herramienta de apertura al rededor del borde.

    • Todavía hay alambres que mantiene juntas las carcasas delantera y trasera. Usted puede dañar las conexiones si separa las carcasas de forma brusca.

  5. 3BBZJmwmjKVUDiJa
    3BBZJmwmjKVUDiJa
    EpjUlyY4L4GWcaLS
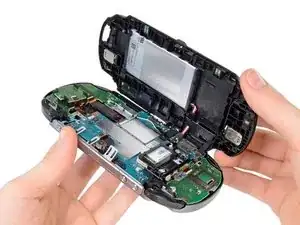
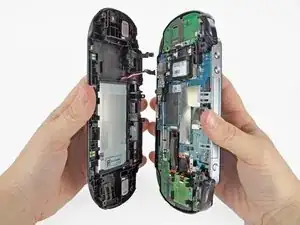
    • Suavemente separar las dos carcasas, teniendo en cuenta la batería y los conectores del controlador de pantalla táctil que mantienen las carcasas juntas..

    One of the shoulder buttons fell out when I was doing this step, along with the piece holding it in place. They go back in just fine when reassembling but make sure that they are oriented properly, of course.

    klung -

  6. NeowybD4slFqYmiM
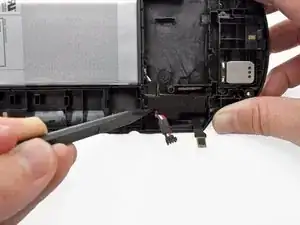
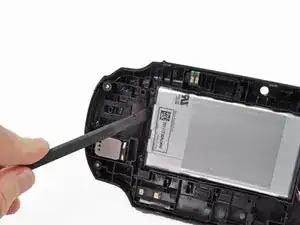
    • Utilizando un spudger, libere el cable flexible del controlador de la pantalla táctil suavemente levantando la conexión.

  7. DtebpV1FIAkm4AUj
    • Libere el cable de la batería levantando suavemente la conexión con un spudger.

    Any idea what type of pcb header is on the board for the battery? I have a motherboard with a broken header but I cant source a replacement

    Jimbo Jones -

    This is where I screwed up so I recommend extra caution for other newbies. Only the black part is supposed to come off. Don't be an idiot like me and pry off too much...

    ylimakiminna -

    Yea I messed up there too. Is there a way to fix it?

    Alethia Henry -

    This component was far more stubborn than the screen connector when it came to removal. I opted for a smaller tool than the spudger (small flat-head) and managed to disconnect it after determining the best bit size for the job. Screwdriver is metal, obviously, so being gentle helps to avoid damaging anything.

    klung -

  8. fkyIaVUrPDRIlhZV
    • Separar las carcasas delantera y trasera.

  9. VX2TaXVbYtwNHIKP
    VX2TaXVbYtwNHIKP
    EWlJuiUsM1DIWfPZ
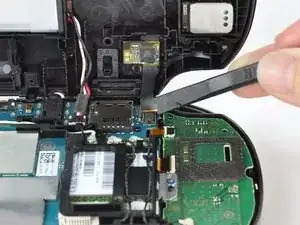
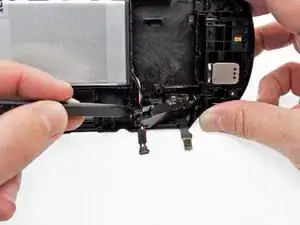
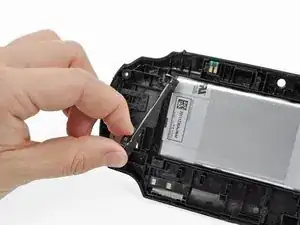
    • Con la ayuda de un spudger, levante suavemente y quite el retenedor del cable de la batería en el conjunto de la carcasa trasera.

    • El acceso más fácil al retenedor del cable de la batería es donde sale el cable de la batería.

    • También puede usar las dos lengüetas pequeñas en el lado del retenedor del cable. Localice las pestañas y suelte una a la vez. Tenga cuidado de no empujar la cubierta y volver a bloquearla.

    Using the tabs (I could really only see one) on the side of the retainer proved essential for me to remove it and release the cable. Unless that happened that cable retainer was not moving for me at all. It did come out once the tabs were pressed though they did prove somewhat uncooperative with clicking back into place once I had installed the new battery. Also, watch that the battery’s cable isn’t pinched when you’re putting everything back in place.

    klung -

  10. jWQeSRp1IvWd1Uk5
    jWQeSRp1IvWd1Uk5
    DreEZarQjH5flyTe
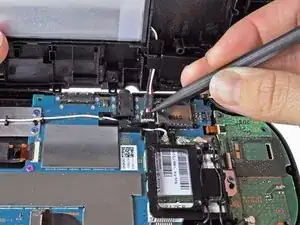
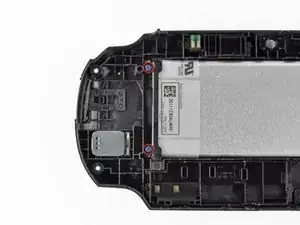
    • Utilizando un destornillador Phillips # 00, retire los dos tornillos de la caja de la batería azul de 5,0 mm.

    • Retire la barra de retención de la batería de plástico.

    When reinstalling the battery retaining bar, be sure to insert the bottom end (as shown in the photo) into the slot before driving in the screws. If you just lay it on top, you will crack the bar.

    Lee Johnson -

  11. xwePUQIY3U6KNvWS
    xwePUQIY3U6KNvWS
    NdNRLZVKwGAMGxKI
    nPB3YCMyWJOKYWrP
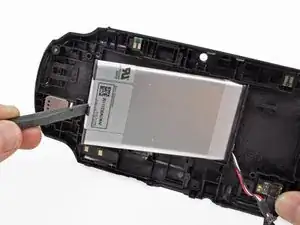
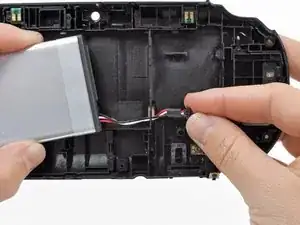
    • Con el dedo o con un spudger, levante la batería y retírela.

    • Guíe los cables de la batería a través del orificio de la carcasa trasera mientras retira la batería.

Conclusión

Para volver a armar el dispositivo, siga estas instrucciones en orden inverso.

Brittany McCrigler

Miembro Desde 05/03/12

88184 Reputación

26 comentarios

Great guide. Only problem is this takes very steady hands (something i do not have)

chavis0704 -

This is a great guide. It allowed me to execute the repair and do so without and damage. Just be careful with the triggers they can move and get caught while closing everything up.

Amon Bouchereau -

how do i know what persent my battery is at

jewon -

Jewon today we have a hack for psvita 3.60 version ONLY !! this allow u download a VPK file that says how much persent your battery is at

brunosapo -

With your Vita connected to your PC and the Content manager application running, on windows right click on the vita and then properties and the battery percentage will show up.

Matthew Michand -

Great guide. Thanks for writing it!

Reiaze -

weeelll I think I have a broken Vita now. Make sure you're not an idiot like me who doesn't know which parts to pull in which direction when trying to free the battery cable.

ylimakiminna -

Well. Didn't take out the memory card after removing battery Aaannndddd now the vita says its not in there.

Emmanuel Brown -

I had the same issue do you think you just need a new memory card? I'm hoping that's all it is even though they aren't cheap it's cheaper than a whole mother vita...

klarson79 -

Yeah, I’d seen warnings about that online. Apparently, when you install a new battery there is a surge of power as everything is reconnected. Removing any cards in any of the slots is advised to prevent damage to them.

klung -

I had the same issue Emmanuel I just need a new card then right?

klarson79 -

Thank you! My son's PS Vita alive again :)

Юрий Иванов -

My PS vita phat is only displaying PlayStation. Logo then shutdown I can't even go through the recovery mode.. Tried most charging method... I tried removing my battery and putting it to a different PS vita unit and it worked fine... Is my battery faulty?

demetrio dario -

So I replaced the battery on my PS Vita 1000. When I try turning it on, an orange light shows up on the PS logo but the device does not turn on. Should I let the new battery charge for a bit before trying again?

ajsanaje -

The iFixit info on the Vita battery product page stated to calibrate the battery before use. Not sure if that has to do with the complications you’re facing but worth considering.

klung -

Are there alternatives to the Spudger and/or Opening Tools that one might already have available from home?

Matthew Conklin -

Worked perfect. Great guide. Thanks!

Jochen Jakob -

My version is different i can’t for the life of me get back panel touch foil into the connector it is really short

limbovampier -

Try to hold the back panela at a closer angle with the console and use a spudger to or tweezers to reach the cable if necessary.

Daniele Carminati -

The socket on the motherboard is different and smaller than on the replacement seems to big and I can't get it to fit

Jesinia Reyna -

My nine-year-old Vita still worked, but its original battery was not in the best condition. I obtained a replacement battery from iFixit and used this guide to install it. It may look daunting at first, but if you study the guide, take your time, and follow the steps carefully, it’s actually pretty straightforward. Having a spudger definitely helps.

Lee Johnson -

Do you know if this will get rid of your jailbreak on your vita?

Daniel Lopez -

nope it wont just gotta rebuild database insert and remove the sd2vita multiple times trial and error.

Chip -

Ok for the most part but way to vague overall with the position of the clips, specially step 7 and 9 which are about basically useless as these are not the most common attachment positions so I had to figure them out, the direction and clip lock points by myself with risk of damaging these critical small connectors and pieces;

Please consider adding red indicators and a glossary of clip lock types and along with it's own release mechanism and clip points.

Thank you

ionX -

While I'm at it, for step 7: the battery connector disconnected upwards instead of sideways, and the release/locks of the clips are on the sides towards the cable side not the connectors;

And for step 9: the plastic piece holding down the battery and rear touchpad connectors in place, the release clips are too the 2 sides right below each little hole, push in from each side from the outside of the piece itself inwards to unclip

(Can be a bit hard to tell since they are so small and being all black)

It's late but I hope you could consider adding such info in in a clearer manner

ionX -

What batteries can be used instead of sp65x?

Nattawat Saelim -