Introducción

Usa esta guía para reemplazar la batería.

Nota:

Si hay un film delgado de plástico en tu batería de reemplazo, no intentes removerlo. Está pegado y protege el paquete de batería mientras está dentro de la MacBook.

  1. 3bTejPotVlS4MkaI
    • Antes de continuar, cierra la computadora y colócala sobre una superficie suave con la parte superior hacia abajo.

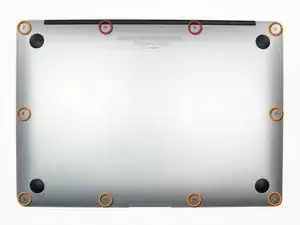
    • Retira los siguientes diez tornillos:

    • Dos tornillos Pentalobe de 9 mm y 5 puntos

    • Ocho tornillos Pentalobe de 2,6 mm y 5 puntos

    • El destornillador especial necesario para quitar los ocho tornillos Pentalobe de 5 puntos se puede encontrar aquí.

  2. WwI3rtRnhTEHj54C
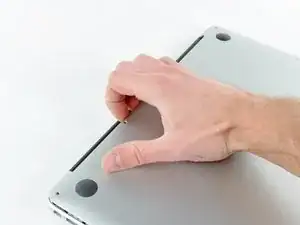
    • Coloca tus dedos entre la pantalla y la caja inferior y jala hacia arriba para sacar la caja inferior de la Air.

    • Remueve la caja inferior y apártala.

  3. N4ACcJX3UJrBILst
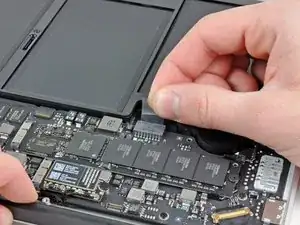
    • Toma la lengüeta de plástico transparente conectada al conector de la batería y jálala hacia el borde frontal de la Air para desconectar la batería de la placa lógica.

    • No levantes hacia arriba en el conector mientras lo desconectas.

  4. y3TUhCKKYPlT2GMN
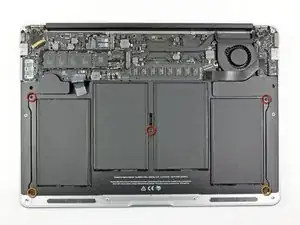
    • Remueve los siguientes cinco tornillos que sujetan la batería a la caja superior:

    • Tres tornillos T5 Torx de 6.3 mm

    • Dos tornillos T5 Torx de 2.4 mm

  5. Q6nMUHBqq3Ao6jyi
    • Al manipular la batería, evita apretar o tocar las cuatro celdas de polímero de litio expuestas.

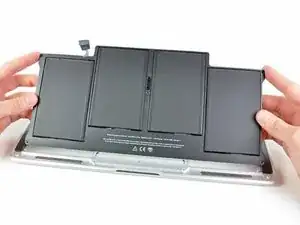
    • Levanta la batería de su borde más cercano a la placa lógica y retírela de la caja superior.

    • Si estás instalando una batería nueva, debes calibrarla luego de la instalación.

    • Cárgala hasta el 100% y luego sigue cargándola durante al menos 2 horas más. Luego, desenchúfala y úsala normalmente para drenar la batería. Cuando veas la advertencia de batería baja, guarda tu trabajo y mantén tu laptop encendida hasta que se duerma. Espera al menos 5 horas, luego cárgala de forma ininterrumpida hasta 100%.

    • Si notas alguna conducta o problema inusual luego de instalar tu batería nueva, podrías necesitar restablecer el SMC de tu MacBook Pro.

    Thanks for the easy step by step guide. MacBook working like a dream again

    Peter atkins -

Conclusión

Para volver a ensamblar tu dispositivo, sigue estas instrucciones en orden inverso.

Andrew Bookholt

578639 Reputación

17 comentarios

I received the batter for my late 2010 in good order. The instructions were easy to follow and the replacement went well. The two tools mentioned are a must - the P5 pentalobe and T5 torx.

My disappointment is that the battery from iFixit is, in fact, not new. No, it has not been used and shows 6700 mAh design capacity. However, Coconut Battery reports the manufacture date of the battery as 12-14-2011 or 1134 days. Also, I am getting 4-6 hours when I expected 5-7. What is the shelf life of an unused battery?

Perhaps iFixit may wish to change the battery description from "Brand New" to "Never Used" and put the manufacture date.

Thanks

fwunder -

Great post and thanks for this tips.

see more : http://www.geeksonsite.co.nz/

lalit -

Just arrived the battery.

Replaced in 5 minutes.

Perfect!

My Mac is up, running and charging the new battery.

Thank you

Vinicio

vgusv -

Sounds like you did not follow the conditioning procedure?

grant varga -

My battery arrived today and I was able to install it in about 30 minutes (I have not done this before). My Mac is up and running and the battery has charged up and is in use.

Thanks for all the help.

SG 03/22/2017

Saadia Greenberg -

I followed this instructions. Everything is fine except that I cannot fully insert the pull tab back into the battery connector. How hard do you have to push ? Does it have to make a click ?

Julien Salort -

Hello Julien,

It will not click, but it will need about the same amount of force to push it in as the amount needed to pull it out. This being said, you should check the battery connector for any debris, and look at all the pins to make sure nothing is broken. Let us know if you succeed!

Scott

Scott Havard -

Worked great! I used an egg carton for the screws, an ifixit 52 piece toolkit — which I love! — and the battery switch was painless and worked immediately. Many thanks! The sixteen year old girl can get back to her tweeting now. Thank God.

Best,

Ira

airira -

All went smoothly! A little bit more explanantion about re-inserting the power connector would have been nice. . . . . . .

Saved my 2011 MacAir.

thanks!!!

Paul Harris -

If you don’t already have these tiny screwdrivers, you might want to also buy the P-5 Pentalobe screwdriver and the little plastic tool (“Spudger”) from IFIXIT. My local hardware store did not have the P-5, so it was a good thing I had ordered it. And the little plastic spudger was helpful in pushing the new battery connector plug into the jack on the board. Getting the T-5 Torx, too, could be handy just to avoid a trip to the hardware store. The price on IFIXIT was not significantly more than I paid at the local Ace hardware.

Jason D -

The instructions you have given to calibrate the new battery are different from the ones that came with it. How do I proceed?

Patricia Lacerda -

I have found the answer. There are 2 different procedures, one is called CONDITIONING and the other is CALIBRATING. Conditioning of a brand new battery involves one cycle of 12 h uninterrupted charging followed by complete drainage of the battery until MacBook shuts down (repeat this 3 times). Calibrating can be done afterwards on old batteries and involves the usual instructions given by many websites (here, Lifewire, Apple, etc).

Patricia Lacerda -

Hi. I did also reset the SMC after replacing the batteries.

Fabrice -

Do i remove the plastic film on the new battery?

John -

Hi John,

If the plastic film is an easily removable layer, you can remove it. If it is glued onto the battery, do not remove the layer.

Arthur Shi -

how important is it to keep the plastic film on the battery? i didn’t see the message at the beginning and removed it :(

if it is important, i would include that message to the step where the new battery is installed.

matthewyo -

Good point! I will add a note in the last step. The battery may come installed with a liner and/or thin plastic film. The plastic film is easily removable and should be removed before installation. The liner helps with installation and acts as a layer of defense against punctures.

Arthur Shi -