Introducción

Esta guía de reparación fue creada por el personal de iFixit y no ha sido respaldada por Google. Obtén más información sobre nuestras guías de reparación aquí.

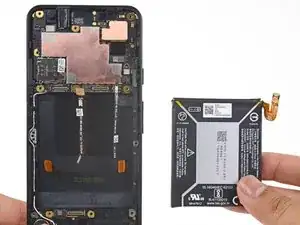
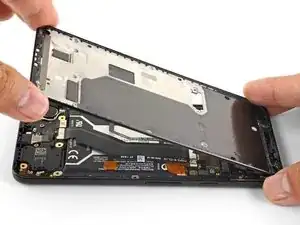
Sigue esta guía para retirar la batería de iones de litio del interior del Pixel 3a.

Si tu batería está hinchada, toma precauciones adecuadas. Por tu seguridad, descarga la batería por debajo del 25% antes de desmontar el teléfono.. Esto reduce el riesgo de un evento térmico peligroso si la batería se daña accidentalmente durante la reparación.

El panel de la pantalla del Pixel 3a no reforzado es frágil.. Si estás reutilizando la pantalla, asegúrate de prestar especial atención a las advertencias en el procedimiento de apertura.

  1. UYLZJkTCPKIULQqg
    UYLZJkTCPKIULQqg
    sLKr2jdAKWhyf1lS
    rqLvMH3flk6RFDWV
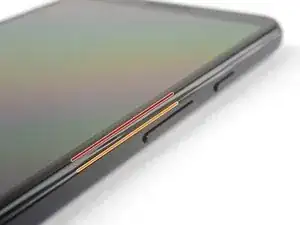
    • Toma nota de las dos juntas en el teléfono:

    • Juntura de la pantalla: Esta juntura separa la pantalla del resto del teléfono. Es aquí donde deberías hacer palanca.

    • Juntura del marco: Esto es donde el marco de plástico se junta con la tapa trasera. Se sujeta en su lugar mediante tornillos. No hagas palanca en esta juntura.

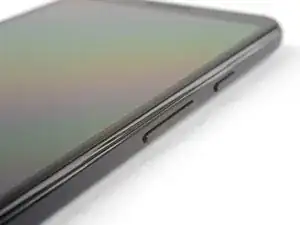
    • Antes de empezar a hacer palanca, ten en cuenta las siguientes áreas de la pantalla:

    • Cable flexible de la pantalla: No hagas palanca más allá de lo indicado o correras el riesgo de dañar este cable.

    • Perímetro del adhesivo: Si haces palanca más allá del perímetro estrecho sin inclinar la púa, se dañará la pantalla .

    Power is off, but does the battery need to be disconnect to safely do this replacement?

    mplishka -

    Da ich keinen iopener ( dachte das wäre alles dabei wie auf der bstellvorschau!!!) habe ich eine Wärmflasche auf das Handy gelegt ..behutsam und nicht zu heiß. Besonders an Kopf und fußende war das Display ziemlich fest...befolgt man die Anweisungen genau ist es eigentlich kein Problem das Display vom Rahmen zu lösen, jedoch bin ich der Meinung, dass hier schon ein gewisses Maß an motorischer Vertrautheit mit der Materie bestehen sollte, da wie gesagt oben und unten doch ein tieferes eingreifen in den Rahmen unter das Display nötig ist...

    Ralph S. aus Neumünster

    Ralph S -

  2. kOMOAsYMaVlLnIYw
    • Calienta un iOpener y aplícalo al borde derecho de la pantalla durante un minuto

    • Puedes optar por omitir este paso ya que el adhesivo para pantallas de Pixel 3a no es muy fuerte. Calentarlo, sin embargo, disminuirá la posibilidad de agrietar la pantalla.

    I used a washcloth soaked with hot water and sealed in a plastic bag instead of the iOpener for this step, and it worked great.

    E. Dunham -

  3. i1VAm1KlVh2tBbff
    i1VAm1KlVh2tBbff
    Mq3cR1WegRxaZItu
    UQV6s6vJigNk1VVT
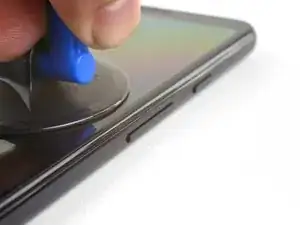
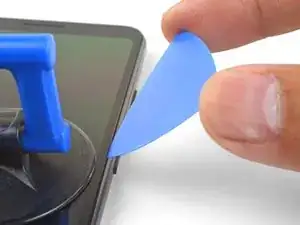
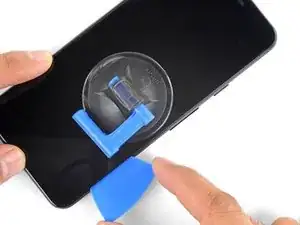
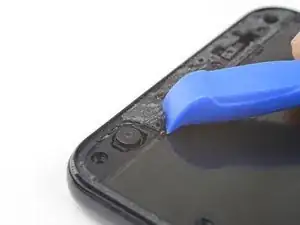
    • Coloca una ventosa cerca del borde derecho de la pantalla.

    • Tira de la ventosa con fuerza constante.

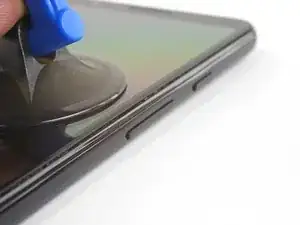
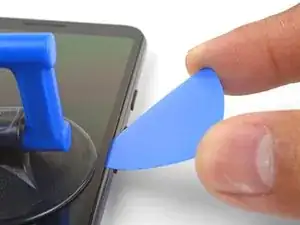
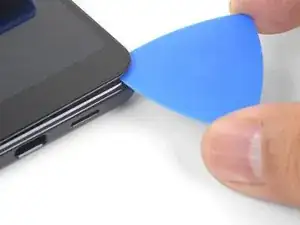
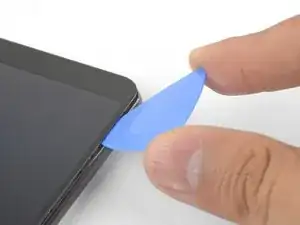
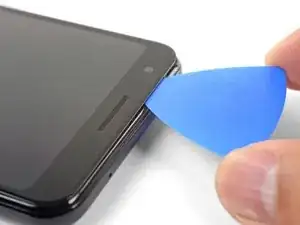
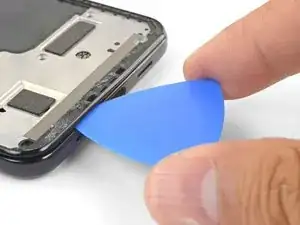
    • Inserta la púa en la grieta , no más de 1 mm.

  4. nT1rWFhmDPUKyTnu
    nT1rWFhmDPUKyTnu
    pKRFx5PKkAHK3DIU
    mppctEFPhMHpfsaI
    • Este paso muestra cómo insertar la púa sin dañar el panel OLED. Haz esto antes de cortar los borders largos del teléfono.

    • Con la púa 1 mm dentro de la grieta, gira la púa hacia arriba hasta un ángulo pronunciado.

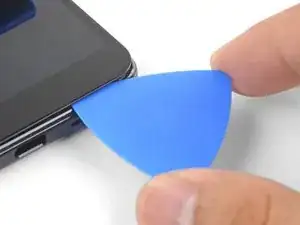
    • En este ángulo, empuja cuidadosamente la púa en el espacio aproximadamente 6 mm. La púa debe deslizarse por debajo del panel OLED.

    • Deténte si sientes que la punta de la púa golpea un borde. La púa puede estar presionando contra el borde del panel OLED. Inclina la púa e inténtalo de nuevo.

    If you don’t have picks, you can also use the corner of an old gift card, though it may be necessary to shave it a bit thinner with a knife so it fits the gap better.

    E. Dunham -

  5. WoQdhZ5ekrhLtqRY
    WoQdhZ5ekrhLtqRY
    W11csdZiT2jUR2UJ
    ZXKPkOXWYIngKQga
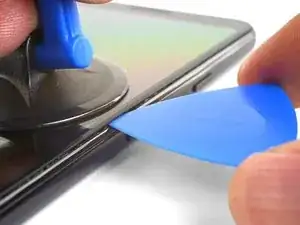
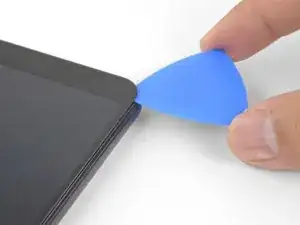
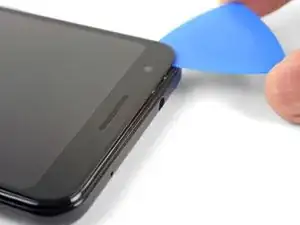
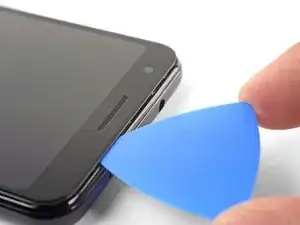
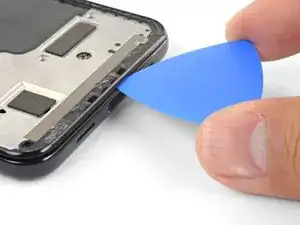
    • Desliza la púa a lo largo del borde derecho, cortando el adhesivo.

    • No insertes las púa más de 6 mm, ya que podrías dañar el cable flexible de la pantalla.

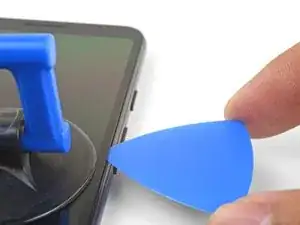
    • Deja una púa en su lugar para que el adhesivo se vuelva a sellar.

    Don’t make my mistake and read ahead. 6mm may be too close for comfort! 8mm is definitely too far and caused me to damage. Also be sure to read the right manual! I have an XL and it notes 5mm.

    Miguel Higgins-Moy -

    Fortunately my old screen was beyond repair, But be super careful around the bottom I managed to sever the ribbon cable to the digitizer.

    Stephen Hammons -

    I broke my screen here. The adhesive in my case was quite strong on the top and bottom.

    Mario Flores -

    This is by far the hardest part of the entire replacement. I ruined my screen doing this, you might as well buy a new screen at the same time as you buy your battery. I just barely rubbed the edges of my screen and it turned the edge of my screen purple. This eventually migrated to the entire screen causing the whole thing to be purple/black.

    Ross Lancaster -

    Hard to not make a mistake here. It's more like 1/8". It's difficult to keep the pick at a steep angle at all times on left and right sides.

    Won Choi -

    I've repaired many iPhones, and never had any issues. The screens always remained intact. But with the Pixel, I completely destroyed the screen. The only thing it showed after booting up was a purple line... The adhesive is very strong and it's nearly impossible to separate the screen without damaging it. You should order a new screen before you attempt to change the battery, just in case.

    Philipp -

  6. RrOoEGutj3bVnmxB
    RrOoEGutj3bVnmxB
    26JTeECcBV4a1D3h
    eER1QHa3BSo3E4gj
    • Al cortar alrededor del borde inferior del teléfono, no insertes a la púa más de 6 mm.

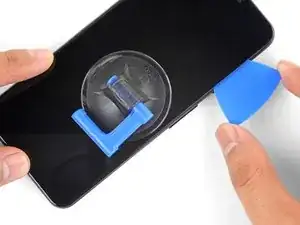
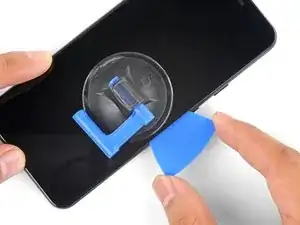
    • Desliza la púa por la esquina inferior derecha para cortar el adhesivo.

    • Si la esquina se siente difícil de cortar, aplica un iOpener caliente a la esquina durante un minuto e inténtalo de nuevo.

    • Continúa cortando a lo largo del borde inferior del teléfono y a la vuelta de la esquina izquierda.

    Heating bottom of the screen and going very slowly is key here. The adhesive was stronger than expected, and I cracked the glass while going around this first corner.

    Jerome C -

  7. NPKYImIn6ahmqWff
    NPKYImIn6ahmqWff
    3LQTJQOCtclJoMOP
    Iun2OAM2kt2jqsFa
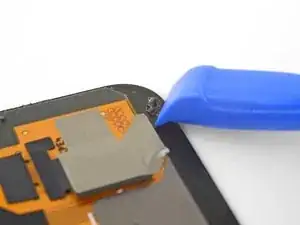
    • Corta a través del borde izquierdo del teléfono, asegurándote de inclinar correctamente la púa debajo del panel OLED e insértela no más de 6 mm.

    • Para inclinar la púa debajo del panel OLED, inserta la punta de la púa no más de 1 mm, inclina la púa hacia arriba, y luego empuja lentamente la púa 6 mm.

  8. OdHxSWOTKxjIRZTo
    OdHxSWOTKxjIRZTo
    JVOygjVn1eFAL2mI
    VSOfpVBWHKuTF2AV
    • Corta a lo largo del borde superior mientras mantienes la púa no más de 8 mm adentro.

    There is a LOT more adhesive at the top than anywhere else on the phone! It’s like there’s 2 lines of adhesive, one along the edge of the case and one along the edge of the screen, and it’s filled in between them wherever the speaker camera aren’t. I needed to heat and pry several times to get the top loose. Fortunately, there’s little risk of hitting a cable near the top (look ahead to the step where you lift the screen off to see where all the cables go!)

    E. Dunham -

    I found that applying the iOpener across the top edge of the glass for about 30 seconds at this step helped soften the adhesive significantly. My front camera was replaced only a few months ago by uBreakiFix and the display adhesive subsequently let go on the entire right edge, bottom, and part of the left side shortly after the new front camera failed. Only the top was still securely stuck.

    Reid Solberg -

  9. XTsNwEiy5QswHVMb
    XTsNwEiy5QswHVMb
    RdpgIiTntnUQteQW
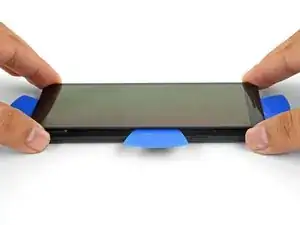
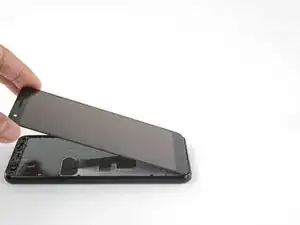
    • Con todos los bordes cortados, abre con cuidado el borde derecho de la pantalla.

    • No quites la pantalla. Sigue conectado al teléfono mediante un cable flexible cerca del borde izquierdo.

    • Utiliza una púa de apertura para cortar con cuidado cualquier resto de adhesivo.

  10. 1TCaAfShYJjQxYYd
    1TCaAfShYJjQxYYd
    bJQqUYJcpfnCJZCN
    cc3XMNsGRmuCcRPZ
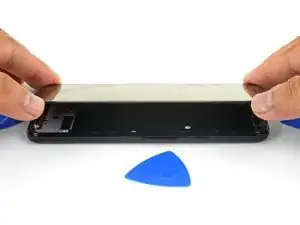
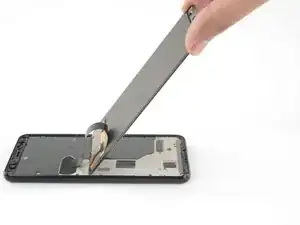
    • Con todos los adhesivos cortados, voltea el vidrio de la pantalla hacia abajo y colócalo en la parte superior del teléfono. El cable flexible de la pantalla debe estar ligeramente arqueado.

    Hi, could you help me with one clarification?

    What does the small “metal patch” in the middle of the display ribbon do?

    Does it prevent the phone from starting while disconnected?

    Thank you for your time!

    oliver schirmer -

    Hi Oliver,

    I think the patch you’re referring to helps with either EM shielding or heat dissipation. It should not prevent the phone from starting.

    Arthur Shi -

  11. tHK6Pmg16eiUvJgL
    tHK6Pmg16eiUvJgL
    tnkCikUCkDWAfKlu
    v5vVIOJkOgNtIZ2m
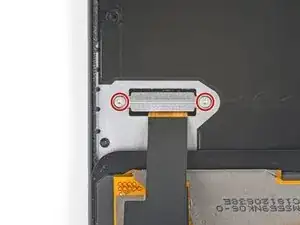
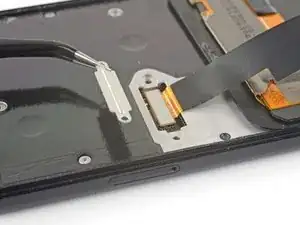
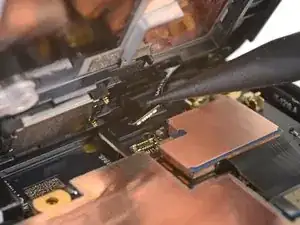
    • Despega cuidadosamente la cinta negra que cubre el soporte del conector de la pantalla.

    • Si está en buenas condiciones, puedes reutilizar esta cinta durante el reensamblaje. De lo contrario, reemplázalo con un trozo de cinta adhesiva eléctrica.

    • Retira los dos tornillos T3 de 4.4 mm de largo que fijan el soporte del conector de la pantalla.

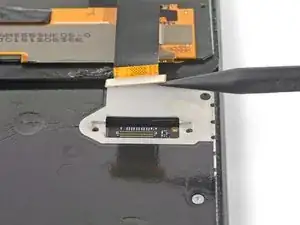
    • Retira el soporte del conector de la pantalla.

    This may be a silly question but how are you able to tell whether the tape is in good condition? Is it based off of how sticky it is after you remove it?

    Sylvia -

    That is a fair question! If the tape is in one piece and is relatively sticky, it can probably be used again.

    Arthur Shi -

    Oops! I forgot to put any tape back. Does this tape have a critical purpose, in other words should I go to the trouble to pry the screen back off and tape it?

    elyze -

    The tape does not serve a critical purpose. If you have already re-sealed your phone, I wouldn’t worry about it.

    Arthur Shi -

    Les vis sont des T4 et non des T3

    Gaëtan PERRIER -

    Bonjour Gaëtan ! Merci pour la remarque. En fait, il y a toujours une certaine tolérance entre le tournevis et la tête de vis. Donc il se peut que la taille supérieure ou inférieure soit plus “confortable” au cas par cas. Bonne réparation !

    Claire Miesch -

    Bonjour,

    Pouvez-vous me conseiller un bon kit de réparation pour mon Google Pixel 3A?

    J'ai peur de me faire arnaquer en achetant un mauvais écran de basse qualité .

    mailsecoursd -

  12. 1LpxCoCGOb2YFKyK
    1LpxCoCGOb2YFKyK
    KisWpfFOvn3u35XK
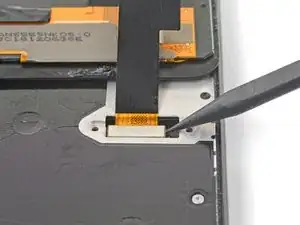
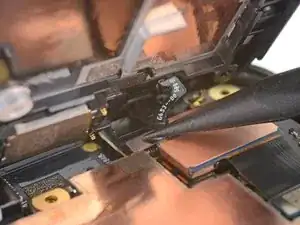
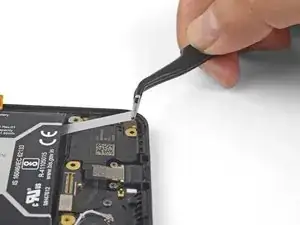
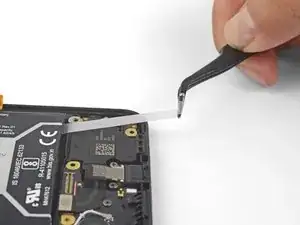
    • Usa la punta de un spudger para entrometerse y desconectar el cable flexible de la pantalla.

    • Cuando desconectes conectores como estos, ten cuidado de no desalojar los pequeños componentes montados en la superficie que rodean el zócalo.

    • Para volver a colocar los conectores de presión como éste, alinea y presiona con cuidado en un lado hasta que encaje en su lugar, luego repite en el otro lado. No presiones hacia abajo en el centro. Si el conector está desalineado, los pines pueden doblarse, causando daños permanentes.

    I had accidentally pressed the power button and the phone was on when connecting the new screen and that broke the board! So make sure the phone is off.

    Diako Mardanbegi -

    is it okay if I forgot to add the black tape on the connector area???

    Harry Banda -

  13. ODdQHEZ2HSon1SkQ
    ODdQHEZ2HSon1SkQ
    DFtWMRU1kdamp2pa
    HAesK3jdCOvXdKZd
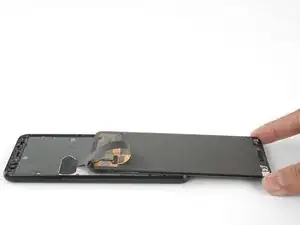
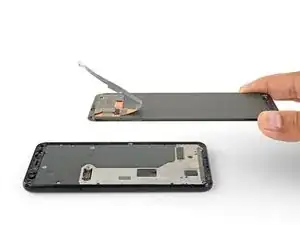
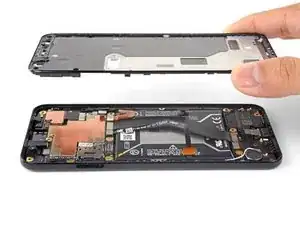
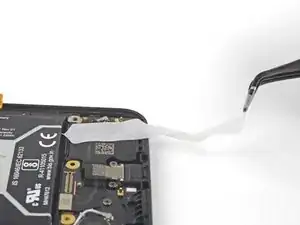
    • Remueve la pantalla.

    • Con atención compara tu pantalla de reemplazo con tu pieza original. Podrías necesitar transferir componentes adicionales (como la malla del auricular) a la nueva pieza.

    • Para volver a instalar la pantalla:

    • Sigue esta guía si estás usando adhesivos personalizados.

    • Si estás usando cinta de doble cara (como la cinta de marca Tesa), usa esta guía

    • Durante el proceso de arranque después del reensamblaje, la pantalla pasará por una secuencia de calibración. No toques la pantalla durante este proceso, ya que podrías provocar una calibración táctil incorrecta y crear problemas táctiles.

    There is a blue plastic tape covering the digitizer and when I try to take it off it rips out something more than just the tape I think it’s pulling the magnet too

    Darien Suarez -

    i had a little plastic piece around the camera (seems to just be a spacer) that i moved to the new screen. had to pry it up with a pick cuz it was stuck down good.

    elyze -

    actually to clarify- i didn’t move the little camera spacer to the new screen- i placed it around the camera on the phone, where there was a little indent for it, and stuck it down with a bit of tesa strip, then applied more tesa strips around the edge of the phone before finally reconnecting and replacing the screen. the little plastic bit i encountered needs to be precisely placed around the camera so would not be a good idea to just stick it to the screen when reinstalling!

    elyze -

    Thanks team! I was able to replace my broken screen with no issues!

    Instead of cutout adhesives or tesa tape, I used B-7000. Painless.

    Appreciate the screen and instructions!

    Jessica Hale -

    Bonjour,

    Pouvez-vous me conseiller un bon kit de réparation pour mon Google Pixel 3A?

    J'ai peur de me faire arnaquer en achetant un mauvais écran de basse qualité .

    Hello . Can you advice me a site where i Can buy a quality screen replacement pack for my Google Pixel 3A?

    There's a lot of rip off on internet and id like to get a good pack and a quality screen .

    Bichette Laterreur -

    Hello! We currently sell a replacement screen. However, I’m not sure if it is available yet internationally.

    Arthur Shi -

    I have a quick question, so I haven’t done anything yet because I only just ordered my repair kit, but is it possible to replace the battery without having to replace the display ?

    Braeden -

    Hi Braeden!

    Yes, it is definitely possible to replace the battery without replacing the display. With that said, the initial entry steps can be pretty tricky. Before you begin, look very closely over the display to see if you can see any micro-fractures. If you see any, you will most likely crack the screen when you try to remove it. Take your time and apply a heated iOpener often. Good luck!

    Arthur Shi -

    I forgot to order the tape when getting my replacement USB port, so I ended up putting the screen back on without any tape and using regular clear tape on the outside of the phone to keep the screen from falling off. It’s less waterproof, but it’ll do the job until the right part arrives.

    E. Dunham -

    Speaker mesh appeared to already be in place on my replacement screen, so I did not transfer this over from my old screen. That was a huge mistake, sounds were garbled above about 30% volume. Make sure you do this part!

    Evan Heisman -

  14. 1jGUBiS2LfJs6DEy
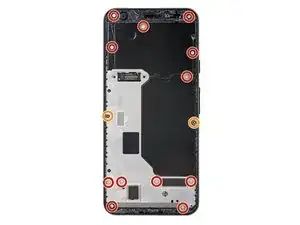
    • Remueve los catorce tornillos T3 de los siguientes largos que sujetan el marco medio de plástico:

    • Doce tornillos T3 plateados de 4.3 mm

    • Dos tornillos T3 negros de 4.3 mm

    • A lo largo de esta reparación, realiza un seguimiento de cada tornillo y asegúrate de que vuelva exactamente al lugar de donde vino.

    I found that a T3 bit didn’t get purchase on the screws in my Pixel 3a, but the T4 bit worked great. Not sure what’s up with that.

    E. Dunham -

    This is definitely possible, depending on which kit’s T3 bit you use, along with potential screw quality variances.

    Arthur Shi -

    My Pixel 3a has been apart three times for a non-functioning front camera. The first time, it was by a Google authorized repair shop, and the camera stopped functioning again after a few months. When I took it apart the second time, I noted that many of the screws weren't seated before I removed them. The camera module had become disconnected and simply reseating the connector fixed it. I was careful to fully drive all screws and apply an appropriate amount of torque to them, thinking the repair shop failed to do so. After 9 or 10 months, my front camera stopped working again. Again, I'm noticing a lot of the screws have worked themselves loose. I'm going to try to find an appropriate thread compound that I can precisely apply to these tiny screws.

    Reid Solberg -

    Hey Reid,

    I would suggest blue Loctite or threadlocker. Dab a small drop on each screw before you install them.

    Arthur Shi -

    One of the bolts was rounded, so the torx screwdrivers (T3 or T5 in the kit) couldn't bite and loosen it. Not sure how to go forward.

    Won Choi -

  15. 2nCRJiMcSwebyPBk
    2nCRJiMcSwebyPBk
    ci3fCjpXwEmOtkEL
    aM5vkaMMmeJAYGSE
    • El marco medio se mantiene en su lugar mediante clips de plástico.

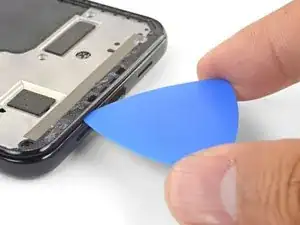
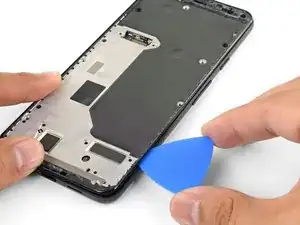
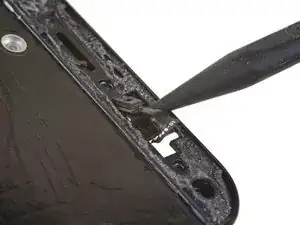
    • Inserta una púa de apertura en la juntura del marco en la parte inferior del teléfono. Esta costura se encuentra entre el marco medio de plástico y la tapa trasera.

    • Desliza la púa a lo largo de la costura para soltar los clips que sujetan el marco medio de plástico.

  16. PxEQULZaDKFGPaxC
    PxEQULZaDKFGPaxC
    EcSEKHLXTf6xePYB
    rbOiwtGxyLHM1HYH
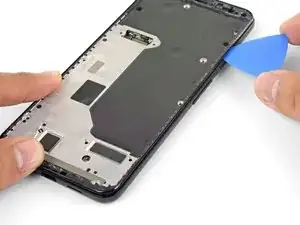
    • Desliza la púa de apertura a lo largo de los bordes izquierdo y derecho del teléfono para liberar los clips del marco medio.

    • Levanta el borde inferior del marco medio de plástico pero no lo quites. El marco medio todavía está atada al teléfono por el frágil cable del sensor de proximidad en el borde superior.

    • Para volver a instalar el marco medio de plástico, alinea el marco medio con la tapa posterior y aprieta el perímetro del teléfono con los dedos para volver a colocar los clips en su posición.

  17. QYTepdAm1EArIBrm
    QYTepdAm1EArIBrm
    bDN4qoISJsxrbqok
    HyRfUshSyDXJwWZe
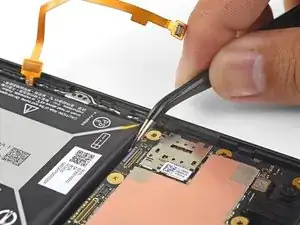
    • Utiliza la punta de un spudger para hacer palanca con cuidado y desconectar el conector del sensor de proximidad de la placa madre.

    • Es posible que el conector del sensor de proximidad se haya desconectado automáticamente cuando levantaste el marco medio.

    • Remueve el marco medio de plástico.

    This connector is f*ckn impossible to reconnect 😭

    Arnau Mora -

    This is the hardest part of the job. I gave up on connecting the proximity sensor while in the midframe, and found it much easier to remove the proximity sensor from the midframe, attach the connector, then thread the sensor into its home in the midframe.

    Steve Williams -

  18. S4IkS64HioO5Ncfm
    S4IkS64HioO5Ncfm
    A3yiXK5Q1b1Rxo1Y
    WCxWN3BDnBpxZcND
    • Este paso muestra cómo volver a conectar el sensor de proximidad durante el montaje.

    • Alinea el borde superior del marco medio de plástico con el teléfono.

    • Utiliza la punta de un spudger para alinear y empujar cuidadosamente el conector del sensor de proximidad en el zócalo de la placa madre.

    • Esto requiere un poco de paciencia y delicadeza. Una vez que tengas el conector en su lugar, también puedes utilizar un dedo para presionar suavemente el conector en el zócalo.

    • Si lo prefieres, puedes quitar el sensor de proximidad del marco medio para volver a fijarlo primero a la placa madre.

    • Usa la punta de un spudger para sacar con cuidado el sensor de proximidad de su hueco en el marco medio. El sensor está ligeramente adherido al marco medio.

    • Retira el sensor del marco medio. Conecta el conector del sensor en el zócalo de la placa madre.

    • Pasa el cable del sensor a través del marco medio y reposiciona el sensor en el hueco. Presiona hacia abajo con el dedo para volver a adherir el sensor al marco medio.

    I tried to do this for about 15 minutes before I went to the alternative. There is a tiny post to hold the sensor in position on the midframe. I pried the sensor from the midframe from the corner opposite that post and then finished this step in 2 minutes.

    jason.naylor -

    Definitely plan b for reconnecting the proximaty sensor…

    noel -

    Plan B ok for me as well. There is a hole below the sensor in order to push it with a sim card opener.

    Laurent GUILLOT -

    Definitely plan B

    Tom Heath -

    Plan B here as well. Also +1 for Laurent GUILLOT's hint.

    Paul Kube -

  19. pOLpXD1YGDfllilE
    pOLpXD1YGDfllilE
    g1mqQtmrMFSUwoLo
    XChYjmeFnVmQdbPH
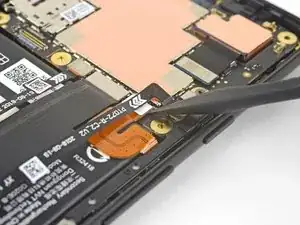
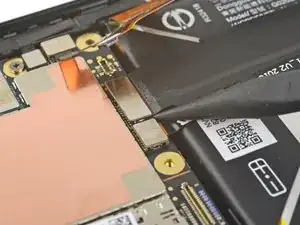
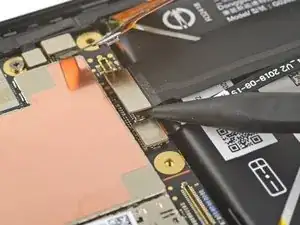
    • Utiliza la punta de un spudger para entrometerse y desconectar el conector de la batería del zócalo de la placa madre.

    • Dobla el cable flexible de la batería ligeramente para que no haga contacto accidentalmente con el zócalo.

  20. PQMpaHIknk31eO5X
    PQMpaHIknk31eO5X
    3bFWRgLt16UlEALo
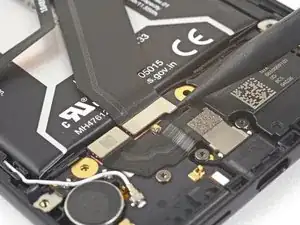
    • Usa la punta de un spudger para levantar y desconectar el cable de interconexión de su zócalo de la placa madre encima de la batería.

  21. gGeXYoKgFJg5MdFO
    gGeXYoKgFJg5MdFO
    TSeFawKLJLWZNVVd
    aSN3bUTuYURBQOKR
    • Usa la punta de un spudger para levantar y desconectar el cable de interconexión del zócalo de la placa hija debajo de la batería.

    • Remueve el cable de interconexión.

  22. LbgEZ6q6h3fRCTpK
    LbgEZ6q6h3fRCTpK
    i1m3BVHuIquya1lK
    vjWMDAfcTAgU5VDR
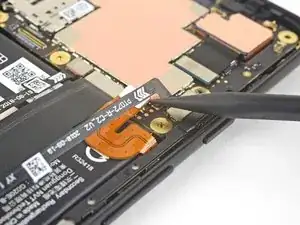
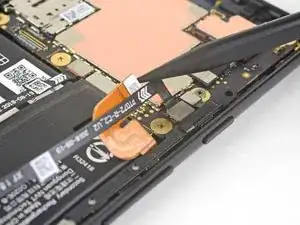
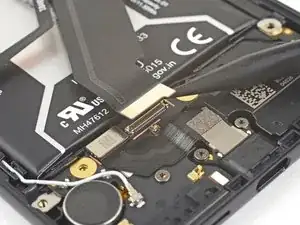
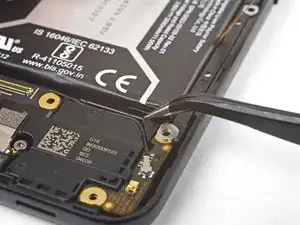
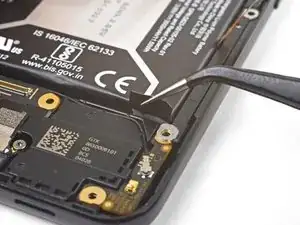
    • Utiliza la punta de un spudger para levantar y desconectar el conector del sensor de presión izquierdo de su enchufe en la placa madre por encima de la batería.

    • Repite el procedimiento para el conector del sensor de presión cerca del botón de encendido.

  23. NGKqyhNf3urOt5bD
    NGKqyhNf3urOt5bD
    EAtUff2MpBPn4PLK
    bIrBZmM23NbrJLlR
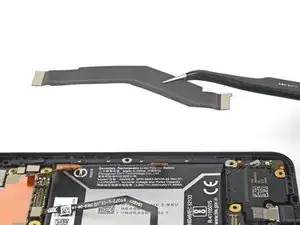
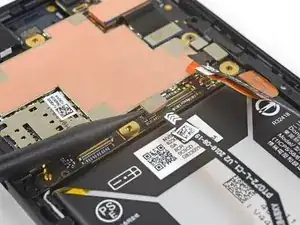
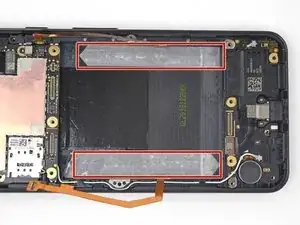
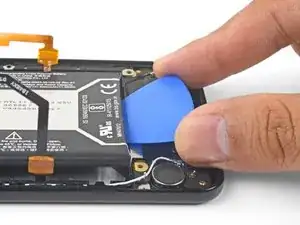
    • La batería se mantiene en su lugar mediante dos tiras adhesivas de liberación elástica.

    • Tira con cuidado de la lengüeta de la tira adhesiva de liberación elástica desde la parte inferior derecha de la batería.

    • Ten mucho cuidado de no perforar la batería con las pinzas.

  24. 54wMVDOGLsjhQ45I
    54wMVDOGLsjhQ45I
    l3C2jfrCAWTdBRUe
    gYSpQcAxnb1auohj
    • Tira de la lengüeta en un ángulo poco profundo (casi paralelo al teléfono) con una fuerza constante. A medida que la tira sale, puedes enrollarla alrededor de tus pinzas.

    • Sigue tirando hasta que toda la tira quede libre.

  25. ZUKLDGCrmQURZdgH
    ZUKLDGCrmQURZdgH
    EyJthTwZJxacfHQL
    ul12WXPS322wdmWU
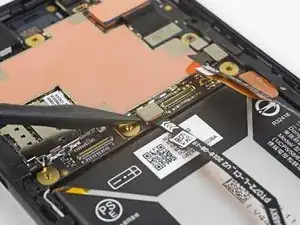
    • Encuentra la segunda lengüeta del adhesivo de liberación elástica en la esquina superior izquierda de la batería.

    • Ten cuidado de no perforar la batería con las pinzas.

    • Toma con cuidado la lengüeta con tus pinzas.

    • Tira de la lengüeta en un ángulo poco profundo con fuerza constante, enrollándola a medida que se alarga, hasta que toda la tira quede libre.

    • Si las tiras adhesivas no se han extraído intactas, inserta una púa de apertura debajo del borde inferior de la batería y haz palanca hacia arriba para aflojar la batería.

    • Si es necesario, aplica un iOpener caliente en la parte posterior del teléfono durante un minuto para aflojar el adhesivo de la batería.
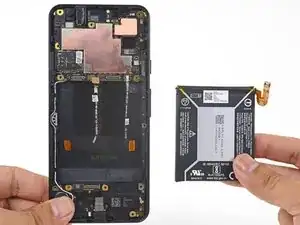
  26. qVxQbsX2QrXVIbv3
    • Remueve la batería.

    • Para instalar una batería de reemplazo:

    • Retira cualquier resto de adhesivo de la batería que quede en el teléfono.

    • Instala adhesivos de repuesto, o cinta adhesiva de doble cara, como la cinta Tesa, en el compartimento de la batería del teléfono donde se pegaba el adhesivo original.

    • Coloca suavemente la batería en su lugar. Conecta temporalmente el conector de la batería a la placa madre para asegurarse de que la batería esté en la posición correcta.

    • Presiona la batería firmemente en su lugar con tus dedos.

    • Desconecta la batería de su placa madre y resume el reensamblaje.

    Der Zusammenbau gestaltet sich sehr einfach, lediglich die Verbindung mit dem Näherungssensor war so ätzend dass ich mir den Teil erspart habe. Den Versuch den Sensor vom Rahmen zu lösen hatte ich leider nicht mehr gemacht ich glaube aber, dass das der bessere Weg ist.

    Ansonsten habe ich den neuen Akku mit Teppichklebeband befestigt und das Display habe ich mit dem noch vorhandenen und anhaftenden Klebstoff wieder auf den Rahmen gedrückt....

    Nach dem der Akku geladen war und ich das Gerät gestartet habe, fand Ein Neustart statt und danach lief das Handy wieder noch nicht einmal eine Display oder Fingerabdrucksensor Kalibrierung wurde gefordert.

    Wenn es jetzt nochmal 2-3 Jahre macht bin ich sehr zufrieden....

    Achtung die Schrauben sind so klein ..., Mir ist eine abhanden gekommen warscheinlich zu tief eingeatmet...., Aber zum Glück geht der Drucksensor dennoch!!!!!!

    Ralph S -

Conclusión

Para volver a ensamblar el dispositivo, sigue estas instrucciones en orden inverso.

Para un rendimiento óptimo, calibra la batería recién instalada:: Cárgala al 100% y manténla cargada durante al menos 2 horas más. A continuación, utiliza dispositivo hasta que se apague debido a que la batería está baja. Por último, cárgalo ininterrumpidamente al 100%.

Lleva tus desechos electrónicos a u centro de reciclaje certificado.

¿La reparación no salió según lo planeado? Consulta nuestra comunidad de respuestas de Google Pixel 3a para obtener ayuda para solucionar problemas.

Arthur Shi

Miembro Desde 03/01/18

219102 Reputación

5 comentarios

There is no link to a battery part to purchase, where can those be found?

Nir Hadjes -

Hi Nir,

We are in the process of getting replacement batteries. Because the phone is so new, supply chains have not gotten to offering replacements yet.

Arthur Shi -

Just completed this took, probably took me an hour and half from start to plugging the phone back in after I was done. Seems to have worked very well! Do be careful pulling the adhesive out from behind the battery. If it breaks, it can be a little trickier to get it out. I had to heat up the adhesive through the back of the phone, but once I did that I was able to very carefully pry the battery out, using a pick as a load distributor on the battery.

Zachary Tolar -

If you are reusing the screen, this guide is too dangerous

1. You should heat the disaply evenly, not only at the right edge:

Using simple physics heating the display from all sideas will reduce the adhesive force of the glue overall, heating only one side will reduce the adhesive force on one side, thus you will need to use more force on the suction cup making things worse.

2. Start from bottom edge:

Most glue is present on bottom and top edges, also there is more space to insert the pick too cut the glue. It will give you more room to work on left and right edges where the gap is very less.

3. Don't use iopener

It's very hard to evenly heat the display with iopener. You basically heat one edge, run to the microwave to heat the iopener then place on the next edge, until then the first edge cools. Use hair dryer, or heat gun they heat the display evenly

Abhijeet Narvekar -

worked pretty smoothly. I would have appreciated better reassembly instructions, particularly for the screen installation. I connected the screen before putting the adhesive on, which was a mistake. Should have mounted the adhesive to the mid-frame first, then mounted the screen cable then peeled off the upper adhesive backing. The proximity sensor was much easier to do the second method. All good though and charging up.

tobywhitfield -