Introducción

Esta guía de reparación fue creada por el personal de iFixit y no ha sido respaldada por Google. Obtén más información sobre nuestras guías de reparación [enlace|Ensuring Quality Repair Information on iFixit|aquí |nueva_ventana=verdadero].

Usa esta guía para quitar o reemplazar una batería gastada en el Google Pixel 4. Si tu batería está hinchada, [toma las precauciones adecuadas.

Para tu seguridad, descarga la batería por debajo del 25% antes de desmontar el teléfono. Esto reduce el riesgo de un peligroso evento térmico si la batería se daña accidentalmente durante la reparación.

Para un rendimiento óptimo, calibra tu batería recién instalada después de completar esta guía.

Precaución: Google advierte que el desmontaje del conjunto de láser frontal podría resultar en una exposición peligrosa a las emisiones de láser infrarrojo invisible. Lee sus advertencias de seguridad aquí.

  1. Hvp1kuHwJo1AClCp
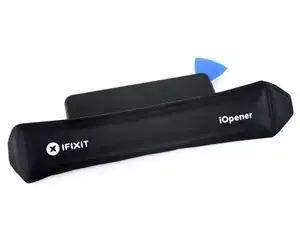
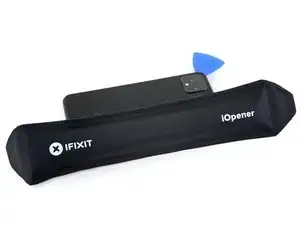
    • Prepara un iOpener y aplícalo al borde inferior del panel trasero durante un minuto.

    • También se puede utilizar un secador de pelo, una pistola de calor o una placa calefactora, pero hay que tener cuidado de no sobrecalentar el teléfono, ya que tanto la pantalla como la batería interna son susceptibles de sufrir daños por el calor.

  2. VK4rWKHPMxSBgjeI
    VK4rWKHPMxSBgjeI
    GS4NhjEZM3SCXJcR
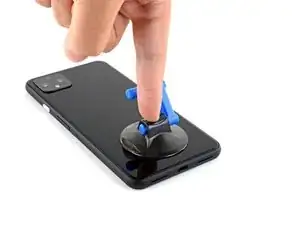
    • Aplica una ventosa al borde calienta del panel trasero presionándolo para crear succión, lo más cerca posible del borde.

    • Si el cristal trasero está muy agrietado, cubriéndolo con una capa de cinta de embalaje transparente puede permitir que la ventosa se adhiera. Alternativamente, se puede usar cinta muy fuerte en lugar de la ventosa. Si todo lo demás falla, puedes pegar la ventosa al panel roto.

  3. mkgNQMFVCGsIjSWI
    mkgNQMFVCGsIjSWI
    ZcuoIwCBSbZQv1Jp
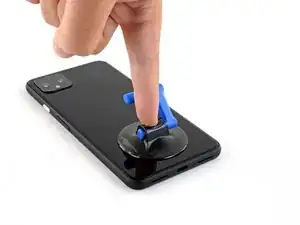
    • Tira hacia arriba de la ventosa con una fuerza fuerte y constante para crear un hueco entre el panel trasero y el marco.

    • Dependiendo de la edad del teléfono, esto puede ser difícil. Si tienes problemas, aplica más calor en el borde e inténtalo de nuevo.

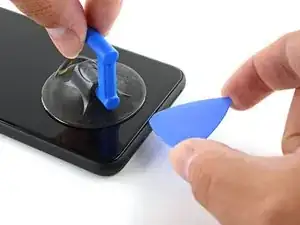
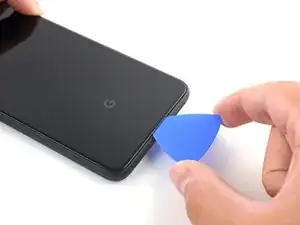
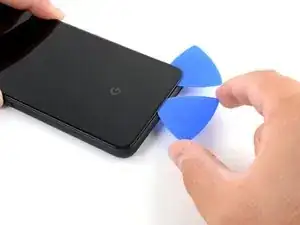
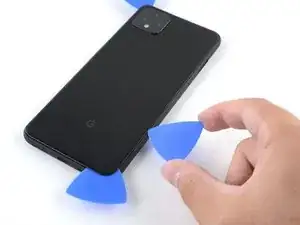
    • Inserta la punta de una púa de apertura en al ranura.

  4. JPn1p4UL3KeHgTlm
    JPn1p4UL3KeHgTlm
    rerDsh5OJUS5DXft
    pq3vfvBe5v5htEJY
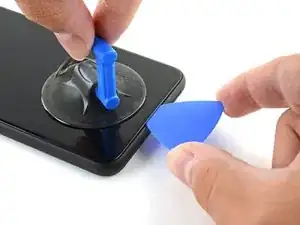
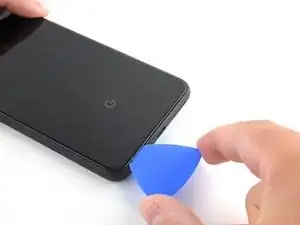
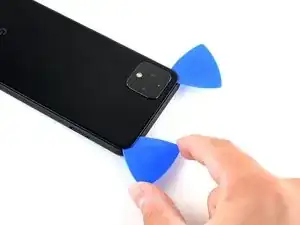
    • Desliza la púa de apertura por la parte inferior hacia la esquina izquierda para cortar el adhesivo.

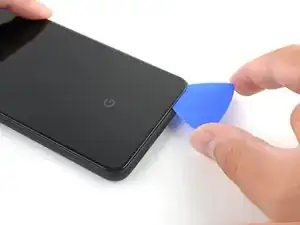
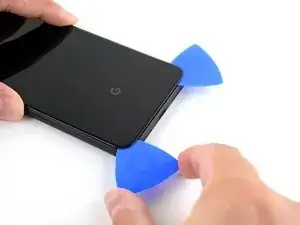
    • Con la púa aún insertada, deslízala desde la esquina inferior izquierda hacia la esquina inferior derecha para cortar completamente el adhesivo del lado inferior.

    • Deje la púa insertada en la esquina inferior derecha para evitar que el adhesivo vuelva a sellarse.

  5. bmjILIENBtpPcpxn
    • Prepara un iOpener y aplícalo al borde izquierdo del teléfono durante un minuto.

  6. GQ32GFimDFPnCaIN
    GQ32GFimDFPnCaIN
    KwMHik5nQYlWV3HD
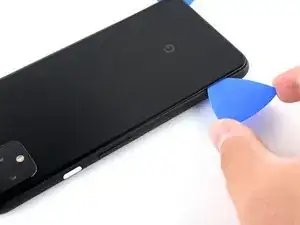
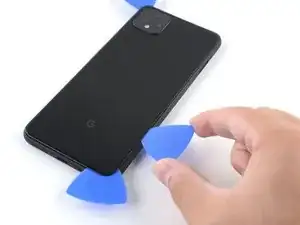
    • Inserta una segunda púa de apertura debajo del panel trasero directamente sobre el puerto de carga.

    • Desliza la púa de apertura hasta la esquina inferior izquierda del teléfono.

  7. 3wRXCsDVIiReHwDt
    3wRXCsDVIiReHwDt
    TsAtoOUWx5OUtfJw
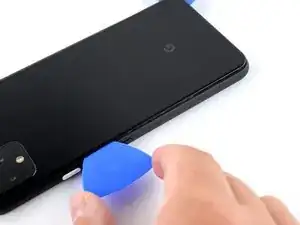
    • Desliza la púa de apertura por la esquina inferior izquierda y por el lado izquierdo del teléfono para cortar el adhesivo.

    • El adhesivo puede ser muy gomoso. Empuja la púa hacia adentro y hacia afuera con un movimiento de sierra para ayudar a cortar.

    • Detente cuando llegues a la esquina superior izquierda, cerca de la cámara, y deja la púa insertada.

  8. qPt1cI1qIYhrYhrk
    • Prepara un iOpener y aplícalo en el lado derecho del teléfono durante un minuto.

  9. 3MaLYKdcXwMGfmHm
    3MaLYKdcXwMGfmHm
    nNHbQECIIHKXCkeA
    dgKAYchvRQfbG4ZJ
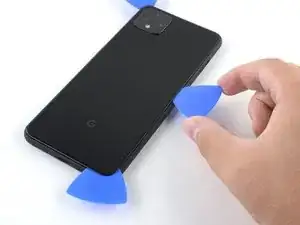
    • Con las dos primeras púas de apertura todavía en su lugar, inserta un tercer púa en la parte inferior del lado derecho.

    • Desliza la púa de apertura hacia la parte superior del teléfono, cortando el adhesivo del lado derecho.

    • Detente cuando llegues a la esquina superior derecha, y deja la púa insertada.

  10. pdXuWBOPnOHID4vo
    pdXuWBOPnOHID4vo
    I1Y2GTUYJV4tftII
    • Desliza la tercer púa de apertura por la esquina superior derecha y por la parte superior del teléfono, cortando la última tira de adhesivo.

  11. HySfZPvhGRSUENZS
    HySfZPvhGRSUENZS
    54ZsgXBi4YYA6vBS
    YMgGdiVcyxhx52e1
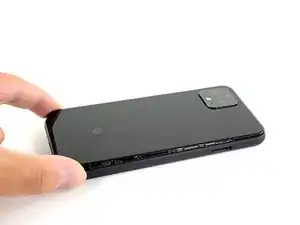
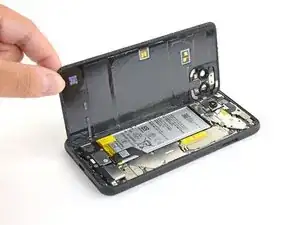
    • Una vez que hayas cortado el perímetro del teléfono, levanta cuidadosamente el borde derecho de la cubierta trasera, abriéndola como un libro.

    • No intentes sacar el panel del todo todavía, ya que todavía está conectado al teléfono.

  12. iFNKHEbN5C5UEQkS
    iFNKHEbN5C5UEQkS
    B5L3GJWi4AWfOxaI
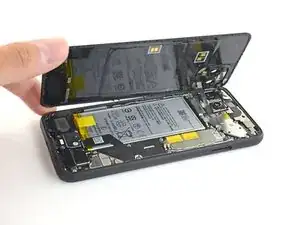
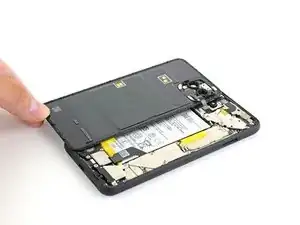
    • Continúa abriendo el panel trasero hasta que puedas apoyarlo en el borde izquierdo del teléfono, teniendo cuidado de no poner ningún tipo de tensión en el cable plano adjunto

    • Durante el reensamblaje, este es un buen punto para encender el teléfono y probar todas las funciones antes de volver a sellar el panel trasero. Asegúrate de volver a encender el teléfono completamente antes de seguir trabajando.

  13. cDEhvBgNJQUZJ2NE
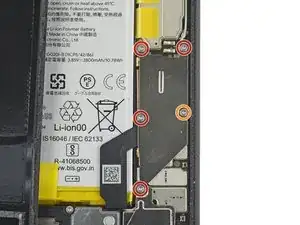
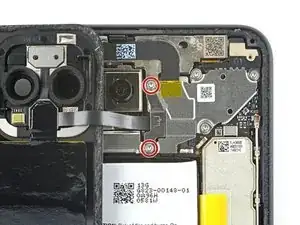
    • Remueve los cinco tornillos T3 Torx que sujetan el escudo del conector de la batería:

    • Cuatro tornillos de 4.0 mm

    • Un tornillo de 2.1 mm

    • A lo largo de esta reparación, haz un seguimiento de cada tornilloy asegúrate de que vuelva exactamente a su lugar de origen.

    Does anyone know where I can get a replacement T3 - 2.1mm screw (the one circled in orange)? I lost this screw during the battery replacement. Had it, dogs fought, had to get up to break it up, and couldn’t find it. I swore I put it on the mat, but I couldn’t find it when I got back to the table. :(

    Nikki Chan -

  14. DpgvSry4M16dxYBf
    DpgvSry4M16dxYBf
    Tgut2yL1UUMP6SWV
    • Usa un par de pinzas para remover el escudo del conector de la batería.

  15. A34sTTTFGUNelCdO
    A34sTTTFGUNelCdO
    SBgRCm6ApbKbQuCr
    • Ten mucho cuidado de no perforar la batería cada vez que uses el spudger cerca de ella

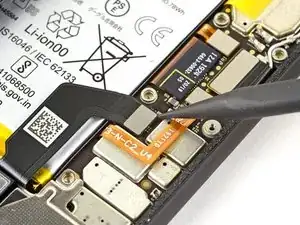
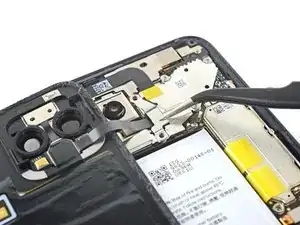
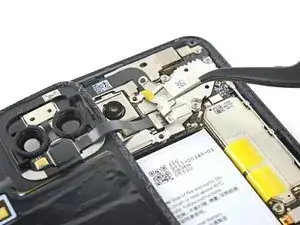
    • Con el extremo puntiagudo de un "spudger", haz palanca en el conector de la batería directamente desde la placa madre para desconectar la batería.

    • Para volver a conectar los conectores a presión como éste, alinee con cuidado y presione hacia abajo en un lado hasta que encaje en su lugar, y luego repita en el otro lado. No presiones en el medio. Si el conector está mal alineado, los pines pueden doblarse, causando un daño permanente.

  16. aSUOVtDFdAFw6ufa
    aSUOVtDFdAFw6ufa
    E22f6ZaNgbVi2xET
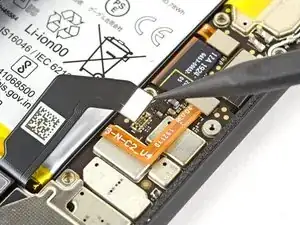
    • Con el extremo plano de un spudger, dobla suavemente el cable de la batería para que no haga contacto accidentalmente durante el resto de las reparaciones.

  17. XhJoRsZlHgH4g5iJ
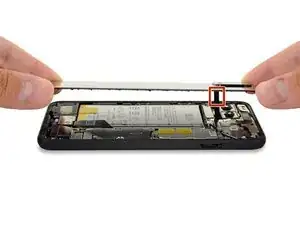
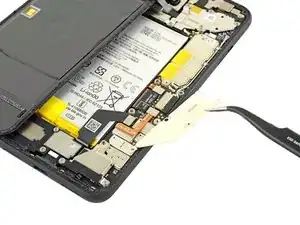
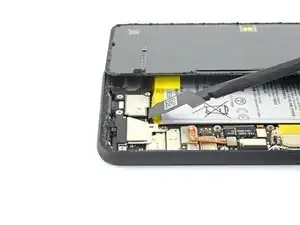
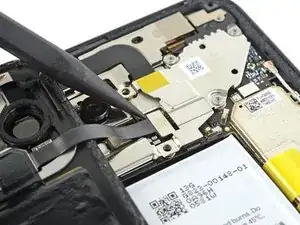
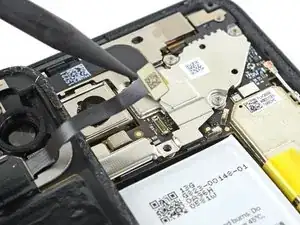
    • Usa un destornillador Torx T3 para quitar los dos tornillos de 4 mm que aseguran la cubierta del conector del panel trasero.

  18. LouDYcubQQ312jgD
    LouDYcubQQ312jgD
    sVhpSIsBpW1NlJCT
    • Usa un par de pinzar para remover la cubierta del conector del panel trasero.

  19. HmoWeEMDomqaJL4d
    HmoWeEMDomqaJL4d
    jhUrNSsNsSZVYYNb
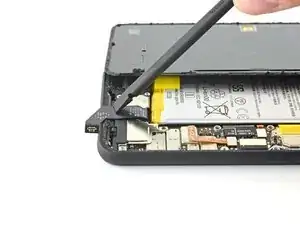
    • Con el extremo puntiagudo de un spudger, levanta y desconecta el conector del panel trasero.

  20. 2XIeuefUddCBWJBf
    • Remueve el panel trasero

    • Antes de instalar un panel trasero de reemplazo, asegúrate de remover todo el residuo del adhesivo del marco del teléfono. Usa una herramienta de apertura y alcohol isopropílico de concentración alta.

    • Si vas a reutilizar el panel trasero, asegúrate de limpiar cualquier adhesivo y aplicar un nuevo adhesivo para el panel trasero.

    • Si estás instalando un panel trasero de repuesto, asegúrese de compararlo con el original.

    Why does the kit not come with the back panel adhesive?

    It's not cheap to get the full kit, and it seems like it's such a small thing to include.

    I ended up re-using the existing back panel adhesive and now a bit worried that it's not as strong and I will have issues with water or moisture getting into the device more easily.

    Mike Y -

  21. vsQtZECg1AKRxDNS
    vsQtZECg1AKRxDNS
    1iKUwRFf55WPTDZ3
    64VaExVETwEM64D5
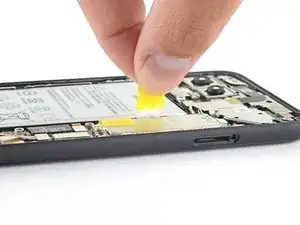
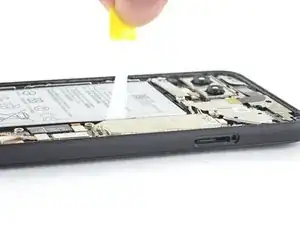
    • Tira de la lengüeta amarilla en un ángulo poco profundo con una fuerza constante.

    • Si el adhesivo se vuelve difícil de tirar, puedes enrollarlo alrededor de un spudger y seguir tirando.

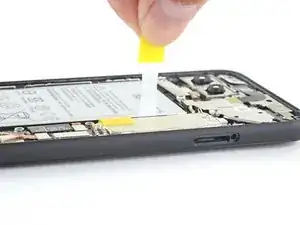
    • Continúa tirando firmemente hacia arriba de la tira adhesiva con una fuerza constante. Si utilizas un spudger, gíralo de vez en cuando para mantener la sección expuesta de la lengüeta de tiro lo más corta posible.

    • Esto podría requerir un montón de fuerza.

    • Estas lengüetas adhesivas son muy propensas a romperse por la mitad durante este proceso. Tire lo más lentamente posible

    • Si las lengüetas adhesivas no se estiran, puede llenar un gotero o una jeringa de plástico con alcohol isopropílico de alta concentración y aplicar unas gotas debajo del borde izquierdo de la batería. Dale un minuto al alcohol para debilitar el adhesivo de la batería.

    • Continúa este proceso para cada una de las tres lengüetas, hasta que todas estén fuera o se hayan partido por la mitad.

  22. l2fY2QMAGemF5Kl1
    l2fY2QMAGemF5Kl1
    IWAyH4OHf2o2dMHr
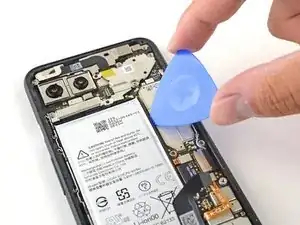
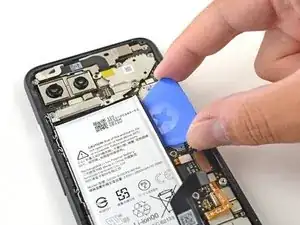
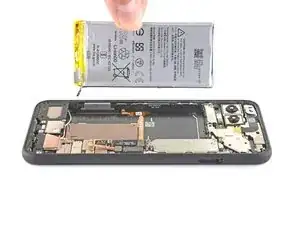
    • Si las lengüetas de la batería se rompieron durante la extracción, inserta una púa de apertura en el borde superior derecho de la batería, cortando el adhesivo por debajo.

    • Aunque hayas retirado las tres lengüetas de la batería, puede resultar útil utilizar un punzón de apertura para sacar la batería.

    • No insertes la púa de apertura en el cable sensor de agarre ni en ningún lugar debajo de él, ya que la púa puede dañar el cable flexible del puerto de carga que se encuentra debajo de la batería.

  23. E5FBP3CiWZbnNiWO
    E5FBP3CiWZbnNiWO
    pcrMlAEWQhMEw6Ub
    • No reutilices la batería si se ha deformado o dañado, ya que hacerlo es un peligro potencial para la seguridad. Reemplázala con una batería nueva.

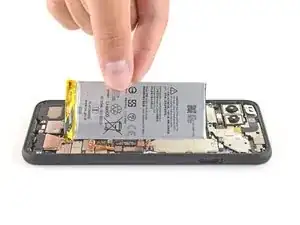
    • Levanta la batería y retírala del teléfono para quitarla. Es posible que debas quitar la batería de las pestañas adhesivas sobrantes

    • Si queda algo de solución de alcohol en el teléfono, límpialo con cuidado con un paño sin pelusa o déjalo secar al aire antes de instalar la batería.

    • Para instalar una batería de reemplazo:

    • Si estás utilizando adhesivo de liberación por estiramiento, aplícalo en la batería. De lo contrario, aplica cinta adhesiva de doble cara o tiras adhesivas precortadas en el receptáculo de la batería del teléfono, con cuidado de no cubrir el cable flexible del puerto de carga. Retira los revestimientos de cinta para exponer el adhesivo.

    • Vuelve a conectar temporalmente el conector de la batería a la toma de la placa madre. Esto asegura que la batería esté bien colocada.

    • Coloca la batería sobre el adhesivo y presiona firmemente.

    • Desconecta el conector de la batería del zócalo de la placa madre y vuelve a montarla.

    There is a better guide for applying the back adhesive. Search out the guide for the pixel 4 back adhesive on this website. It sucks that they didn't include it here, and I messed it up by trying to decipher these generic instructions.

    Joe Gaughran -

Conclusión

Para un rendimiento óptimo, calibra tu batería recién instalada después de completar esta guía.

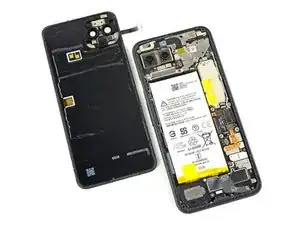
Compara la nueva pieza de repuesto con la original. Es posible que tengas que transferir los componentes restantes o retirar los respaldos adhesivos de la nueva pieza antes de instalarla.

Para volver a montar el dispositivo, sigue los pasos anteriores en orden inverso.

Lleva tus desechos electrónicos a un centro de reciclaje certificado.

¿La reparación no salió como planeaste? Echa un vistazo a nuestra comunidad de respuestas para ayuda en la resolución de problemas.

Carsten Frauenheim

Miembro Desde 10/03/20

88878 Reputación

21 comentarios

If you are gonna sell me your tool kit at least supply a *!&$!&$^ T3 Tork bit to complete the job.

Nicholas Smyth -

Hi Nicholas,

The iFixit kit should definitely have a T3 bit. Please contact our customer support and we will get the issue resolved!

Arthur Shi -

When you put it back together do you need to reheat the adhesive?

Keith P -

Hey Keith,

When putting the phone back together and reinstalling the back panel, we recommend removing the old adhesive and installing new adhesive. The Pixel 4’s back panel adhesive can be found here, and a guide on how to install it can be found here!

If you’d like to reuse your old adhesive, try removing any large uneven chunks, reheat the adhesive, and press the back panel back into place.

Carsten Frauenheim -

Does the kit include replacement battery adhesive strips? I don’t recall seeing it in mine.

Nikki Chan -

Hey Nikki!

The kit should come with a pre-cut adhesive card. You can pull strips from the card to adhere your battery to the frame.

Arthur Shi -

@arthurshi Thanks, I figured as much. However, I thought it would be nice if they included this instead of the pre-cut adhesive card. This way the battery can still be removed the Google factory way. [producto vinculado inexistente o deshabilitado: IF356-191-1]

Nikki Chan -

That’s a great idea! We got the battery strips recently and haven’t had a chance to incorporate them into the kit. We’ll definitely do that.

Arthur Shi -

After putting in the new battery the phone doesn’t turn on. If I plug in a charger I get the splash screen and then the battery icon indicating the charge level (85%). What am I missing here?

Bryan P -

For anyone who may find this later - my issue was the side button connector ribbon cable came loose in the process of removing the old battery. I had to remove the cover for that and then re-seat the connector. I put it all back together and it’s working great now.

Bryan P -

After replacing the battery and putting it back together, the WIFI is no longer working. It only works when the phone is on top of the WIFI router now.

I cleaned the contacts for the WIFI on the back cover, but still nothing. I reformed the contacts on the board and that didn’t help either.

Anyone else have WIFI issues after replacing the battery?

Techie Zeddie -

is the kit available to purchase in ifixit canada? I can’t find the kit for pixel 4 battery replacement.

d02chan -

Replaced the battery in my Pixel 4 about a month ago using this guide. Went well and only took about 45 minutes. Everything works well and is as good as new. Kit came with everything needed to complete the job. Zero complaints from me. Thanks ifixit!

Danny -

Great tutorial and I followed step by step successfully. But I did (and recommend to do) steps 17 - 20 first, and 13 - 16 afterwards. If you remove the back panel first, it is easier to unconnect the battery than vice versa.

Andreas Voss -

I have successfully completed this repair guide twice. Thanks a lot for providing the guide!

One thing: One of the iFixit batteries had a charge level of 1%, so it was about to be completely discharged. If you have other rechargeable batteries in stock, you should charge them from time to time, otherwise they may get destroyed.

Andreas Voss -

Very good guide and the fixit kit is awesome.

All went well and battery works like the first day!

Adrian Frach -

I recently replaced the battery on my pixel 4 and it was a simple fix with this kit. However, my back panel is not remaining stuck down. Particularly the corner around the camera starts to separate when my phone gets hot. This was the first indication that my old battery was bulging, and I'm hoping that's not the case again so soon. (It's only been 3 days!).

It could also be that I didn't properly seal the back. I have been unable to find good instructions for using the supplied back panel adhesive. I had to basically make it up.

Did I need to heat it? Clamp it? How to properly close the back? Yesterday I tried applying the iOpener again, then clamping the back closed and putting the phone in the fridge for 5 min. Doesn't seem like it worked.

Any tips? I could buy another back panel adhesive ($8 cdn) but maybe I can still fix this?

Matt Gorbet -

This guide is great. After reading it, I'm confident enough to buy the parts to fix my phone myself!

Artemis von Otto -

I just changed the battery of my pixel 4 and it was the easiest phone repair I’ve ever done, all thanks to this guide and the kit available. Thanks!

Unai Blazquez -

Ugh! My camera has spots all over it now! I guess my battery is ok though.

Matt Cosentino -

It took me approximately 2 hours to complete this guide including the significant amount of time cleaning the previous adhesives off the phone. In my case I may not have needed to be so thorough but am happy with the results - resealing the back cover had zero issues.

A pretty reasonable repair for someone with steady hands. I am happy to see a significant performance increase from the replaced battery compared to the 4 y/o one.

RJB -