Introducción

Usa esta guía para reemplazar una batería gastada en tu Huawei P20 Pro.

Abrir el Huawei P20 Pro dañará el sellado impermeable del dispositivo. Si no reemplazas los sellos adhesivos, tu teléfono "funcionará normalmente", pero "perderá su protección contra el agua".

Antes de desmontar el teléfono, "descarga la batería por debajo del 25%". Si tu batería está hinchada], no la calientes. Las baterías hinchadas pueden ser muy peligrosas, así que usa protección ocular y ten la precaución debida, o llévalas a un profesional si no estás seguro de cómo proceder.

Necesitarás un "adhesivo de repuesto" para volver a unir los componentes cuando vuelvas a montar el dispositivo.

  1. xpDgRe5sC5HBFNfB
    • Apaga tu teléfono.

    • Usa un iOpener para aflojar el adhesivo debajo del cristal trasero. Aplica el iOpener durante al menos dos minutos. Es posible que desees repetir este paso varias veces durante la extracción de la cubierta posterior.

    • El adhesivo del Huawei P20 Pro es de resistencia moderada, sin embargo, también se puede utilizar un secador de pelo, una pistola de calor o una hornillo si no se puede abrir el dispositivo con el iOpener. Ten cuidado de no sobrecalentar el teléfono, ya que la pantalla OLED y la batería interna pueden dañarse con el calor.

    Ich hatte keinen iOpener. Daher hab ich das P20 Pro für ein paar Minuten auf eine Wärmflasche gelegt. Die Klebeschicht konnte relativ schnell gelöst werden.

    David T. -

  2. qLQSfjVYYigAlcsB
    qLQSfjVYYigAlcsB
    hjc3FkdK5AgAPPkq
    mC32MvX3MBTsGFdH
    • Si el cristal trasero del teléfono está agrietado, es posible que una ventosa no se pegue muy bien. Trata de levantarla con cinta adhesiva fuerte o pega la ventosa en su lugar y deja que se cure para que puedas continuar.

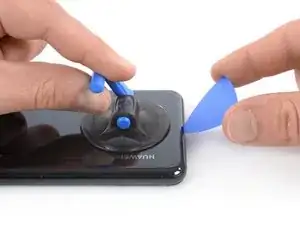
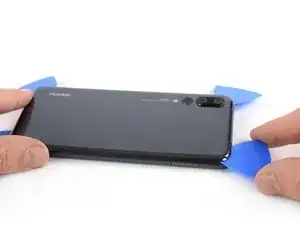
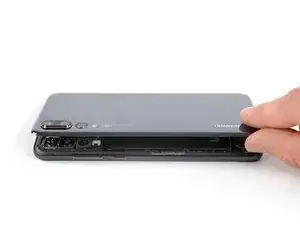
    • Presiona una ventosa en el cristal trasero cerca del borde inferior del teléfono.

    • Levanta el borde inferior con la ventosa, abriendo un pequeño espacio entre el cristal trasero y el marco.

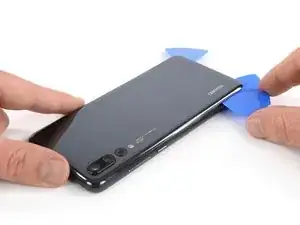
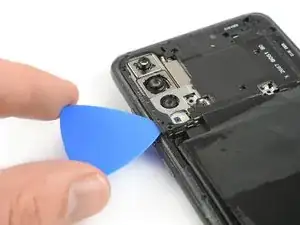
    • Inserta una púa de apertura en el hueco y deslízala hasta la esquina inferior derecha. Déjalo allí para evitar que el adhesivo se vuelva a sellar.

    if the back cover is not broken, i’d suggest NOT to use an opening pick as if the phone was not heated enough, you may crack the glass on the edges. better use the iPlastix, it is thinner and less stressful for the glass.

    Stefano Restuccia -

    It is better to put a peak on the side because the side opens first than the bottom of the phone.

    이정일 -

    I have to agree that is is much easier to start opening from the side. Do read the rest of the guide though, to make sure you won’t hit something when opening it from the side.

    Jacob Cain -

  3. IKE2EPSZlMgYRUCW
    IKE2EPSZlMgYRUCW
    jSnSyxxrd3BcGmOS
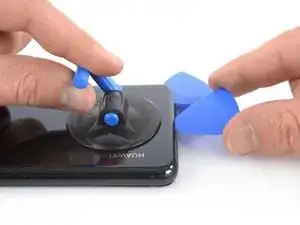
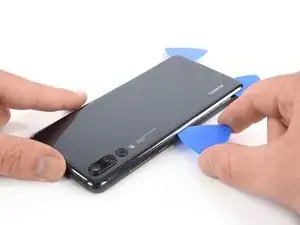
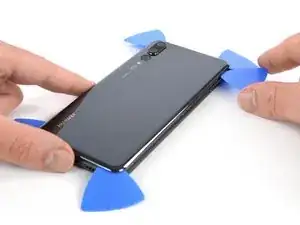
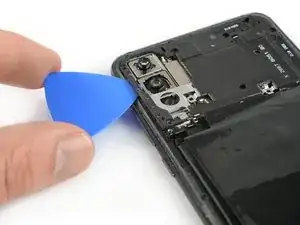
    • Inserta una segunda púa de apertura y deslízala hasta la esquina inferior izquierda. Déjalo allí para evitar que el adhesivo se vuelva a sellar.

  4. grCAZb2cWgyJOJRU
    grCAZb2cWgyJOJRU
    UfGdHGnfRhWEfKlW
    QDqlKGmQ11vwxoMq
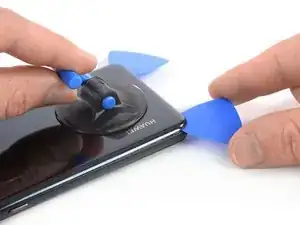
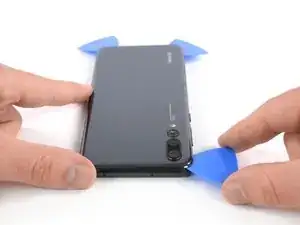
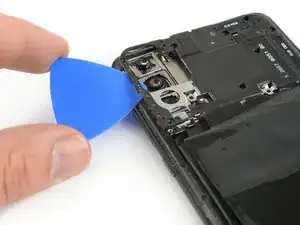
    • Inserta una tercera púa de apertura en la esquina inferior izquierda.

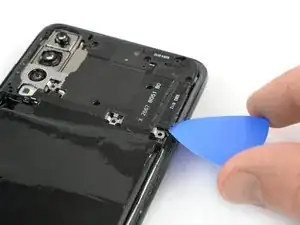
    • Desliza la punta de la púa de apertura a lo largo del borde izquierdo del teléfono para cortar el adhesivo.

    • Deja la púa de apertura en la esquina superior izquierda del teléfono para evitar que el adhesivo vuelva a sellarse.

  5. 6PUVXBeYmsNgNiYq
    6PUVXBeYmsNgNiYq
    wTA6yTcmQWEPFCKs
    • En caso de que tengas problemas para cortar el adhesivo, vuelve a aplicar el iOpener durante otro minuto para aflojarlo.

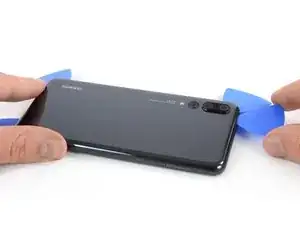
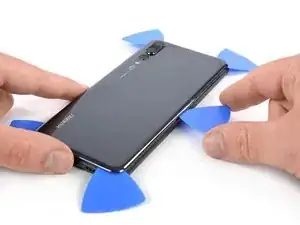
    • Inserta una cuarta púa de apertura en la esquina superior izquierda del teléfono.

    • Desliza la púa de apertura a lo largo del borde superior del teléfono para cortar el adhesivo debajo del cristal trasero y déjalo en la esquina superior derecha.

  6. G4cCQI6GjiWrxlZC
    G4cCQI6GjiWrxlZC
    pJHckn3vUQZZRAHu
    36bUESsEL1YJwUQr
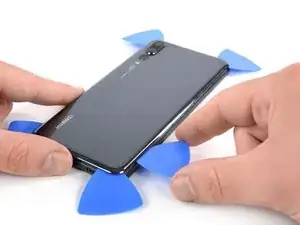
    • Inserta una quinta púa de apertura en la esquina superior derecha del cristal trasero.

    • Desliza la púa de apertura a lo largo del borde derecho del teléfono para cortar el adhesivo restante.

    • No abras el teléfono todavía. El cable flexible del sensor de proximidad sigue conectado a la placa madre.

  7. yiTIZnUSURwQO3Ca
    yiTIZnUSURwQO3Ca
    3mt2kVFnlifkDJCW
    opxbNEBmIBWBSqAl
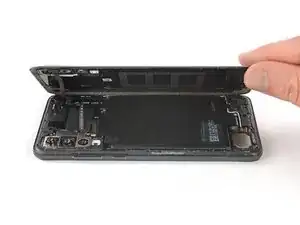
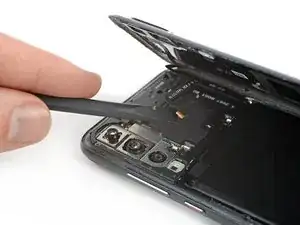
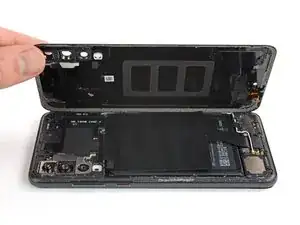
    • Levanta con cuidado el cristal trasero hasta que pueda alcanzar el conector del cable flexible del sensor de proximidad junto al ensamblaje de la cámara trasera.

  8. WgEZU4VYwsBUAGoN
    WgEZU4VYwsBUAGoN
    1nbUiBTHAFOgANc5
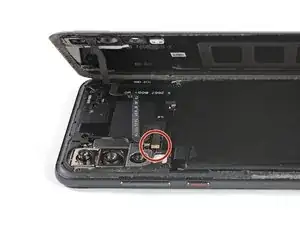
    • Usa el extremo plano de un spudger para levantar y desconectar el cable flexible del sensor de proximidad.

  9. TAPkFQDLU5kJaO3D
    TAPkFQDLU5kJaO3D
    GaqTJ3SVEspFhJqr
    • Remueve el cristal trasero.

    • Antes de instalar el nuevo adhesivo y de volver a montarlo, retira cualquier resto de adhesivo del teléfono y limpia las áreas pegadas con alcohol isopropílico y un paño sin pelusas.

  10. RhCfvCP2nNsJcDAo
    • Remueve los nueve tornillos Phillips #00 (3.4 mm de largo)

  11. 6eEW4dJDhSwQOSxU
    6eEW4dJDhSwQOSxU
    kPKRhlu6aEZiXviX
    eJtdndfDWxgRVGXa
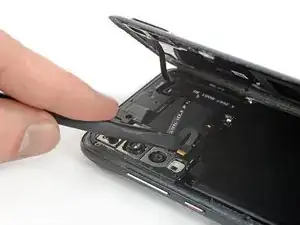
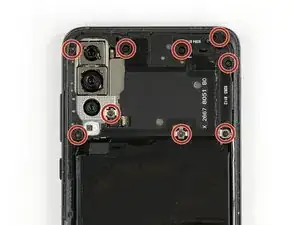
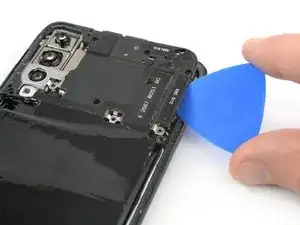
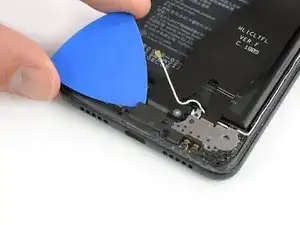
    • Inserta una púa de apertura debajo del lado izquierdo de la tapa de la placa madre que incluye el NFC.

    • Desliza la púa de apertura hacia la esquina superior izquierda del teléfono y gírala para sacar la tapa de sus abrazaderas de plástico.

  12. yI32FgFnGwScjPZ3
    yI32FgFnGwScjPZ3
    UEOwDhKgMsruF5jI
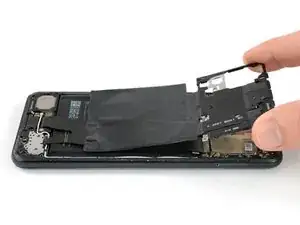
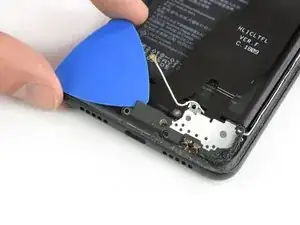
    • Repite el proceso anterior en el lado derecho y gira la púa de apertura para abrir la tapa de la placa madre.

  13. JqyvPfRcMGtBI4mr
    • Remueve la tapa dela placa madre.

    Porque cuando desconectas el nfc no vuelve a funcionar?

    Vanesa Gutierrez -

    a teraz to zopakuj po vychodňarsky

    Lukas Franko -

  14. ijkmoXtESVCJiZeZ
    ijkmoXtESVCJiZeZ
    iTbIVrBFioKSoZRp
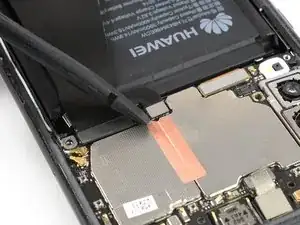
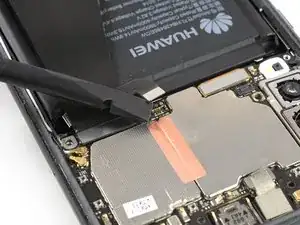
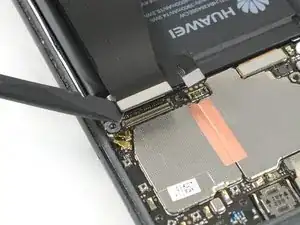
    • Usa el extremo plano de un spudger para levantar y desconectar el cable flexible dela batería.

  15. dRVcbRfvlBEBMQPf
    • Remueve los cinco tornillos Phillips #00 (3.4 mm de largo)

  16. aLJFGIR5qdOSw1nf
    aLJFGIR5qdOSw1nf
    GxQqwFKuQEA4QVIq
    Hn6qxXQTNYlSiOPE
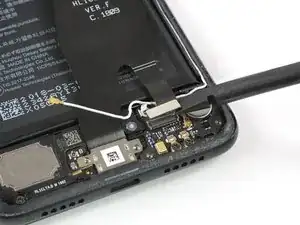
    • Usa un par de pinzas para desconectar el cable de la antena.

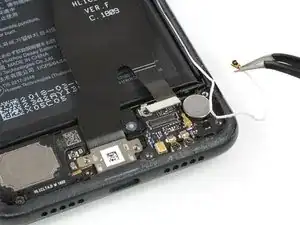
    • Usa un par de pinzas para sacar el cable de la antena de su ruta.

  17. WjFoGJwRuMB2SjEy
    WjFoGJwRuMB2SjEy
    YUxFhmdAprnqkcla
    ZZFy4CJ2jvyUoRpv
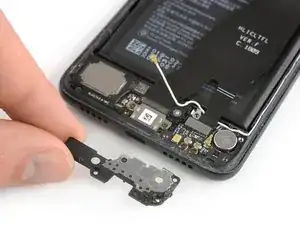
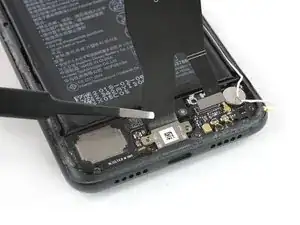
    • Desliza una púa de apertura bajo el lado izquierdo de la tapa de la placa base y empieza a apretarla hasta que puedas agarrarla bien.

    • Retira la tapa de la placa hija.

  18. WFPCFWfVDOyoLHVI
    • Retira los dos tornillos Phillips #00 (3.4 mm de longitud) a ambos lados del puerto USB C.

  19. hIPucWFKCkuUIbly
    hIPucWFKCkuUIbly
    NnOGHYOdvBFAlgSv
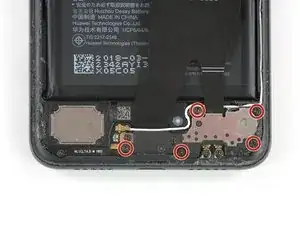
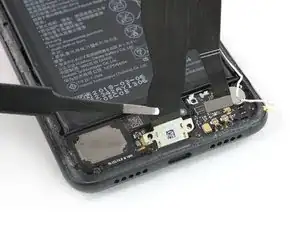
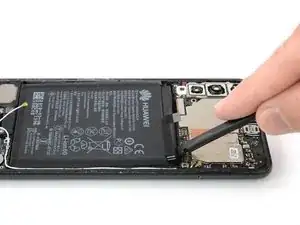
    • Usa el extremo plano de un spudger para hacer palanca y desconectar el extremo superior del cable flexible del puerto de interconexión y de carga de la placa madre.

  20. R3tkatpff1K3MXJ4
    R3tkatpff1K3MXJ4
    kP2cguWrTth5vG3Z
    CSvR2useDMrAq2wC
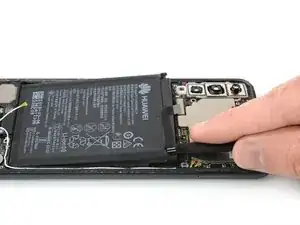
    • Usa el extremo plano de un spudger para hacer palanca y desconectar el extremo inferior de la interconexión y el cable flexible del puerto de carga de la placa hija.

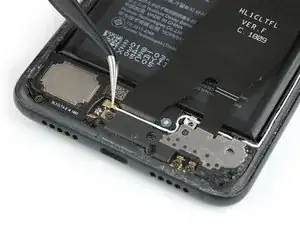
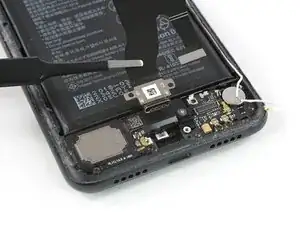
    • Usa un par de pinzas para mover el cable de la antena.

  21. u2X23JxWbnoiFVdf
    u2X23JxWbnoiFVdf
    cFuhFTK2rQ2OvmE2
    RX1hDCP1F36TopEf
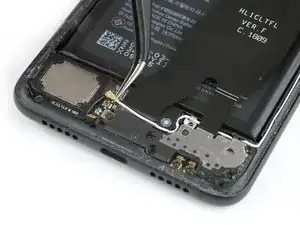
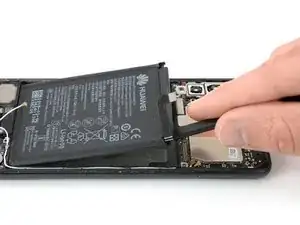
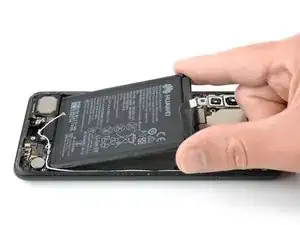
    • Usa un par de pinzas para sacar el puerto de carga de su hueco.

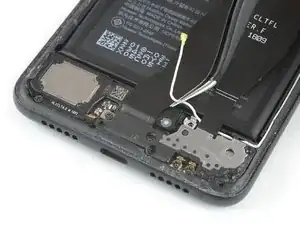
    • Retira el cable de interconexión, incluido el puerto de carga.

  22. MrutJxsHnPn6ZLWX
    MrutJxsHnPn6ZLWX
    Jqm4lP33bbOIZh2D
    5uLnYZp4C1kXeRaa
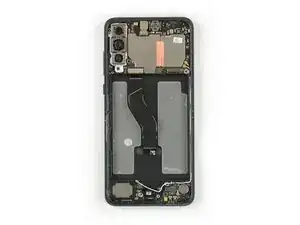
    • Usa un iOpener para aflojar el adhesivo debajo de la batería. Aplica el iOpener en la pantalla durante al menos dos minutos.

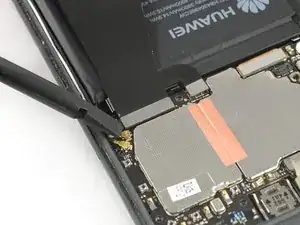
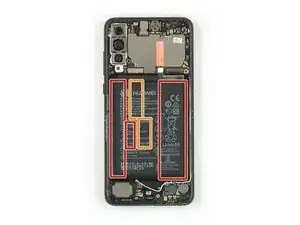
    • En el siguiente paso, sólo aplica el spudger en las áreas marcadas en rojo, que es donde se encuentra el adhesivo de la batería.

    • Evita el área naranja donde pasa el cable flexible de la pantalla.

  23. mJv65aPgEfEkc2ml
    mJv65aPgEfEkc2ml
    2jg5UrUfA5cHN5qT
    e6fOjp1mGvMYQyHs
    • En caso de que tengas problemas para sacar la batería, es posible que el adhesivo no esté lo suficientemente suelto. Se puede colocar alcohol isopropílico debajo de cada esquina de la batería y dejar que penetre durante unos dos minutos para ayudar a debilitar el adhesivo.

    • Intenta no deformar la batería durante el siguiente proceso de extracción. Las baterías de iones de litio de cáscara blanda pueden tener fugas de productos químicos peligrosos, prenderse fuego o incluso explotar si están dañadas. No uses fuerza excesiva ni hagas palanca en la batería con herramientas metálicas.

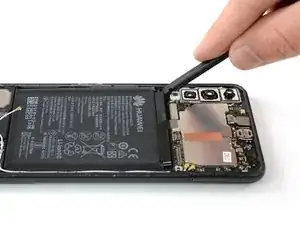
    • Inserta el extremo plano de un spudger en la esquina superior izquierda de la batería y comienza a hacer palanca hacia arriba.

    • Desciende por el lado izquierdo de la batería y afloja el adhesivo con el spudger.

  24. VMGvZvFNcqJBDvPH
    VMGvZvFNcqJBDvPH
    1KnojMrWoon1vFoD
    E4rJNmBrdHD4wAS3
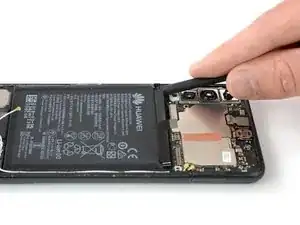
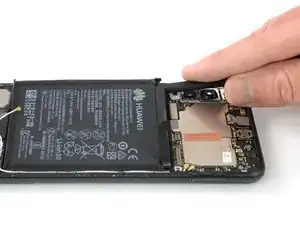
    • Inserta el spudger en la esquina superior derecha de la batería y empieza a hacer palanca hacia arriba.

    • Deslízate hasta el extremo inferior de la batería para aflojar todo el adhesivo.

  25. wNtSuGHbSRmCQeSO
    wNtSuGHbSRmCQeSO
    qSAtinQuCeuAJSiJ
    • Remueve la batería.

    • Nunca reutilices una batería dañada o deformada, ya que ello supone un riesgo potencial para la seguridad. Reemplázala con una batería nueva.

    • Antes de instalar una batería nueva, retira cualquier resto de adhesivo del teléfono y limpia las áreas pegadas con alcohol isopropílico y un paño sin pelusas.

    • Asegura la batería nueva con adhesivo precortado o cinta adhesiva de doble cara. Para colocarla correctamente, aplica el nuevo adhesivo en el teléfono en los lugares donde se encontraba el adhesivo antiguo, no directamente en la batería. Presiona la batería nueva firmemente en su lugar durante 5-10 segundos.

Conclusión

Para volver a ensamblar tu dispositivo, sigue estas instrucciones en orden inverso.

"Si es posible", enciende tu teléfono y "prueba tu reparación" antes de instalar el nuevo adhesivo y volver a sellar el teléfono.

Para un rendimiento óptimo, calibra tu batería recién instalada: Cárgala al 100% y manténla cargada durante al menos dos horas más. Luego, utiliza tu dispositivo hasta que se apague debido a que la batería está baja. Finalmente, cárgala ininterrumpidamente al 100%.

Lleva tus desechos electrónicos a un centro de reciclaje certificado.

¿La reparación no salió según lo planeado? Consulta nuestracomunidad de respuestas para obtener ayuda para la resolución de problemas.

Dominik Schnabelrauch

Miembro Desde 23/11/16

169012 Reputación

17 comentarios

Quando sostituisci la batteria perdi tutti i dati ?

ale -

Hi Ale,

when replacing the battery you won’t lose any data as long as you don’t damage any relevant components for data saving.

Dato che purtroppo non parlo italiano, ho creato questa risposta con l'aiuto di un traduttore. — Quando si sostituisce la batteria non si perderanno dati finché non si danneggiano componenti rilevanti per il salvataggio dei dati.

Dominik Schnabelrauch -

I just watched 2 YouTube guides on doing this and one used an adhesive ring strip while the other used glue from a bottle. Is one solution any more solid than the other?

Also, I don’t have an iOpener so would either isopropyl alcohol or a hair dryer be a good alternative for softening the back cover/battery adhesive?

Finally, I’ve seen and heard people using all sorts of things to pry out phone batteries ~ plastic pry sticks, metal pry tools, and even flat-edge screwdrivers. Which tool(s) are the safest and/or most effective?

TinkerJosh -

Hi TinkerJosh, isopropyl alcohol (>97%) is a valid option for softening adhesive. A hairdryer will also achieve a good result for heating the adhesive. I would advise against using metal tools (such as metal spudgers or flat screwdrivers). To pry out the battery you are better off with opening picks and a plastic card. Either way, try not to puncture or deform the battery to avoid damaging it. Successful repairing

Tobias Isakeit -

Great instruction, Thanks. Is there a part # For the new adhesive gasket, and where can it be bought?

derek5 -

You can actually replace the battery just fine stopping at Step 14. You dont need to take the bottom interconnect baord out at all. Just hold the interconnect ribbon up out of the way, and pry the battery out (carefully) as you would any other phone. The new one can then be refitted following the same method. I would also argue that this task doesnt deserve its “Moderate” dificulty rating… Its the abck cover and 9 screws. That’s all.

dragon2309 -

Yes, stopping at step 14 worked for me too. It was easy to remove the battery with the interconnect ribbon held out of the way. Total time was one hour using an iOpener kit. The whole process was a lot simpler than I had expected.

Steve -

Hi.

I had my battery changed due to bloating and everything works except I get no service unless the power cable is plugged in.

Any ideas where they should be looking as it’s had No Fault Found from two labs now?

Cheers

Phil Teague -

Can someone help me out here, so I have a Huawei mate P20 Pro, and my current battery keeps losing charge and seems to be faulty. I had ordered a battery to replace the faulty one. I swapped out the battery, however, for some reason when I switch on the device it shows the Huawei logo and then switches off. It's so odd I even bought another battery and it does the same thing. But when I put back the original battery that came with the device, the device boots up normally. I feel as though I need to format my device or something, can anyone advise ?

Minhaz -

Hi Minhaz,

sadly I do not have the perfect solution for you but here is some information from the Huawei service I found which might help you:

1. Use a USB cable to connect your phone to a charger or computer. Press and hold the Volume up and Power buttons for at least 30 seconds to enter eRecovery mode. Connect to an available Wi-Fi network and follow the onscreen instructions to restore your phone.

2. If a USB cable is not available, press and hold the Volume up and Power buttons for at least 30 seconds to enter Recovery mode, and then restore your phone to factory settings.

3. Connect your phone to a computer using a USB cable, then press and hold the Volume down and Power buttons for at least 30 seconds to enter Fastboot mode. Then, install HiSuite on your computer, then use HiSuite to restore your phone.

Please take note that your personal data may be erased during the process. Exercise caution when doing so and back up your important data first if your phone can be powered on.

Dominik Schnabelrauch -

I just replaced my battery following these instructions. The only problem I found was the top right side screw was covered by thick rubber (adhesive?) and I had to cut it away with a scalpel to get at the screw underneath. Other than that, it was pretty simple to follow. I used a hot air gun to soften the battery adhesive and it came off easily enough. For some reason the fingerprint scanner isn't recognised anymore. Although that may be a software issue as lots of people are complaining about this happening after software updates.

belfastgooner -

i bought all the tools and parts but it doesnt include the battery adhesive or the back glass adhesive! cmon bruh do i gotta make another order now? cause all of it arrived already. why doesnt the guide include the process of closing it back up?

Grqfes -

I just replaced my battery due to the old one being bloated and it won't seem to stay charging. Is there some hardware lock feature or could it possibly be reconnecting the connectors improperly? I checked twice to make sure they were in place but same problem.

Sakkoh -

I did this, the screen now won't turn on. the backlight still works, it worked when before I went to bed now nothing. what did I do wrong?

Chloe B -

Thank you, this guida was great and I fully managed to change my battery. I would only suggest to use a lot of patience, the hardest part was actually to take off the battery due to all the glue. Good Luck to everyone else who will try this!

Benedetta Capuani -

Any video hot to change whole body?

George Andrew -

Brilliantly-clear instructions

The 'phone has a new lease on life!

Jeff Law -