Introducción

Utiliza esta guía para reemplazar la batería de tu Nexus 5X.

Antes de desmontar el teléfono, descarga la batería por debajo del 25%. Si tu batería esté hinchada, no calientes tu teléfono. Las baterías hinchadas pueden ser muy peligrosas, así que usa protección ocular y ten la precaución debida, o lleva tu teléfono a un profesional si no estás seguro de cómo proceder.

Necesitarás adhesivo de repuesto para volver a unir los componentes cuando vuelvas a montar el dispositivo

  1. hZuBjDNMirRpxDPW
    hZuBjDNMirRpxDPW
    JWDcUTTe2RHKb3Aw
    CyV6ZtdsOoQKFIlC
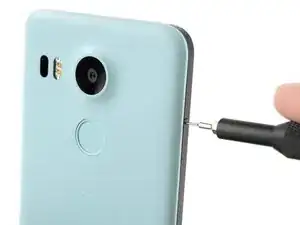
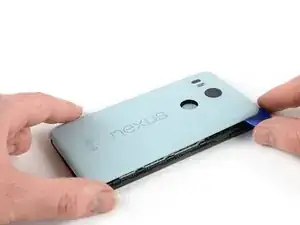
    • Inserta una herramienta de expulsión de la tarjeta SIM en el orificio de la bandeja de la tarjeta SIM, situado en el borde izquierdo del teléfono.

    • Presiona aquí para expulsar la bandeja de la tarjeta SIM.

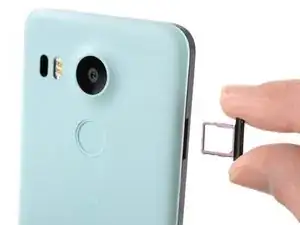
    • Retira la bandeja de la tarjeta SIM.

  2. ICCoMW16jfCrFbcn
    ICCoMW16jfCrFbcn
    sQxCgO3CGWjyHP2m
    MDAUADr5BeVSLDZl
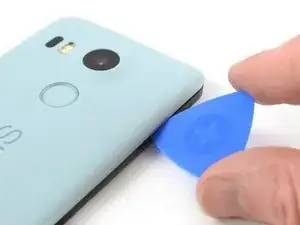
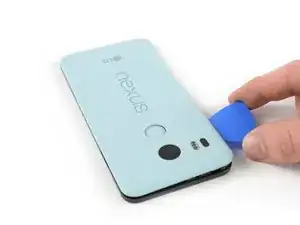
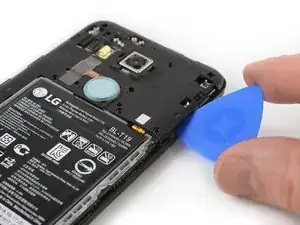
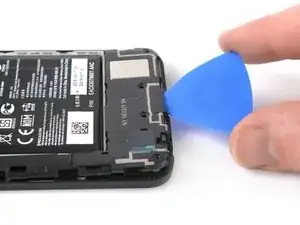
    • Coloca una púa de apertura en la abertura de la ranura de la bandeja de la tarjeta SIM y gírala hacia los lados para soltar el primer clip de plástico que sujeta el panel trasero en su lugar.

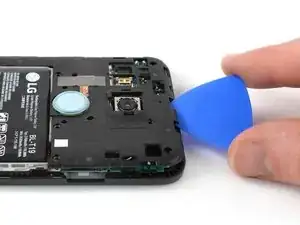
    • Desliza la púa de apertura alrededor del borde superior del teléfono para liberar los clips de plástico que aseguran el panel trasero.

    A guitar pick is a good substitution for the plastic opening tool.

    Sam Sippe -

    Here’s a photo of the location of the 18 tabs that hold the back cover in place

    Steve -

    Twisting sideways didn’t do it for me, but sliding along the edge did. However, at first I didn’t realize that the pick was between the motherboard and midframe, rather than between midframe and back cover like it was supposed to. This led to breaking off a spring-loaded connector on the motherboard, connecting to an antenna (I guess) in the back cover. So far I haven’t noticed any reception issues, but I can’t say for sure.

    In essence: be careful to get the pick towards the back cover, and not “straight in” under the midframe.

    Hampus -

  3. afVYqSRSsfYK5iHi
    afVYqSRSsfYK5iHi
    pIWZAi2MnVlPLqqa
    WCXoRcGIOO46lSW1
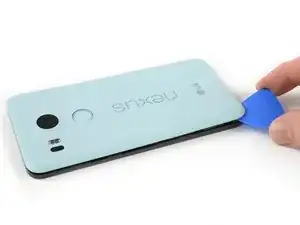
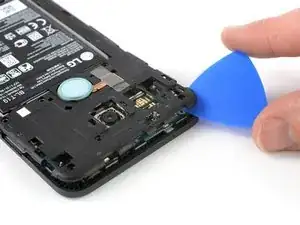
    • Continúa deslizando la púa de apertura alrededor de todos los lados del teléfono para liberar todos los clips que aseguran el panel trasero.

  4. elaUMDhpoLaSyiLC
    elaUMDhpoLaSyiLC
    xC4oPmeXKWyCeJYD
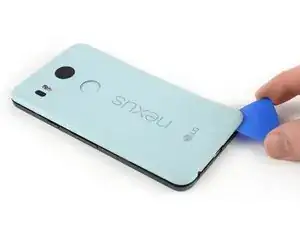
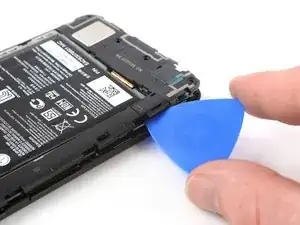
    • Inclina la púa de apertura para levantar un poco el panel trasero.

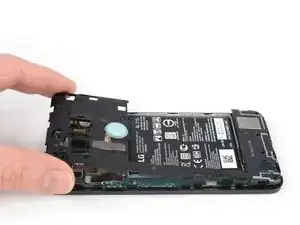
    • Hay dos clips de plástico más junto al sensor de huellas digitales. Suéltalos tirando suavemente del panel trasero.

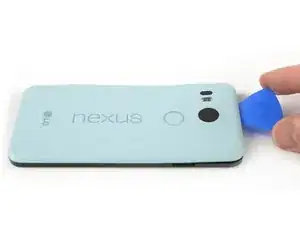
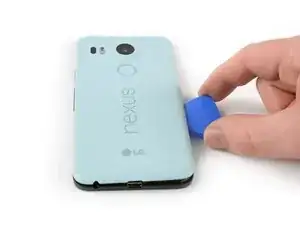
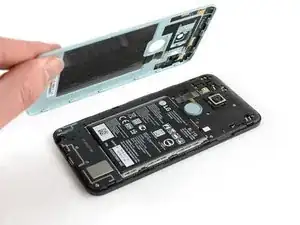
    • Retira el panel trasero.

  5. SLBb5Cl3QMGTDxxc
    • Remueve los diez tornillos Phillips de 3.6 mm que sujetan el marco medio.

    Some models use a Y1 screw head.

    Kyle Wright -

  6. kbJbMKZvCYpi5Ym1
    kbJbMKZvCYpi5Ym1
    SBDl6Qt1OeRUcuOJ
    • Inserta una púa de apertura en la ranura de la bandeja de la tarjeta SIM y gira la púa de apertura hacia un lado para liberar los clips de plástico.

    The photo seems to show that the person is opening from the top, which is the opposite of your advice. So, just want to be clear.

    Robert Konigsberg -

    yes, open from bottom first... the pic above shows the finished product after reaching top of phone. I found it best to actually start close to the right of the usbC connector. Pushing inbetween the 2 tabs and up will release the shell.. then work clockwise.

    Chris Mayberry -

    Chris, your advice to start to the right of the usbC connector was excellent, thank you!

    Robert Konigsberg -

    I found that my middle panel was already broken at the narrowest part just to the left of the 2-D scan code on the battery, perhaps from some ham-fisted previous repair. This seems of little consequence, there do not seem to be any electrical connections running through this part.

    Wiley Sanders -

    After a long amount of prying, I discoved that, if used gently, a jimmy can really help get the plastic off

    Timothy Owens -

    I could not remove the cover with the opening tool but had success with the opening picks (the triangle parts). Just slide them under the cover and gently bend and twist the pick to release the cover from the locks. By the way: it’s perfectly normal for the bottom cover part to come loose from the top cover part. It’s designed that way (they interlock).

    Marco Miltenburg -

    Here’s a photo of the location of the 20 tabs that hold the middle assembly in place, and the pry angle needed.

    Steve -

    This is the scariest part but it is the same process of taking a bike tire off the rim: lift up one part of the cover then put a wedge under the lifted section to hold it up then continue around the frame lifting it up and holding it up with the blue picks. You’ll find that after you life the bottom you can wriggle free the rest by hand.

    The 10 screws came out quickly using the IFIXIT.com magnetic screwdriver.

    mcguinness.david -

  7. MPaVeGZ53Yant1bX
    MPaVeGZ53Yant1bX
    1EYFK4Jmr4ZkYCXc
    • Continúa deslizando la púa de apertura alrededor de la parte superior del marco medio para soltar los clips de plástico.

  8. UnqADRuHrCdSINRZ
    UnqADRuHrCdSINRZ
    LfjUs6JGfUqrEVjA
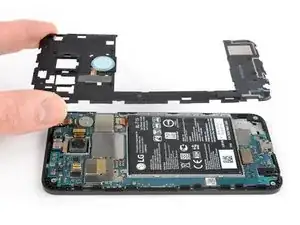
    • Utiliza la púa de plástico para abrir los clips de plástico en el borde largo del marco medio y en el borde inferior.

    • Asegúrate de que los clips en el borde largo estén sueltos. El marco medio es propenso a romperse aquí si no se desconectan correctamente.

  9. A65jPFCZQIiwZlZb
    A65jPFCZQIiwZlZb
    CLJTmiqEsupw21Yg
    • Asegúrate de que todos los clips estén libres.

    • Retira con cuidado el marco medio.

  10. Ifqg6MTxcFQ6GQ2l
    Ifqg6MTxcFQ6GQ2l
    kgXBZmhgQmKKwHKW
    • Usa el borde de un spudger para hacer palanca y desconectar el cable flexible de la batería ubicado en la parte inferior derecha de la placa madre.

  11. uqrJb2kFfeGpZ2yo
    • Usa un iOpener para aflojar el adhesivo debajo de la batería. Aplica el iOpener en la parte posterior del teléfono durante al menos dos minutos.

    And all that in 3 minutes.

    No way!!!

    Chris Hibbert -

    Yeah, three minutes is probably not very realistic. I updated the time estimate to something a bit more conservative. :)

    Jeff Suovanen -

    The adhesive on mine was also really strong.

    I had to use a heat gun at about ~110F while applying pressure to get the battery to release

    Brian Stambaugh -

    Seriously? All this, just to change the battery?

    Robin Gregory -

    Your comment only makes sense in 2017.

    Krzeszny -

    I was able to spudge the battery out from the bottom edge using a “custom” tool made from an old credit card cut to a width slightly less than the bottom of the battery.

    Wiley Sanders -

    Great tip - I used a credit card too without the need for a heat gun.

    Sam Sippe -

    No need to remove the battery if you only want to get the mainboard out. Just release all the connectors

    Wim Brouwer -

    I’d recommend trying to remove the battery without using heat as my phone failed with the infamous “boot loop” problem less than a week after I changed the battery.

    chilton cabot -

    Following these helpful comments, I used isopropyl alcohol and the spudge to get the battery loose, no heat.

    hans haucke -

    Another data point: to be safe, I used the iOpener according to instructions (30s, ~900W microwave, the iOpener just started to expand a bit) and added some isopropyl alcohol. The battery came out without too much effort in a few minutes. No reheating needed, used the spudger from the kit.

    The pre-exiting adhesive seemed good enough still, so I didn’t bother removing and re-applying.

    Hampus -

    I also used isopropyl alcohol only without heat. I got the spluger into the corner just a little to give a small space between the battery and the surrounding plastic enclosure for the battery. Then soaked a corner of a paper towel with a little alcohol. Tipped the phone and squeezed some of the alcohol into the space and let it drain down the edge of the battery. Waited about 60 seconds and then pryed gently with the spluger on that side. It came up pretty easily. Once I got one side of the battery up, I soaked the paper towel again tipped the phone so the edge that was still stuck was down, and squeezed alcohol all along the edge that was freed to let alcohol get down to the tape that was still holding. Waited another minute and then pried gently again and the rest of the battery came right up. The whole procedure took maybe 4-5 minutes.

    Jonathan Stucklen -

  12. GrPYrJccvZbJsOrg
    GrPYrJccvZbJsOrg
    J6QOY1pDtjdXw6GR
    • Haz todo lo posible por no deformar la batería durante el siguiente proceso de extracción. Las baterías de iones de litio de cáscara blanda pueden tener fugas de productos químicos peligrosos, prenderse fuego o incluso explotar si están dañadas. No uses fuerza excesiva ni hagas palanca en la batería con herramientas metálicas.

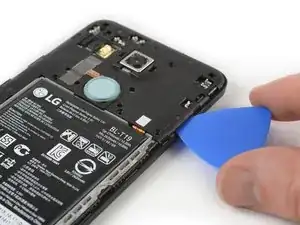
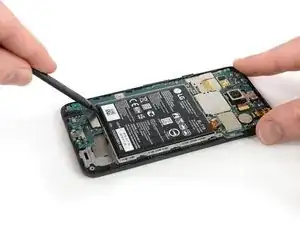
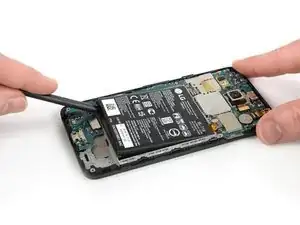
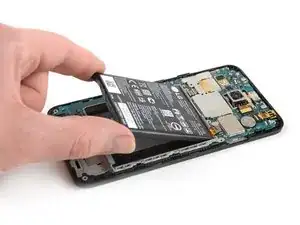
    • Inserta el extremo plano de un spudger debajo de la esquina inferior izquierda de la batería y haz palanca suavemente hacia arriba.

    • El adhesivo sólo se encuentra debajo de los bordes de la batería, por lo que no hay necesidad de hacer palanca debajo de su centro.

    • Si tienes problemas para sacar la batería, es posible que el adhesivo no esté lo suficientemente suelto. Puedes aplicar un poco de alcohol isopropílico debajo de cada esquina de la batería y dejar que penetre durante varios minutos para ayudar a debilitar el adhesivo.

  13. lytcTWZeVOcpIoWh
    lytcTWZeVOcpIoWh
    mqywwCDXvRK1akDB
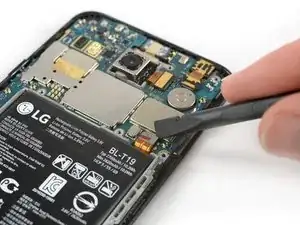
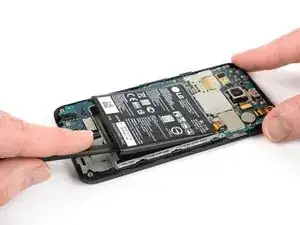
    • Inserta el extremo plano de un spudger debajo de la esquina inferior derecha de la batería y haz palanca suavemente hacia arriba para aflojar el adhesivo restante.

  14. vP1iMlVEupJeYEQp
    • Retira la batería.

    • No vuelvas a utilizar la batería después de haberla retirado, ya que ello supone un riesgo potencial para la seguridad. Reemplázala por una batería nueva.

    • Antes de instalar una batería nueva, retira cualquier resto de adhesivo del teléfono y limpie las áreas pegadas con alcohol isopropílico y un paño sin pelusas.

    • Asegura la batería nueva con adhesivo precortado o cinta adhesiva de doble cara. Para colocarla correctamente, aplica el nuevo adhesivo en el teléfono en los lugares donde se encontraba el adhesivo antiguo, no directamente en la batería. Presiona la batería nueva firmemente en su lugar durante 5-10 segundos.

    If you use the ifixit heat-pad to remove the battery and gently lever the battery away from the internal glue then the original glue will still be functional.

    Edmund Cramp -

Conclusión

Para volver a ensamblar tu dispositivo, sigue estas instrucciones en orden inverso.

Si es posible, enciende el teléfono y pruebe su reparación antes de instalar el nuevo adhesivo y volver a sellar el teléfono.

Para un rendimiento óptimo, calibre la batería recién instalada: Cárgala al 100% y manténla cargada durante al menos dos horas más. Luego, utilízala hasta que el teléfono se apague debido a que la batería está baja. Finalmente, cárgalo ininterrumpidamente al 100%.

Lleva tus desechos electrónicos a un reciclador certificado R2 o e-Stewards.

¿La reparación no salió según lo planeado? Consulta nuestracomunidad de respuestas Nexus 5X para obtener ayuda para la resolución de problemas.

Dominik Schnabelrauch

Miembro Desde 23/11/16

168982 Reputación

29 comentarios

I replaced the battery with a stock LG OEM replacement. Now, 1. Lighting bolt indicator doesn't appear. 2. Doesn't read "Charging" or "Charging Rapidly" on the lock screen. 3. I lost rapid charge; it charges slooooowly. Help!

Thom -

Is the battery supposed to be one hard piece or is it supposed to be squishy as in bendable?

danchee -

I replaced the battery, but I'm still not getting an led or anything on the screen to show it's charging. What else could be the issue?

pocketdrummer -

All went smooth here. Pulled the mainboard out and was able to gently pry the battery free without heat. Rapid charging is working fine. I got an LG battery off Amazon. Didn't cost much more than knock-offs.

Andrew Cook -

worked great for me, in the end used brute force to get the battery off with a terrifying crack.

Terrence Benade -

I replaced screen + battery at the same time (using ifixit replacement battery and display assembly). All went well, pretty easy to do, and the new display looks great. However, my battery appears to be stuck at 50%. I suppose I can pop loose and then try to re-seat the connector. Probably won't help. Has anyone else experienced this issue? Any hints/ideas on how to fix it? Thx

dave white -

Great guide - I used a hairdryer for the heat... Was quite concerned the phone was getting very hot but in the end the battery did start to become unstuck. I also removed the motherboard (disconnecting the two connectors to do so) following Andrew's comment, but had to use heat in the end. Patience is a virtue... All working once back together again; I got a genuine LG replacement on eBay for £15. Hopefully the battery will last a day now - time will tell!

Ollie Steer -

All worked - hardest part was getting the back off - the fixit tool isn’t great to be honest. Hairdryer a better option then the iOpener for getting the battery out.

Rob Wood -

thank you,,,, your instructions were clear and to the tee. Worked like a dream. It was a little scary at first, however, I took my time and did it! thank you again.

TracyN

Tracy Nikol -

Thank you … your instructions were clear and to the tee. It was a little intimidating at first, however, I took my time and was able to switch out my old battery for the new one without any problems. Thank you again.

Tracy Nikol -

Thank you very much! Very clear instructions.

I didn’t have a iOpener kit, so I used the kind of things to keep you warm that you put in the microwave. It’s not too hot so it can’t damage the phone but warm enough for the glue to slightly melt. Then I used a dental floss to separate the adhesive from the battery.

But when I reassembled the phone the fingerprint reader was not working. It was because I damaged the connections which are on the top left above the battery (opposite side of where the battery is connected (step 6). I managed to fix it but I’d advise to be very careful any time you manipulate the phone when removing the battery.

Remi -

Thanks for the guide. I replaced the battery (official LG replacement) last week and so far everything is working properly. Overall it’s not difficult. The only step which is a bit more challenging, is removing the battery itself as it’s “squishy” and the adhesive is rather strong.

But nevertheless I would only do it if really is needed & make sure to take enough time to follow the process carefully. After all it’s clear the phone is not made to dis/re-assemble often as it has a lot of fragile parts (in particular in step 5)

Dieter Termote -

Worth noting that the flat cable between battery and main board is slightly longer than required and arrives straight.

You need to put a fold in it for it to fit, which is easier to do before you place the replacement battery in the sticky slot.

Travis Dixon -

Also that the back panel clips to the camera, not the finger print panel

Travis Dixon -

I was able to slightly pry up one side of the battery, and then used a small hairdryer to loosen the rest of the glue. By slowly and gently prying as I heated the battery, it released from the glue without damage to t he phone. I proceeded with that step very carefully and it all went well. The instructions were very helpful. Everything is working perfectly.

Gary Dolan -

Did everything, no sweat. Battery level now stuck at 50%. Ideas?

spencer.andre -

Just a  thank you. Good job

jay Smithers -

Same here. Battery level stuck at 50% after battery replacement.

Darren Chapman -

Thank you so much. I’ve used this a few times with some issues on my phone, once again saving my bacon!

Heather -

Geht keine 5 Minuten, Danke!

Andreas Soder -

It took less than half an hour to do this, and the phone is back up and running like it was never taken apart.

Outstanding tutorial. The only tip I can really suggest, is take your time, and be patient. It also might help to carefully use an IFixit prying tool to work the corners of the outer case loose, very carefully.

Thanks :)

Brian “Retina Burner” Turner -

Took about 15 minutes. Thanks so very much. With your info I was not treading into the unknown. P.S. I found it easier to to connect the battery and then put the battery into the case.

Robert H Smith -

Much easier than I expected. Took about 10 minutes.

Using a credit card as a spudger to remove the old battery worked like a charm. Didn’t need to use any heat!

Thanks to all for the great suggestions.

richardfrisch -

This worked great for me as well, however now suddenly the sim slot does not detect my sim card anymore :(

Jeroen Tuijn -

Replaced with battery from iFixit. Remains to see if capacity improved. Volume down button did not work after the replacement. Upon further inspection, I found a dislocated resistor on my desk while cleaning up. Sad days.

Opened the sim tray with a 0.1” pin header. Opened back cover clips with the back lever of a pair of nail clippers. Removed battery by heating it with a soldering station heat gun on the lowest setting for a few seconds, then prying it up starting under the flex cable. Experienced the “terrifying crack” mentioned by another commentor.

On the volume button, looks like this reddit commentor had the same issue: https://old.reddit.com/r/nexus5x/comment...

So please be careful with the volume buttons if you’re doing this replacement.

Daniel Walters -

It seemed to me that the biggest trick to completing this was getting the metal ribbon on the battery to connect precisely to that spot on the phone. It took me several tries to get the ribbon in the right spot to make the connection. A tip… I could tell that it wasn’t connected properly when I couldn’t turn the phone on, but I also wondered maybe the battery wasn’t “pre-charged” enough to register… I plugged the phone in and got the lightning bolt, but it did not indicate it was charging, and so I tried again to connect the ribbon correctly. It took several tries before I saw that the lightning bolt indicator showed it was charging before I reassembled the rest of the phone.

George Bingham -

This is a superb guide - thanks so much for pulling it together! I did it step by step with my 10 year old son, revitalising my 5 year old Nexus to hand down to him. It’s a good lesson all-round. Spend $25 for an original LG battery (rather than $500 of my hard earned wage), use this excellent and easy to follow guide and keep another perfectly usable piece of tech out of landfill. I didn’t use any heat guns, just a basic spudger that came with the battery, a guitar pic for the SIM slot and no shortage of patience with firm but supple pressure - both to get the case off and the battery out. Successful rapid charging of the battery and all working as expected. Really happy with it. Thanks again!

Craig -

I have a tray full of tools for this work - following the instructions in sequence took less than 30 minutes with no problems at all and the phone is now fully functional again. The internal design of the Nexus 5X phone is much better than more modern phones and the battery replacement is relatively simple and easy.

Edmund Cramp -

everything you just said. Wish all modern phones were this easy

Jaxon Lee -