Introducción

Usa esta guía para reemplazar una batería gastada o muerta en tu Galaxy A50.

Si tu batería está hinchada , toma precauciones apropiadas.

Por tu seguridad, descarga la batería por debajo del 25% antes de desmontar el teléfono. Esto reduce el riesgo de un evento térmico peligroso si la batería se daña accidentalmente durante la reparación.

Necesitarás adhesivo de repuesto para volver a colocar los componentes cuando vuelva a montar el dispositivo.

  1. Tter6xHe42gG2BMm
    Tter6xHe42gG2BMm
    sR6YlmvO5nGrTnXR
    bRDLPC3aeq1gXgWx
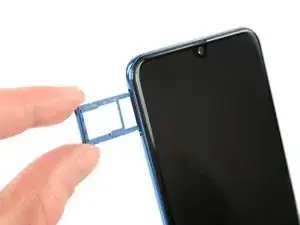
    • Inserte una herramienta de expulsión de la tarjeta SIM, una punta de expulsión de la SIM o un clip de papel enderezado en el orificio de la bandeja de la SIM situado en el lado izquierdo del teléfono.

    • Insertar traducción aquí

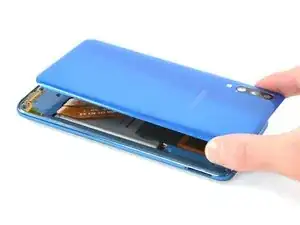
    • Retira la bandeja de la tarjeta SIM.

    • Cuando reinsertes las cartas, asegúrate de orientarlas correctamente en la bandeja.

  2. hQqQMV2uIHPIJMNq
    • Comienza por apagar el teléfono.

    • Calienta un iOpener y aplícalo a la tapa trasera para ablandar el adhesivo.

    • El adhesivo del Galaxy Samsung A50 es muy fuerte. También se puede usar un secador de pelo, una pistola de calor o una placa caliente si no se puede abrir el dispositivo con el iOpener. Ten cuidado de no sobrecalentar el teléfono, ya que tanto la pantalla AMOLED como la batería interna son susceptibles de sufrir daños por calor.

    Überhitzen das Gerät nicht, das AMOLED-Display und der Akku sind sehr hitzeempfindlich.

    Nur ein kleiner Tippfehler-Hinweis: (Überhitze das Gerät nicht)

    Jonas Hahn -

    OK, korrigiert. Das kann übrigens jeder machen, iFixit ist ein Wiki.

    VauWeh -

    how long should the heat pack be used for?

    David Hall -

    The heat pack is in the wrong position in photo - the glue that you are heating is actually all around the edge of the phone!

    David Hall -

  3. SaR1nWctkfCekyW2
    SaR1nWctkfCekyW2
    F6WgLBgnrW1bSZdS
    wMENyH4P5ZXwdQXU
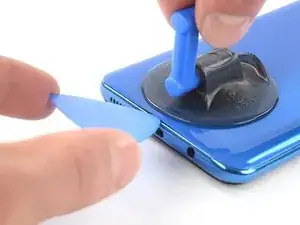
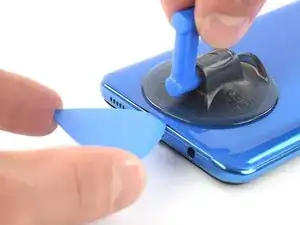
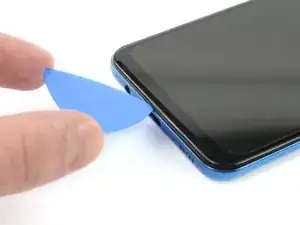
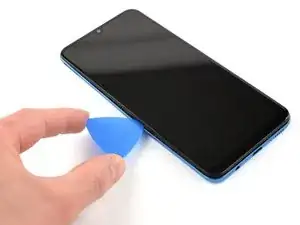
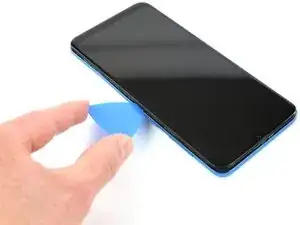
    • Inserta una púa de apertura en la parte inferior del teléfono, cerca del puerto USB-C.

    • Si no puedes pasar entre la cubierta trasera y el marco medio con la púa de apertura, puedes usar una manija de succión o una cinta adhesiva resistente para levantar la cubierta trasera y crear un espacio.

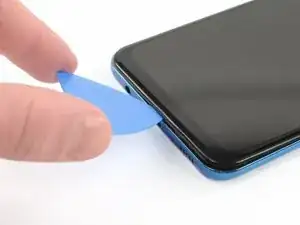
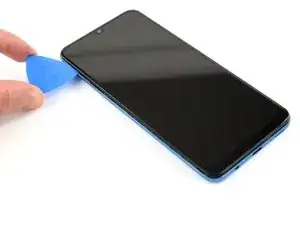
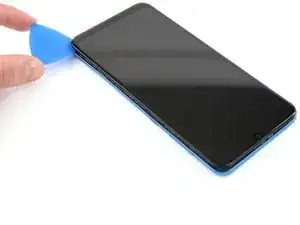
    • Desliza la púa de apertura hasta la esquina inferior izquierda.

    It would be much better to attempt the opening from the top of the phone as there is a delicate flex PCB antenna at the bottom just where you stick the pick in that can get damaged.

    David Hall -

  4. J6hoMZYSHdAR3St6
    J6hoMZYSHdAR3St6
    6lcmRp4Rgrvs5Mgv
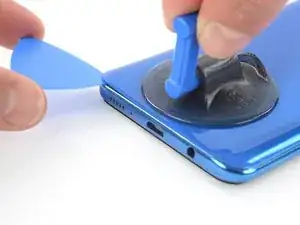
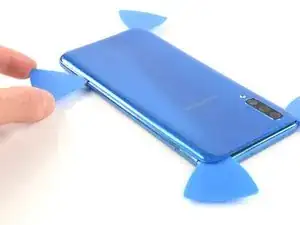
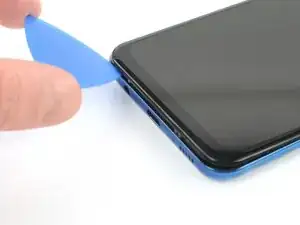
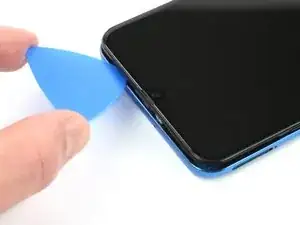
    • Inserta una segunda púa de apertura y deslízala desde la parte inferior a la esquina superior izquierda para cortar el adhesivo

    • tienes problemas, aplica más calor para ablandar más el adhesivo. Sigue las instrucciones del iOpener para evitar el sobrecalentamiento.

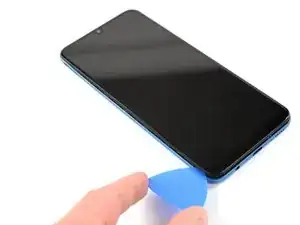
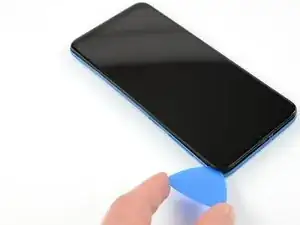
    • Deja la púas de apertura en su sitio para evitar que el adhesivo se vuelva a sellar.

  5. JeOJFGaHeVgLGwhJ
    JeOJFGaHeVgLGwhJ
    yArlWRJHNyBgskmB
    sg2pqmNKAs4fVnWn
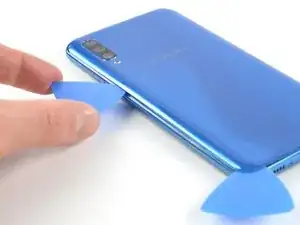
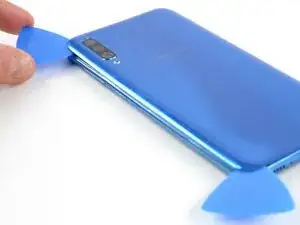
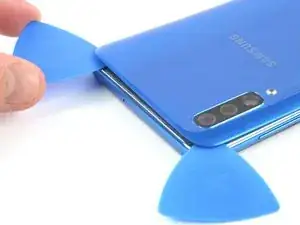
    • Inserta una tercer púa de apertura bajo la esquina superior izquierda de la tapa trasera.

    • Desliza la púa de apertura a lo largo del borde superior del teléfono.

    • Deja la púa de apertura en la esquina superior derecha para evitar que el adhesivo se vuelva a sellar.

  6. cWya5vxHi3KMPW4j
    cWya5vxHi3KMPW4j
    oCfao3PLFWBonI5w
    VHcirgPVDSFwhxGi
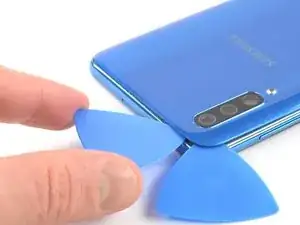
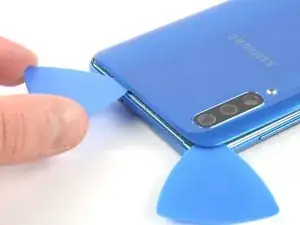
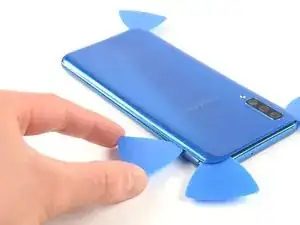
    • Inserta una cuarta púa de apertura debajo de la esquina derecha superior de la tapa trasera.

    • Desliza la punta de la púa de apertura a lo largo del lado del teléfono hasta la esquina inferior derecha para cortar el adhesivo.

    • Deja la pua de apertura en la esquina inferior derecha para evitar que el adhesivo se vuelva a sellar.

  7. kIkBXjkFmSSdLs5C
    • Remueve la tapa trasera.

    • Después de instalar la contraportada, aplica una presión fuerte y constante al teléfono durante varios minutos para ayudar a que el adhesivo forme una buena unión: una pila de libros pesados funciona bien.

    Very straight forward and simple replacement to do with the right tools, I used my hot air gun work station so this might have been alot easier for me then someone without one? Hair dryers work too, just in case a hot airgun station is not available to you dont worry you can do this repair without, but some form of heat will make life alot simpler :)

    Matthew Newton -

  8. WVI6nRb1nSMWSGgH
    • Remueve los 13 tornillos Phillips #00 (4 mm de largo)

    To separate the screen from the mid-frame a few pointers I picked up from a video
    1. use a hard pry tool such as iFixit Opening Tool
    2. start on a long side about quarter way down from corner
    3. work around the frame careful not hook the button assembly

    Code Jason -

  9. CRHDLwJGoJCxBOoY
    CRHDLwJGoJCxBOoY
    1aBAEPVXflQt5RXG
    kGmHNhoPcMSrlOi4
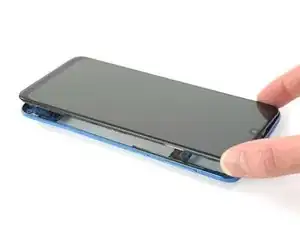
    • Inserte una púa de apertura entre la pantalla y el marco medio en la parte inferior del teléfono, encima del puerto USB-C.

    • Desliza la púa a lo largo del borde inferior para liberar los clips.

  10. DsGiJEtDJPnADDPo
    DsGiJEtDJPnADDPo
    PMyuxmGFRADklYMa
    sjQOSkPdHkJ5YTnP
    • Continúa deslizando la púa a lo largo del borde izquierdo del teléfono para liberar los clips.

  11. WXMTgpNI4rWSgpBa
    WXMTgpNI4rWSgpBa
    RZWKpWOZmIblvqoM
    • Desliza la púa de apertura a lo largo del borde superior.

  12. EIdPPpmEVuFHUFMM
    EIdPPpmEVuFHUFMM
    cDVOxhcBiRsJiYqb
    s1FuyKT51goegcL6
    • Desliza la púa de apertura a lo largo del borde derecho hacia la esquina izquierda inferior.

  13. OqjiaORnQHVMUsBk
    OqjiaORnQHVMUsBk
    OKQmTq5DPo6kKHGh
    • Asegúrate de liberar todos los clips que sujetan el marco medio.

    • Separa el marco medio del teléfono.

  14. et2slvL3JoopN6TW
    et2slvL3JoopN6TW
    Wm2L6KdX3ddXQgJN
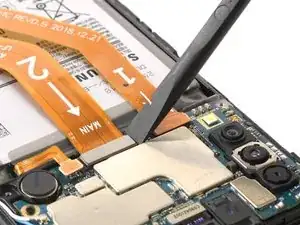
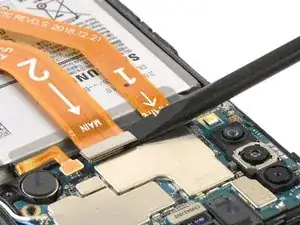
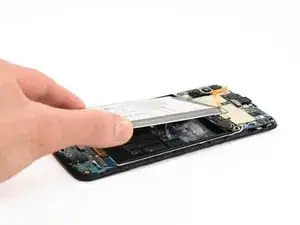
    • Usa un spudger para desconectar la batería levantando el conector directamente de su zócalo.

  15. tcWXSq6bFpQIKjnj
    tcWXSq6bFpQIKjnj
    QsqvT1yWeewHJler
    WuORrn1RJwU1gPKJ
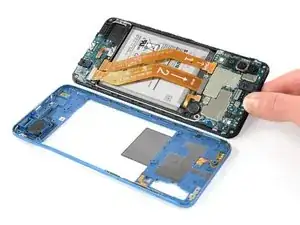
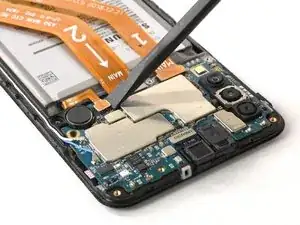
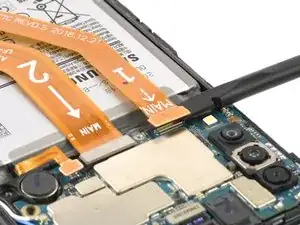
    • Usa el extremo plano de un spudger para levantar y desconectar los cables flexibles de pantalla y de interconexión de la placa madre.

  16. UenLYjYYmH3IdaZN
    UenLYjYYmH3IdaZN
    Y22KMLRtFMuxJ1Sp
    jxBUVVRLQFEFZeWO
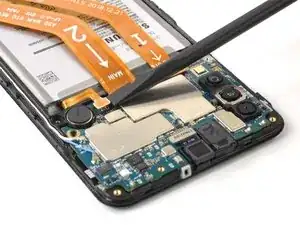
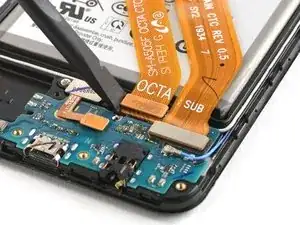
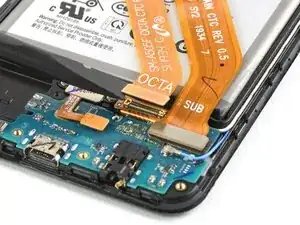
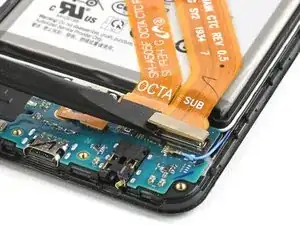
    • Usa el extremo plano de un spudger para levantar y desconectar el puerto de carga y los cables flexibles de pantalla de la placa hija.

  17. ZhNWKOhJrBUNhaGy
    ZhNWKOhJrBUNhaGy
    ZJDSumfjU4VIDZo2
    • El adhesivo que mantiene la batería en el Samsung Galaxy A50 es extremadamente fuerte.

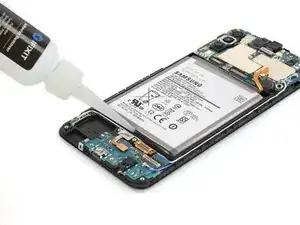
    • Aplica un poco de alcohol isopropílico bajo cada esquina de la batería y déjalo penetrar durante varios minutos para ayudar a debilitar el adhesivo.

    • Alternativamente, aplica un iOpener caliente iOpener a la pantalla directamente detrás de la batería durante dos minutos para ayudar a suavizar el adhesivo. Repita el proceso según sea necesario.

    Pro tip. i Highly recommend that you decharge the battery 100% before you even try to touch the battery. Reason is these kind of batterys do not like to be bend og damaged at all. If the battery is charged and you bend it, it can burst into flames or even explode, if you hear a hissing sound or see smoke instant push the phone away from you.. in worst case it can send out a 30cm burning flame or maybe it just make smoke and nothing happen.. So always drain the telephone of power before you try to remove the battery… Example turn on wifi and make it stream a movie or something until it run out of power is an easy way to do this ;-) No matter what i recommend to use safety glasses just in case. PRO tip.. in general if you repair any machine with a battery disconnect it and make sure it has no power.. A car battery is safe, but the kind in some electronic devices are not.. so make sure battery has no power.!!!!

    Peder -

  18. Gyhkl5XbOURn6TfL
    Gyhkl5XbOURn6TfL
    e4NrfydAtLxoGMjE
    NVAXJCXJRYmXxeem
    • Haz lo posible por no deformar la batería durante este proceso. Las baterías de iones de litio de caparazón blando pueden tener fugas de productos químicos peligrosos, incendiarse o incluso explotar si se dañan. No emplees una fuerza excesiva ni hagas palanca en la batería con herramientas metálicas.

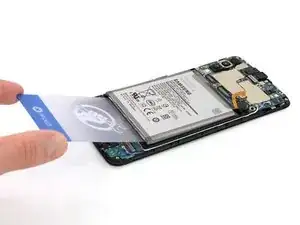
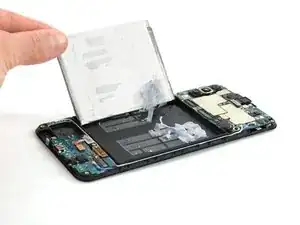
    • Inserta una tarjeta de plástico debajo del borde inferior de la batería y deslízala con cuidado por debajo de la batería.

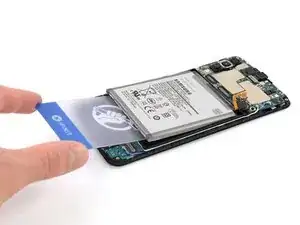
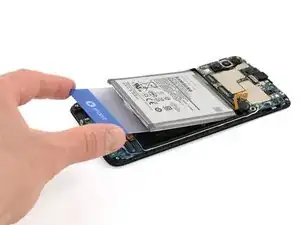
    • Continúa deslizando la tarjeta plástica debajo de la batería para aflojar el adhesivo de la batería

    Pro tip. i Highly recommend that you decharge the battery 100% before you even try to touch the battery. Reason is these kind of batterys do not like to be bend og damaged at all. If the battery is charged and you bend it, it can burst into flames or even explode, if you hear a hissing sound or see smoke instant push the phone away from you.. in worst case it can send out a 30cm burning flame or maybe it just make smoke and nothing happen.. So always drain the telephone of power before you try to remove the battery… Example turn on wifi and make it stream a movie or something until it run out of power is an easy way to do this ;-) No matter what i recommend to use safety glasses just in case. PRO tip.. in general if you repair any machine with a battery disconnect it and make sure it has no power.. A car battery is safe, but the kind in some electronic devices are not.. so make sure battery has no power.!!!!

    Peder -

  19. HVfokP32iZRsdJhn
    HVfokP32iZRsdJhn
    NYGoGYieUfTX2jtZ
    • Remueve la batería.

    • No reinstales una batería dañada o deformada, ya que hacerlo es un peligro potencial para la seguridad. Reemplázala por una batería nueva.

    • Antes de instalar una batería nueva, retira cualquier resto de adhesivo del teléfono y limpia las zonas pegadas con alcohol isopropílico y un paño sin pelusas.

Conclusión

Si es posible, enciende tu dispositivo y prueba tu reparación antes de instalar un nuevo adhesivo y volver a sellar.


Asegura la nueva batería con adhesivo precortado o cinta adhesiva de doble cara. Para posicionarla correctamente, aplica el nuevo adhesivo en el dispositivo en los lugares donde se encontraba el adhesivo antiguo, no directamente sobre la batería. Presiona la nueva batería con firmeza en su lugar.

Para volver a montar el dispositivo, sigue estas instrucciones en orden inverso. Aplica un nuevo adhesivo donde sea necesario después de limpiar las áreas relevantes con alcohol isopropílico (>90%).


Para un rendimiento óptimo, calibra la batería recién instalada: Cárgala al 100% y manténla cargada durante al menos 2 horas más. Luego usa tu dispositivo hasta que se apague debido a que la batería está baja. Finalmente, cárguela sin interrupción al 100%.

Lleva tus desechos electrónicos a un |centro de reciclaje certificado|new_window=true]].

¿La reparación no salió como planificaste? Intenta con soluciones de problemas básicos, o pide ayuda a nuestra comunidad de respuestas.

Adriana Zwink

Miembro Desde 18/12/19

38947 Reputación

12 comentarios

Great guide.. One tip… ALWAYS make sure to decharge the battery so it have no power before you do anything… example turn on wifi and stream a movie and when phone is out of power you can remove the battery.. never bend it, use heat, use fluid to desolve the glue behind battery.. never cut/damage or bend the battery and use safety glasses just in case. Battery in a mobile phone is NOT a toy

Peder -

Teşekkürler. Çok açıklayıcı ve anlaşılır biçimde hazırlanan değerli bir rehber olmuş. Gerçekten başarılı.

Ahmet Külahlıoğlu -

My a50 just got a black screen, I have tried the forced reboot for a couple of time it opened but returns to black screen, now I can't open it with force reboot, is this battery or something else

allan_heyz -

I have same problem in same time. On the screen, I only have a circle charging sign, but not a percentage of battery charge when it's charging normally. I think the battery's dead.

inaumoski -

Hi Allan, It's difficult to remotely identify what's wrong with your A50. Let us know what the reason is if you can figure it out.

Adriana Zwink -

Perfecte handleiding! ik heb deze gevolgd en binnen een uurtje was mijn telefoon voorzien van een nieuwe batterij.

Kleine opmerking nog, bij de stappen 9-13 moet je de openingsplectrum wel een beetje schuin naar beneden houden zoals duidelijk te zien is in stap 9/ Als je hem iets vlakker houdt zoals ik eerst deed dan gaan de klemmetjes niet los.

Gertjan Evertse -

Hi @Gertjan, we’re happy to hear that your smartphone is up and running again. Thanks for your feedback!

Adriana Zwink -

Can I use iPhone adhesive strips to hold down the new battery?

Thanasis Dakakis -

Sure, you can use them for your Samsung as well. Good luck with your repair :).

Adriana Zwink -

Zdravím jaké lepidlo můžu použít k nanesení pod baterku?

Bob Bobek -

Clear and informative instructions that are well illustrated. They enabled me to make a successful replacement of the battery. Thank you!

neil evarts -

الله يبارك ماشاء الله

KADER ARAIBIA -