Introducción

Esta guía te muestra cómo reemplazar la batería en tu Samsung Galaxy S10.

La batería está sujeta con un adhesivo resistente. La aplicación de alcohol isopropílico de concentración alta (más de 90%) hará que el proceso de extracción de la batería resulte mucho más fácil.

Asegúrate de tener adhesivo de reemplazo o cinta Tesa a mano para volver a adherir la batería y la tapa trasera.

Si tu batería está hinchada toma precauciones apropiadas y no calientes tu teléfono.

Por tu seguridad, descarga tu batería por debajo del 25% antes de desmontar tu teléfono. Esto reduce el riesgo de un evento térmico peligroso si la batería se daña accidentalmente durante la reparación.

Algunos pasos podrían mostrar el marco inferior/altavoz extraído. No necesitas extraerlo para el procedimiento de la batería..

  1. BOTuIKImcEsVyvLH
    BOTuIKImcEsVyvLH
    eCjFXP1W4M6VxntQ
    SW2McIMxOQBXdudo
    • Desenchufa y apaga tu teléfono antes de comenzar.

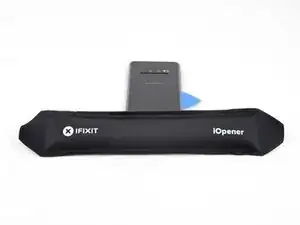
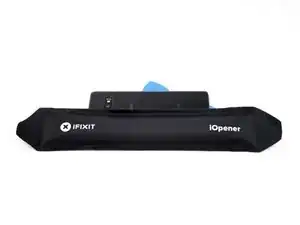
    • Calienta un iOpener y aplícalo al borde derecho de la tapa trasera durante dos minutos.

    • También se puede usar un secador de pelo, una pistola de aire caliente o una placa caliente, pero ten cuidado de no sobrecalentar el teléfono. La pantalla y la batería son susceptibles de sufrir daños por calor.

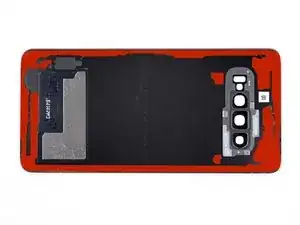
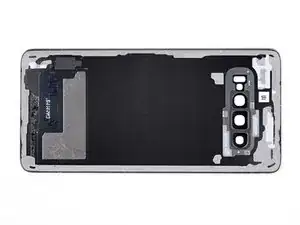
    • Mientras esperas, echa un vistazo la imagen de la tapa trasera retirada y toma nota de dónde se encuentra el adhesivo.

  2. pvp5QqK6q2INIOSw
    pvp5QqK6q2INIOSw
    6RcP5dPE1OTYZMlw
    cNWAYxvQ5QIc2MHu
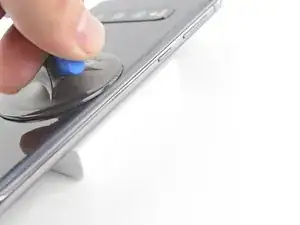
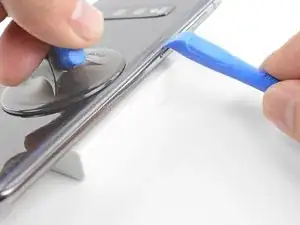
    • Apoya el borde calentado del teléfono sobre algo que tenga un grosor de aproximadamente 13 mm. Esto angula el teléfono para ingresar la herramienta de apertura.

    • Apoya el borde izquierdo del teléfono con los dedos para que el teléfono no se deslice. Tira de la ventosa con una presión firme.

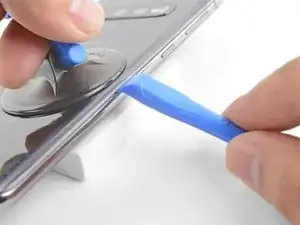
    • Presiona el borde de una herramienta de apertura en la costura entre la cubierta posterior y el marco.

    • Desliza la herramienta de apertura hacia adelante y hacia atrás a lo largo de la costura unas cuantas veces para soltar la tapa trasera.

    Will the Suction Cup work with a cracked back?

    Red Royal -

    Might be hard with the suction cup on a cracked back. I'd rather break it off and buy a new back (it's super cheap, around 10$ online).

    Guenter -

    Yes! Apply a layer of packing tape to the cracked back cover first, and the suction cup will adhere to the smooth tape surface.

    Arthur Shi -

  3. JdXMpUxPMBWOM6cS
    JdXMpUxPMBWOM6cS
    w6i4NwEfSD1CCH4q
    vVmiMOyKISOjvGUX
    • Calienta un iOpener y aplícalo al mismo borde del teléfono durante dos minutos.

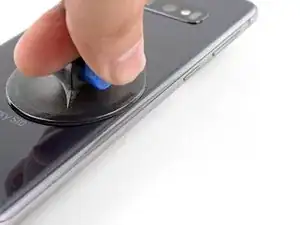
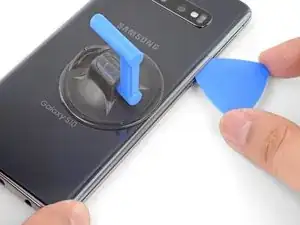
    • Aplica una ventosa en la parte posterior del teléfono, lo más cerca posible del centro del borde derecho (donde el adhesivo es más estrecho).

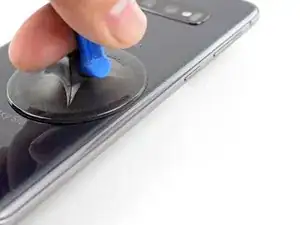
    • Tira de la ventosa con fuerza y firmemente para crear un espacio entre la tapa trasera y el marco.

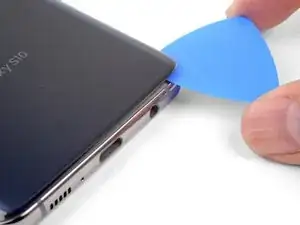
    • Inserta la punta de una púa de apertura en la grieta.

    • Debido a las estrictas tolerancias, esto puede requerir múltiples intentos.

    • Si tienes problemas para crear un hueco, lo mejor es aplicar más calor al borde y probar el paso anterior nuevamente. El cristal esta lo suficientemente caliente cuando esta demasiado caliente para ser tocado.

    • Puedes intentar aplicar algunas gotas de alcohol isopropílico de alta concentración (más del 90%) en la costura para ayudar a aflojar el adhesivo.

    • No apliques una fuerza excesiva con la púa o te arriesgarás a agrietar el cristal de la tapa trasera.

    I had trouble lifting up to create a gap. What I did is watch Jerry rig everything's teardown and he said the back glass must be barely too hot to touch in order for the adhesive to weaken.

    So I heated the iOpener till it was too hot to touch, but not so long that it would burst. Put on right edge for a few minutes. Then I lift with the suction cup, using my middle finger and thumb to grip the sides of the phone and my pointer finger to pull up on the suction cup .

    I cleaned the glass with an alcohol wipe beforehand to make the suction cup stick better, though I'm sure any cleaning method that removes fingerprints will help.

    I couldn't make as big a gap as shown in the picture, but I was able to stick my metal jimmy tool carefully into the crack between the glass and the metal frame and it was just enough to slide the tool a little. And I was very careful since it's a metal tool. After that I could stick the plastic pick in and slice the adhesive and then that gets you started removing the back cover. Reheat often to weaken and slice adhesive. STOP and reheat if it even gets a little harder to slice. DON'T risk cracking the glass.

    A X -

  4. KrxueC2Y4SYsJnOw
    KrxueC2Y4SYsJnOw
    JplpUUV6xGskGeXn
    syWrI2LMh4WREk6B
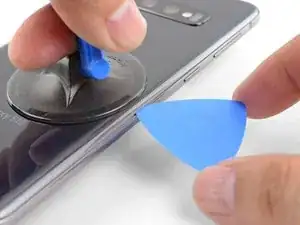
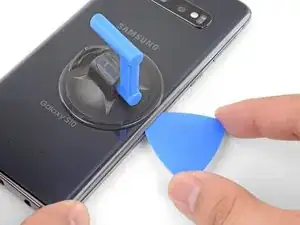
    • Desliza la púa de apertura a lo largo del borde del teléfono y corta el adhesivo.

    • No intente cortar el adhesivo que sujeta las esquinas hacia abajo antes de aplicar calor. Si lo haces, puedes romper la tapa posterior.

    • Deja una púa en el borde para prevenir que el adhesivo se vuelva a sellar.

  5. SPIusbpCMjutVaZe
    SPIusbpCMjutVaZe
    trPeWgTOtRvVq2gM
    • Aplica un iOpener caliente en el borde inferior del teléfono durante dos minutos.

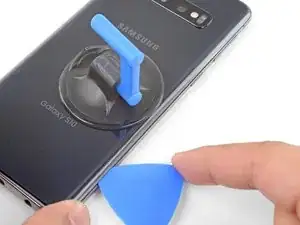
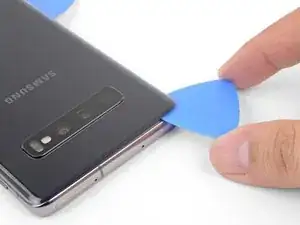
    • Inserta una púa de apertura en el borde derecho cerca de la esquina inferior derecha.

    • Con cuidado desliza la púa alrededor de la esquina. Continúa cortando a lo largo del borde inferior y alrededor de la esquina inferior izquierda.

    • Si el corte se siente difícil, vuelve a aplicar calor al borde antes de continuar.

    • Deja una abertura en el borde para evitar que el adhesivo vuelva a sellarse.

  6. OS62cDANwiOD3dfZ
    OS62cDANwiOD3dfZ
    AYMenH5IPmIDuFTx
    6U2yctlR6O4thvXb
    • Continúa calentando y cortando alrededor de los bordes restantes del teléfono.

    • Al cortar alrededor de las esquinas, asegúrate de que la esquina esté completamente caliente.

  7. RPxDgPhDg5pxaEsM
    RPxDgPhDg5pxaEsM
    2lNBD2KT1FMIn6aL
    ArfZMO3JvGPGDQxi
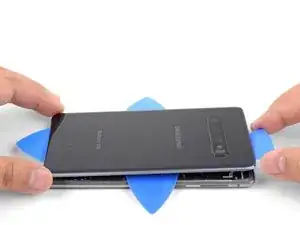
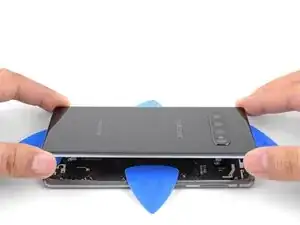
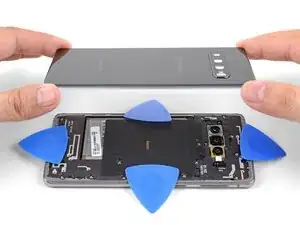
    • Una vez hayas deslizado las púas alrededor del teléfono, gira una púa de apertura en uno de los bordes para ayudar a separar la tapa posterior del marco.

    • Levanta la tapa trasera lentamente. Usa púas de apertura para cortar cualquier adhesivo restante.

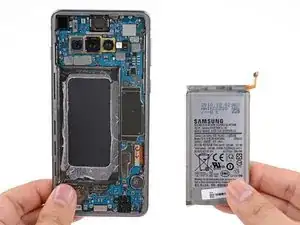
    • Retira la tapa trasera.

    • Durante el reensamblaje, este es un buen punto para encender tu teléfono y probar todas las funciones antes de sellar la tapa trasera en su lugar. Asegúrate de apagar completamente su teléfono antes de continuar trabajando.

    • Sigue esta guía para volver a instalar la tapa trasera y reemplazar el adhesivo.

    • Si lo deseas, puedes reinstalar la cubierta trasera sin reemplazar el adhesivo. Retira cualquier trozo grande de adhesivo que pueda impedir que la tapa trasera quede al ras. Después de la instalación, calienta la tapa trasera y aplica presión para asegurarla.

    Thank's for the help I will try to repair my phone with a new battery all on my

    ron hayes -

  8. NBfOnOc5Ne3pSnVZ
    • Remueve los ocho tornillos Phillips de 4 mm que sujetan el marco medio al teléfono.

  9. i1SvNwTTPtbjZFAt
    i1SvNwTTPtbjZFAt
    6S1YuVbRp1BAxo2W
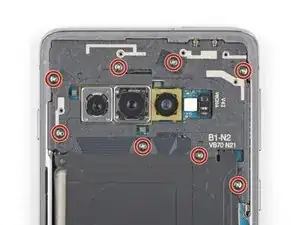
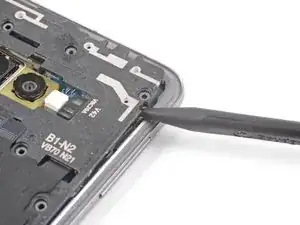
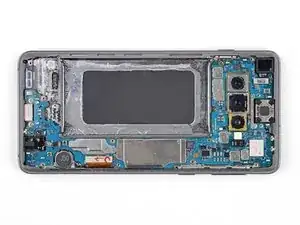
    • El marco medio está sujeta por unos clips de plástico alrededor del borde.

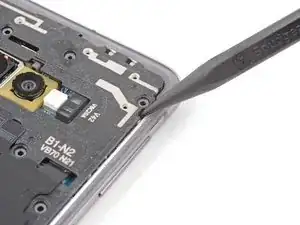
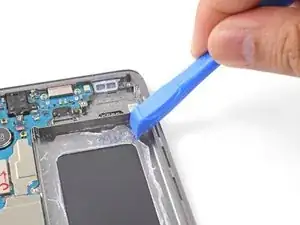
    • Inserta la punta de un spudger en la muesca en el borde derecho del marco medio, cerca del botón de subir el volumen.

    • Haz palanca para soltar el marco medio desde el teléfono.
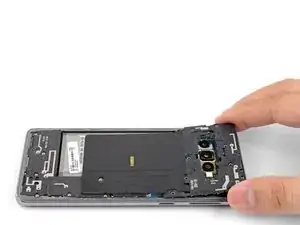
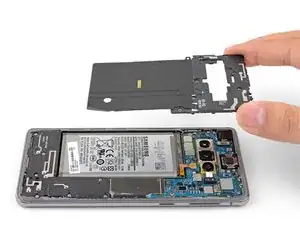
  10. rqEg2ThYsWuRrF6t
    rqEg2ThYsWuRrF6t
    b6jUyYpeZntHclyD
    TrZeM2AWaG3DnpUV
  11. 2j6qHfuIlKbYTk14
    2j6qHfuIlKbYTk14
    4SMkg6BeITfAM4HT
    ISPpTKGXZJTOYRFZ
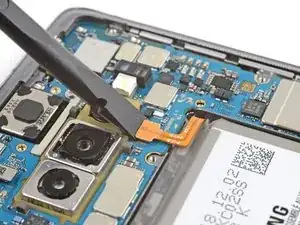
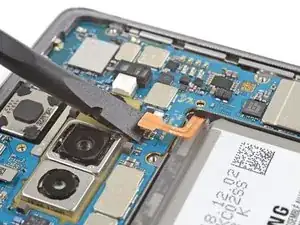
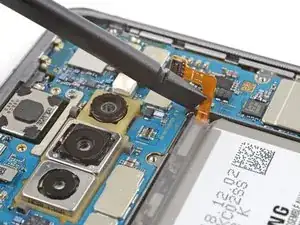
    • Inserta la parte plana de un spudger por debajo del conector de la batería, que está conectada a la placa madre abajo de la cámara trasera.

    • Levanta para desconectar el conector de su zócalo.

    • Cuando desconectes los conectores como estos, ten cuidado de no sacar los componentes pequeños montados en la superficie que rodea el zócalo.

    • Con cuidado empuja el cable flexible de la batería apartándolo del zócalo de la placa madre para prevenir contacto accidental.

  12. sUvTYyqwo5TcvuwS
    sUvTYyqwo5TcvuwS
    buYxiSpVP1ybGpCM
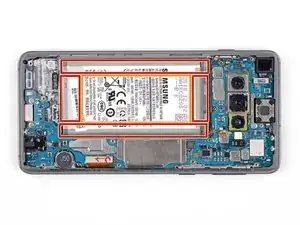
    • La batería está pegada fuertemente en su lugar. Mira las áreas marcadas debajo de la batería.

    • El marco, donde la batería esta sujeta por un adhesivo resistente.

    • El recorte en el marco que expone el el ensamblaje de pantalla frágil debajo. Ten cuidado cuando hagas palanca en este área o podrías dañar la pantalla.
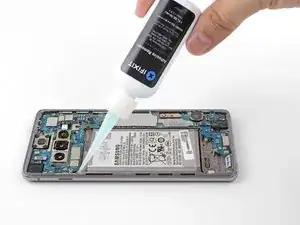
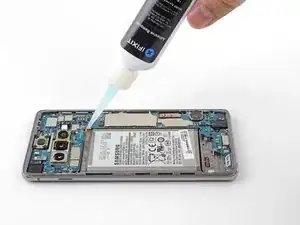
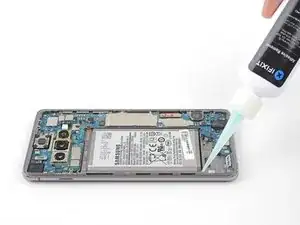
  13. HPCFfsCgLWajnbmN
    HPCFfsCgLWajnbmN
    TosWLnOEcefoILB2
    CCPWKNfPBx4LySGB

    Was passiert wenn trotz des Adhesive Removers der Kleber am Akku sich einfach nicht lösen will?

    leowider -

    Erstmal, Zeit lassen und nichts erzwingen. ;) Am besten erhitzt du dein Gerät nochmal, um den Kleber zu weich zu bekommen und versuchst es dann nochmal. Das ist leider sehr zähe Arbeit, die nur in Ruhe funktioniert.

    Fabian Neidhardt -

    Destroyed my display by applying too much alcohol since the battery wouldn't come off. Beware! Display died 4 hours afterwards during use.

    oromis995 -

    Thank you for the warning. sorry that happened! :/

    A X -

    I tried a few drops of isopropyl alcohol 91%, but the battery was still firmly stuck. I was too scared to use more alcohol so I heated the right side of the screen with an iOpener.

    And once the battery felt warm, I was able to pry between the frame and the right side of the battery using triangle plastic pick. Pry, applying upward force to the battery. I kept prying on the side, moving up and down the side and prying again, till the battery popped out. It popped out on the top left corner for me, personally.

    I did what the person in this video did: https://youtube.com/clip/UgkxDMPJGQ5EOkd...

    A X -

  14. HJNDRGvfpoIQNFQU
    HJNDRGvfpoIQNFQU
    gCPZNwNQT6XtXHBK
    IfoEULGHhSILMSxs
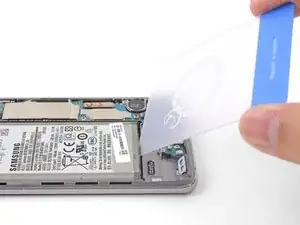
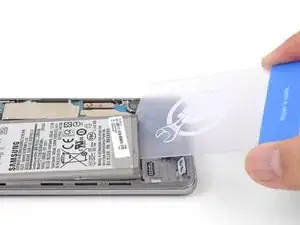
    • Inserta la esquina de una tarjeta de apertura en la ranura entra la batería y el marco medio inferior.

    • Insertar traducción aquí

    • Si la batería no se mueve, el adhesivo no está lo suficientemente blando.

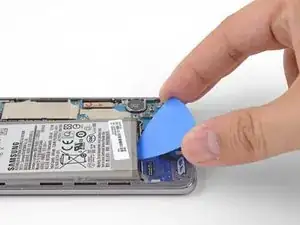
    • Intenta una púa de apertura, una herramienta de apertura o un spudger para levantar la batería. No uses herramientas de metal.

    • Repita el paso de aplicación de removedor de adhesivo/alcohol isopropílico e intenta nuevamente.

    • Intenta aplicar más calor en un iOpener.

    This is the only real challenge in changing the battery.

    My steps:

    1. add isopropyl alcohol and let it soak for a min or two

    2. use the blue opening tool to see if there is any movement (I guess it is not moving)

    3. use the card (really the card - which is not a part of the battery replacement kit, or cut out a thing plastic card from the packaging yourself)

    4. use the card to get under the battery. cut through the battery on the bottom side and the lower half of the left side. you should see that glue is coming up (even if just a bit) - make sure youre only a few milimeters under the battery

    5. check if the blue opener allows you lifting the battery (maybe use a sudger too)

    6. If not movement, add a bit more alcohol and WAIT

    7. cut through the glue around the left lower edge again. use the opener again

    repeat 6 and 7 if still no success

    do not add alcohol everywhere, dont use too much of it

    dont use other tools or any extensive force on the battery

    Guenter -

    Thanks for the helpful advice!

    A X -

  15. CAmPMiJ4soSADqkb
    CAmPMiJ4soSADqkb
    a1AdLG6QYmvVD5TZ
    • Retira la batería.

    • No vuelvas a usar la batería después de haberla desconectado, ya que su uso será potencialmente peligroso. Reemplázala con una batería nueva.

    • Para instalar una nueva batería y el adhesivo correspondiente, sigue esta guía

Conclusión

Para volver a ensamblar tu dispositivo, sigue estas instrucciones en orden inverso.

Para un rendimiento óptimo, calibra tu batería recién instalada después de completar esta guía.

Lleva tus desechos electrónicos a un centro de reciclaje certificado.

¿La reparación no salió según lo planeado? Consulta nuestro Comunidad de respuestas para obtener ayuda para solucionar problemas.

Arthur Shi

Miembro Desde 03/01/18

219099 Reputación

11 comentarios

Selbst als Selbständiger muss man ab und zu nachforschen, dank dieser Webseite-Info habe ich mich vergewissert dass ich alles genau so richtig wie beschrieben und auf den Bildern machen wollte.

Danke dem Autor dieser Information.

MFG

AK Computer Service

Alfred K. -

Sehr gut. :) Dafür gibt’t diese Seite.

Fabian Neidhardt -

You need to screw the midframe down again before trying to do a power on test, not just reconnect the battery. If you don’t, you’ll get an overheat error icon (red thermometer in yellow warning triangle) when trying to power it on because the NFC sensor is on the midplate and the pogo pins connecting it need screw down pressure to make a solid connection. (No I don’t know why NFC is needed to power the phone on, or why its absence shows as an overheat error.) After figuring this out (shut out to Go Cell Phone Repair on Youtube) the battery repair worked fine.

Dan Neely -

The iFixit kit to replace the battery in S10 worked fine, including the heating sausage. Jus need to take your time and take great care to follow the instructions in order. The most stressful bit was getting the new adhesive in the correct spot to achieve a flawless finish. It is brilliant that these phones are repairable and that there is so much support for same. Shame on you Apple. We have to stop throwing repairable things away, both to save money and to save the planet. Thanks iFixit.

Bill Green -

Don't do what I did and flood the battery with isopropyl alcohol because it seeped into the screen and after a few hours the screen stopped working altogether. Very costly mistake!

monty plt -

Same, wish I had read the comments beforehand.

oromis995 -

thanks for that pointer. I read it before I started the replacement and I only used a bit of alcohol which did no harm. thanks a lot!

Guenter -

Hallo zusammen,

insgesamt hat es geklappt, wobei sich der Deckel des S10 fast zwei Stunden geweigert hat sich zu öffnen. Trotz des Wärmekissens und dem Einsatz eines Heißluft-Föns. Letztlich hat es dann doch ohne Beschädigungen zu verursachen funktioniert.
Allerdings ist der von iFixit gelieferte Akku nicht besser als der alte Akku. Der alte Akku hatte 82 % und der von iFixIt gelieferte neue Akku hat (trotz Kalibrierung) nur eine Kapazität von 85 % (2800 mAh). Maßnahmen wie Akkuschutz-Laden auf 85 %. haben nichts gebracht.
Es wäre ein voller Erfolg gewesen, wenn das Ersatzteil auch die gewünschte Qualität gehabt hätte. Ich habe extra den teureren Akku von iFixIt gekauft, statt anderer Alternativen.
Zurückschicken bringt nichts, denn dann muss ich das Handy wieder zerlegen. (: Insgesamt bin ich sehr enttäuscht von IFixIt.


Gruß Michael

Michael Lorenz -

After replacing the battery, the battery will not charge anymore. What to do?

jacquelineslavenburg -

I was ultimately successful with this repair but don't make the same mistake as me: I was so focused on removing the back panel that I didn't realize I was actually removing the screen, so of course I broke it while doing so. Luckily I was able to replace that as well, but would have preferred not to pay for a new one!

Melissa L -

Great instructions and nothing that doesn't work as explained. My advice on a few steps:

* I didn't use the iOpener, a hairdryer did the job in NO time. I see absolutely no risk of breaking the glass when heated properly and using the plastic openers as shown. make sure you cut through the glue properly and you should be fine.

* You WILL NEED the adhesive removal / softener because that battery glue is nasty! I used isopropyl alcohol to soften the glue (there is this plastic thing that allows you to add alcohol in smaller doses. LET IS SOAK for a min or two! However, to really remove the battery, I just cut the flat plastic case (in which the battery shipped). This is a typical packaging plastic which is very flexible and flat and perfectly bends to reach below the battery and cut through the plastic ( you could also use those flat plastic cards shown and sold here on ifixit too).

Great product!

Guenter -