Introducción

Utiliza esta guía para reactivar su iPhone 8 con una nueva batería. Si tu batería está hinchada, toma las precauciones adecuadas.

Esta guía te indica que extraigas completamente el ensamblaje de la pantalla; esto pretende evitar daños accidentales en los cables de la pantalla. Si te sientes cómodo/a retirando la batería sin ejercer tensión excesiva en los cables de la pantalla, puedes omitir los pasos para separar la pantalla. Además, si bien es posible quitar las tiras adhesivas que sujetan la batería tan pronto como abres el teléfono, esta guía recomienda quitar primero el Motor Táptico. Si lo haces, reduce el riesgo de romper accidentalmente las tiras adhesivas inferiores, ya sea enganchándolas en el Motor Táptico. o tirando de las tiras en un ángulo demasiado agudo.

Para obtener un rendimiento óptimo, después de completar esta guía, calibra la batería que acaba de instalar: Descargar por debajo del 10% y luego cargar ininterrumpidamente hasta 100%.

Al abrir el iPhone 8 se dañarán los sellos impermeables de la pantalla. Si no reemplazas los sellos adhesivos, tu teléfono funcionará normalmente, pero ya no será resistente al agua.

  1. QEiwXOLOCt5t6bkO
    • La batería del iPhone está asegurada por cuatro piezas de adhesivo de liberación elástica: dos en la parte superior y dos en la inferior.

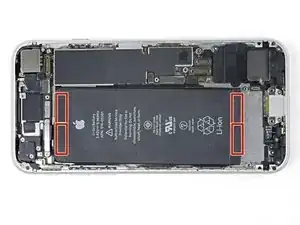
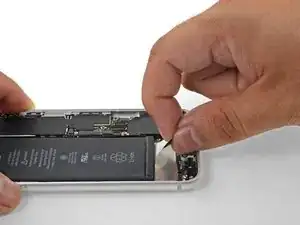
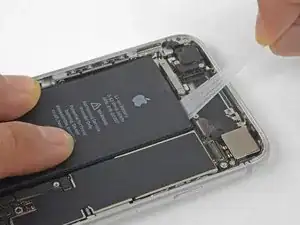
    • Cada pieza de adhesivo tiene una lengüeta negra en el extremo, que se adhiere ligeramente a la superficie frontal de la batería.

    Be careful prying around the side button connector when trying to remove the top tabs. There is very little room to maneuverer

    Tom Millard -

    £ Tapes broke on me so I applied iISOPROPYL ALCOHOL using an Eye Dropper waited 30 seconds tHen heated up some oil in the bag rice for 2 minutes on 700W and the applied the unopened packet to the back of the iPhone for 90 seconds.

    Themn I used an out of date credit card with the raised numbers facing down to easily release the battery.

    David Howard

    David Howard -

    Great tip! Worked perfectly and easy. Thanks.

    Stephen Smith -

    It should read heated up some boil in the bag rice

    David Howard

    David Howard -

    Very difficult. be very careful on the limited space end that you don't puncture the battery!

    Carl Schultz -

    I really hope you guys not to skip steps for detaching taptick engine because it is really hard to pull out string with taptic engine. 4 of 3 strings were cutted when I treid to detach batteries with taptic engine. So, I really recommend you to get rid of taptic engine before you start this step. But if you skipped and strings are cutted, there is a way. Use hair dryer 90 secs as maximum hot behind the battries and detach the batteries. It worked to me.

    Min Su Kang -

  2. vs4oMYcRlWEFb2lY
    vs4oMYcRlWEFb2lY
    jImYu1JRHGErUfnj
    okM1ORGZUueh1Xi6
    • Desprende la primera lengüeta adhesiva de la parte inferior derecha de la batería.

    • Si es posible, usa tus uñas o pinzas sin punta. Ten cuidado de no pinchar la batería con herramientas afiladas.

    Vor Schritt 30 umbedingt die Rückseite des iPhone erwärmen. Ich habe das iPhone 10 Minuten auf eine heiße Wärmflasche gelegt.

    Moritz Hartges -

    Strongly suggest you remove the display. Also the picture shows the "perfect world" it is far ore difficult to remove and get to those white adhesive pull strips. be very careful!!!

    Carl Schultz -

  3. 4eDyPbJ62yPLKLAd
    4eDyPbJ62yPLKLAd
    J3TMbulIt5RYhCcJ
    fjKZrs3OCvNRVb3I
    • Trata de mantener las tiras adhesivas planas y sin arrugas durante este procedimiento; las tiras retorcidas o arrugadas se pegarán y se romperán en lugar de despegarse de forma limpia.

    • Además, no presiones la batería mientras tiras de las tiras. Presionar la batería crea puntos de presión que pueden enganchar y romper el adhesivo.

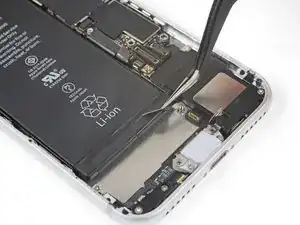
    • Tira lentamente de una de las lengüetas adhesivas de la batería hacia la parte inferior del iPhone.

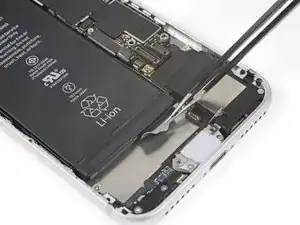
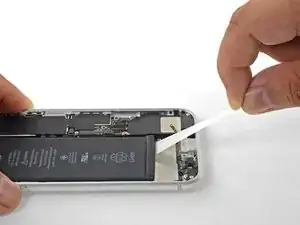
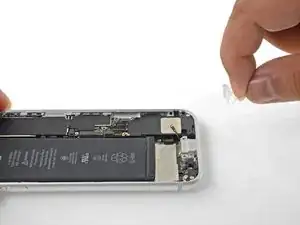
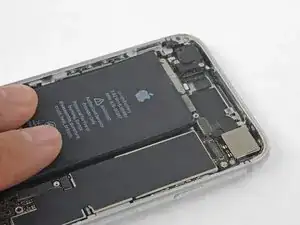
    • Tira con firmeza, manteniendo una tensión constante en la tira hasta que se deslice entre la batería y la carcasa trasera. Para obtener los mejores resultados, tira de la tira con el ángulo más bajo posible, sin engancharla en ninguno de los otros componentes del iPhone.

    • La tira se estirará a muchas veces su longitud original. Continúa tirando y vuelve a agarrar la tira cerca de la batería si es necesario.

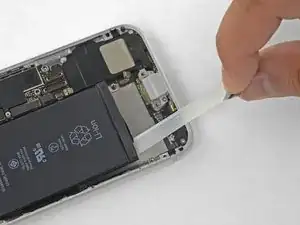
    • Si las lengüetas adhesivas de la batería se rompen durante el proceso de extracción, usa tus dedos o pinzas sin filo para recuperar la longitud restante del adhesivo, y continúa tirando.

    • Si alguna de las tiras adhesivas se rompe debajo de la batería y no se puede recuperar, intenta retirar las tiras restantes y, a continuación, sigue las instrucciones que se indican a continuación.

    This was the most frustrating step of the process. I found that if you pull steadily and slowly while continuing to grip the adhesive as close to the battery as you can there is a much smaller chance of breaking the adhesive strip and losing it under the battery.

    Benjamin Boldt -

    I did not have replacement adhesive tabs for my battery so I needed to re-use the old ones. First, I pulled back the black tabs from the top and sides of the battery (Steps 28 and 29). Then I laid the phone on a hot water bottle (Wärmeflasche for our German friends) while I very, very, very slowly prised the battery out of the body using the flat end of a spudger, starting at the corner closest to the volume buttons. The battery did deform somewhat during the process, but it was fully discharged and I had no combustion problems. After a few minutes of gentle pressure on the battery corner, it started to release from the adhesive. Full removal took about 5 minutes and the adhesive tabs were not damaged in any way and happily re-adhered to the new battery.

    I did all this after skipping over steps 18 to 27 and put the new battery in place after connecting it first to the circuit board to ensure correct alignment.

    jnbruin -

    All 4 strips tore after just removing a small portion… even though I took great care to pull slowly and at a small angle. Could not imagine how anyone could have managed this with my phone. Had to heat and pry out.

    griffin.weber -

    I damaged the graphite film underneath the battery while removing it from stubborn adhesive using a card from the side. Can I buy replacement graphite film? Should I remove it altogether since it's ripped or will that cause problems for heat dissipation? Thank you for any information.

    Anne Marie Hammock -

  4. yAxAcOuZkVKD1xAY
    yAxAcOuZkVKD1xAY
    vMCND6xEQrEDRyJI
    woB3TYHUSBFt1Phm
    • Repite los pasos anteriores para quitar las tres tiras adhesivas restantes.

    • Asegúrate de sujetar la batería al retirar la última tira, ya que de lo contrario podría salir del iPhone de forma inesperada.

    • Si has quitado todas las tiras adhesivas con éxito, salta el siguiente paso.

    • Si alguna de las tiras adhesivas se rompió debajo de la batería y no se pudo recuperar, continúa con el siguiente paso.

    If you have a thin flexible plastic shim shaped like a letter opener, you can slip it under the battery and take it off the adhesive.

    Spencer Chan -

    I damaged the graphite film underneath the battery while removing it from stubborn adhesive using a card from the side. Can I buy replacement graphite film? Should I remove it altogether since it's ripped or will that cause problems for heat dissipation? Thank you for any information.

    Anne Marie Hammock -

    Good luck with the top two…. Virtually impossible to remove. Both of mine broke almost immediately. I tried floss and a strong thread and both broke before they did much good.

    so I took a plastic card (an old credit card would work, but you’ll have to cut it thinner or work from the sides. If you got the bottom two out successfully, you should be able to get enough lift to start prying gently with the card.

    Good chance you’ll scuff up the super-thin carbon film over the charging coil if you’re too aggressive. And DO NOT use alcohol to soften the glue because it will melt right through that thin carbon layer and make a mess. Best bet is to go gradually…. Put the plastic card under the battery, pull up a bit to add tension, and then stick a pencil or popsicle or something under the card to keep keep the tension and give it 5 minutes or so for the tape to loosen. Then pull up on the card to add new tension, move the stick up, and wait again. It’ll take 20-30 minutes. Repeat until free and don’t rush.

    Bigh -

    Anne, I had little rips in that layer, and it doesn’t seem to have affected anything.

    Bigh -

  5. DBnvH5CTIVnxfCdd
    DBnvH5CTIVnxfCdd
    Ch4yrKmbroeQvpsG
    • Si alguna de las tiras adhesivas se rompe y la batería se queda pegada a la carcasa trasera, retírela añadiendo unas gotas de alcohol isopropílico (>90%) bajo la batería y cera de la(s) tira(s) pegada(s). Más o menos un minuto después, levante con cuidado la batería.

    • No intentes hacer palanca para sacar la batería. Si fuera necesario, aplica más alcohol para ablandar el adhesivo. No deformes ni perfores nunca la batería con una herramienta.

    • Si decides utilizar alguna herramienta para hacer palanca y sacar la batería, ten mucho cuidado o puedes dañas los conectores o la bobina de carga inalámbrica que se encuentra justamente debajo de la batería.

    • Si la batería sigue pegada al chasis, prepara un iOpener o utiliza un secador de pelo para calentar la carcasa directamente por detrás. Esto ayudará a ablandar el adhesivo.

    • Calienta el iPhone hasta que la carcasa esté demasiado caliente como para poder tocarla cómodamente. No sobrecalientes el iPhone, o podrías prender accidentalmente la batería.

    • Otra posibilidad es pasar un poco de cuerda resistente (como hilo dental o una cuerda de guitarra) por debajo de la batería.

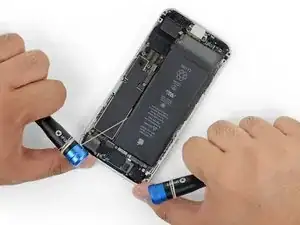
    • Tira de la cuerda de un lado a otro con un movimiento de sierra a lo largo de la batería para separar el adhesivo. No deformes ni dañes la batería.

    • Para proteger tus dedos, usa guantes o envuelve las puntas de los hilos alrededor de una herramienta (como los dos mangos de los destornilladores que se muestran en la imagen).

    In my case the floss caught on the sharp edge of the wireless charging coil pulling up the edge of the coil, butane cutting off the floss. I think the coil had been damaged by some previous repair, but be careful. After you pull past the first two adhesive strips, peek under the battery to make sure the floss is sliding over not under the coil. The coil doesn't look like a coil – more like a paper thin pad.

    Joel -

    Soaking the floss in rubbing alcohol helped also. It took some doing, but eventually came through without issue.

    Trever Knie -

    the wireless coil accidently got a little tear just to the right middle area. I put the new battery in and everything seems fine. I wonder if I should change the coil? anyone have any suggestions of what symptoms to look for if there were to be an issue ? thank you

    cb brooks -

    I ended up heating the back of the phone for 30-60 seconds (don't do anymore than that) and used the opening tool as a fulcrum to lift the battery. As long as you're careful it should work!

    Vladimir Stanev -

    I damaged the graphite film underneath the battery while removing it from stubborn adhesive using a card from the side. Can I buy replacement graphite film? Should I remove it altogether since it's ripped or will that cause problems for heat dissipation? Thank you for any information.

    Anne Marie Hammock -

    We used my heating pad set on low, placed the case on it, about two minutes and using the opener tool, lifted the battery out. This was the only bump/snag we had, the remaining steps went well and I have my phone back.

    Pete P -

    All the adhesive strips broke, so I used the long plastic tool for brute force extraction, twisting the old battery in the process. Most of the old strips in the back remained, so reused them for the new battery.

    Boaz Ben-Zvi -

  6. 4bYRPYeqSJkQMwrH
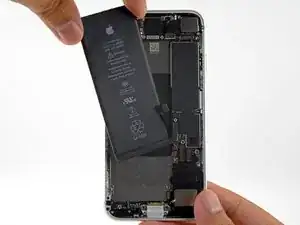
    • Retira la batería del iPhone.

    • Si la batería de repuesto viene en una funda de plástico, retírala antes de la instalación.

    • Si queda algún resto de alcohol en el teléfono, límpialo con cuidado o deja que se seque antes de instalar la nueva batería.

    • Si la nueva batería no viene con adhesivos preinstalados, consulte esta guía para reemplazar las tiras adhesivas.

    • Realiza un reinicio forzoso después del reemsamblaje. Esto puede evitar varios problemas y simplificar la resolución de problemas.

    • Antes de colocar la batería de repuesto, conéctala temporalmente a la placa madre. Esto asegura que la batería estará correctamente alineada en su hueco.

    • Coloca la batería, desconéctala y continúa reemsablando tu dispositivo.

    Having received a replacement battery from CE Store, the phone is now OK with top battery performance. The one received earlier was just a scrap, not chargeable. Now, I’m quite satisfied.

    Miklos Barton -

    I made the mistake of powering the phone on once the new battery was connected to make sure it was working, before I put the screen back on. Now my home button doesn’t work, even after two hard resets. Anyone know how I can get it working again? Note I didn’t disconnect the screen or taptic engine or anything else. I just left the screen hinged 90°, the only connector I touched was the battery connector.

    John M -

    Same issue. Home button is dead. No cables were damaged. Everything else works. Any ideas?

    Aaron Soderholm -

    I had the same issue with the Home button, I turned on Virtual Home Button, which makes the phone usable. Shutting the power off off and restarting the phone bring you to the login screen. go to Settings, Accessibility, Touch, Assistive Touch.

    Gary Berman -

    I recommend making sure the battery connector is lined up with the socket before setting it down on in the compartment, mine was very close, but a little too high and it made getting it connected a little more difficult than it needed to be.

    Benjamin Boldt -

    I agree Benjamin. Eager to ask anyone starting this, since it added 90 minutes onto my project, be careful, though I can testify that the metal flex connector bends. In other words, I bent it about 3 times so the proper alignment could be attained - sort of a zig zag. Amidst that phase I had practically given up, almost started removing the new battery, but alas I got the phone to work again. We'll see if its function can last.

    Steph B -

    Performing a force restart at this point makes no sense. Shouldn’t it be performed after the display is installed?

    Richard Dempsey -

    Creio que a "reinicialização forçada" deverá ser feita "após a remontagem" do aparelho como está instruído.

    Samuel Vitor Alves dos Anjos -

Conclusión

Para volver a montar tu dispositivo, sigue los pasos anteriores en orden inverso.

Lleva tus desechos electrónicos a un centro de reciclaje certificado.

¿La reparación no salió según lo planeado? Consulta nuestra comunidad de Respuestas para obtener ayuda para la resolución de problemas.

Arthur Shi

Miembro Desde 03/01/18

219093 Reputación

0 comentarios